Friday, September 28, 2012

TIme to Vote: Week 3---The White Sheet Challenge

This week the challenge was to take a white sheet and turn it into a masterpiece.  And once again....the designers did spectacular work (especially under pressure)!  Be sure to scroll down to see all of the designer's looks and then make your vote count.  The voting is in the left-hand column and it is one vote per computer (IP address).


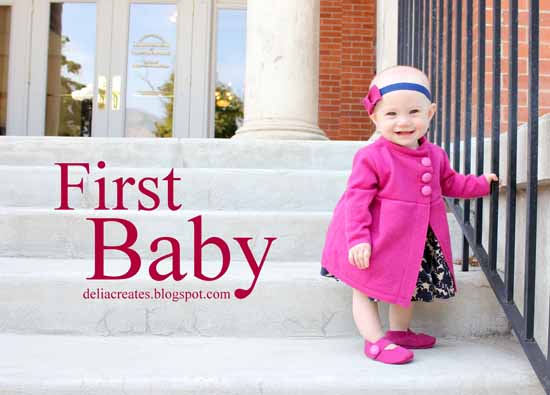
Delia Creates--Pretty in Peach

This was the most difficult challenge for me yet! I knew I wanted to make the white sheet unrecognizable. I knew I wanted to add texture to it, and I had a million ideas of how to do it. I finally edited it all down into a cute little charcoal grey, tunic length dress that flares out into a circle skirt. Using pin-tuck pleats, I created a star burst effect on the front of the bodice and lines on the back. The back pieces overlap, leaving a triangular cut out in the middle of the dress, and are secured with a big peachy pink button. I kept the sleeves and neckline streamlined so as to not overwhelm the dress. I felt that peach would complement the dark gray nicely, so I made gathered shorts and dyed them a pretty peach/pink. Hence, why I call this ensemble "Pretty in Peach."


I hand sewed french knots in charcoal grey embroidery floss, all over Natalie's shorts and hair bow to resemble dots and to add dimension and texture to the bed sheet fabric. Please come by my blog: deliacreates.blogspot.com for more pictures and some close ups of the garment details.


Lindsay, etc-- Battenburg Ballet Dress
For the white sheet challenge I made a dress fit for a night at the ballet with  a battenburg lace style design cascading down the front. I wanted the dyeing process to be an after thought, and for the dress to have most of it's depth and detail from the contrasting white bias.
 I never realized how much fabric makes up one king sheet. I cut mine into thirds and dyed 1/3 this soft plum, a color that is sweet, but would really make the overlay stand out. The dress itself is simple with a circle skirt and zipper in the back. About 1/3 of the fabric went to bias production and then pieced into this pattern.
For more details on this dress, please check out my blog!


Welcome to the Mouse House--Purr-fectly Playful

One white sheet?  Sounds easy, but oh man…. it gives you WAY too many options!  This was BY FAR the most challenging week for me.  My crafting attention was all over the place and I swear I came up with about 17 different ideas.  Guess who decided the look for me this week?  AINSLEY!  I asked her what she wanted and OF COURSE she said " A Kitty Cat outfit".  In case you aren't a regular reader of my blog, Ainsley is seriously obsessed with Kitty Cats.  Check out what I had to do for her birthday party HERE.  So, I went with it.  A twin size jersey knit sheet was the perfect option for this outfit:  soft, comfortable, and easy to play kitty cat in!  Plus, I love working with knits.  So, I bought several color dyes, fabric paint, a kitty face stamp, and embroidery thread…. and off to work I went!

I self-drafted four different pieces:  Reversible cardigan with cute kitty cat appliques on the front using coordinating knit fabric I found last year on clearance (bonus!), peasant style dress with two pockets embellished with kitty cat buttons, soft leggings featuring a hand embroidered kitty face on the tushie and hand stamped kitty faces around the hem of the pants, and a kitty face hat using an upcycled wool sweater.

Check out Welcome to the Mouse House for a ton of other photos because trust me, I take a lot of them!


A Girl and a Glue Gun--Salmon and Scallops and Sparkles, oh my.

alrighty. at first i was totally like..crap. a blank slate. i mean really. it's a bit intimidating.
when the world is your oyster it's kinda hard to dig out the pearl.
did that make zero sense?
yup.
anyways. here's what i came up with...

a bit of dyeing...painting...bead work...and some fancy cutting--i got four pieces that i totally love...
the skirt is ombre gray...cut into scallops...by using jersey knit i was able to leave the scallops just raw cut...which means they roll up a little...which i kinda love.
and scallops on the cardigan. 
added some painted polka dots on the leggings..
and some bling for the shirt...
throw in an adorable (yet sassy) daughter 
and you have this week's look:
you can come here to see even more pictures...


Elegance and Elephants--Kiss From a Rose

From white sheet to très chic!  For this week's challenge I decided to dye my 100% organic cotton sheet with wine coloured liquid Rit dye.  The rich colour that it became was perfect for a beautiful special occasion gown, so that's what it became.  While the rules of this challenge allowed for only the majority of the outfit to be made from the sheet, I decided to make each piece exclusively from it (other than a little bit of tulle lining inside of the bodice), since I just loved the feel, drape, and subtle sheen of the fabric.
I designed the dress, and self-drafted the pattern, basically by pinning, draping, hand basting, and then cutting the bodice fabric directly on my dress form.  This gown features pleated and draped shoulders with a cross-over front, and a full, gathered skirt. The back has an invisible zipper closure for a professional and formal look.  To create two separate looks, I made a sash, dyed pearl grey, and a bolero jacket, stencilled by hand in a floral pattern.  The jacket is also an original design.  The accessories to accent this ensemble include a hand sewn fabric rose corsage and an oversized bow hairband.
For more details and photos from the rose garden, come visit Elegance & Elephants


Sew Country Chick--Purple Pumpkin

I am so happy to be here after barely squeaking by last week!
After making a black outfit last week and a muted dusky pink one with black trim previously, this week I knew I had to make something colorful and fun for Genevieve. Her favorite color is purple so I dyed each piece of her dress separately before I sewed them together to create this ombre type effect. I actually painted the dye on in different concentrations to give it a striped effect. I mixed some purple and royal blue RIT dye together to create this shade of bluish purple. 


 The dress is a high low style and I made the pattern from a maxi dress pattern I created this summer.
Gigi loves to twirl around in it and the purple color is just right for fall. Since we don't get much cool weather here in California until late November I know she will wear this little dress a lot during the warm days to come! It was fun to watch my dress evolve is I made it as I didn't have a clear picture of the dress and it just sort of formed itself as I made it over three days. Every night in bed I would think of something new to do to it. I really enjoyed the spontaneity of this challenge! If you would be interested in seeing more photos stop by my blog! I will be releasing this and all of my Project Run & Play patterns as PDF's soon.


Thursday, September 27, 2012

Giveaway---Elk Dresses

Today's giveaway is from one of our sponsors that has been with us since the beginning, Elk Dresses.  We got to meet Marjory in person this last Spring....and she is the nicest ever.


Not to mention that she makes beautiful clothing for little girls.  Really and truly!  

One of you lucky readers has the opportunity to win a $25 gift certificate to her darling shop....


All you need to do to enter is head over there and then tell us what darling outfit you would choose in the comments.  Good luck!!!  See you tomorrow!

This giveaway is now closed but you can always find Majory's designs over in her shop!

The Pick Your Plum Giveaway Winner Is...

Mandy from Sugar Bee Crafts!
 
We will be emailing you soon with more info.

Wednesday, September 26, 2012

Boys Classic Johnny Vest Tutorial

Today we have Heidi sharing her vest tutorial from her winning look this week.  I have this sneaking suspicion that we are going to be seeing lots of cute little boys wearing five-button vests after today.  Isn't it just darling?

Take it away Heidi.....


Hello PR&P readers!  I'm so excited to be here this morning sharing this tutorial with you.  Could you believe all the incredible outfits submitted for Fashion Icon week?!  What an awesome theme...I could see there was a lot of passion behind the designers and Flickr group's looks.  I'm sure all the Fashion Icons would be proud...wouldn't it be so cool if they actually saw them!?

Anyway, I'm going to show you how I made the Johnny vest.  

First of all, you'll need three types of fabric for the front, back, and lining.  See the hideously frayed shorts my husband used to wear (don't ask me how that happened...I have no idea!)?  Yeah, that's what I used for the back of the vest, and there's the houndstooth and patterned red for the front & lining.


To trace the pattern pieces, I used a vest I had previously made, although you could use a shirt as well.  Notice how I changed the shape of the bottom.  

The pieces:


Sew the back and back lining together at the centre.
Then sew the back to the front at the sides.
Repeat these steps with your lining.


Here's how to make the faux welt pockets (that are already done on the pic above).

As you can see, I added interfacing to the pockets.  Not entirely necessary, so may want to skip that step.  If you're using a striped pattern, like I did, don't forget to line up them up with the fabric on the front.


 Here are the ties in the back.  I just sewed some long, thin rectangles right sides together, flipped them right side out, then pressed and topstitched them, leaving on end open.  Attach them by folding the open end under, and sewing them on the vest, reinforced with an X.


Attach the lining to the outer front and back leaving the shoulders and bottom of the back open.  Click all the curves.


Turn the vest right side out.  Fold in the back shoulder the width of your seam allowance, tuck in the front shoulder, press, and blind stitch closed.  Blind stitch the bottom of the vest closed.


Go have some fun with your new vest!!


I hope you've enjoyed this tutorial and that you'll come visit me at  Elegance & Elephants for more info on when you'll see other how-tos from this look (including the hat).

Don't want to draft your own pattern? Use the Baie Blazer from our shop as a starting point. Want to save this tutorial for later? Pin the image below: 

Boys vest tutorial


Tuesday, September 25, 2012

Guest Judge: Destri from The Mother Huddle

This week we have Destri from The Mother Huddle as our guest judge.  She is a sew-er extraordinaire and is always sharing free sewing tutorials for all of us to enjoy.  You need to go and browse the Sew Be It section to see all of her skills...I got lost over there for a good while looking at all the beautiful handmade things.

I, personally, love her Central Park Swing Coat....


(See what I mean?)


Take it away Destri......

Hey friends, so excited to be here!  Let's get right to it shall we?  I was thinking I might share a tutorial for my post today, but with all the great designs coming out of this year's PR and P, I figured you'd have plenty of those to keep you inspired for weeks.  So instead I decided to share my thoughts on this weeks White Sheet Challenge.  I think it's brilliant, and here's why:

I read something, somewhere (you know how that is) that this particular artist only kept blank white paper out for her kids to write and color on.  She believed that the mind needed the white space to create his or her most "genuine" art.  The article went on to explain that you'll find your children's unique style of creativity best this way.

At the time I didn't have kids and I remember thinking the idea was a little far fetched to me.  Now that I have kids - I find myself intrigued by it.  So on a table in my sewing room sits a stack of blank white paper that my kids have free rein on.  Next to it is a box full of crayons, water colors, scissors, glue, and things of the like for them to use; next to that a box full of my scrap pieces of ribbon, trim, lace, and other little riffraff they can embellish with.

When my 4 year old daughter sits down to the table she usually starts with the crayons, but quickly turns her attention to the glue stick and box of scrap embellishments.  She'll glue on little pom poms cut from trim, lace, rick rack, and ribbon until the entire piece of white paper is filled. She always ends up with an eclectic, mixed media masterpiece.

When my five year old son sits down to the table he takes the same paper and makes it into something first.  Using the tape and glue he'll whip up a plane, ship, car, or anything else he thinks it ends up looking like.  Then he paints on it a little, or like the other day he made a wallet (kind of like an envelope) and decided to glue on a little tassel trim to the top.  He always ends up with something he sculpted from the paper, with very simple embellishments.

It's been so fun to sit back and watch how their own little creative style comes out starting with a white piece of paper.  If I were to put a coloring page in front of them, they'd just color it.  If I put a maze in front them they'd start at the beginning and draw a line through it until they reach the end.  But give them a blank sheet of paper and they have to tap into their unique way of creatively expressing themselves.

That is why I can't wait to see what comes from this weeks challenge - not just from the designers competing, but from the flickr pool too.  I think you are going to see everyone's unique style really shine through.  Some will sculpt, some will embellish, and I am guessing most will do both - but each will have started with a blank canvas - that white space that lets the mind think of all the possibilities.

So I hope this encourages some of you that have thought about joining the fun to go and get a white sheet - just to see what comes of it.

Thanks so much for having me and wish me luck with the judging, I think I'm going to need it!

Monday, September 24, 2012

Week Three: The White Sheet Challenge (Plus Week 2 Results)

Wow. 
Last week was so fun!  Aside from the variety of styles and genres that our designers delved into (which were so great) all of you at home who entered our flickr group were AMAZING. 
Honestly, this may have been my favorite Flickr group week ever.
 
The photographs, and designs, were some of the best I've seen and I spent WAAAAAYYYY too long reading all of your posts and the descriptions of each creation.
Ladies, you out did yourself.
You really did and I can't wait to see what happens this week.
 
This week we have "The White Sheet Challenge".
Here are the rules---get a white sheet (any size up to a King) and make your design from it.
That's it.
Yes, you can add other supplies but THE MAJORITY of your look should be made from that white sheet.
So many possibilities---so many creative people sewing along...this is going to be another excellent week!


Now onto our results from Week 2.
The winner of our fashion icon week (after combining the judges scores with the voters tally) is:
Heidi from Elegance and Elephants with her Classic Johnny look.
Congratulations Heidi!


And sadly we have to let another friend go.
(Honestly, this part is so hard.)
And this week we have to say goodbye to another designer who as is just as nice as she is talented:
Christina from2 Little Hooligans
but fortunately she won't be going home empty handed.
The good people over at  Stitch Simple are sending her a $25 gift card to choose from their amazing selection of pre washed and ironed fabrics.
Thank you Stitch Simple!
Please head over to Christina's blog today and let her know how much she'll be missed.
(Which is a lot.)


As for our at home sewing ladies from the Flickr group....
As I said before this week was unbelievable---I want to post every single photo---it was out of control!  (All of the judges complained...you were all too awesome.)
So after much deliberation our Flickr group Fashion Icon winner is:

Froo and Boo with her Kate Middleton look!
And she will be receiving $25 from Sew Fresh Fabrics.
Congratulations!

Thank you again to our designers---we appreciate your hard work and are inspired by your looks.
And thank you also to our sew along ladies.  You are making this season amazing!
Here's to another fantastic week!
Friday, September 21, 2012

Time to Vote---Week 2: The Fashion Icon Challenge

It's Friday again and time to vote on the Fashion Icon Challenge.  Each designer chose their favorite icon and then designed, sewed and photographed a look for us today!  Be sure to scroll down to see all the outfits before voting.  They all put so much work into each piece---don't you agree?

Remember it's one vote per computer (or IP address).  Good  luck designers and happy weekend everyone!

Lindsay, Etc.--Stella Style

I love Stella Mccartney's style and designs- she melds modern and vintage so perfectly with clean lines and sweet details. I swoon over anything she has a hand in, and love the way she incorporates classic pieces and makes them hip. 


The band jacket was a must for me, and with lace details and gold buttons it has a hint of femininity. The "maestro" style top was a labor of love with all the pleats on the bodice, and the capris are perfectly tailored to accentuate the shape of the tops. From the trimmed cuffs to the pleats in the pant leg, little details really gave this look the Stella touch.  See more photos HERE.


2 Little Hooligans--Boho Kiddo


For this weeks challenge I decided to make two looks based upon one of my favorite fashion icons...Nicole Richie. I pretty much love her boho chic style, it is very flowy with lots of draping. She pairs prints with solids and she just has a knack for layering and accessorizing. Now taking her style and making it into wearable toddler clothes was a little bit of a challenge but I think I was able to do it. The long boho maxi dress was by far the most challenge piece I have made. Making this flowy dress without elastic or gathering at the top was something that took a lot of thought. But I finally came up with the perfect shape that is flowy around her middle but fits perfectly around the chest and neckline without any gathering. Then once the main part of the dress was made I added a ruffled collar and a ruffled piece to the bottom of the dress just to make it a little more toddler friendly. My little girl was looking more like a 10 year old then a 3 year old. The closure in the back of the dress is a simple tie that I made from a long strip of fabric. Then to add a little more sweetness, I made a lace vest using 1/2 yard of fabric and draping it so that is flowed longer in the front and shorter in the back. I made it sleeve-less so that the longer sleeves from the dress could flow freely. To finish off the look I made a belt using the lace fabric and added some knit as well as some leather from a belt I had on hand. And of course a bag was a must! So I made a slouchy bag out of denim and then added a handle made from the knit and lace fabrics that I had left over. Then I added the buckle part of the belt to the front of the bag for a little detail.
The second Boho Kiddo look was a little more casual. For this look I made 4 pieces. The shirt was made the same way as I made the dress but just shorter in the length and longer on the sleeves. I used the same fabric tie closure on this shirt as I did in the dress but instead I put the tie in the front of the shirt instead of in the back. The vest was made out of corduroy fabric and is lined with purple lycra and pink. I simply layered the pink lace over the purple lycra to give it a little texture and contrast. For the tank top underneath the main shirt I used a simple design for the top and then added angled layers with the purple Lycra and pink lace to the bottom. Her pants bell bottom pants were made from some super stretchy denim-looking fabric. Layering was key in this look much like Nicole's personal style. I love how these looks are wearable and comfortable for the kiddo's but still have the boho chic style. For more pictures head on over to my blog.


Welcome to the Mouse House--The Preppy Princess


 I am completely and utterly thrilled to be here for another week!  Woot woot!  
Okay, so this week's challenge was "Fashion Icon" and it was so incredibly hard for me to choose someone that would translate appropriately for an adorable 3 year old girl.  I wanted it to be conservative, wearable, playful, and fresh.  There are so many icons out there in the fashion world, but none seemed to have quite what I was looking for until I remembered how much I LOVE Kate Middleton's style!  
Classic, refined, and sophisticated, yet still young, fresh, and practical.  Perfect!
Plus, Ainsley looks absolutely adorable in navy blue and yellow.

I made 5 separate pieces (phew!) and all of them are interchangeable:   Fully lined twill blazer, yellow cotton shirt dress with pin tucking,  rib knit boatneck shirt with tie neck, clam digger knit skinnies with button accents, and a cute matching bow headband.  All inspired by the lovely Kate Middleton!  I love the fact that Ainsley now has several useful additions to her wardrobe and she is classically styled for the upcoming season.  Everything was created using practical fabrics, especially the knits.  LOVE knits for children… wearable and versatile!  That is MY kind of princess :)


(There are a TON of pictures on my blog with inspiration pictures and drawings, if you would like to see them! )


A Girl and a Glue Gun--Cameron Diaz Knock-Off
This was a tough choice! so many people who has wardrobes i'm envious of...
 (and i've got a pinterest board to prove it)
but i finally chose Cameron Diaz.
love her...her style (mostly CASUAL style) her laugh, her personality.
and to add icing...my daughter's name is Kameron (with a k. cause it's cooler)


different sized layers of pink tulle...a lot of pink tulle....
as usual..i only took a bazillion pictures..you can go HERE to check them out!


Elegance and Elephants--Classic Johnny


One thing I knew for sure was I wanted to make a look for my boy.  The next thing I knew was it had to be something classic/retro, because that's what I love.  Then I thought of my favourite actors, and right near the top of the list is Johnny Depp.  And when I started researching and found out he had recently been the only male to ever receive the Council of Fashion Designers of America Fashion Icon award, I knew my search for inspiration was over.


My take on Johnny Depp's style includes a classic white cotton dress shirt complete with back box pleat, sleeve pleats, chest pocket, and functional cuffs.  There's a fun, boyish element with the contrasting fabric on the inside of the button placket.  The wool blend, herringbone dress pants feature a zipper fly, double back welt pockets, rounded front slant pockets, adjustable elastic waistband, and cuffed hems.  You rarely see Johnny Depp without a vest, so I needed to make Tobias one as well.  Mine is fully lined and made with a combination of wool blend, silk, and cotton fabrics.  And to top it all off, a signature Johnny Depp style feature: the fedora hat.  I constructed mine with poly/rayon blend fabric and a whole lot of interfacing.  It is fully lined with the same fabric as the inner placket on the dress shirt.


For more photos and details on the making of this look, come visit Elegance & Elephants.


Sew Country Chick--Channeling Coco Chanel

Todays' Lesson in Fashion Icons For Tots 101?
Coco Chanel, The Grande Dame of fashion....


With all of the talk in the fashion world of Karl Lagefeld's new book, The Little Black Jacket, an homage to Ms. Coco Chanel,  I thought I might make my own little black jacket for the toddler set here in Sew Country! I studied the construction of the Chanel jacket and applied some of the methods I learned to this little jacket, which is made from some metallic textured boucle fabric I found in the thrift shop and have had sitting in my stash. It is lined in the same pink fabric as the blouse and quilted together on the inside, with an attached fringe trim on the outside and lined patch pockets. And of course some fancy gold and black buttons to finish it. 


The on trend bow tie blouse is made from cotton sateen and has an attached collar/tie and a knit waistband to avoid it riding up and to make it more comfy. It also has puffed sleeves which I love for little girls, trimmed with black bias trim . I made the pants from some soft and stretchy black denim and tapered them to make them slim fitting. The inset panels are the same boucle fabric as the jacket, there is an elastic waistband, and there are little tabs on the bottoms of the pants to give them a more authentic, equestrian look. I drafted all of the patterns from the outfit with the help of my new pattern book, Metric Pattern Cutting For Children. I also made the beret at the last minute and the ceramic hairclip. The flower was a pin which I pried the pin part off of, then I glued it to one of my flat head bobby pins and I traced a dinner plate to make the beret. Gigi will not keep a clip in her hair or a hat on her head unless I bribe her with lollipops which I did plenty of in this shoot.  She is now ready to attend the Polo match in this ensemble. Santa Barbara here we come!


Delia Creates-- First Baby
For fashion icon week, I chose Jacqueline Kennedy Onassis. Her aesthetic was clean, simple, classic and timeless, which is very much in keeping with my own point of view. I didn't want to recreate her clothes per say, but I pulled details from a smattering of pictures of her, to come up with a outfit that I feel looks regal enough for a first lady and yet perfectly suitable for a baby.


Hence, why I've called this ensemble, "First Baby." The dress begins with a sheer shoulder and sleeve made of navy organza, and is clasped in the back with a pearl button detail which I placed there as a nod to the pearl necklaces Jackie O is known for. The rest of the dress is made of cotton in a muted navy floral pattern and finishes in a nice full skirt. It wouldn't be a Jackie Kennedy outfit without a great jacket, so I made this 100% soft wool cardigan/jacket/sweater dress made from one of my old wool sweaters. It is a nice bright pink which complements navy nicely and is classic Jackie O. The buttons are large and bold, like many Jackie O jackets. To tie everything together, I made pink leather shoes from a thrifted belt, navy polyester satin bloomers, and a head band and bow made from fold over elastic and leftover leather from the shoes.


Please come by my blog: Delia Creates for lots more pictures, some close ups, and to see the pictures that inspired me!