Tuesday, August 31, 2021

Season 25 Week 3: To DYE For

 You're going to DYE/DIY/DIE over this week's looks by the designers!!!

Make sure to check out all the creations, and then support TWO of the designers with your vote at the end of this post.


Sincerely Shantelle - Pastel Dreams

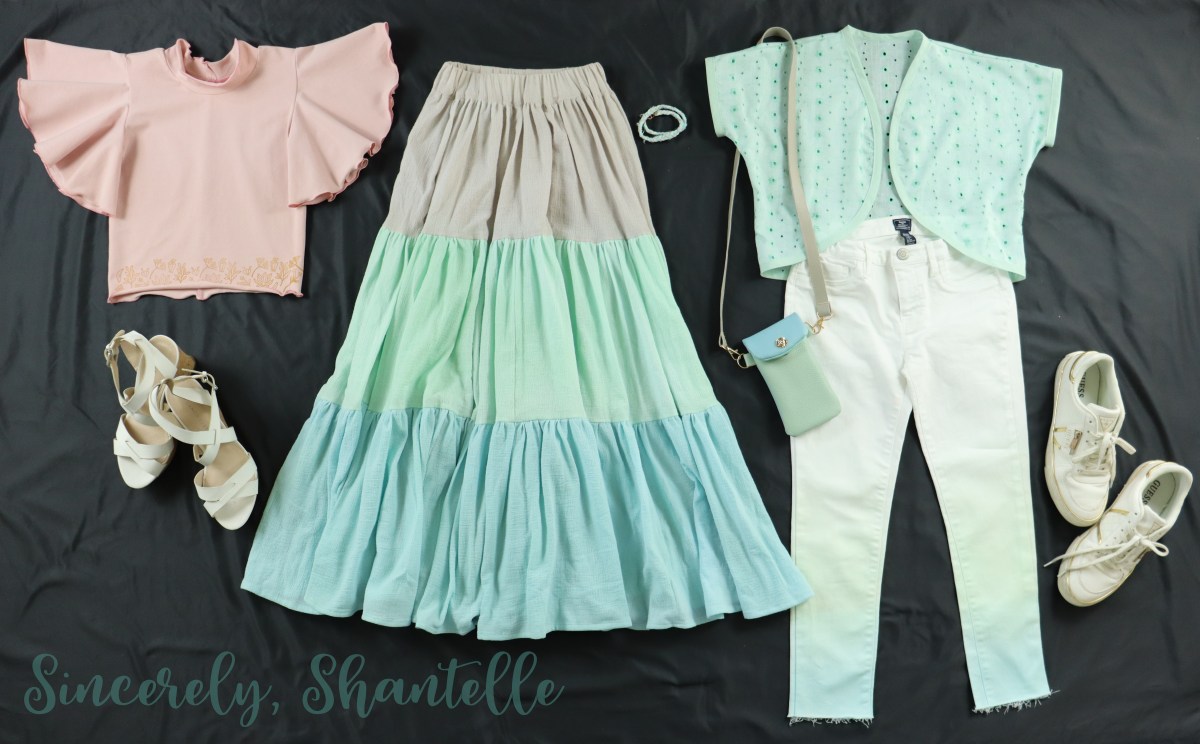
Hello everyone, and thank you for having me back for Week 3! I'm still over the moon with my win last week, and can't believe it happened. I hope to wow you again with my "to die for" look for this week's To Dye For theme! I present to you, Pastel Dreams.

This week, I simply could not commit to tie dye of any sort! Every summer, my family ventures into making tie dye shirts, and over the years, every one of mine has come out very meh looking. I knew tie dyeing anything would likely result in being sent home, so I went an entirely different route. My feature model last week was my son, which meant it was my daughter's turn this week. I took her input using a dreamy, pastel color palette she chose, and used a starting point for the creation of my two looks. I wanted them not only to be light in color, but lightweight, easy to wear, and to give off a very dreamy, airy vibe. For the first piece, I custom dyed 7 yards of cotton gauze so that the tiers matched the bottom three colors of the palette. That was an adventure (first time dyeing aside from tie dye PLUS almost 14 yards worth of gathering), but the outcome was gorgeous! I really liked the look of the colors, so I tapped into my "DIY" bit of the brain and braided some strips of the leftover dyed gauze and added some hardware to create a matching bracelet. To pair with it, I made a flounce sleeve top in dusty pink cotton spandex (for the first color of the palette), cut between crop and regular length so that the entire skirt would be visible. I finished the sleeves and hem with a rolled hem to keep the lightweight, floaty look, & stamped a floral motif around the hem with metallic gold ink, to create a border. My daughter loved this look and said she felt like a princess. Because it's so lightweight, it would be perfect for meeting up with friends at a coffee shop (she's a tea drinker, though) or even out for a day at the mall. It also would pair lovely with sandals for a more casual and comfortable look.

For a super casual look, borrowing from these same colors, I decided to cut and dye some white jeans. I attempted an ombre look, which was very hard to photograph the light colors outdoors. From the bottom to around the knee is a blue into mint gradient. I paired with a plain white tank top we had at home, and created a woven bolero using a knit cardigan pattern with some mint floral eyelet I had in my stash as a gift from a sewing friend. I ended up having to dye white bias tape to finish the raw edges because there was none in the store that matched. It turned out perfect! And because no tween outfit is complete without the most important accessory of all (the phone), I used this cool YouTube video from the Ellie and Mac channel to create a phone purse for her to carry her phone around in style. This also discourages the continuous dropping and helps protect her phone. I made several modifications to the tutorial for my own look, but it was a very good starting point. Though it was my first time working with vinyl, it turned out not too shabby. The colors also came from the palette, and I finished the purse off with light gold hardware, and a gold rose embellishment to continue on with the floral/pastel theme.

As with all the pieces I sew, she could wear the bolero with the skirt or even wear the flounce top with the jeans. I really enjoyed working with these colors (though I was reminded again of how much I despise photographing light colors lol). I hope you love this dreamy look as much as I do, and would be so happy if you'd vote for us and get us on to the finals next week! You can also stop by my blog for all of the full details of the looks, as well as some behind the scenes. I really hope to see you all again. Until next time....


DIY with Manneken - Paint Party

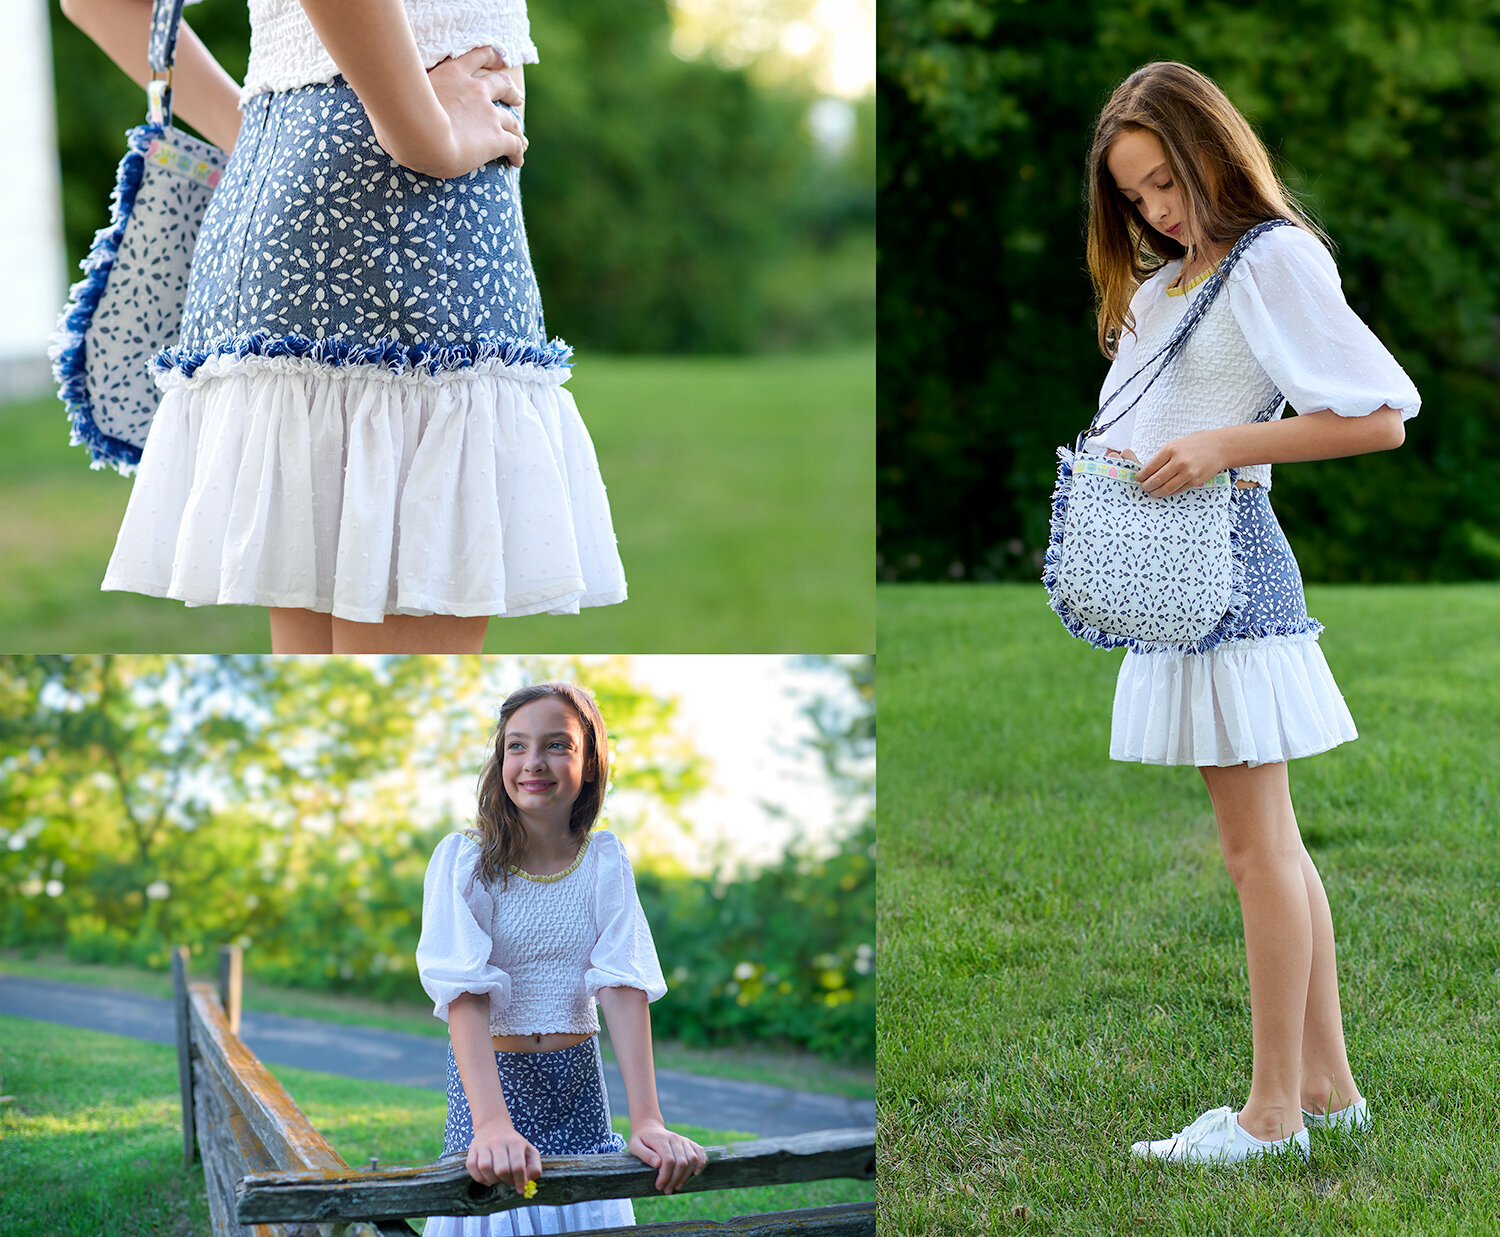
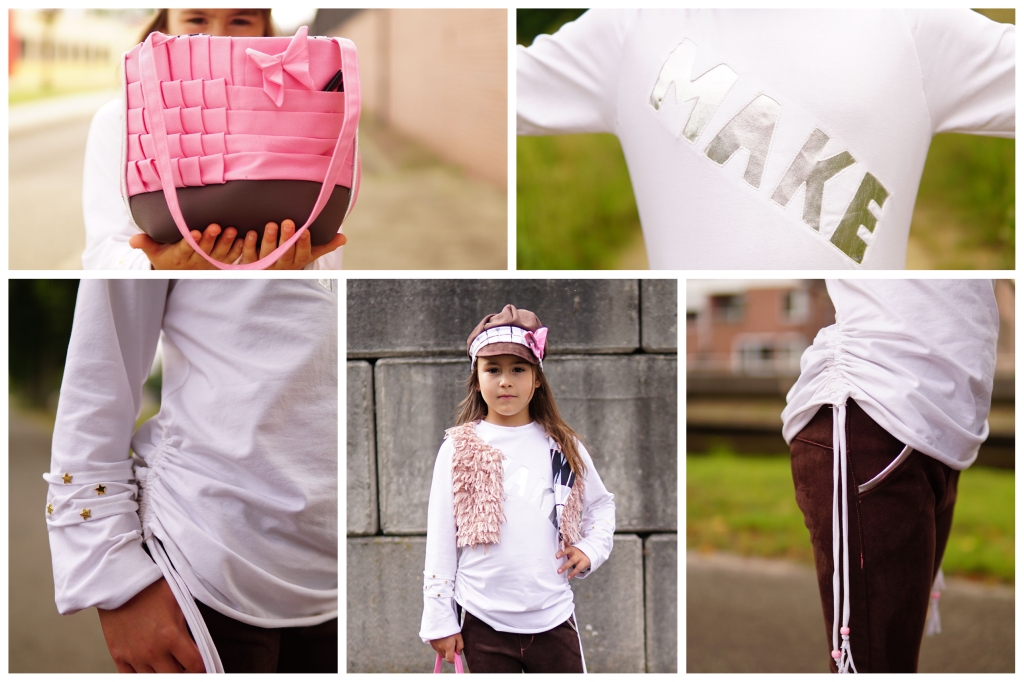
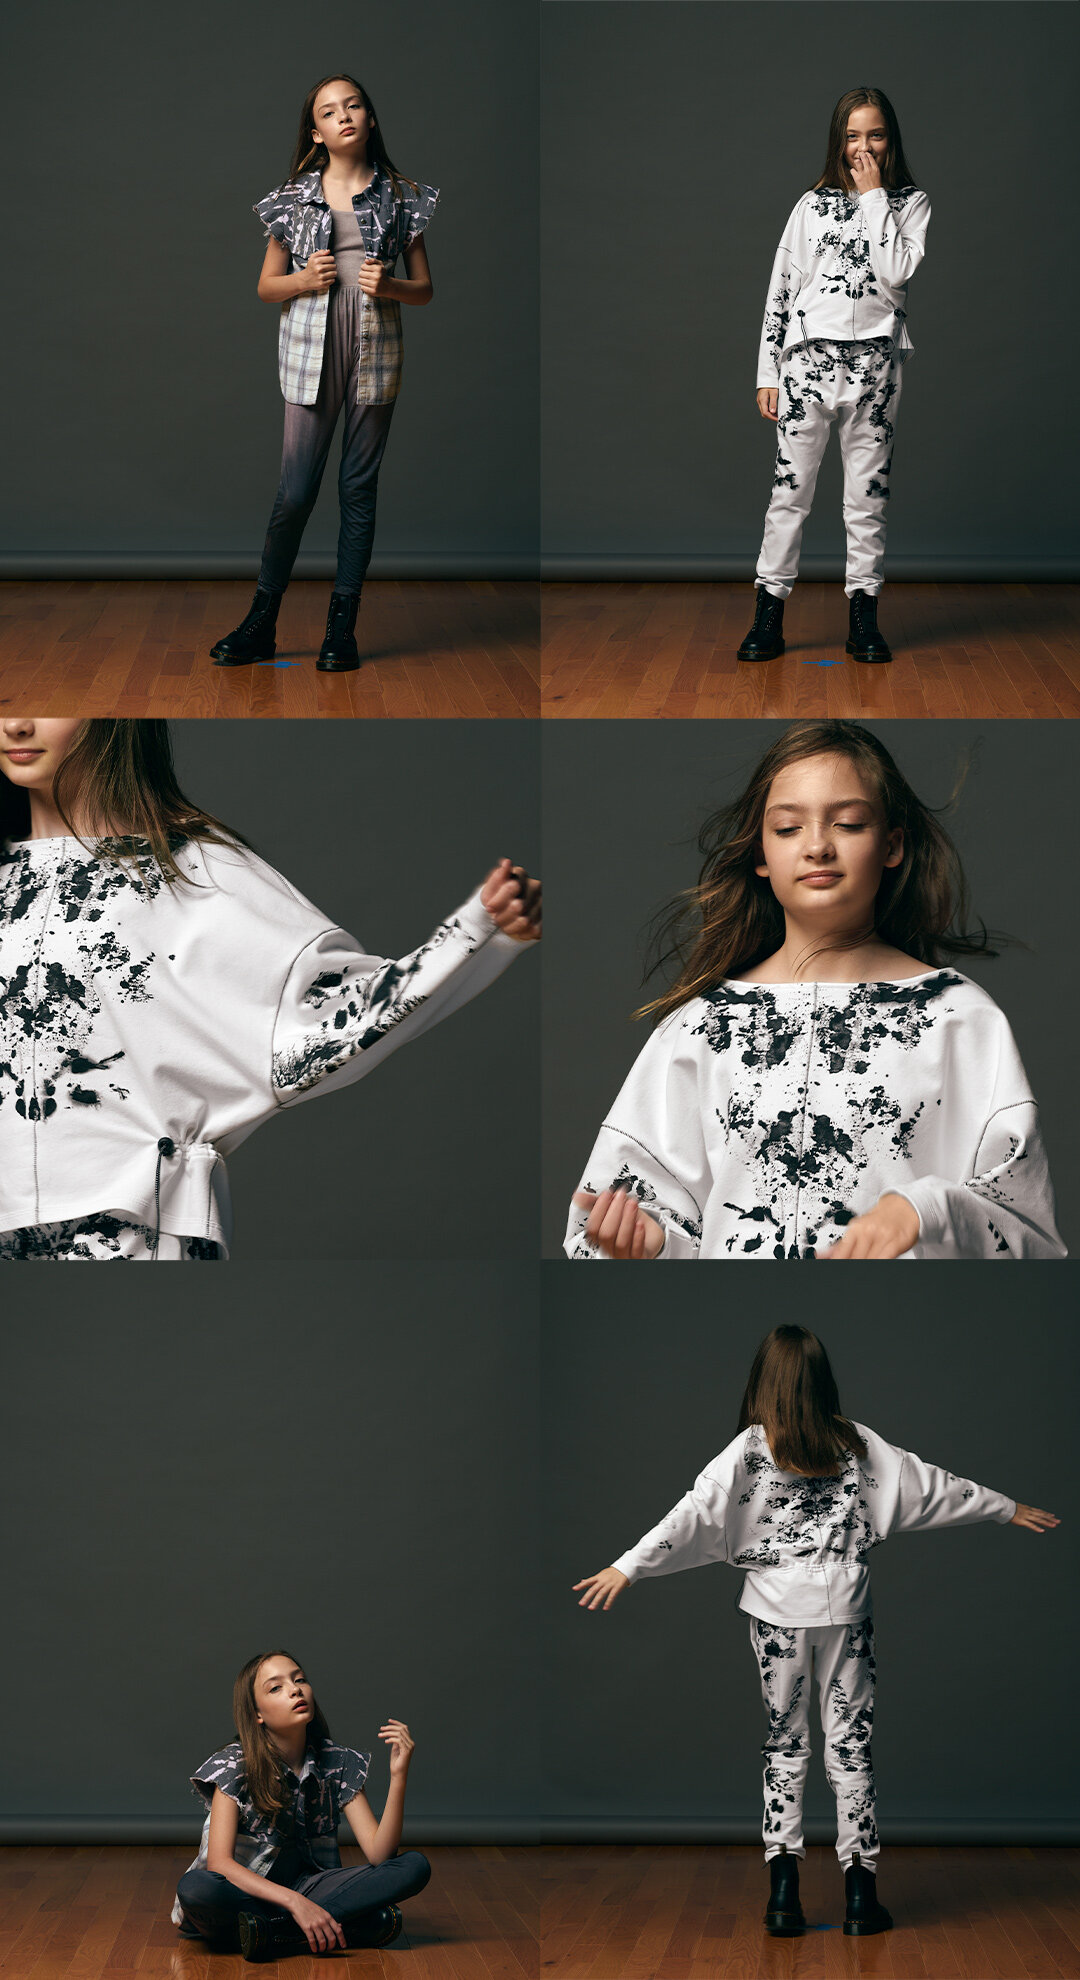
Well well, we’re on to week 3. This week has been a great struggle for me. I really did not know what to design for this week, so I decided to make it a family project. 

At first, I asked my daughters to dye the fabric for me, totally random, their choice. They had a few fun evenings doing this, and the result of the fabric was, “made by them”. It was a perfect Paint Party. 

My older daughter wanted a set for herself, so this has been a big achievement for me, because for once I made something for her that she really liked. Her style is very sporty, loves to dress in sweatpants and nothing else!

My younger daughter loves everything I sew, loves to dress, loves makeup. She likes wearing skirts, dress, styles her own outfits, she even overdresses for many ocassions. The best thing is that she does not feel shy about anything!

So the great challenge for this weeks them was to design something that would blend my daughters style together. I had to upgrade an outfit for my older daughter and downgrade my younger daughter’s design. The common thing has been Tie Dye, which they both love. 

The first thing I chose was the fabric. Knit fabric is perfect for both of them. Comfortable, sporty, casual.

They both helped me design their outfits. Noor (my older daughter), wanted shorts and a Tshirt. I gave her the privilage to design the shorts, I designed the top. I self drafted the shorts, taking as a base one of her favorite shorts. 

The top was a hack of a fibre mood sweatshirt I made for myself. I shortened it, and tightened it. 

Queralt (my younger daughter) and myself designed the dress together. She wanted a dressy but casual outfit. The ruffle of the dress gives it a dressy mood, and the knit fabric the casual mood. 

I decided the ruffle would have all the tie dye, and the rest of the dress is black to sober down the color!

Self drafted pattern. I also made a headband and a scrunchie for them to accessorize. 

You have more info in my blog, and my Instagram account. 

Hope you like my designs, and hope to see you next week!


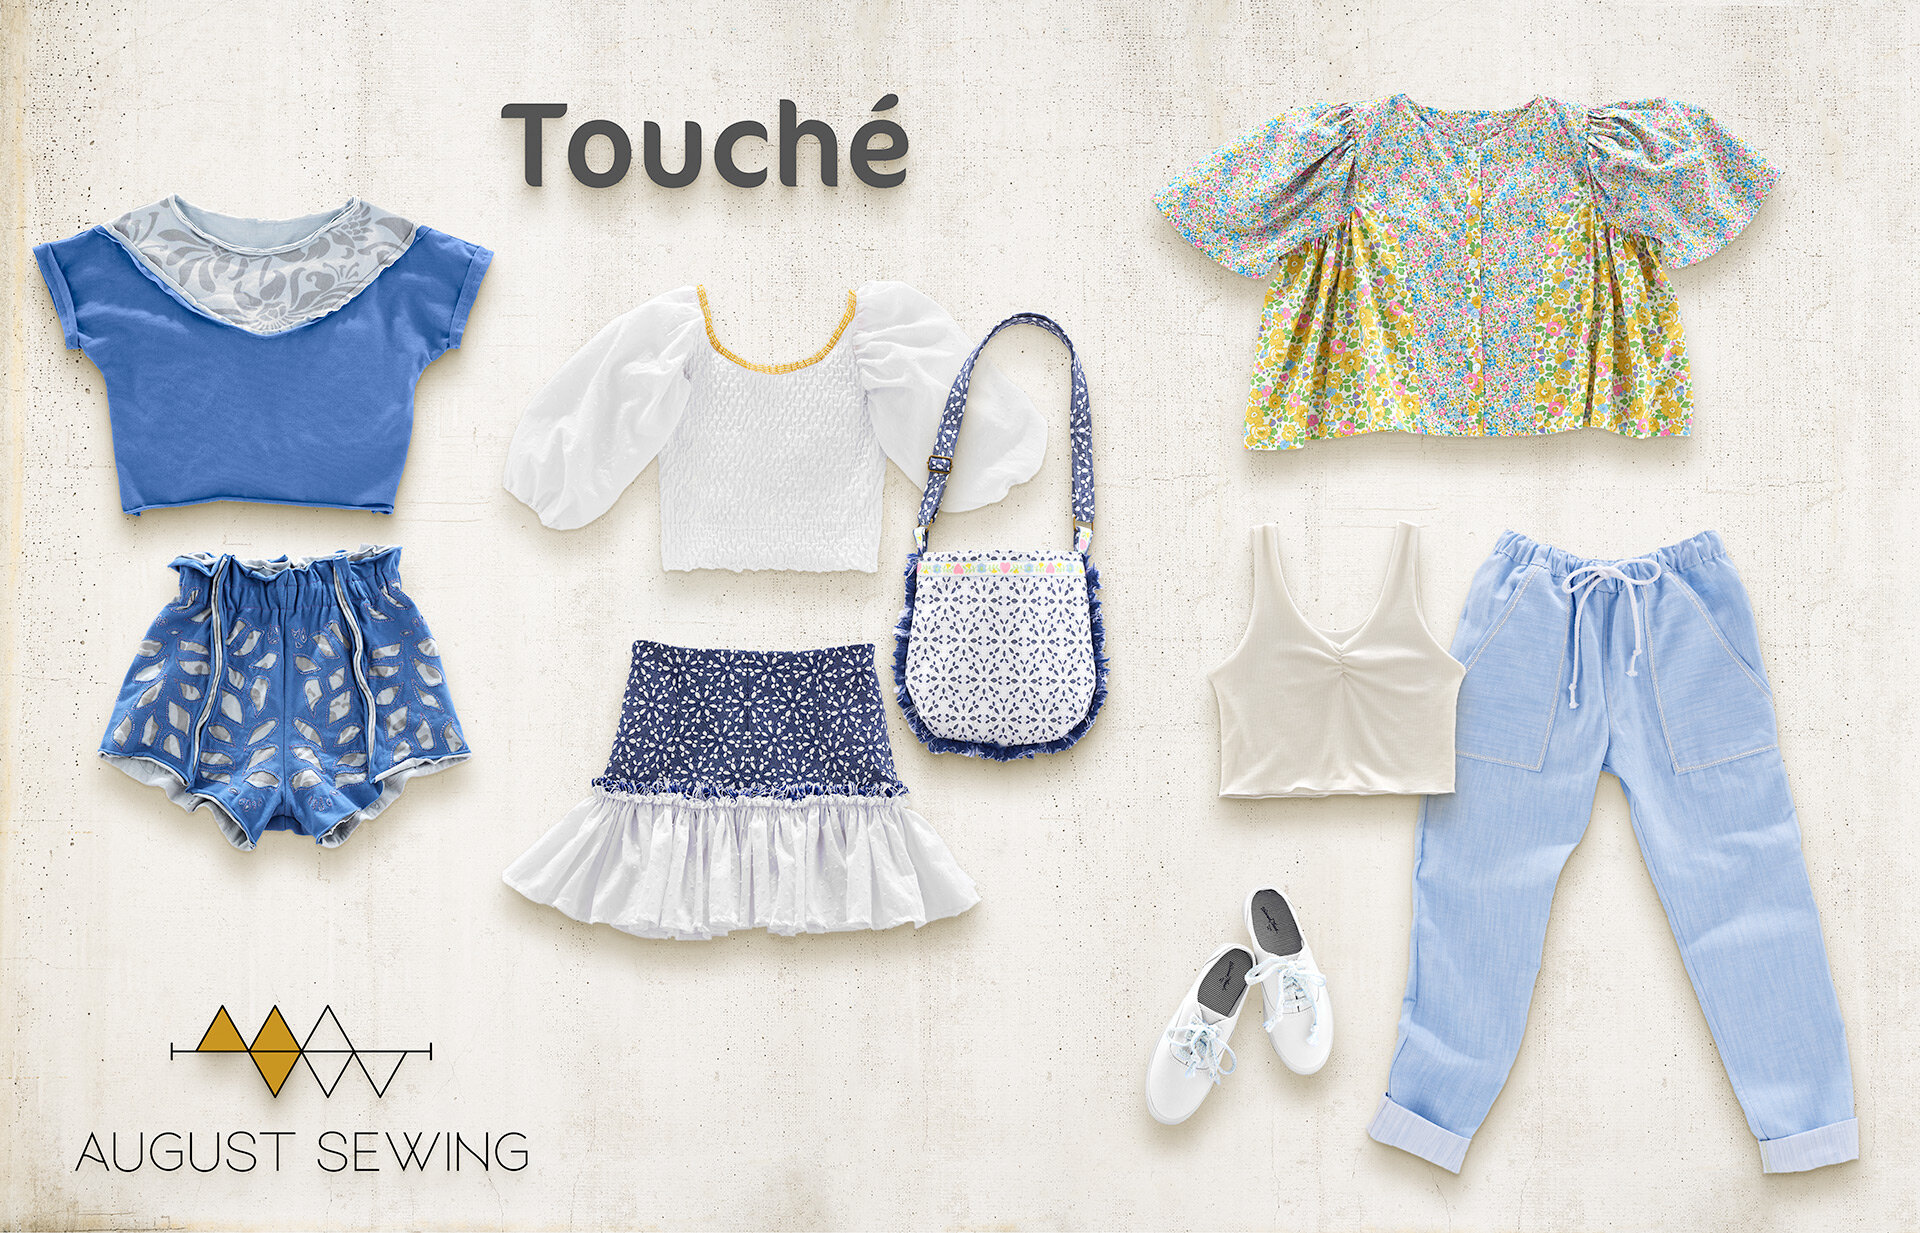
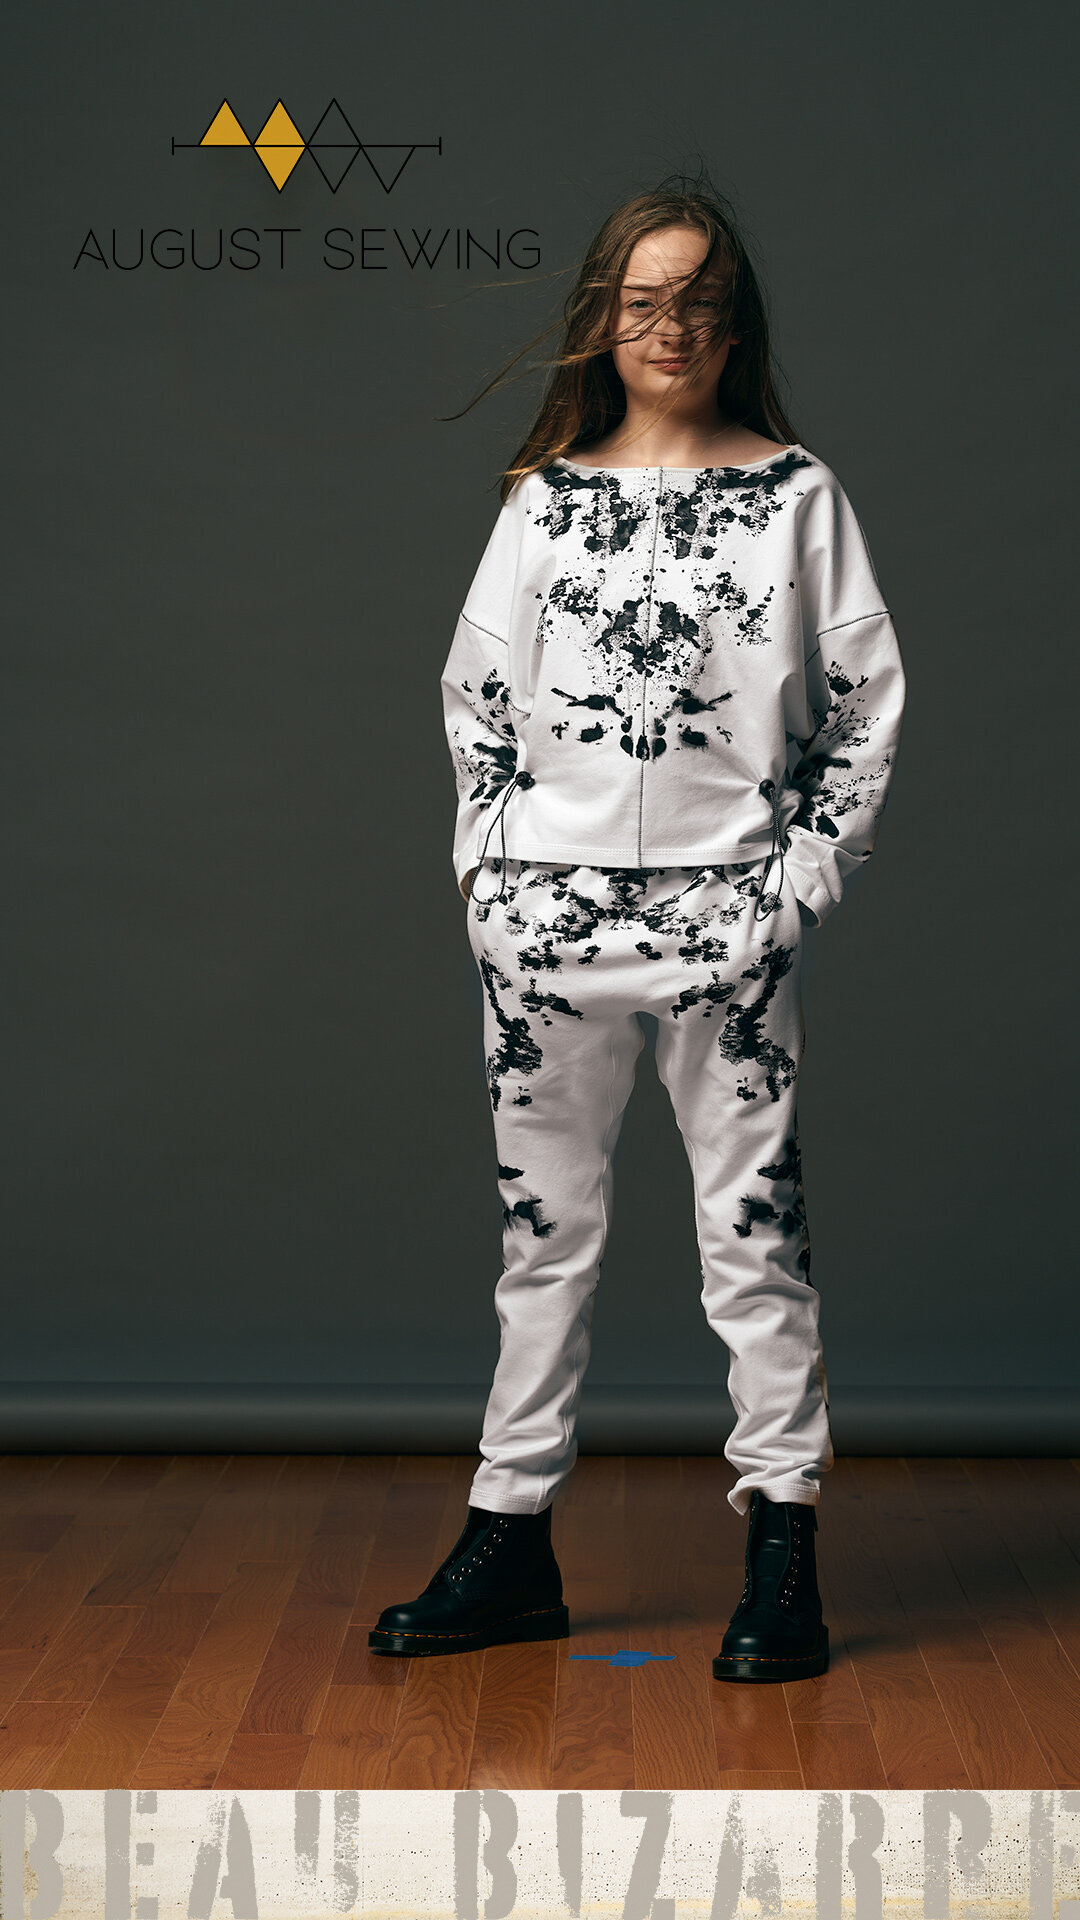
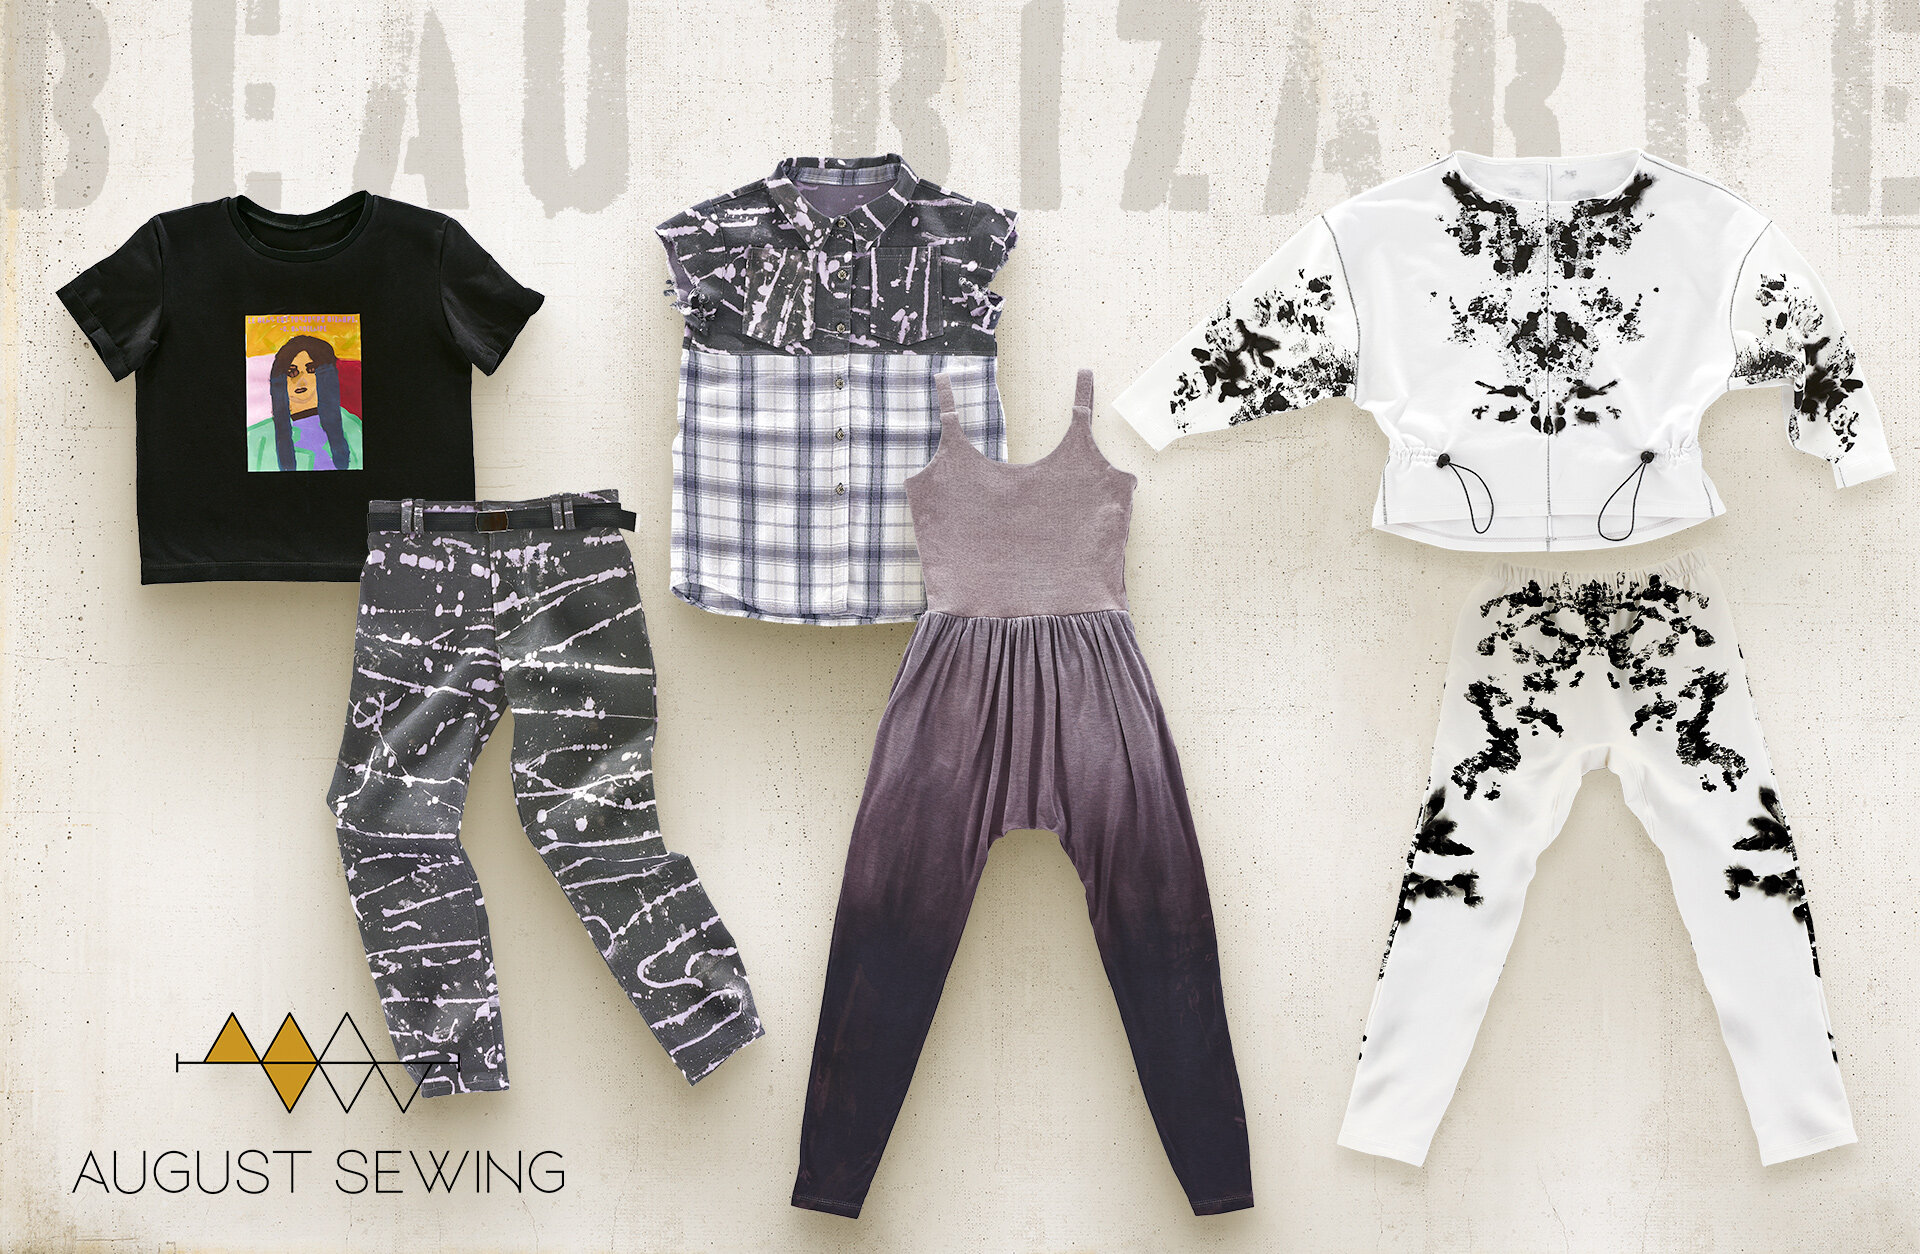
August Sewing - Beau Bizarre

French poet, Charles Baudelaire wrote, "Le beau est toujours bizarre,” which translates to “Beauty is always bizarre.”

During the preparation of To Dye For, I often had to ask myself, "is this totally ugly, or really cool?" Dying fabric is one of those things that feels risky and exciting. I had triumphant moments and results that looked like clown puke. This is a collection some of you will appreciate and others may want to quickly forget. That’s the beauty of it.

Look one is inspired by the 90s and grunge. I started with Bonobos deadstock denim that was bluish-gray. I used bleach and cotton cord to create a pattern and then gave it a quick dye rinse for a subtle violet hue. Making jeans has been on my list of things to do. The Laura Jeans from Suco by Susana had an awesome video tutorial which helped me along. I modified the belt loops and adjusted the pattern to eliminate the elastic waist. I added the belt to highlight the belt loops. I cut the legs a bit wide but straight and added pleats to the hem for a more barrel shape. For the arcuates, I stitched my daughter's initial L. To complete the look, I made the self-drafted tee in black Supima Modal from Goldie Olding Fabrics. The intention was to create something that might be reminiscent of a band tee. It features a painting my daughter created that I paired with Baudelaire's quote. It has a modern Mona Lisa vibe. Can you guess who it's a painting of?

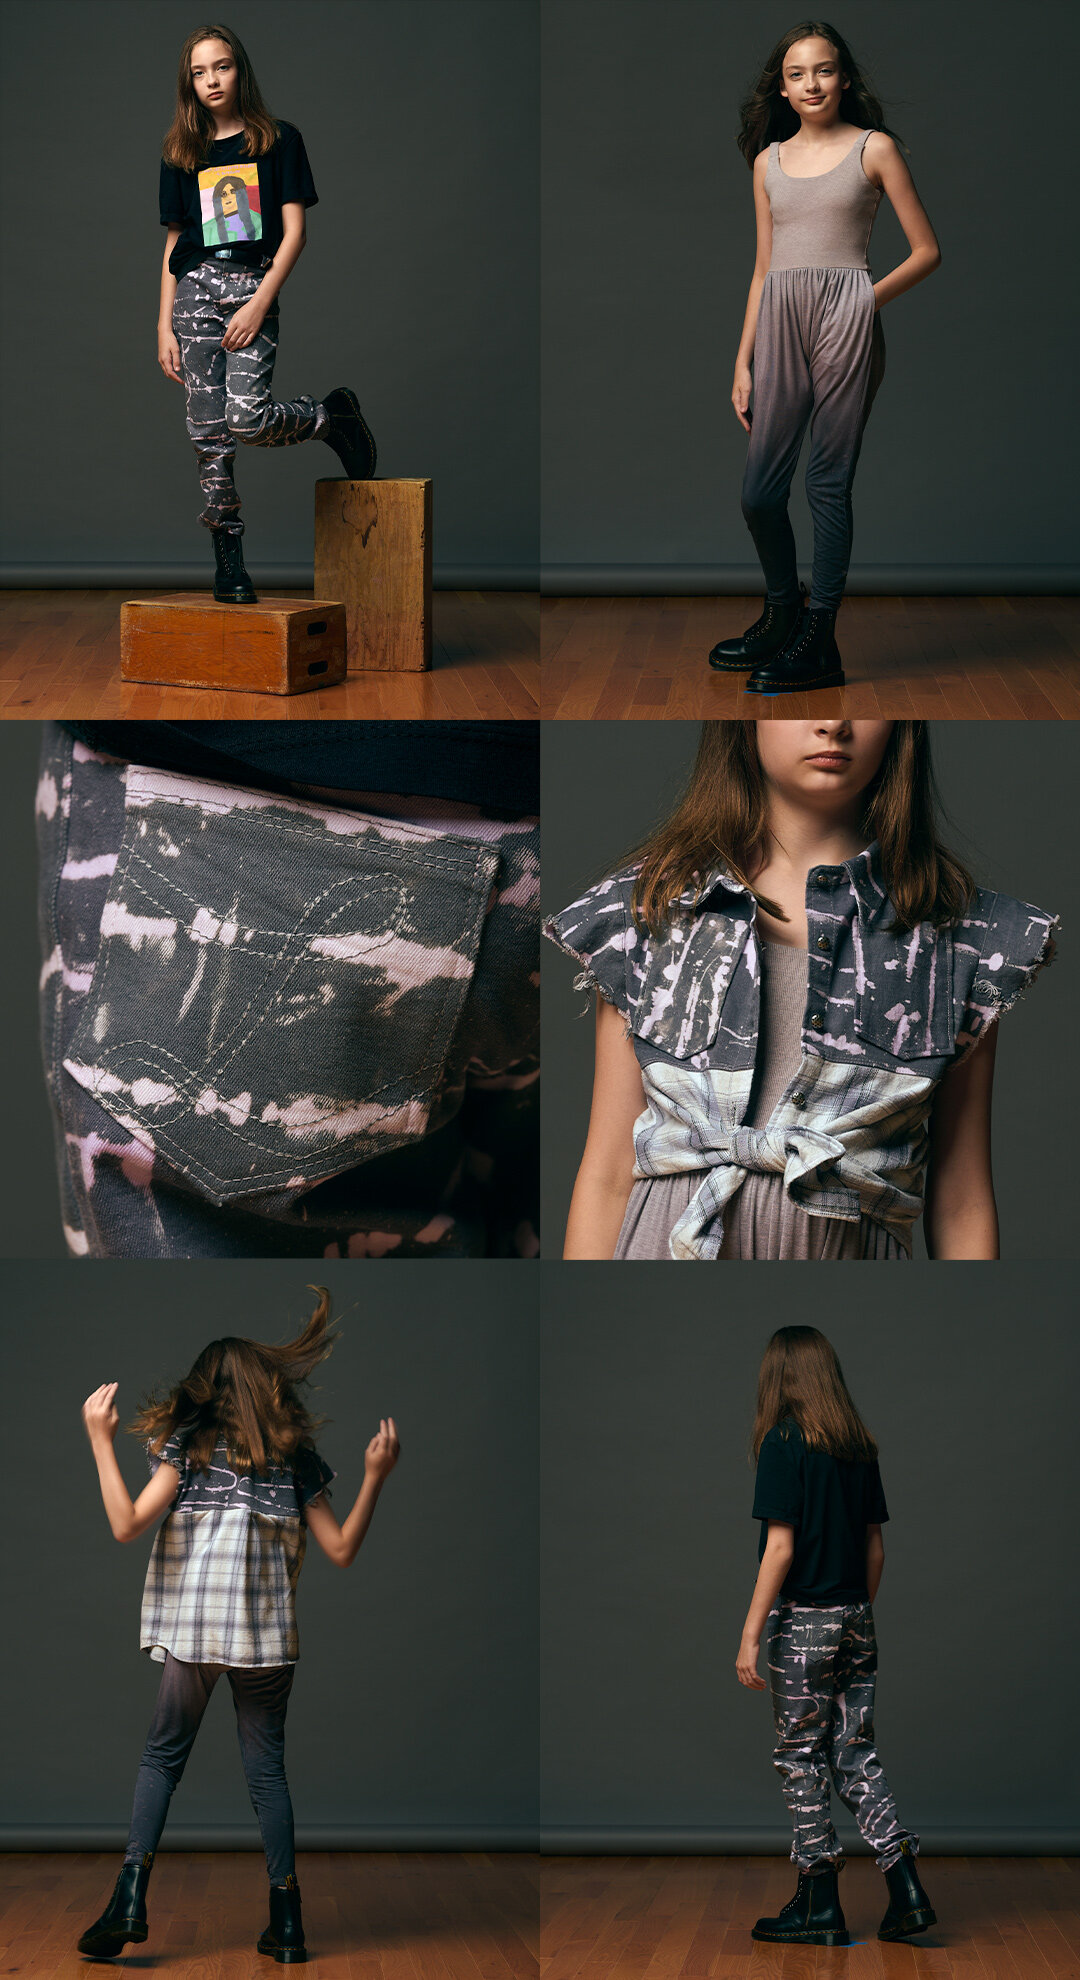
For the second look, I drafted this jumpsuit I call Bounce. I used a gray rib for the top and a gray modal for the bottom. Both fabrics came from my shop. I dip-dyed the finished jumpsuit for an ombré effect. It’s paired with the Bayfield button-up shirt from Little Lizard King. I modified the sleeves of the pattern and blocked the top using bleached denim and added a flannel to the bottom. Metal buttons from Super Textiles complete this look. My daughter loves this outfit. She’s been tying the shirtwaist into a knot upfront.

Then, we come to the Rorschach look. Rorschach's initial interest was in how people perceive things differently. I couldn't think of a better way to represent my theme. I used a combination of black, white, symmetry, and abstraction to create this classic Rorschach inspired look. Painting the fabric was quite fun! The self-drafted Squeeze top is super comfy. It has a detail which I love, middle seams, flatlocked for emphasis. The self-drafted Slouch pants have an elastic waistline, inseam pockets, and a gusset. This is a pattern I've often made for my daughter. Both pieces are made from French Terry cotton from my shop. For more details about my Rorschach painting method, visit August Sewing.

Enjoy!


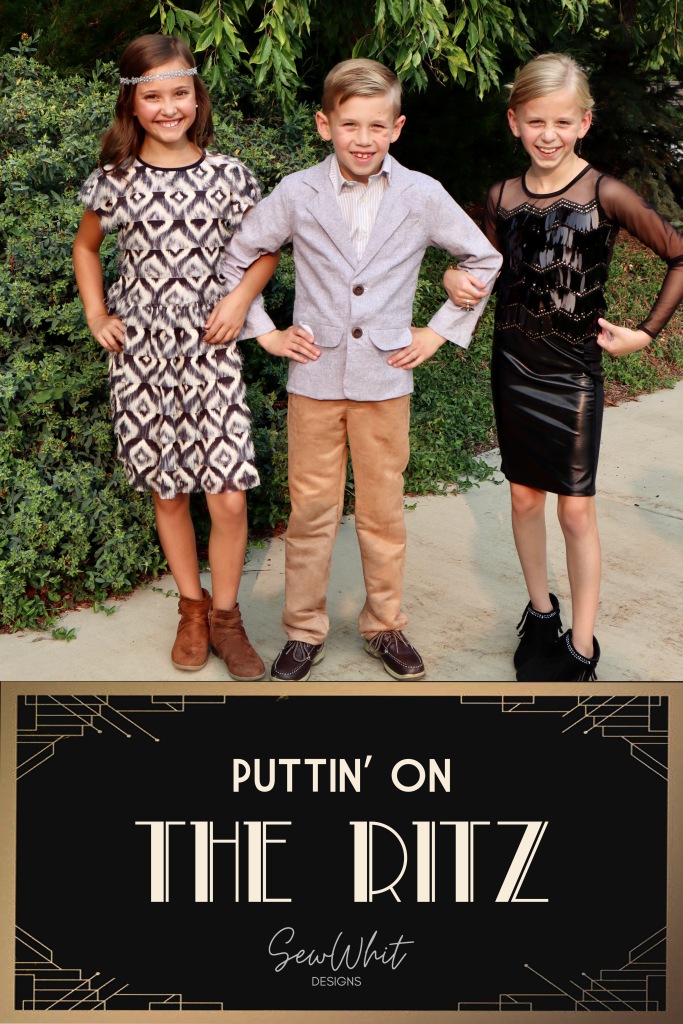
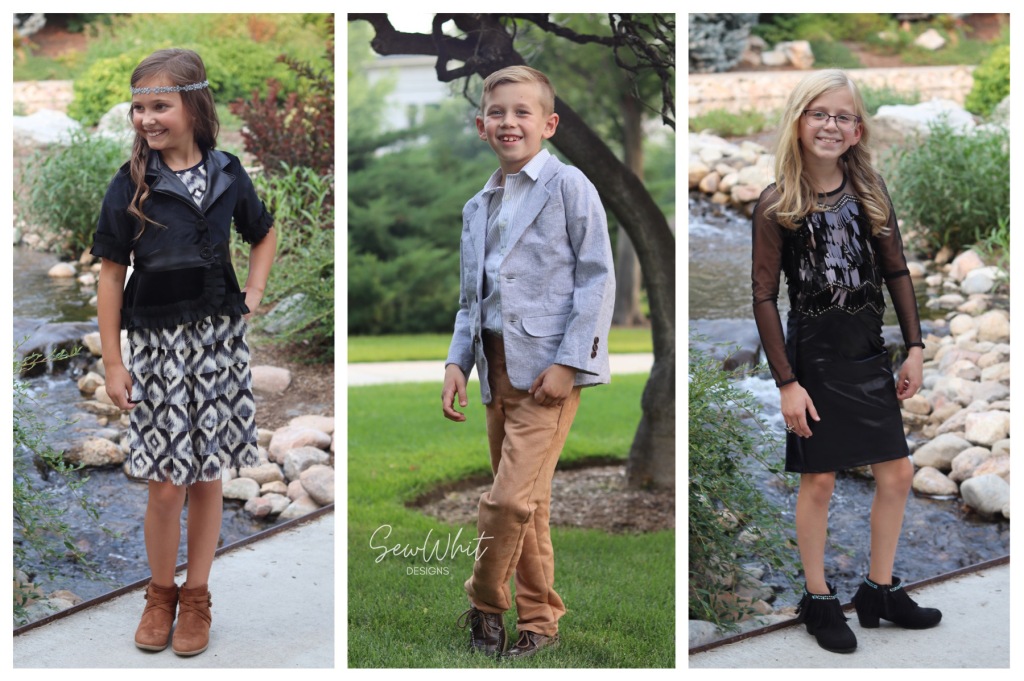
Sew Whit Designs - Live like you were Dyeing

If I’m being honest this week was the one I was most worried about. Tie dye is everywhere right now, and it is not my cup of tea. But, I was up to the challenge to create something cute and fun that my daughter would love. When I came across this reversible tie dye spandex I knew it would be perfect to create a look for my tiny dancer who lives life to the fullest, and dances like no one is watching.

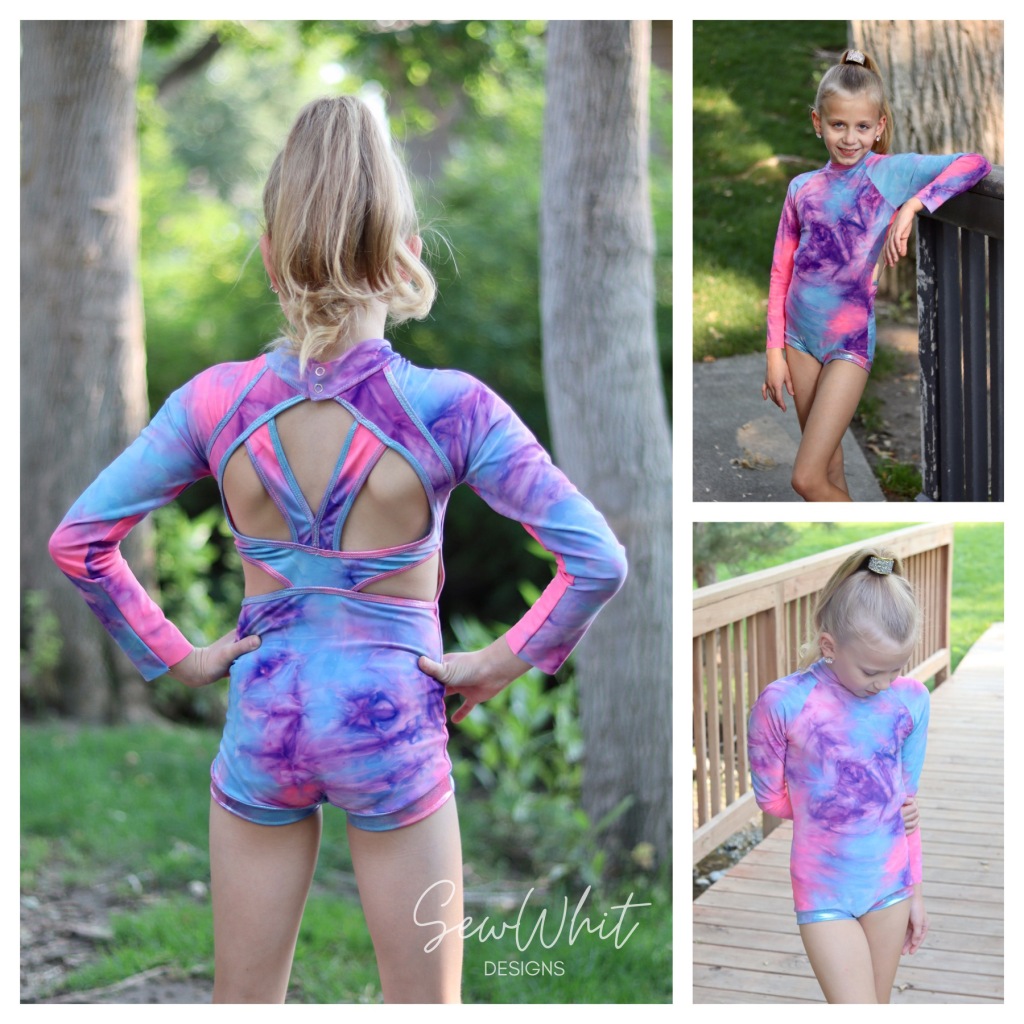
For the leotard I use the “wrong” side of this sparkle tie dye fabric from JoAnns. I mashed 2 patterns to create the Leo and self draped the back, on a duct tape dress form of my daughter. I combined the Mairin from Sew a little seam and added the raglan sleeves from our favorite rashguard, the Aloha Burn Blocker. I bound the back details and added the leg bands with the “right” side of the sparkle fabric.

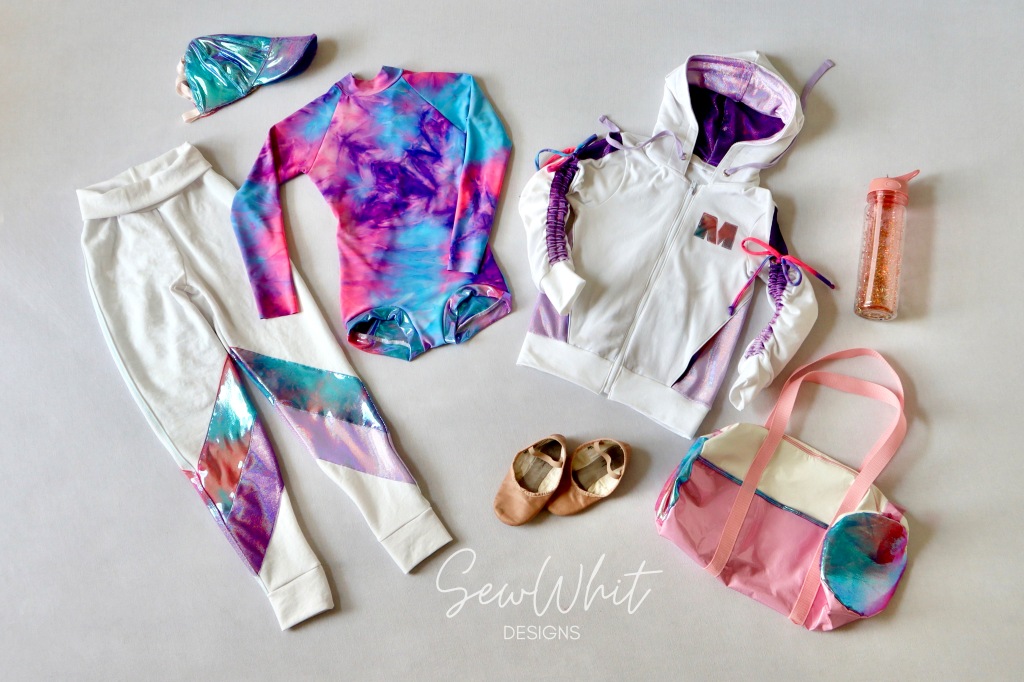
For the warm up set I used a white pique from my stash. I color blocked the Jordan joggers from Peekaboo Pattern Shop and added a yoga waistband. For the zip up hoodie I started with the Horizon Hoodie from Lil Luxe Co. I chose another ombré dyed purple sparkle fabric for the color blocking and hood lining and I changed the pullover to be zip up. We needed some TIEs to go with our dye look, so we added the cinch strings on the sleeves. On the back of the jacket I did a little DIY personal touch. I projected her studio logo onto the fabric, cut it out, ironed on the back and machine appliquéd. I made a girly ball cap with fold over elastic in the back that allows her to pull her pony tail through the top. For the final touch I drafted a duffle bag out of white and clear pink vinyl. I use the tie dye fabric for the lining and the sparkle side for the ends of the bag. Turns out tie dye is actually not that bad. For more details and pics head over to my blog.


Now it's your turn to support TWO of these designers with your vote!  Remember, only 3 designers can proceed to the final week, and you can help choose!


 This week's celebrity guest judge Amy of Peekaboo Pattern Shop really has her work cut out for her!


The designer scores are determined as follows:

1/3 of the designers score is determined by the celebrity guest judge
1/3 of the designers score is determined by the panel of judges
1/3 of the designers score is determined by YOU, the audience!

Monday, August 30, 2021

Season 25 Judges

Today we get to introduce you to the Season 25 judges!  These hard working  ladies have the extremely difficult job of helping sort through the stunning designer creations!  But as you're about to see, they're up to the task.

Celebrity Judges: 

Meet the celebrity judges for Season 25:


For week 1, we have the talented team of Tami Meyer and Tessa Heiser from Love Notions.They have combined their love of sewing to create a positive community around the Love Notions brand, encouraging people of all levels to sew beautiful garments. Find them on Insta here: Love Notions & Tessa Does . 


Navy drape dress4_Nosh fabric_Needle and Ted

Olu from Needle and Ted will be judging week 2. In 2014, Olu challenged herself to start sewing her daughters' clothes. She enjoyed it so much, she decided to continue. Her style is so sleek and modern. If you aren't following her on Insta, you are definitely missing out: Needle and Ted


Amy is the powerhouse behind Peek-a-Boo Pattern Shop and Knit Fabric dot com and will be judging week 3. Amy first starting blogging in 2010 grew her shop from there. She now has patterns for everyone in the family and fabrics for all occasions. Amy loves to spend time with her family, sew, read, and spend time outdoors. PAB can be found on Instagram here: Peek a Boo Pattern Shop.


Liz from Little Lizard King will be our week 4 judge. LLK is well known for its large collection of  beautiful dress patterns but they also have patterns for women, boys, paper piecing, and much more. Liz loves to find inspiration from exploring cities and nature. She designs clothes that inspire the sewing community to try new things. You can find LLK on Insta here: Little Lizard King.


Panel of Judges:

The panel of judges keep Project Run & Play consistent as they judge each week of every Season in 2021.  Each of them was a Designer themselves on a past Season of Project Run & Play.


Cassie comes to us from Lily Shine Creates.  She was a designer on Season 10, and now designs patterns for Violette Field Threads.  Who can forget her amazing Shine Brite creation for the 80s Cartoons Theme?  These days, she's sewing quite a bit for herself as well as her childern, and it's sew inspiring!  It's a true honor to have Cassie make time in her busy life (follow along on Instagram!) for Project Run & Play.


Katy comes to us from Wild + Wanderful.  She was a designer on Season 12 and is the boy sewing expert on this panel!  You can find her on Instagram here.  Katy also runs Thread & Grain, with so many products for sewists!  It's so exciting to have her on the panel of judges for 2021.


Carin comes to us from Art Bella Creates.  She was a designer on Season 18 and shared her breathtaking aesthetic every single week!  A truly talented sewist, Carin is always a 1st pick when we are creating our stunning lookbooks!  Be sure to follow Carin on Instagram.  It's incredible to have her on this panel for Project Run & Play.


It's such an honor to have these talented ladies giving their time and effort on the behalf of Project Run & Play.  Please thank them by following them on social media, and reading and commenting on their blogs!


Friday, August 27, 2021

Season 25 Week 2 Results!

 Wow, are you inspired to create some texture in your sewing now or what??!!??!

The results have been tallied for the Week 2 Gimmie Some Texture theme, and the winner is:


not [di]stressed, just chillin' by Lakeisha from Sincerely, Shantelle

Here is what Olu of Needle and Ted and Made It Patterns, our celebrity guest judge had to say about her creations:

1   SINCERELY SHANTELLE

What a dude!
This incredibly cool streetwear inspired look, immediately captured my attention. Not one to scroll past, but one that demands a closer look. The distressed fabric Lakeisha used for the zip-up hoodie is the type of fabric most people would probably steer clear of, it’s a sewing nightmare with all the holes, you have to ensure the stitches have something to grab on to otherwise it would just fall apart. To use it you have to be either naive or fearless. I think Lakeisha must have been the latter, it takes skills to use that sort of fabric and get a good result, but it paid off because the hoodie looks fantastic.

You really do have to look close to see the all the great details Lakeisha used in her garments. That’s what makes her look a winner in my eyes. It’s all there but it’s not glaringly obvious or crammed full of texture for the sake of adding texture. Each piece can be mixed and matched with others, creating a really cohesive little collection. It works, makes sense, looks comfortable and has that urban edge that she was obviously going for.

I particularly like the black t-shirt with the pleated patch pocket and the stitched detail at the shoulder. I love that the texture was created here by cleverly using sewing techniques rather than using an already textured fabric
The black on black is subtle but that’s what gives it finesse.

The whole look is fun but with attitude and swagger, a look that would turn heads in the street. And combined with the location for the shoot, I think she has really embodied the whole streetwear vibe. Very well done Lakisha.


Sadly, only 4 designers get to continue on to Week 3, and that means we're saying goodbye to:


Marieke of Jong Design


Fortunately our sponsors are sending her home with some really nice prizes!  

She received a $75 pre-Season shopping spree from So Sew English!


AND she is receiving a $75 credit to spend at Peony Patterns!


AND she received a $50 pre-Season shopping spree from Minerva.


AND our friends at Love Notions are gifting her $50 certificate!

Plus she's part of the Project Run & Play family now, so expect to see more of her gorgeous work around here in the near future.

Are you sewing along?  Be sure to link up your creations on the sew along page for a chance to win some fantastic prizes.

See you next week for Week 3!
Tuesday, August 24, 2021

Season 25 Week 2: Gimmie Some Texture

 Well now, that was an amazing start to Season 25, wasn't it?  We can tell this is going to be SUCH an inspiring Season!

Are you sitting down?  Because this week's designer makes for the Gimmie Some Texture theme are going to knock your socks off!!!  Be sure to scroll through them all and then support TWO of the designers with your vote at the end.

Here you go:

Sew Whit Designs - Puttin' on the Ritz

Inspired by the luxury, glamor and exuberance of Art Deco fashion, this week I created a formal wear collection full of texture. This black spangled sequin fabric has been in my stash for years just waiting for the right project to come along. I paired it with some black stretch velvet, some black power mesh, and black lycra lame from Cali fabrics. I designed the top from scratch using a custom bodice sloper. I used french seams and bound the neck and sleeve with fold over elastic. For the skirt I used the Stoplight skirt pattern from the Project Run & Play shop. It was perfect for mixing the black velvet and lame textures, but allowed me to keep a basic pencil silhouette to really show off the top.

For my son I used this striped shirting from Cali Fabrics, for a basic button down, dress shirt. I used Peekaboo Patterns classic Oxford pattern and played with the direction of the stripes on the yoke, pocket and collar. For the jacket I used the little gentleman’s jacket pattern, also from Peekaboo. I added the flaps to the welt pockets and buttons on the sleeve. For the jacket, I used this fantastic stretch rayon linen from Raspberry Creek Fabrics. I chose wood buttons for a good contrasting texture against the linen. For his pants I used the Grady pants pattern from sew a little seam. I choose a tan Suede fabric from my stash.

For Miss P. I definitely wanted a flapper vibe. When I saw this fringe fabric at JoAnns I knew it would work perfectly! This fringe was a nightmare to sew on but is soft drapey and comfortable to wear. I’m so happy with the end result. I used the Cayala dress pattern from Lil luxe collection for the basic shape. I wanted to keep the silhouette pretty simple to show off the fringe. I topped off the look with a beaded headband I made with this gorgeous trim from Cali Fabrics. For her jacket I used the same black velvet and lame as I did in my daughters look. I started with Jennuine Designs Baie Blazer, slashed and spread the peplum to get some more fullness and drape. I added pleated trim to the hem and cuffs. For the finishing touch’s I added a satin belt and some beaded buttons. Head to my blog for my details and a pics.


August Sewing - Touché

Texture surrounds us, and we often define our world with it. We might say, 'he looks slick', or 'she's a little hard headed', or 'I'm in a sticky situation' or even 'those button holes went in smoothly.' The word however, texture has two definitions. One as a noun referring to the visual or tactile nature of a thing. And secondly, as a verb referring to the action taken to change the surface or visual characteristics of a thing. I wanted to demonstrate both: the look and feel, but also the act of creating texture by adding-sometimes in abundance-and by removing-only very carefully-and stitching-lots and lots of stitching. I'm calling this collection Touche which means touch in French.

As soon as I saw the eyelet fabric, I knew it would be part of this collection. It has two beautiful sides. I always love a fabric with two beautiful sides. I carefully drafted and cut the 8-panel skirt to create a symmetrical and pleasing presentation of the eyelet motif. I added the selvage as fringe, Cali Fabrics Swiss Dot for the ruffle and an invisible zip in the back. I found a knit that had the perfect texture and stretch to compliment the skirt, added billowy sleeves and a gingham ruffle detail at the neckline. The look is completed by the Noodlehead Sidekick bag to show off the white side of the eyelet fabric. This was my daughter's favorite outfit.

For the second look, the drawstring pants are made out of a designer deadstock chambray. I used the Little Lizard King Oakland pattern for the base and the pockets came from an adult pattern I had. I used a ladder stitch on my sewing machine for the topstitching and then went in by hand and created little knots around all the ladder rungs. On the oversized back pockets, I hand stitched the arcuates with embroidery thread. The little tank top is Little Lizard King Sanibel in modal rib with a ruched center to give it some detail. I drafted the button down top in the most adorable Liberty florals. I wanted it to be something that can be worn buttoned up or open. The front and back yolk are lined, and the sleeves are like little wings. To finish it off, I added some hand stitching and ribbon to the back yolk with decorative stitched hems to add character.

I am a BIG fan of Alabama Chanin and thought this final look would be a good time to create a look based on her embroidery techniques. I played around with samples and realized that I would not be able to finish if I stitched it by hand. Instead, I used my straight stitch machine with two different color threads. I combined two different stencil designs and arranged them on my pattern pieces. This really gave me the feeling of creating an art piece, and I can't wait to do it again! The curved front seam in the new Lowland Kids Breezy shorts reminded me of the leaf in my stencil. I gave the waistline the paper-bag treatment keeping those edges raw and ruffled. For the shirt, I recreated visual details and movement from the shorts, but in a different way. I used the Little Lizard King Sausalito as the base pattern, raised the armhole, changed the neckline, added a yolk and ruched the back.

Please visit the August Sewing blog to see behind-the-scenes photos and to read more about what I made this week.

Enjoy!


DIY with Manneken - Textures from Nature

I'm so happy I passed to Week 2! This week my proposal is inspired in natures textures. Nature is full of different textures, which resemble many fabrics. Pleats from the ruffle fan palm trees and pleated inkcap mushrooms, the waffle texture of the sea sponges, the green range of colours... All this have been my main inspiration.

I really love pleats, and if you really give it a thought you can get a different look with them. I wanted something a bit more dressy, but comfortable, a look that my daughter can wear a day out for lunch with the family, or even for a small event.

First of all I designed the shorts. The shorts had to have all the attention. I chose the waffle pique, inspired in the sea sponges, for which I chose black to give it an elegant touch. For the front pleats I used yellow tulle, to brighten up the shorts. They're wide legged to be more comfortable, and to have a more girly look. Side zipper for closure.

The top had to be simple, with a bit of color, to contrast the shorts. I designed a wide neck top, made of elastic green crepe. The surprise comes a the back, which has a pleated bow made of the same yellow tulle of the short pleats. No closure, easy to wear.

The two pieces can again be worn with other garments, and make different looks. The top with jeans, and the shorts with a white blouse would look really cool.

I self drafted all the patterns again. The fabrics are from Ratucos.

For more info, you can visit my blog or my instagram account!

Hope you like my proposal and help me pass to the following week!

xoxo

Anita


Sincerely Shantelle - not [di]stressed, just chillin'

Thanks for having me back for Week 2 for the theme, "Gimme Some Texture." As an ode to the carefree life that is age 5, and a slight pun on my fabric choices for my collection, I've titled my look not [di]stressed, just chillin'. I made 4 new pieces for this collection, and brought my joggers from last week back (because I really liked them with the pullover I made and...why not lol).

Contrary to what I thought would happen, I wasn't toooo stumped on texture week. My inspiration began with kids' streetwear, and I picked up certain elements to use throughout. It was cool to explore my fabric stash looking for the ones that I knew would fit in well with the theme. I don't have any real organization for my stash, so anytime I'm looking for something, I have to hunt through three separate closets (and about 15 clear totes/bins) to find what I need. I think that took longer than my sewing 😜 By happenstance, I came across a distressed French Terry while I was intentionally looking for a faux-textured French Terry, and they worked really well together. I based my entire collection around them.

For the first piece, I wanted a distressed raglan zip up. I modified a raglan tee shirt pattern into a zip up. It was pretty easy to modify by using my knowledge of how to insert zippers. To add a little warmth to the hoodie, I lined it with the midweight cotton French Terry that I used for my zip joggers last week. Distressed fabric was a little tricky to work with, but I think I managed really well with it. For bottoms, I was inspired by the moto patch harem style pants from my streetwear search. I took a basic harem pants pattern I owned, changed out the pocket and waistband style, & color blocked it to include these cool pleated moto patches. They were time consuming, but I really loved the dimension that the patches added to the pants. I used the same technique for the pleats on the shoulders of his tee to upgrade it from "plain." I think the tee ended up being my favorite! For my final piece, I modified a dolman pullover to have these little front scooped pockets and added a double lining behind the openings so you can see the faux textured fabric through the holes of the other textured French Terry I chose.

I really love this week's pieces and that beautiful blend of faux vs. real texture that I created with them. For full deets on the looks, more photos, and a little funny, make sure to stop by my blog! I hope to see you again next week :)


Jong Design - Look, Feel, Make: Texture

I am so glad I made it to week two! Thank you everyone who voted for me, I really appreciate it.Texture is the theme this week. What an interesting and big theme! You can look at it, feel it or make it yourself. So I combined these three and created a mini-capsule for my youngest daughter. The whole capsule is inspired by different decades and I took the best out of every decade which fit exactly to how my daughter is and what she loves the most. Because at the end, that’s what is the most important.

With using different materials you can get interesting effects and with using other techniques you can manipulate your fabric limitless! And that’s why I made a shirt as base from a plain cotton lycra. I want to show that you don’t need expensive or special fabrics to create something new. This relaxed fitted shirt I drafted myself, cut it on tunic length and added drawstrings at the side to create ruffles and pleats. I cut the word ‘MAKE’ (a synonym for ‘texture’ but being more wearable) out of paper, transferred it on to silver knit fabric and used reversible applique to sew them on. At the sleeves I sewed some pleats and folded them in different directions. Some studs are holding them in place and beads at the end of the drawstrings are added. With ruffling the sides it becomes a top. With the ruffles out, it can be worn as a tunic.

As the shirt can be worn in two different ways, I also wanted two pants. I drafted a straight version first and from that pattern I made a pair of bell bottom pants too, with inserts to create some extra effect. The silver version is a knit velvet, the bell bottom pants are scuba suede. The buttons are made from the same fabric as the inserts to create some extra texture. They are just for decoration, because for a child nothing is easier than to hop in and out their pants if they feature an elastic waistband. I used the scuba suede to make a little dinosaur, my daughters favorite animal, because texture is about touch as well, right? The dinosaur got a little bow around her neck, which I tied on an hair-elastic, so the dinosaur is now an elastic-custodian too. Lol.

Because of the different saisons I decided to draft a little bodywarmer extra. It is reversible, but my daughter prefers the fabric with the strands to be worn on the outside. I have no idea how this fabric is called, but it is so funny and has such a great texture! For making it easy for a child to wear it, it can be closed with a magnet, which is sewed in between the two layers.

Because she loves to wear hats, I also made a matching one to complete the outfit. This is the only pattern I didn’t draft myself, but I wish it was mine! Therefore, to give it a bit of a personal touch I folded origami butterflys in order to achieve a 3-D effect and to show that origami isn’t just for paper. The same little butterfly was added to the bag, as was a hot stone for finishing. With the bag too I want to show that a plain denim can become something totally different! I folded pleats in a horizontal and vertical direction to create a whole new effect. In the upper front pleat I sewed a little hidden pocket. A little belt for wearing over the dress as finishing touch and ‚my’ mini capsule is finished! For the photoshoot we went to some different places around our house, again for proving that texture is just everywhere! For more details and pictures you can always visit my blog: www.jong-design.com/blog.

 
Now it's YOUR turn to support TWO of these talented designers with your vote! 


This week's celebrity guest judge, Olu of Needle and Ted and Made It Patterns really has a difficult task before her to determine the scores!

The designer scores are determined as follows:

1/3 of the designers score is determined by the celebrity guest judge(s)
1/3 of the designers score is determined by the panel of judges
1/3 of the designers score is determined by YOU, the audience!

Monday, August 23, 2021

Project Run & Play is on Pinterest!


We're really excited to let you know that Project Run & Play is on Pinterest!!!!  

It's waaaaay past time, 
our presence there is brand new, 
we have so many plans, 
you're going to be SO inspired
so please please please follow us there!

The very first boards we're creating are inspiration boards for the Season 25 themes.

What are you waiting for?  Go follow