Today we get to share an awesome tutorial from a classy lady and world traveler extraordinaire---Melissa from The Polka Dot Chair . (And not only is she classy and well traveled but she is nice...and that's the best part!)
Hi there!! My name is Melissa Mortenson and I blog at www.polkadotchair.com, I also have a line of PDF sewing patterns, fourteen may! I'm so excited that Elizabeth and Liz asked me to be a part of the Skirting the Issue series. I was lucky enough to meet them in February and hang out a bit more with them at SNAP this Spring. I've always admired their talent and eye for design and was so excited to finally meet them in
person.
When Liz told us about the Skirting the Issue project she mentioned that there was a need for skirts for older girls. Since most of my previous skirt tutorials have been for little girls, I challenged myself to try to make a skirt for an older girl.
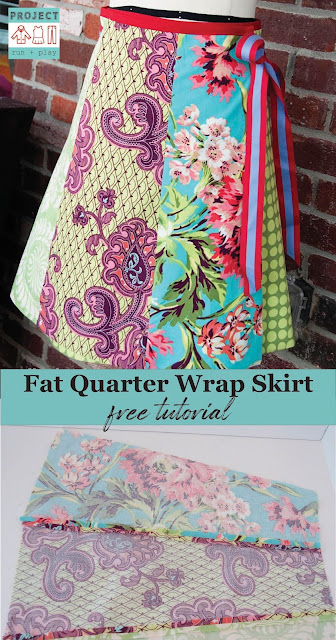
I came up with this wrap skirt because I thought it would be flexible and adjust easily to fit (since it's a wrap). This skirt is for about a size 12-14 girl- or about a Woman's 2-4.
The skirt is made from 4 Fat Quarters, so have fun mixing and matching them!
To begin you will need:
4 Fat Quarters for the skirt
4 Fat Quarters or 1 yard fabric for the lining
1 package double wide bias tape
2 yards wide ribbon
Step One: Cut your Fabric
Cut each fat quarter into 2 pieces each 9" wide by 20" tall (make sure you cut the correct way or you won't get 2 pieces out of one fat quarter).
Measure in 2" from each upper corner of one of the 9" sides of the piece. Place a mark at each 2" spot.
Draw a diagonal line from the 2" mark on your piece to the bottom corner (on the other 9" side). Cut along the diagonal line - Repeat for the other side. When you are done you will have a trapezoid shaped piece that is 9" across the bottom by 5" across the top and 20" tall.
Do this for all 4 fat quarters, at the end you should have 8 pieces.
Using one cut piece as a guide, cut 8 lining pieces from your lining fabric- set lining pieces aside.
Stitch 2 skirt pieces together along the long sides. Press seams open. Repeat until you've sewn all 8 pieces together.
Repeat for 8 lining pieces.
Place skirt lining and skirt, right sides together. Stitch along 2 sides and bottom seam. Press seams open and turn skirt right side out.
Cut your ribbon into 2 pieces, 24" and 48". Unpick about 2" down on your skirt side seams at the top and insert the ribbon piece in and stitch closed. The 24" piece of ribbon will be stitched to the right most panel (the one that will show on the front) and the 48" ribbon will be stitched on the left most panel.
Baste the top seam of the skirt, close to the edge.
To finish the top edge of the skirt, attach double fold bias tape. To attach, fold the bias tape open and stitch the raw edge of the bias tape to the raw edge of the
skirt.
Fold bias tape over and top stitch in place.
To finish, stitch a button hole close to the seam between the 2nd and 3rd skirt panels.
Press well and you're done!
We would love to see what you make from this tutorial! Be sure to join our Facebook group. If you are looking for a pattern that would work well with this tutorial, check out our shop.


Beautiful and simple...thanks for sharing the tutorial
ReplyDeleteAwesome! It's so hard to find cute styles for this size. My daughter is only 8 but a size 10/12 so finding appropriate & cute is hard thank you
ReplyDeleteFab tutorial ! For a bigger girl -me!! Could I just add more fqs? Thanks. Maggie
ReplyDeleteit doesn't say in the article, but I suspect this is a skirt intended for a child not an adult. :)
ReplyDeleteI have made it of a bigger girl and just added more fat quarters, works fine
ReplyDeleteThanks! Making them for Christmas and a choir outfit. Just using plain black for that!
ReplyDeleteThanks Melissa - I made my own adult versions here http://a-fresh-page.blogspot.co.uk/2014/03/wrap-around-skirts.html
ReplyDeleteYou've brought back so many memories! My Mum made me a skirt like this when I was a child. I'm inspired to make an adult version for myself now :-)
ReplyDeleteHow can you adjust this pattern for a misses size 10-12? My granddaughter is past a 14-16 girls and having trouble finding clothes that don't make her look too old. .... She is soon turning 9 but tall for her age
ReplyDeleteHi,you could measure waist and desired length then devide by 8 or other numbers of panels then add 2 inches on each side to make it right shape then follow rest of the instructions as usual. You will need more fabric and remember to add seam allowance...good thing is it's a wrap skirt so if too big it doesn't matter too much
Delete