
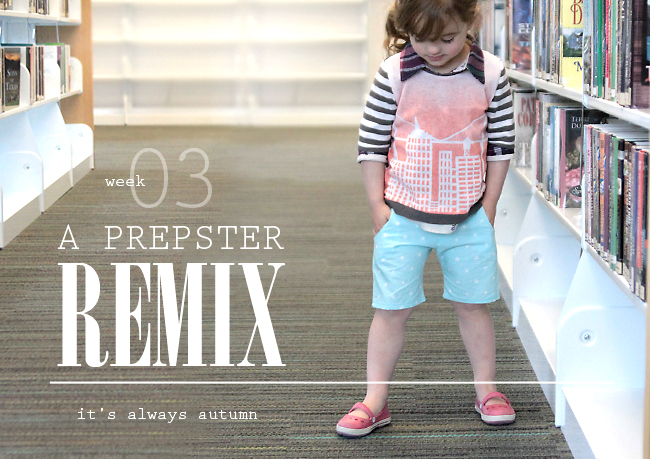
 My goal with this week's "design your own fabric" challenge was to make something that looked commercial as opposed to crafty without spending more money than I would on an outfit from the store. I tried a number of techniques that didn't result in a professional look, so they got ditched. I considered using a service to print my own design on fabric, but it was seriously pricey. In the end I settled on two techniques that produced great results for just a few dollars each: I used a bleach pen to create white polka dots on a pretty aqua quilting cotton, and I used a stencil and spray dye (made for tie-dyeing) to create a graphic skyline print on a white sweater knit. I wanted to play with mixing prints this week, so I added three more prints to my look: a stripe, a plaid, and a floral. I love how the mix of five different prints adds a lot of personality to the preppy-casual outfit I made for this week.
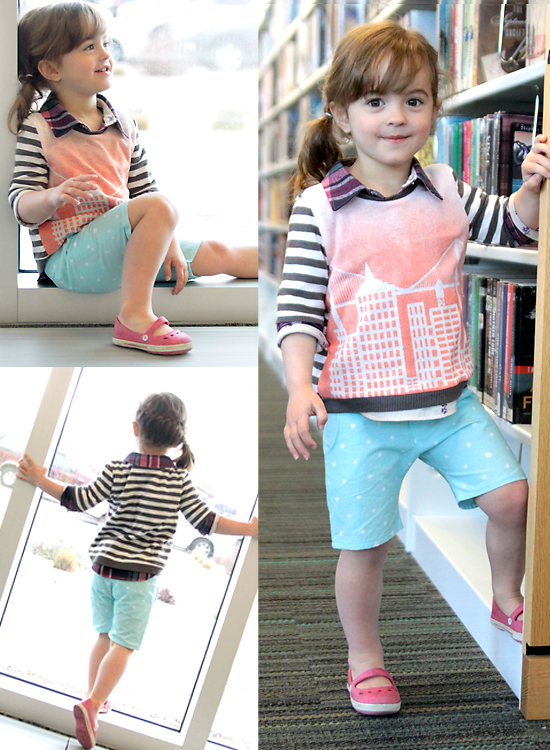
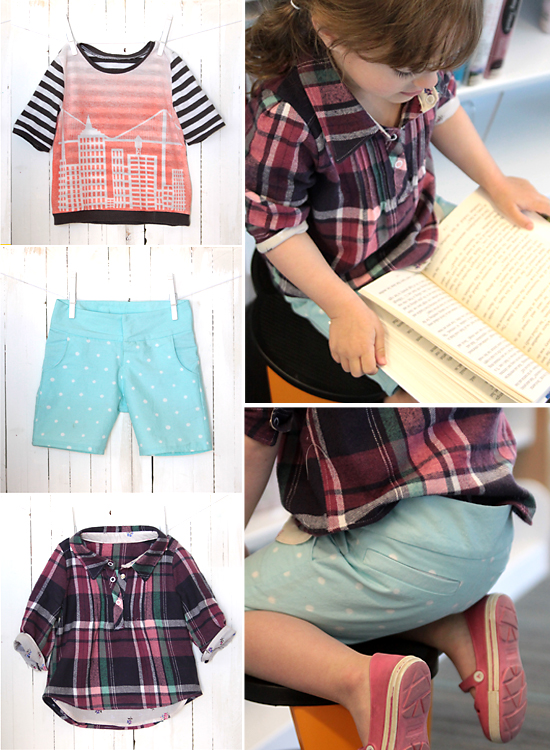
My looks from the first two weeks have been a little on the dressy side, and since my daughter is only 3 I really wanted something she could wear and play in regularly, but still look stylish. I started with a basic pair of knee length shorts and added some sophisticated details, like back welt pockets, a wide contoured waistband that's perfectly tailored to her waist without the use of elastic, and a half fly with bar closure. Then I sewed up her sweater, using the stenciled skyline sweater knit as the front, and a striped knit pulled from a thrifted cardigan for the back and sleeves. The neckline and elbow length sleeves are finished with ribbing (also from the thrifted cardigan). The style is simple and on-trend, and without other added embellishments the stenciled skyline remains the focus. Finally I made a soft flannel shirt with a front snap placket and tiny pin tuck detailing across the chest. The 3/4 sleeves have a small box pleat at the shoulder to add roominess without a puffed shoulder. The inside of the collar stand and cuffs are lined in a coordinating floral (from another thrifted shirt) for a pop of femininity, and you see more of the floral in the layered-look front hemline. The flannel shirt looks great on it's own or layered under the sweater. All three pieces combine in a comfortable and wearable look with plenty of style. All items were self-drafted using other clothes as reference.

For more photos and more details on both DIY print techniques, visit my blog, It's Always Autumn. Thanks!
The Crazy Tailor---All Hands On Deck

Thanks so much for the love, guys! I'm so happy to be able to share with you my "Design Your Own Fabric" look this week! I've not done a lot (any?) of fabric modifying...I kind of like buying my fabric pre-liked. Haha. As in, If I like it, I buy it. I never have thought to do anything to it! So this truly was a challenge for me, and I had a few fails along the way. I tried a couple of different techniques that didn't turn out how I planned: shibori - have you tried this? It's beautiful when it's done well. Mine was not! Next I tried some glue resist (like wax resist). That was a HUGE failure! I did dye my nails a lovely shade of blue, but was not satisfied with the results on my fabric. So I turned to a more predictable fabric manipulation: block printing. I used a sweet potato and carved out a cute little anchor shape and stamped it onto some bottomweight twill using fabric paint. Then I made a pair of Bermuda's for my little guy, with a double welt pocket detail (one with a snap flap) and then finished those off with some suspenders made with leather and elastic. For the shirt, I did a freezer-paper design on one of daddy's repurposed shirts to mimic a Breton stripe nautical tee and then cut out a raglan (yes, again ;). I added a little snap placket on the side shoulder seam to facilitate dressing this kiddo. He has a big noggin!


I decided to go with a more subtle design on the dress. I began with a Geranium dress in chambray, but added epaulets to the shoulders and some cute little bow welt pockets (I'm on a welt pocket kick!) in the front. I also modified the shoulders a bit by adding a slight curve. Then I did a french knotted border around the neckline and a wave motif at the hem. I love the simplicity of the chambray with the white french knots and the slight nod to the whole nautical theme!

For a lot more photos and details on pattern modifications, head on over to The Crazy Tailor!

Petit a Petit---One of a Kind

Hello again! It is so nice to be back this week and I am very excited about the fabric challenge. When I sew for my kids I love making things that are unique and that you can't find anywhere else, but what I also particularly love is to play around with the fabrics and then really create one of kind pieces.

If you already read my blog then you probably know how much I love to dip-dye, potato stamp, stencil, use fabric markers on everything, you can just look at my tutorials page! So for this week's challenge I decided to do all that and even try a little something new. I have been wanting to print fabric at Spoonflower for while now. I took my blog header, which is a photo of my kids taken 2 years ago on vacation, blew it up and had it printed on some cotton. I really love how the Europeans have been using photos in their designs and thought I would give it a try. I used a C'est Dimanche pattern which I've been in love with since Trine made one for Stylo Magazine and just knew it would be the perfect fit. I dip dyed my fabric for the bodice part, created my own piping and modified the back to a slight V to accommodated the orange zip I had. The sash makes it a little dressy, but worn without it it's the perfect everyday summer dress. I also dip dyed the tights with two shades of blue. I am just a little emotional about this dress, the photo means a lot to me- it's the photo I used for when I decided to be serious about my blog, it also evokes happy family times and reminds me of how fast my kids are growing. I might have to frame this dress once my daughter outgrows it.

Call Ajaire---No Scrap Too Small

This week I took all those teeny scraps that come from serging and squaring up quilt blocks and turned them into fabric! Pretty cool, huh? I had been saving piles of the smallest scraps for a different project, but when this idea hit I set to sorting those cast offs by color and crossed my fingers that this would work. I used a simple white muslin fabric for the backing and then sandwiched the scraps and thread and even some cording with wash away stabilizer on top. Then it was a matter of stitching over the stabilizer until I thought the scraps would stay put. I decided a grid would contain everything best so I stitched rows 3/8" apart both vertically and horizontally across the fabric. For the skirt I placed the scraps in a blended rainbow order and for the bodice tops I used all of my shades of pink. Once everything had been stitched I soaked the fabric in water so the stabilizer would dissolve. The resulting fabric is soft and the weight isn't much different than the weight of the original fabrics would have been. It is as easy to sew as a heavy denim might be in some of the thicker areas, but totally malleable and even WASHABLE which is great for a child's garment.

I used a white stretch sateen fabric for the middle bodice (and the bodice lining as well). I love the stretch of the sateen and it's really soft against Bean's skin, but it is also a bottom weight so it has enough heft to hold up the skirt without pulling. The white has a subtle sheen to it so I thought it would help brighten the dress even more. I drafted a fully lined drop-waisted dress with faux cap sleeves and a 3/4 circle skirt. Bean is growing up more than out right now so the drop-waist should allow for wearing this dress through the summer and maybe beyond. The back has an invisible zipper than extends below the skirt so there should be plenty of room to get it on and off as she grows. And finally the circle skirt is bound with a piece of double fold bias binding that I made from one of my bleach-dyed cast offs from last week. The color was too berry for the Nantucket red look, but works perfectly with the colors of this No Scrap Too Small Dress. Please come by and see ALL the details including more of the fabric process pics at Call Ajaire.


Amazing!
ReplyDeleteWow guys! All so creative. Celina your dress is amazingly special! I love that pattern an to incorporate such a treasure photo.. I can see why you love it so much!
ReplyDeletegreat work! it is really hard to just choose one designer :)
ReplyDeletewow!! just incredible!! These projects are stunning!
ReplyDeleteI wanted to choose them all! Fantastic work!
ReplyDeleteAmazing work everyone! My vote goes to Celina - the photo printed fabric as well as dying and bleaching techniques used in great silhouettes really wowed me.
ReplyDeleteIt's impossible to vote! These are all so amazing, I love each look so much
ReplyDeleteAre you kidding me!?!?!? Get the heck out of here ladies. I can't decide.
ReplyDeleteAmazing entries...there are two that stand above the rest but I love how unique all of these creations are. http://xoxograndma.blogspot.com/
ReplyDeleteYou know that moment when you go to choose and you love them all differently. I don't think we should let anyone go this week, you know sometimes it happens on Project Runway...just saying they all rocked it!
ReplyDeleteLadies, ladies! You keep doing better and better from one week to the next. It's always so hard to choose. You're all winners here!
ReplyDeletereally, do we have to choose?????
ReplyDeleteI love the denim jacket. Do you have a pattern?
ReplyDeleteditto!
DeleteAll gorgeous. I love that Roma dress. And that flannel shirt. Oh, and the chambray geranium is a delight. Well done.
ReplyDeleteHoly cow, this is hard.
ReplyDeleteOh my WOW! You all are amazing!! I want to vote for you all. Every one of you.
ReplyDelete~Michelle
i love how adorable the french knot dress looks.. and the prepster look is just so sophisticated.
ReplyDeletebut Mind. Blown. by the petit creation.
brava!!!!
also LOVE how fun and happy the scrap creation looks.. perfect for innocence and girlyness :)
DeleteOkay never throwing another scrap away! Gotta make a "no scrap too small" jacket! (a coat of many colors, if you will)
ReplyDeleteI always have a really hard time choosing my favorites! As always, awesome job and good luck to all contestants! They are all absolutely AWESOME!
ReplyDeleteMy favorite collection such nice! I really like the fabrics which are in different pattern and color. Fabric Carolina is online shop for fabrics. Such a nice collection you can browse here.
ReplyDeleteThe crativity this week was amazing! Great work here!
ReplyDeleteThanks for post! Design Your Own Dress. Design Your Own Dress
ReplyDelete