
It's here, it's here, it's finally here!!! This week the designers got to make their kids dreams come true!
Made by Toya - Sunshine and Rockets

For as long as my children have been able to express there opinions (ie for as long as they've been alive!) I've considered making clothing for them a collaborative process. There seems little point in me making something I'd love for them to wear and it ended up rejected and unworn in the back of their cupboards, so it makes sense to get them involved in the design process. Sometimes this has meant printing their drawings onto fabric or fulfilling a particular request (eg. a dinosaur onesie etc.) and sometimes I might suggest something or draw them a picture and only go ahead with it if it gets a positive response. Turns out shifting from that well trodden path to "I'll make anything you draw," may have been a mistake as they then became extremely specific, - but with some heated discussion we managed to find a way to interpret their designs into something useful that we could all be enthusiastic about!
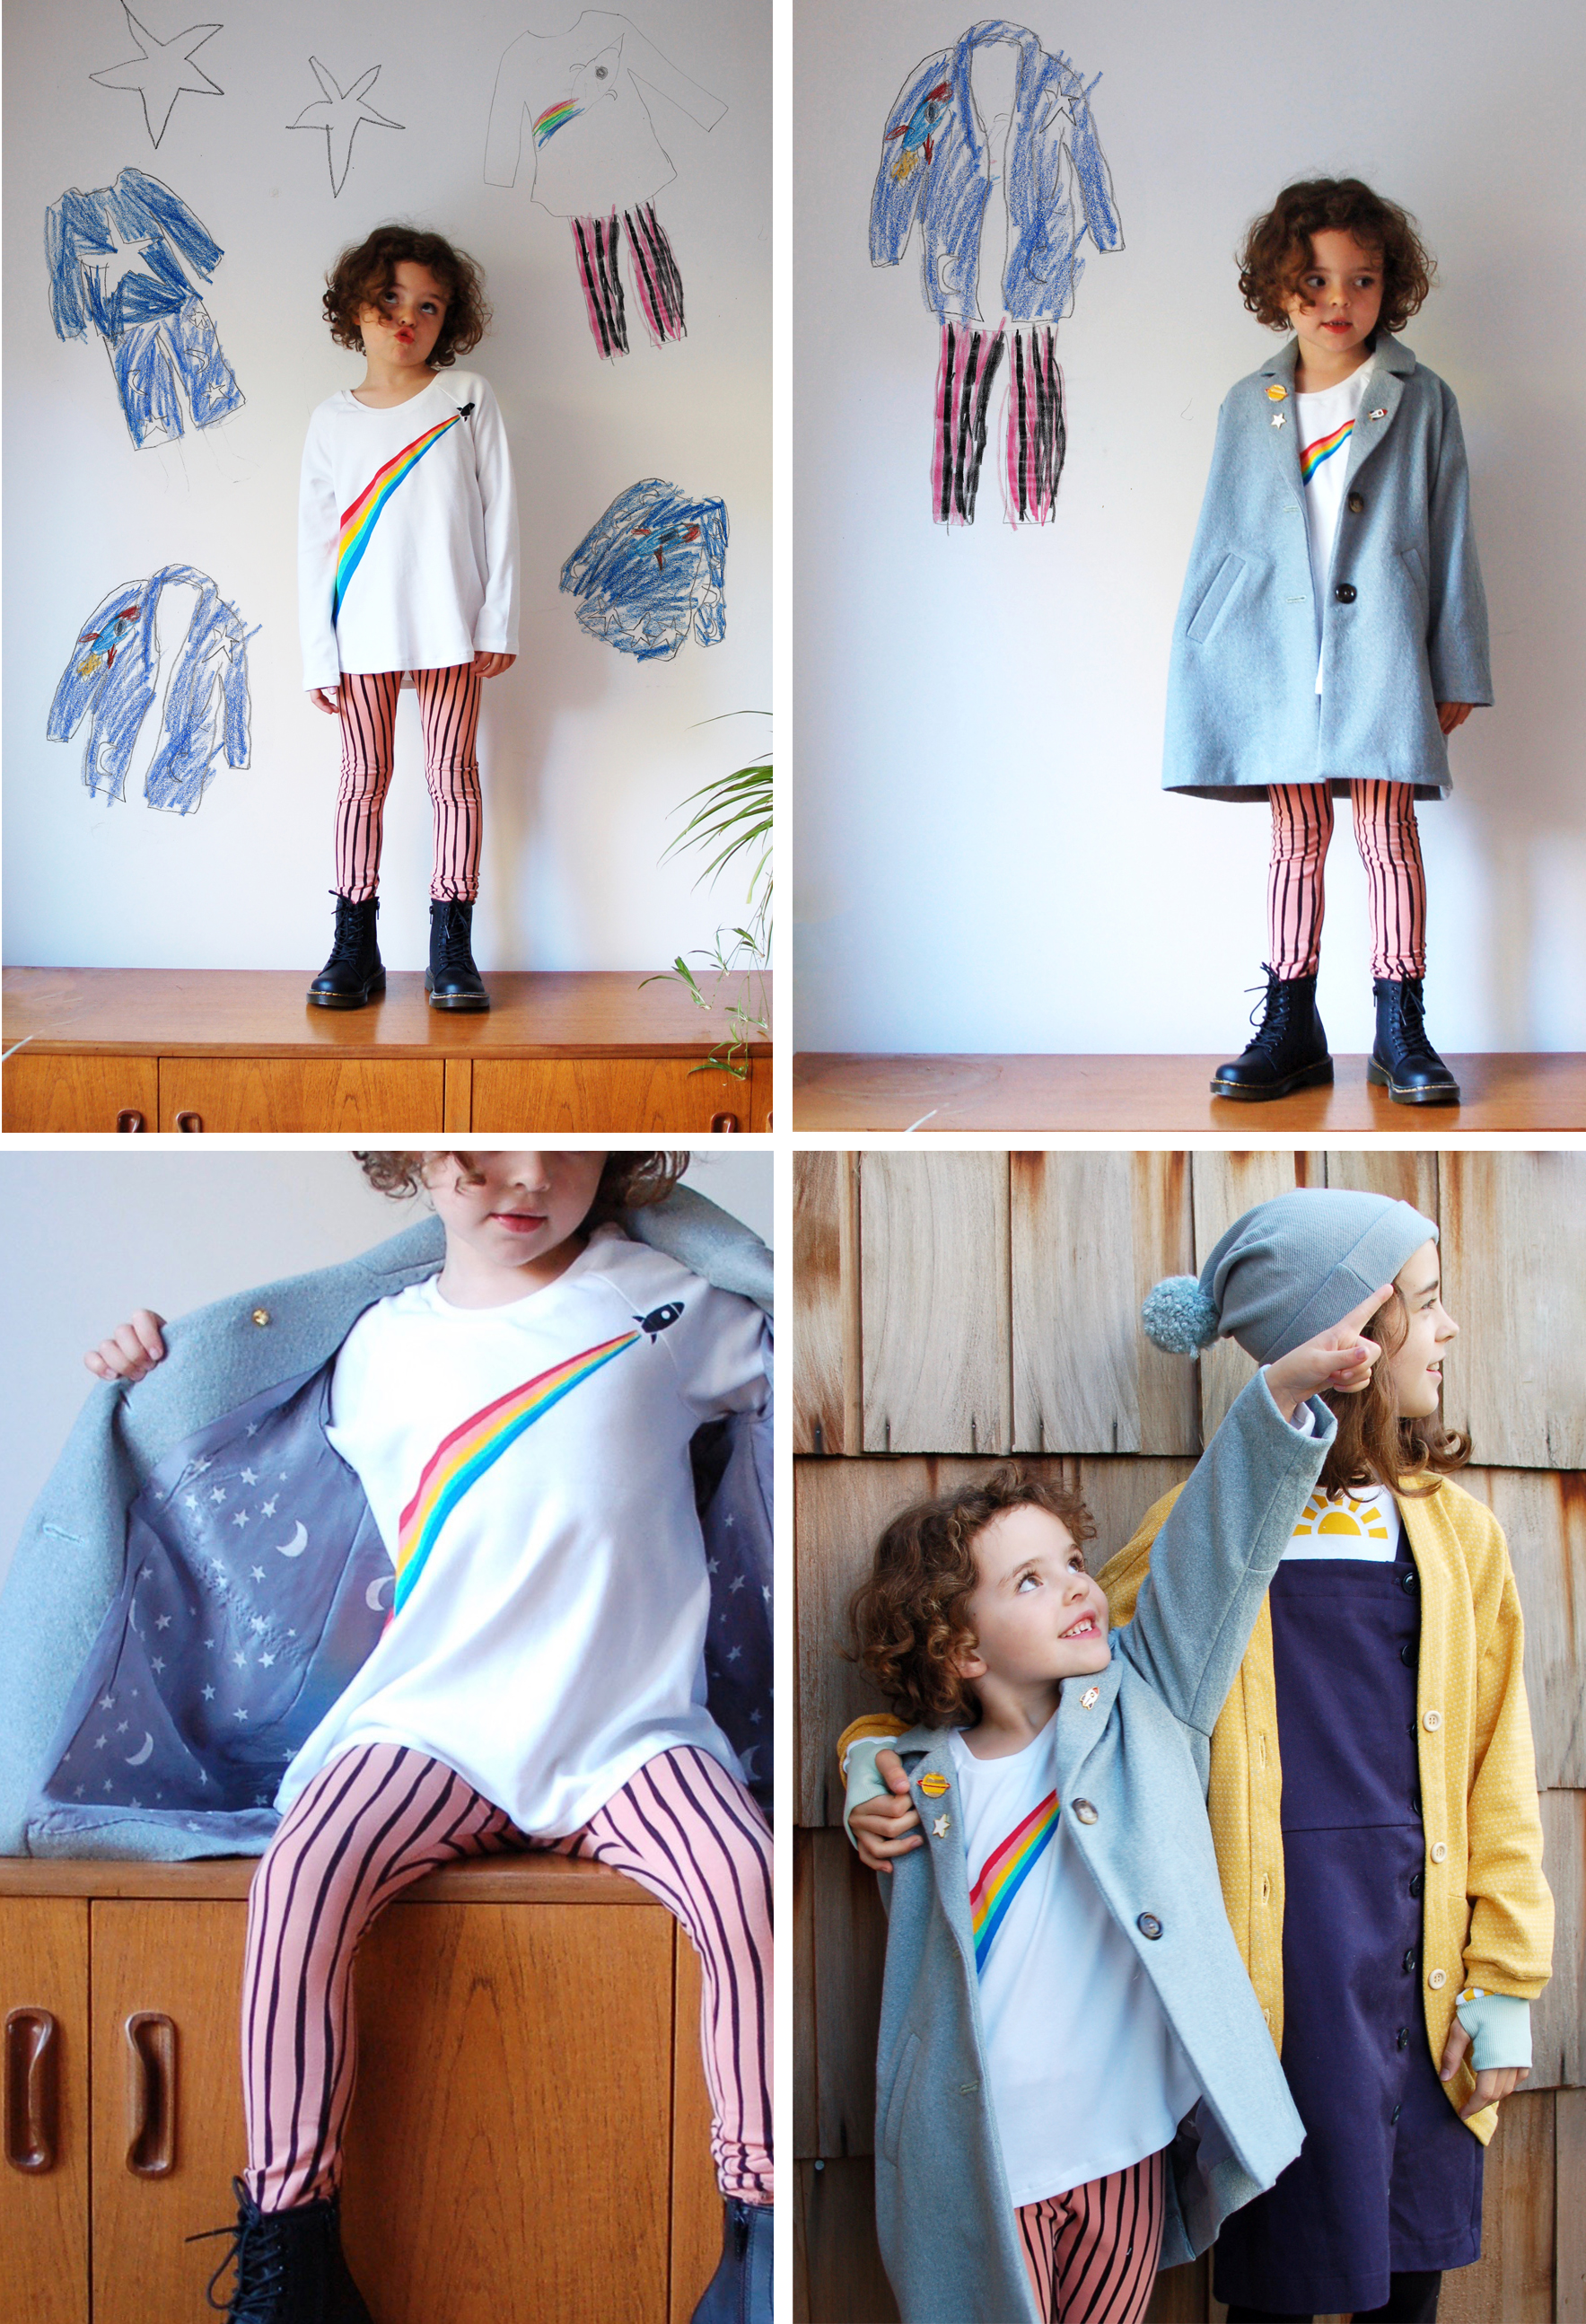
First up an outfit for my youngest who won me over straight away with her space theme. We settled on a pair of (self drafted) leggings made in a coral pink and black striped french terry, and a white long-sleeved t-shirt with screen-printed rocket design. I used Chalk and Notch's Waterfall Raglan pattern - omitting the ruffle and extending the length to compensate and printing the rainbow rocket design on using my Bobbinhood screen-printing set. This time I chose to print the image after the t-shirt was assembled so that the design could extend unbroken over the raglan seams. While making the jacket I fully intended to add embroidered rocket and star patches at the end, but as it took shape I realised that there was beauty in the simple, classic shape and it would end up with more wear if I left it plain. So as not to disappoint my little client, I screen-printed the lining with stars and moons and ordered some space themed enamel pins for the lapels. The jacket is self-drafted with welt pockets and a single vent at the back and made from wool with a silk lining repurposed from a second-hand shirt.
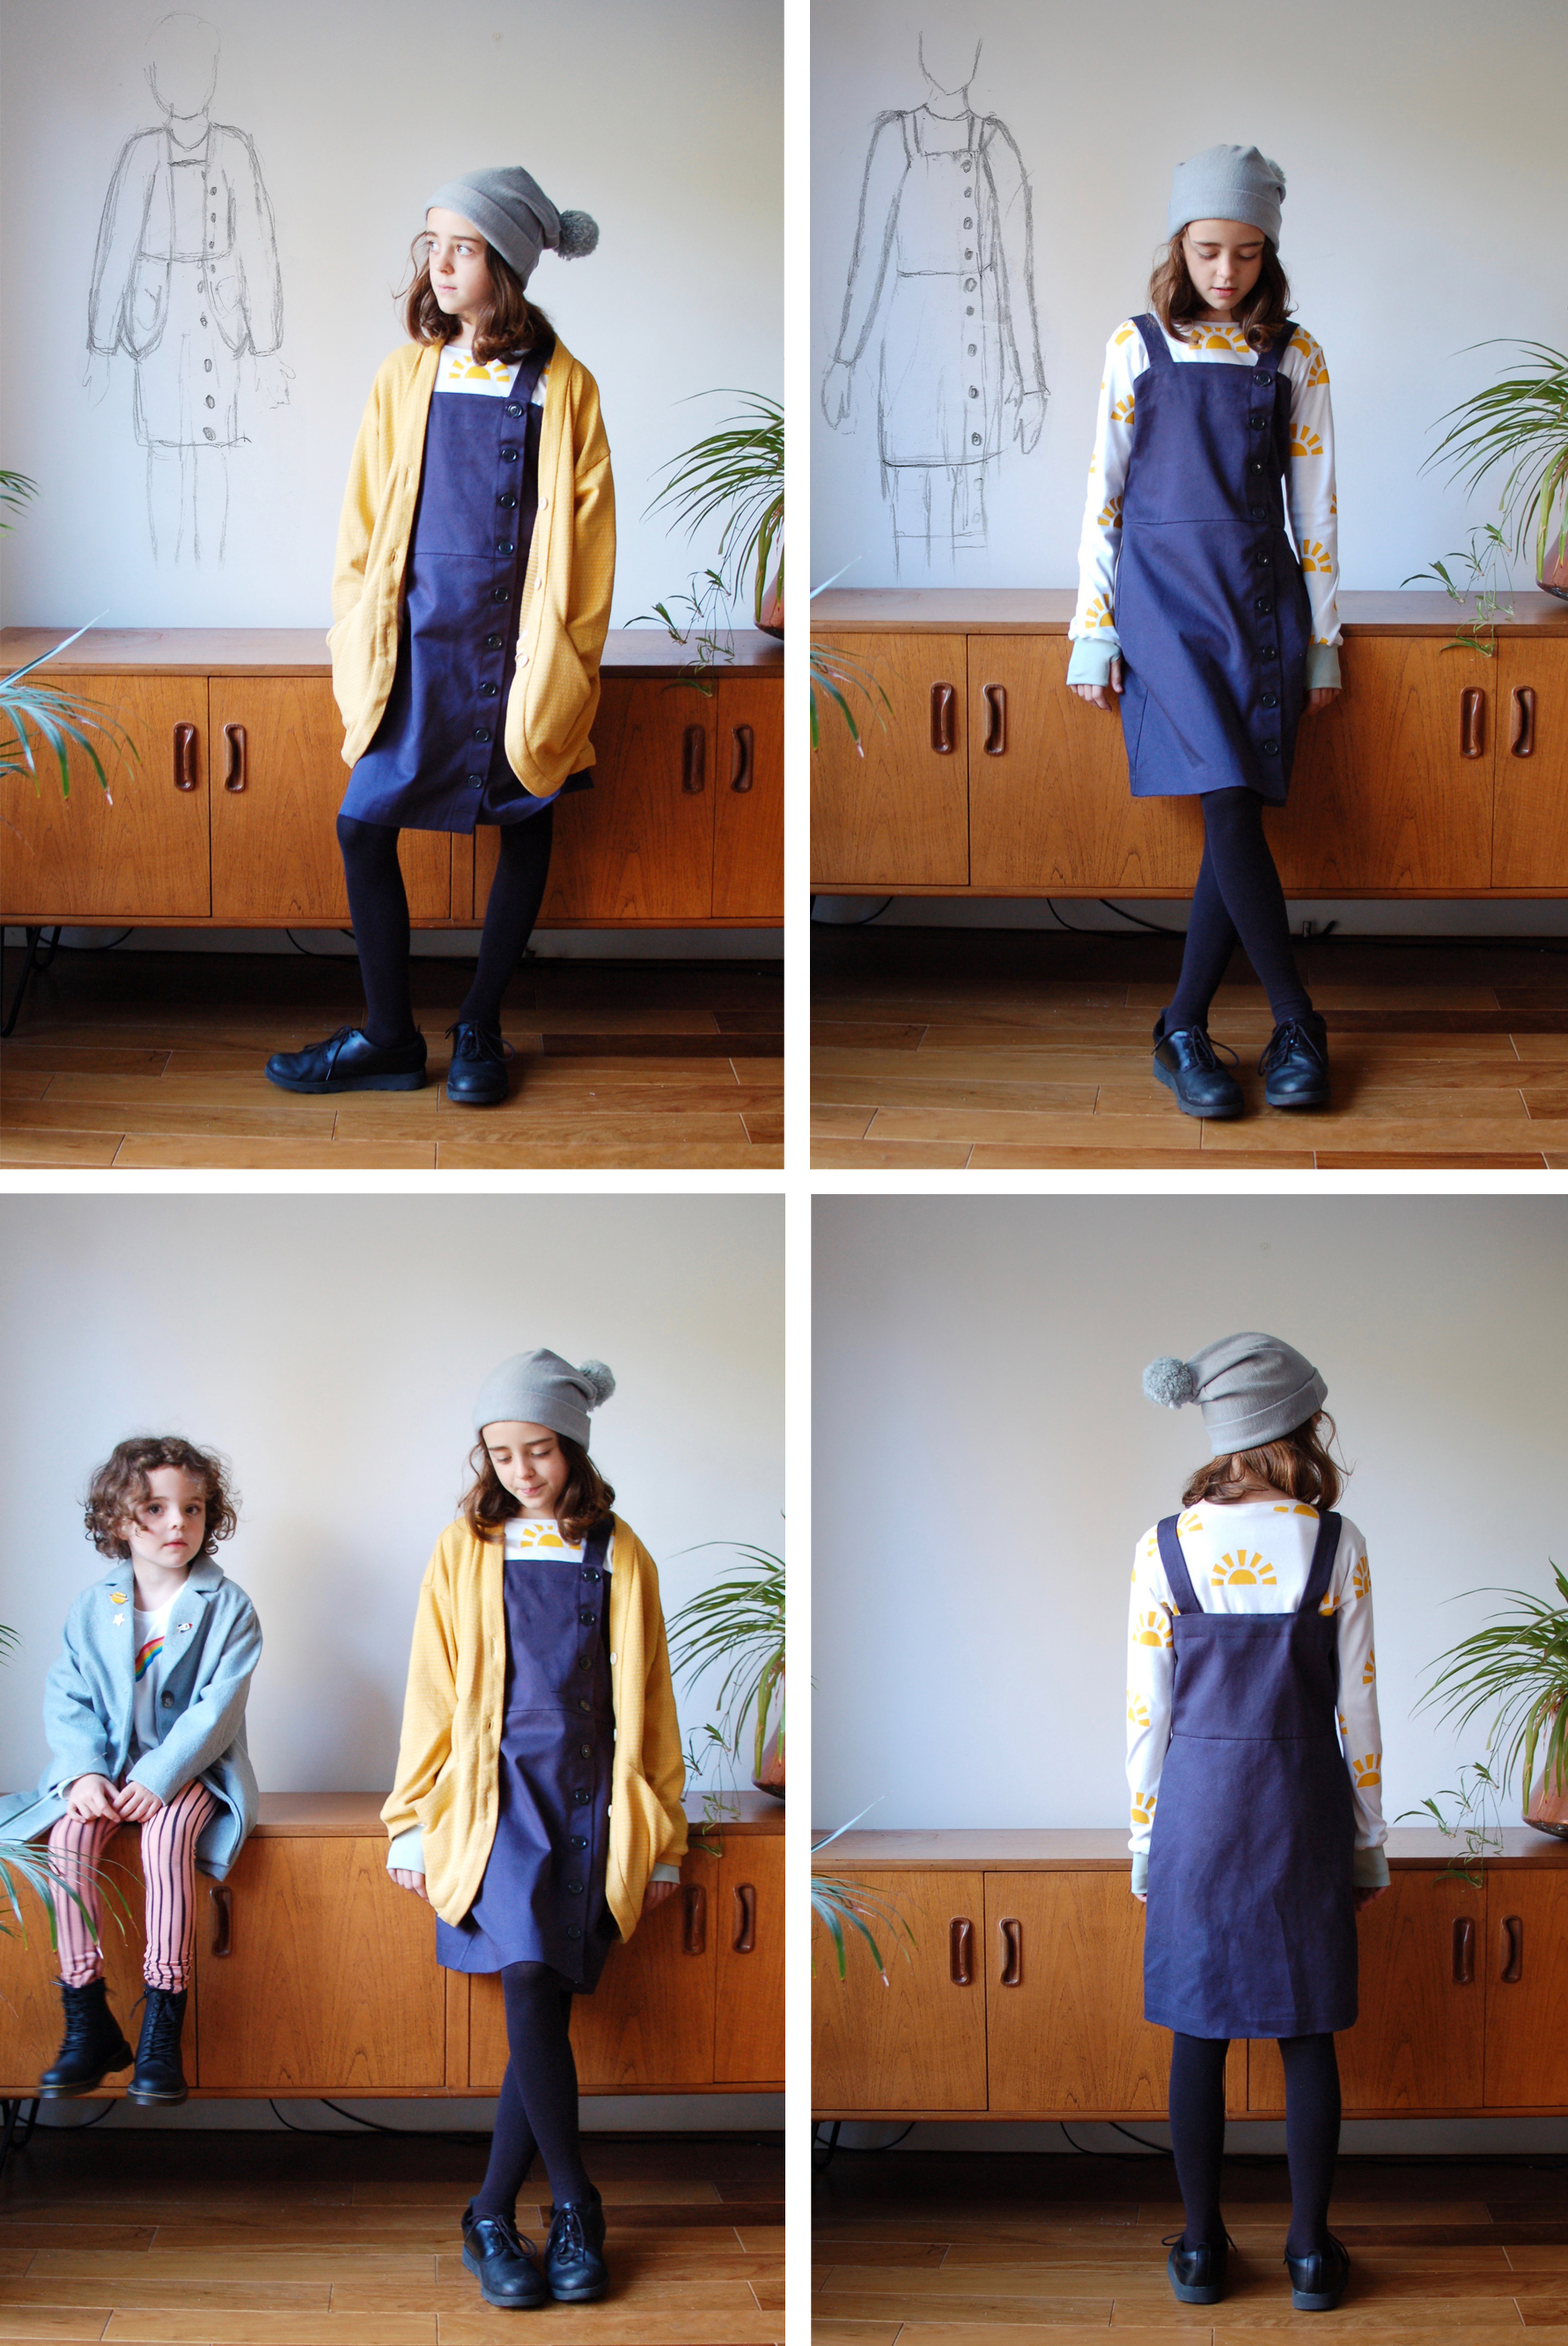
My older daughter came up with a sophisticated asymmetric pinafore and cardigan design that I sewed up as faithfully as possible. Yellow and blue are her favourite colours so those were non-negotiable, but I suggested the sunshine print on the long-sleeved t-shirt to add a little cheer to the darkening days. I drafted the simple pinafore using her measurements sticking as closely as possible to her design. The fabric is a navy cotton drill. The cardigan is again self drafted and deliberately over-sized. I hoped the slanted pockets would compliment the asymmetric pinafore. I used some textured cotton knit fabric in my cupboard for the cardigan but dyed it with tea to soften the colour from it's original bright custard to subtle mustard. I freehand cut the t-shirt and printed the sunshine design on before assembly. My daughter requested extra long sleeves with thumb holes so I made the decision to use a contrast cuff in the hope that they don't end up looking too grubby. The hat is made from an old jumper using the free Slouchy Beanie pattern by Heidi and Finn as a starting point. I graded up the size width wise and removed some of the extra slouch adding a pompom to finish.

For more info on either outfit see the post on Made by Toya.
Art Bella Creates - The World Through Rose-Colored Glasses

I have to start out by saying I am ecstatic about being here right at this moment! It was perfect timing as my girl is old enough to design with me and young enough where she still absolutely adores me sewing for her. When I got the themes so many things were going through my head and I need at least a week to process (It's my favorite part) before I do my first cut into fabric. Let's talk theme - My girl is both outspoken and loves designing. She sees the world through rose-colored glasses. She's all about the love (The shirt definitely was going to have a heart) laugh, color and lots of hugs (Even if you don't want them, it's like she senses who needs them more.) She's my sunshine child (hence the bright yellow jacket.)

The Process - The ribbing of the jacket was our color inspiration. When I pulled the ribbing out of a package a while back, she immediately grabbed it and exclaimed "All my favorite colors all in one," so we went from there. The Shirt was my first item and my own design and from there it just flowed. My mom made this amazing satin ribbon pillow when I was just a little girl that she entered into a competition. I can still picture its beauty in my head so for the heart I used colors from the ribbing in fat quarters and weaved them on a white linen heart and did the inlay on the shirt (it sounds so easy right now :) ) She wanted a shirt type vest so I did just that. In the summer she can wear it as is and in the winter she can either wear a jacket or wear a shirt underneath. She really wants all the pencil skirts but with her activity level it just isn't feasible so I went for a denim pleated skirt (lots of pins and ironing.) It has all the goodness you can possible want from a denim item - pockets and more pockets, a zipper, topstiching and elastic in the waistband. Well-fitted around the hips with lots of pleats for movement and denim goes with EVERYTHING! Tip of the day: buying denim needles and denim thread is worth it.

The jacket had to have a zipper so she can pull it on and off for school or dance or crossfit or soccer, it had to be bright and fun to match her personality, be a hoodie to save the buns from the wind, pom poms on leather strings to play with if she's bored, and minty striped pockets to keep her hands warm (Honestly I want that jacket for me!) The Socks and Wrinkles' outfit - Wrinkles is Bella's best Lovie that she found at a flea market 4 years ago and they are almost always together so I drafted her a little t-shirt with a rainbow applique and a matching pleated skirt with a hole in the back where her tail fits through. Dots, hearts and rainbows are popular in Bella's sketches so we went for gold htv dots on super soft DBP and coral ribbing.
Please visit my blog, Art Bella Creates for lots more information and photos!
Please visit my blog, Art Bella Creates for lots more information and photos!

I could never have done this without fabulous patterns from designers that I adore and love using their patterns as a starting point because I know they fit her well ( Why fix it when it ain't broke)
The Skirt - Small Fry Skinny Jeans from Titchy Threads , The Hoodie - the Pixel pullover from Jennuine Design , socks - cozy critters socks by Peekaboo pattern shop
Confetti Unicorn Design Studio - Hula Hawaii
Confetti Unicorn Design Studio - Hula Hawaii
Hey guys! I'm super excited about the theme this week. Kid designs...HECK YES. My kids both got into the fun this week and I think we came up with something pretty cool together. The original design came from my 9 year old daughter. She made 4 looks and then took votes from the family, and when her favorite wasn't in the lead, she went to her stuffed animals to weigh it in her favor. She called it "Hula Hawaii." This look had 15 votes...we have 4 people in our family. Seems legit. Anyway, I asked her to design something for her brother (6 years old) and she said "Mom, I don't design for boys." Awesome. So I asked him if he wanted to design something and he told me to make him a shirt, shorts, and a "vest like you made for sister before." I was given the instruction to "Make sure it matched hers." And that's how this week's looks were born. Truly inspired...
For my daughter's look, I quickly vetoed the tree bark leggings. She actually thanked me for it later saying "I'd never wear them anyway, mom." She knows that mom knows what's up. I wanted to give her a few pieces she could mix and match with many things because right now we're wardrobe building for her. I asked her which elements were important and she said she wanted blue like the water, a fish somewhere, and a hula skirt. A HULA SKIRT. At that demand I tried to talk her into her "Snow Queen" outfit instead, but she wasn't having it- I mean Hula Hawaii won fair and square after all. So I was left to figure that out. I decided that green fringe was a freaking awesome way to create a fashionable and wearable hula skirt. I drafted my own A-line skirt and sewed rows of fringe all the way up. Once the hula crisis of 2018 was handled, I turned my attention to the fish. I didn't want to make the top she designed for her because I knew she wouldn't wear it. So I pitched the idea of a purse and she went NUTS for it! Whew! I started with the Alice Bag from Polkadot Chair. I changed the size of the bag because none of the three options were exactly what worked. Then I drew and made all the little fishy parts myself with the exception of the eyeball. I used the Whimsy Woo Girly lashes embroidery file for that. I crocheted the strap with twine and BAM- Fish purse. I think it turned out swimmingly for my first real bag ever. The water was featured in jacket form. She had some scallops in her original drawing so I decided to use the Fashionista Jacket by Winterwear Designs as my base. Using denim from old jeans, I cropped it, narrowed the shape a bit and added an elastic waist and arm cuffs to get the exact look I was going for. Now it was time to figure out a top. I had already hit all of her elements, so I added one of my own...COLOR! It needed a splash of something, so I took an orange striped mu-mu thing I bought from the thrift store a while back and made a top. She chose the style of the top. I used the Jalie 2913 as my base and heavily modified it to make it work as a top and not as an ice skating dress. The whole shape had to be altered which took a lot more time than I thought it would. Once it was done, my girl asked "Can I have one with a flowy thing on top?"...a flounce is what she meant. Since my mu-mu left me with not much fabric, I grabbed some white knit from my stash and made her the "flowy thing top" using the same Jalie pattern, but drafting my own flounce to add to it. It all pulls together as a couple of really fun looks that she can divide up to wear with whatever she wants. YAY!
My son is a LOT less picky about what he wears from day to day. He told me what pieces to make and let me sew. I still wanted to keep his personality in mind, so I got working. I started with the Field Research Shorts by Scientific Seamstress made from an old pair of my husband's work pants. I added a LOT more top stitching. Dude, double top stitching when you don't have a double needle is freaking time consuming. YIKES. I also changed the waistband to have double elastics instead of one piece because I just like the look better. I did velcro pocket closures because boys need quick access to the nasty precious things they put in their pocketses. Changes to the fit here and there were made because he's a skinny little thing. Once the pants were done, my kid needed a shirt. I wanted to incorporate the shirt my daughter drew into the design somewhere because it was part of her vision. My boy would DEFINITELY wear it, so it went to him. The pattern was self-drafted. Over the years I've made so many that I just stop printing after a while to save ink. I tie dyed the bottom portion of the shirt to mimic the look of the water in the drawing. Then I made a little applique fishy to match his sister's purse. This time the fishy had button eyes...more manly...I guess. A little bit the of mu-mu fabric was added for the neckband and sleeve cuffs to bring the looks together. His vest may look familiar. I used Kwik Sew 2504 as my base for this one. I made a vest for my girl while sewing along with Willy Wonka week last season. My son has wanted one ever since. And since it was part of HIS design, I had to do it. I lengthened it and boxed the fit. The original pattern tapers at the waist and is more of a crop length... he's a wild monkey and needs more room to move. I also lined the vest for a cleaner finish inside. And there you have it- "Hula Hawaii." Designed by my wonderful kiddos with some help from mom to pull it all together. I had a really fun time with this one and am really glad I was able to work with my kids. They're fantastic little beasts and they're all mine. Thank you for reading and looking and just supporting us all this week. Make sure to check out my blog for more pictures and lame jokes.

The Crafting Fiend - Unicorn World

Week 1 is here!!! I am so excited to share this kid designed and mom sewn look with you! My 6 year old, Cheeks, HAD to have a "Unicorn World" dress! Her design choice is really no surprise to me (or anyone who knows her)... at. all. She wanted me to use her own drawing for the unicorn and happy cloud face and there absolutely had to be a rainbow as well. She also named her look this week!

For this look I started with the Sis Boom Leighanna peasant top as the pattern. I changed almost everything about it in the end except the dress silhouette. I did a quilted front for the dress, the blue quilty pieces under the cloud to give it a bit of a rain look since rainbows always come with rain; and the diamond rectangles above for a little pastel "sunburst" effect. The rainbow and cloud were then free motion appliqued onto the dress, I love free motion applique for adding to that hand drawn feel of the look. I did not want an elasticized neckline, so I did a slightly gathered neckline and used a binding method and then added in a zipper to the back so she can still get it easily on and off. For the sleeves I wanted them to give a feel of happy little clouds and to accomplish this I did a wider top portion of the sleeve in white eyelet fabric and then a narrow knit sleeve bottom portion for that puffed gathered look, but still very comfortable for her to wear for play.

The back of the dress is appliqued on clouds that I drew and rainbow ric rac and is a little longer than the front of the dress. The unicorn on the front is the one that Cheeks drew herself and I created a free motion appliqued version of it that is like a fabric paper doll with yarn for the mane and then attached to the dress (I did not get to stitch it down as well as I wanted because she really wanted the wings to be able to flap so it looks like the unicorn is actually flying when she jumps up and down!) The tights are the Made for Mermaids Bonny Leggings pattern. The happy cloud purse is my own design that I drew up and did a free motion face on. If you would like to read more about this look and experience picture overload please come visit me at The Crafting Fiend blog.

Girl Like The Sea - Modern Knight and Lady

Week one is finally here! After hours of sketching and thinking and fighting with the cat over control of my fabrics, I can finally present the collaboration between my kids and I. I'm calling it modern knight and lady. My 5 year old, Hawthorne, has been fixated on knights for years. So of course when I offered to let him design an outfit for me to sew, all I got was a quick sketch of himself dressed as a knight. Head to toe in gray. I was like.......eeeeeh. Monotone gray might not be the greatest choice for garnering votes, but I'll see what I can do. My 9 year old, Clover, handed me a few sketches of her in a black maxi length evening dress, a billowy princess dress, and another billowy princess dress with disney looking sleeves. Honestly, I'm not the princess dress sewing type (all the people who know me well can snort and laugh about how true that is) and had to do some mental work to figure out how to make her happy while staying true to who I am. So I took the things they both gave me and mashed them up with other things I know they love and came up with these looks. And guess what? They LOVE them. Hawthorne stayed in his outfit for like four days straight. I count that as a win no matter what the results are this week!

For Clover I designed a floaty and ethereal black floral and rust colored dress with delicate straps, layered high low skirts, and a triangle cutout in the back below the snap closure. She feels like a tragic Shakespearean character when she wears it.
Using the Figgy's zephyr sundress pattern as a starting off point, I did a major redesign to get to where I wanted the look to be. Eliminating the front button closure, I created an overlapping strappy snap closure in the back to maximize cute little kid chicken wing exposure. I scooped the armholes down and totally changed the back because of the closure. And I changed the hem length, making it maxi and high low with rolled hems. I think it's a good compromise between her drive to be in grownup looking gowns and my wish to keep her young and innocent as long as possible. I sewed the dress in high quality rayon from my local boutique sewing shop here in Portland. Her shirt is a sweet drapey dusty rose colored layering piece with a lace pocket overlay. I used the mini briar pattern from Megan Nielsen as a starting off point, altering the fit in places and adding in the sleeve cuffs and lace overlay. It's so sweet and romantic and I love it with the black floral dress. When it comes to sewing for your kids, to see the child feel like an element of herself is represented in her clothes, while also representing yours....it's a great feeling. Clover and I differ on taste in so many areas that when we can merge on one, I savor it.

Hawthorne got a layered, knight inspired look with hooded armor sweater, hero tee, distressed knight armor jeans with wolf crest pocket, and a hand knit helmet balaclava. Starting with the armor hoodie, I used the bimaa sweater pattern I used upcycled fabric for the body and added an asymmetrical quilted shoulder armor detail. For a bit of rawness I exposed some of the hems on it as well as on his tee shoulders to be cohesive with the distressed jeans. The hood is made with organic cotton knit. His distressed jeans were meant to look like they's already survived a battle or two. I started with the small fry skinny jeans pattern, made them even skinnier, made them cuffed, and designed a motorcycle style quilted kneepad. Using a couple layers of chambray I built them into the front leg and quilted them before ripping open the fabric between the stitches and hand fraying it. His pockets are a special detail: silk/cotton with a lion pattern that I designed myself. The jeans have flat felled seams, topstitching, working zip fly and jeans button, and a special hand embroidered knight's wolf crest pocket. Wolves are kind of a thing for me, and I compulsively add them into my designs a lot. If I'm still here next week you'll be seeing it again. Haha. The tee is made in organic striped cotton from Cali fabrics and has a handmade scribble effect hero graphic. I did a combo of screenprint ink and fabric marker to do the scribble look, hoping for a design that looked like a child took part in designing it. The knight helmet balaclava was hand knit by me in superwash merino, and is currently the most popular item in our household. It looks pretty darn handsome on Hawthorne when he pulls it down into a cowl too.

Thank you so much for taking the time to look at my fabric dreams! I'll have more photos over at my blog and in my instagram stories.
-Tara-
Thread Riding Hood - Fun Fur All & All Fur Fun

My girls' designs are so fuzzy this week, and it's extra fun to hug them! But before we get into that - I need to say that I'm honoured to be able to be a part of Project Run and Play this season, after watching it for so many years. Thank you for the opportunity to show my love of sewing! Now, back to this week's story - the Kid Designed theme's inspiration was simple, everything was designed for me! The girls even both used pink and fur in their designs, probably because they were drawing and designing together with each other and my stash in mind. My oldest based her sweater dress on one she'd seen at school, then we added leggings and leg warmers because, well, Canada and winter! *lol* My youngest's design came from her imagination, and her desire to always be a princess and wear maxi length everything! The cape was inspired by a small piece of stashed fur and the need for a warm outer layer for her backless dress in winter. The dress is made mostly from satin I've stashed for years and a few vintage buttons. Since I owed my oldest a purse - a whole different story! - she used extra cape minky as inspiration to design one to complete her look. You can see their original design drawings in my blog post. The photo-shoot location (High Park in Toronto) was suggested by one of my amazing sewing friends and it's perfect! I wanted a kid-location for this kid-designed week and my girls had fun, each of them choosing and designing the shots and my husband and I chipped in our own along the way. The castle theme was so fun and the park even has a "sword in the stone", photos I've included on my blog as well. All's well that ends well, and we finished off this shoot with a game of hide and seek!


How did we sew it? Let's start with my youngest's look. Her tiered maxi dress uses Simple Life Patterns' Lexi bodice and was quite simple, - so to do something different (and make it harder to sew, *facepalm, lol*) I pleated the layers instead of gathering them. Pleating satin was not the fastest proposed idea, but, in the end, was perfect for my girl - who pronounced that she felt "Beautiful" after trying it on for the first time. Awwww! My daughter's very specific instructions were that the bottom fabric layer should be a bright colour, and we added a layer of the same bright pink under the lace bodice detail to match, also changing out the Lexi straps for the same lace to keep the look cohesive. The inside is lined down past the knees with proper lining fabric - not my usual broadcloth - so the whole dress feels deliciously swishy to wear. The Lexi bodice's button-back even allowed me to use two of my vintage buttons to top off the back of the dress. On to THE CAPE... yes, capital letters are necessary there... a fully furry, satin lined "floor length cape with a furry hood and a zipper, Mom. And please make it big so I can wear it forever" Cape. I started the design with the Oliver and S "Little Things to Sew" cape, 3 metres of sponsored luxe minky and a lint roller and vacuum cleaner! *lol* From there, we drafted tons of length to the back panels, curved the front side panels towards the middle and up to the (very carefully specified) front length. More luxe minky lines the hood, and the second type of fur was added for the hood trim. There are separate fur-lined pockets in the side seam lining for warmth and a sparkly zipper with a satin cover at the top for the closure. Each seam is serged and stitched for durability, and I added clear elastic to the top 24" of each seam to carry the weight of the fur. The lining was (very patiently) understitched through one of the 5" arm openings - and it may have taken almost forever - especially since I accidentally had to do it twice!
My oldest's design was much simpler - in keeping with her fashion personality - and it suits her perfectly. It started with the Camden from Hey June, lengthened to sweater dress and chopped up to add the fur band. The bodice inset is sewn into (not on top of!) the front panel and top-stitched with clear elastic and a cozy lining underneath to help hold up the heavier fur and make the dress soft to wear. Each of the raglan seams was sewn, serged and top-stitched to help them lay flat for comfort. The neck, arm, and hem bands are the same pink fabric - sewn wrong side out - and I added in the "very important, Mom" thumb-holes as well. We started with Tiffany's Bow and Ruffle Leggings from Simple Life patterns for the pants, with an added hem band for a comfy legging-jogger style. Plus, I sewed leg warmers to bring the pink in her outfit down to her feet - they're from 10-year-old stashed fabric and I've been wanting to make them forever. The whole outfit is designed to be comfy and not scratchy, super important for my daughter, and it's been worn to school, which is a great sign of success! My oldest's purse was a late addition, once I found out we had extra cape fabric. I thought for sure my daughter would design a fully-furry purse, but she wanted most of the exterior to be white vegan leather and I'm so glad because it looks amazing! The purse hardware was thrifted and stash-found and the lining was designed with a zipper pocket for coins and patch pockets for my daughters ever-present drawing pad and pencils.
Thank you so much for checking out my designs. I couldn't fit all the construction details, funny (and not-so-funny) back-stories here, so I wrote a new post with lots more details and photos on my blog. I hope you will come over and visit!

Now it's your turn to get involved! 1/3 of the designers score comes from YOUR vote!
The rest of the designer's score will be determined as follows:
1/3 of the score by this week's celebrity guest judge Kimbo of A Girl and a Glue Gun
1/3 of the score comes from the panel of judges

So fun to see the kids' input in the outfits and to see how each contestant made their child's dreams into outfits. Love all the colors and imagination.
ReplyDeleteThey are all so wonderful! Great job everyone.
ReplyDeleteoh wow !!! I am in love with these looks!!! such a creative group of kids - and they all come by it honestly! GREAT sewing ladies!!!
ReplyDeletethese all are so fun, and i can't wait to see how this week goes!!!
ReplyDeleteAll super fun! Great job. :D
ReplyDeleteWhat a fun collection of outfits!!
ReplyDeleteLove this theme!
ReplyDeleteI think 'Girl By The Sea' work is wonderful. Very creative and well done.
ReplyDeleteWhat a fantastic effort ladies!
ReplyDelete