
It's time for the designers to show us their Signature Style. Prepare for Superstar Signature Style...
This week it's very important for you to make it to the end of the post and VOTE because the prizes will be rewarded according to the results this week!
This week it's very important for you to make it to the end of the post and VOTE because the prizes will be rewarded according to the results this week!
Art Bella Creates - Punky Brewster Style

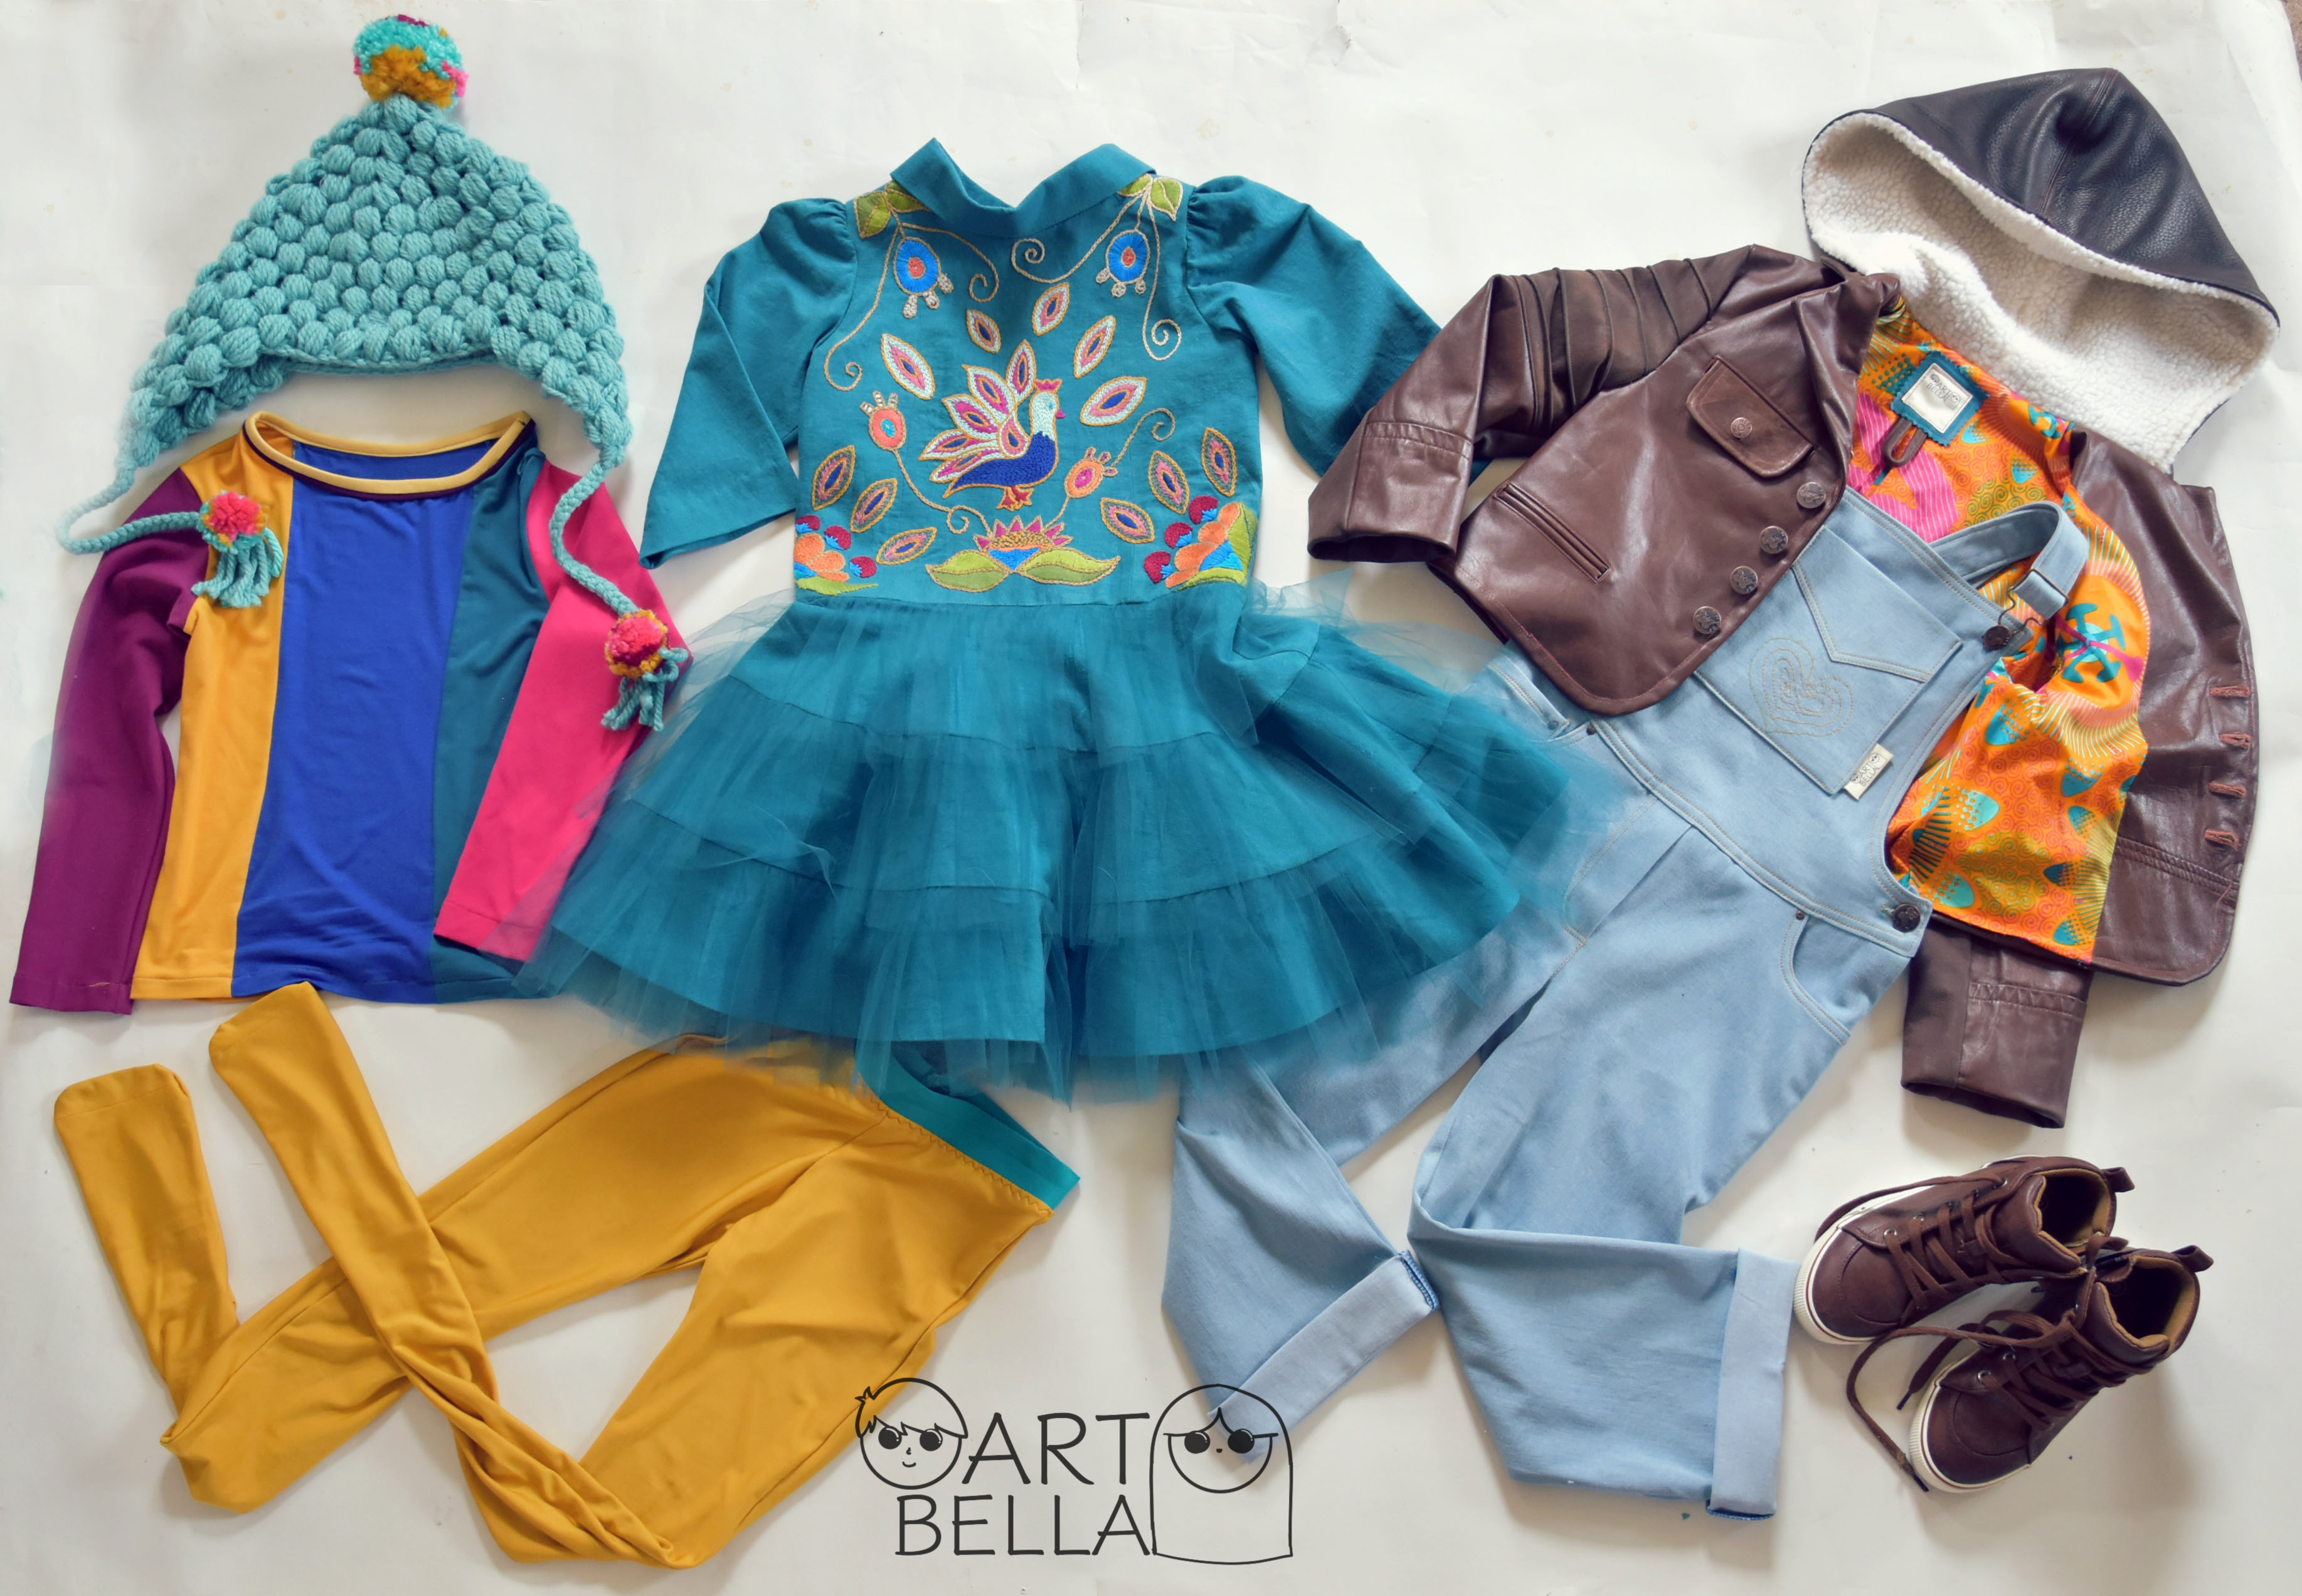
I can't believe this is all coming to an end as a participating designer for me this week. I don't think I ever dreamed of being a designer on Project Run and Play so it was really fun, exhilarating and an honor to make it all 4 weeks. For Signature Style I decided to incorporate a little of my personal style from each weekly challenge and then I challenged myself to use a lot of solid colors, very little print and still be bold just like I like it. My signature style very much includes Isabella's style as she is the one I sew for most of the time and we both have about a 50/50 input into the thought process. We make a great creative team. My very favorite thing is when Isabella wears her mom- made clothes and people compliment her on it and she replies proudly, "My mom made it!" We both like funky, a little fancy, but also very comfortable. She loves to look like a lady but she wants to be able to dig in the dirt looking like one. Signature Style for me means lots of colors, different textures and fiber content fabrics, Ankara printed fabric, fiber arts, layers, different techniques and more importantly ONE OF A KIND, my hope is to always stay true to my unique style. It should look handmade but not homemade. Can I draft a pattern? Yes, but I love using patterns from my favorite Indie pattern designers and putting an ArtBella spin on it. A good friend of mine mentioned that Bella reminds her so much of Punky Brewster and I completely agree, hence the title.

THE DRESS: I love beautiful, rich colored hand embroidery and even though I've done hand embroidery on dresses before, I have never gone to this extent. Doing it for Project Run and Play presented the perfect opportunity. I made the design on paper first, cut out my bodice and transferred my design by tracing my paper design onto the dress with white graphite paper. The dress is made of a teal linen blend (it's more stable than linen) and I used all my and Bella's favorite colors of DM floss to embroider my design. Lots of chain stitching and then some french knots and satin stitches. I will not go into detail on how many hours I spend on this but it was pure joy to see the design come together. I used the Building Block Dress book from Oliver and S again to draft the dress pattern. The dress is fully lined and both the outer skirt and lining has three layers of gathered tulle (It ended up being about 30 yards in length if I would all add them together.) My gathering foot made the ruffling a lot easier, invisible zipper, the collar from the School Photo dress pattern also from Oliver and S (It is my favorite winter collar.) Bella wanted three quarter sleeves so it doesn't get dirty easy but not tight so I love how these came out. Both skirts have homemade bias binding hems (another Signature Style I use most of the time.) The LEATHER BLAZER - I knew this was going to be a challenge so I was ready for it. TIP OF THE WEEK - Goodwill stores are awesome leather shops. I look out for good quality XXL men's leather jackets and buy them when I see them. It is much cheaper than buying leather, you reuse something and the leather is soft so it's easier to work with. I could have just made a bomber which would have been a lot easier but I was looking for a short blazer that will not cover any poofy dresses and will sit just below her waist. I used the basic blazer pattern from Melly Sews, shortened it quite a bit, two double welt pockets on the bottom and added two more welt pockets on the chest with flaps. I made pintucks on a big piece of leather and then cut the top part of the sleeves (this is one of my favorite features,) added a hoodie lined with faux wool and the lining is a beautiful African vlisco that brings out the colors on the dress. I added a pleat to the lining back in the middle for movement and both the sleeves and jacket lining was attached by using an invisible hem done by hand and again like last week added my label and a leather loop for hanging the jacket up, metal buttons, buttonholes galore. The biggest challenge with leather is not that it is hard to work with but layers of fabric can become very thick, you can't iron it which is horrible because if your mama taught you right you know you need to press after every seam sewn. My sewing machine is a powerhouse and I was very thankful for it during this sew. Leather needle is not optional but a must. There were a few times where I thought it was going to break but I managed to only break one needle.
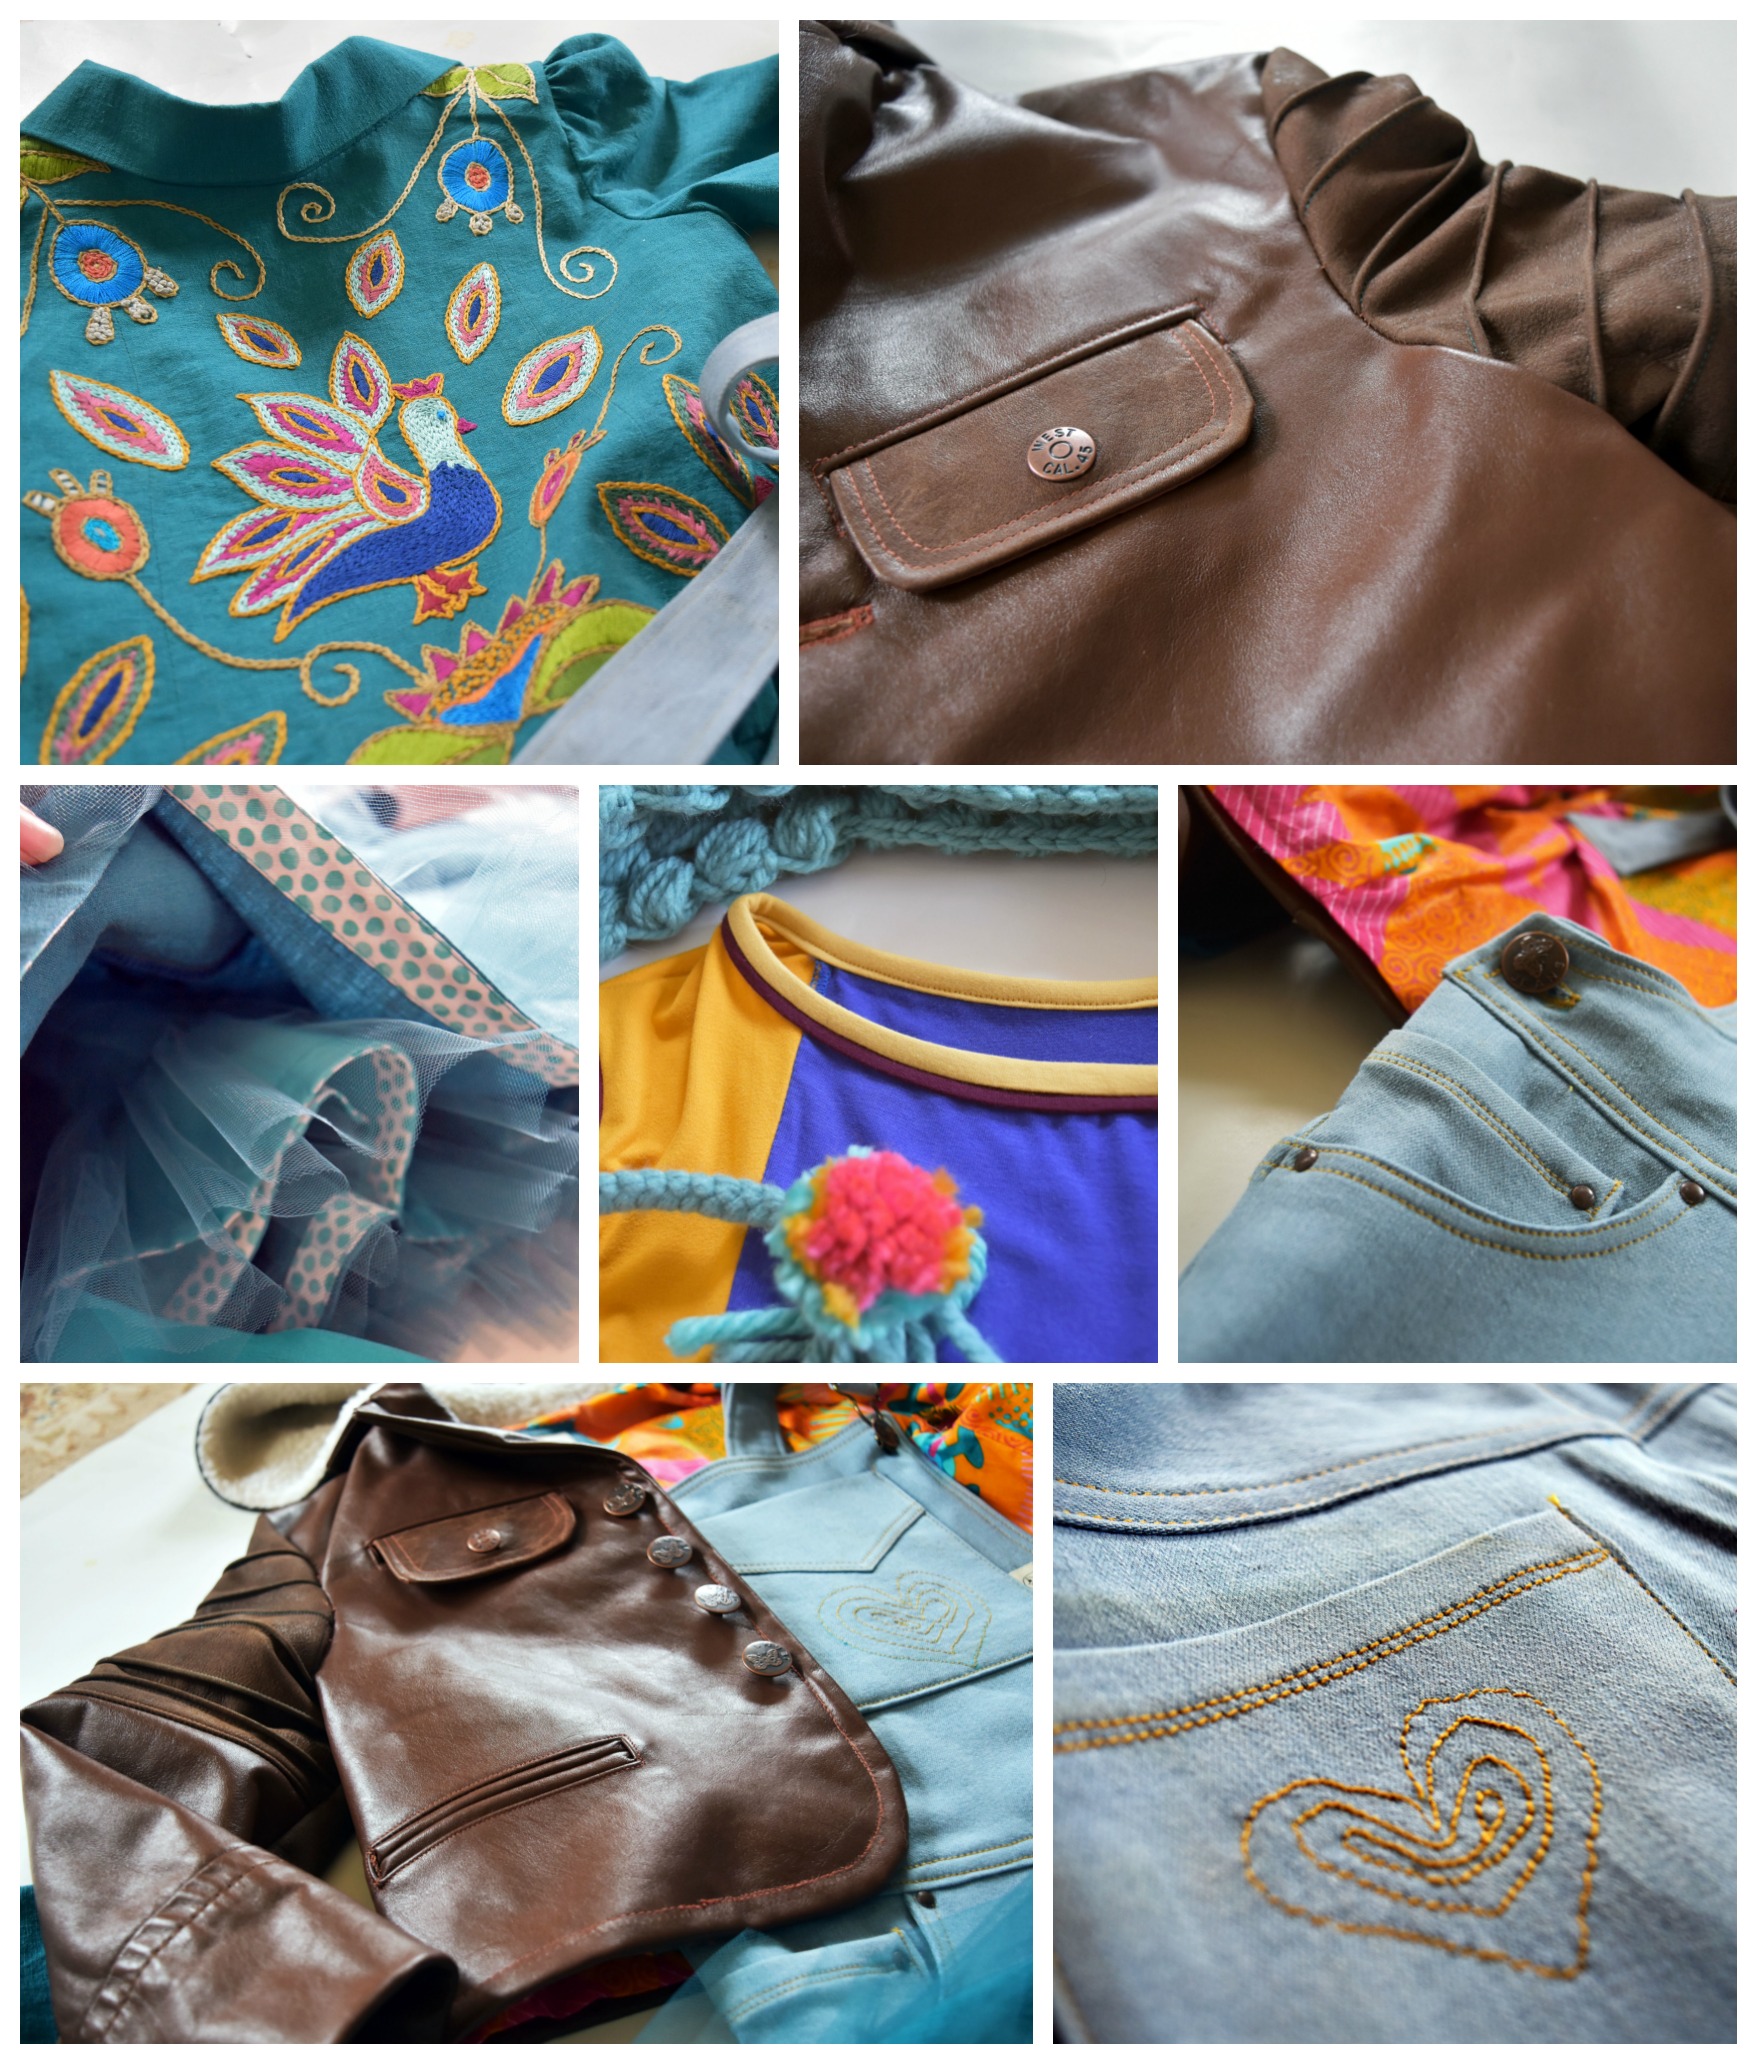
THE TIGHTS and the TEE: Bella don't like tights and also not socks much, but she likes the socks I made for her in week 1 so I meshed the Flash leggings pattern and the cozy critter socks pattern to make the perfect tights. (It's made in an activewear knit which makes it super cozy and moveable) The Tee is the Skiff tee also from Jennuine Design, I narrowed it a little, color blocked it in most of the colors present on the embroidery on the dress bodice. The neckline has a double ribbing with two different color knit fabrics. The DENIM DUNGAREES: My girl loves these so much and it completed my Signature Style week look in a perfect way. I used the Loverall dungarees pattern for Petit a Petit Patterns (it is available in the Project Run and Play Shop) Just like with Jennuine Design you might have noticed that I use Celina's patterns quite often. The fit is great on my girl and I never have to make changes on fit after I have taken measurements. I drafted my own front bib and widened the pant leg in the bottom but the rest all stayed the same. I used lots of denim thread for topstitching and made free motion hearts on all three pockets. Bella calls them maze hearts and likes to follow the thread path with her finger. Just like I recommend using a leather needle when sewing with leather, the same goes for denim. You will have to head on over to my blog Artbella Creates to see more pictures and close-ups. (We took pictures in the beautiful Princeton Art District) The weather turned so fast the past couple of weeks I tried to keep that in mind while designing as I wanted to take some outdoor pictures - After Ann posted a quick puff stitch crochet hat pattern, I quickly made one to keep her head and ears warm during pictures and added some homemade pom poms.) Thank you for following along, what a pleasure it was indeed to share my craft and joy with you.
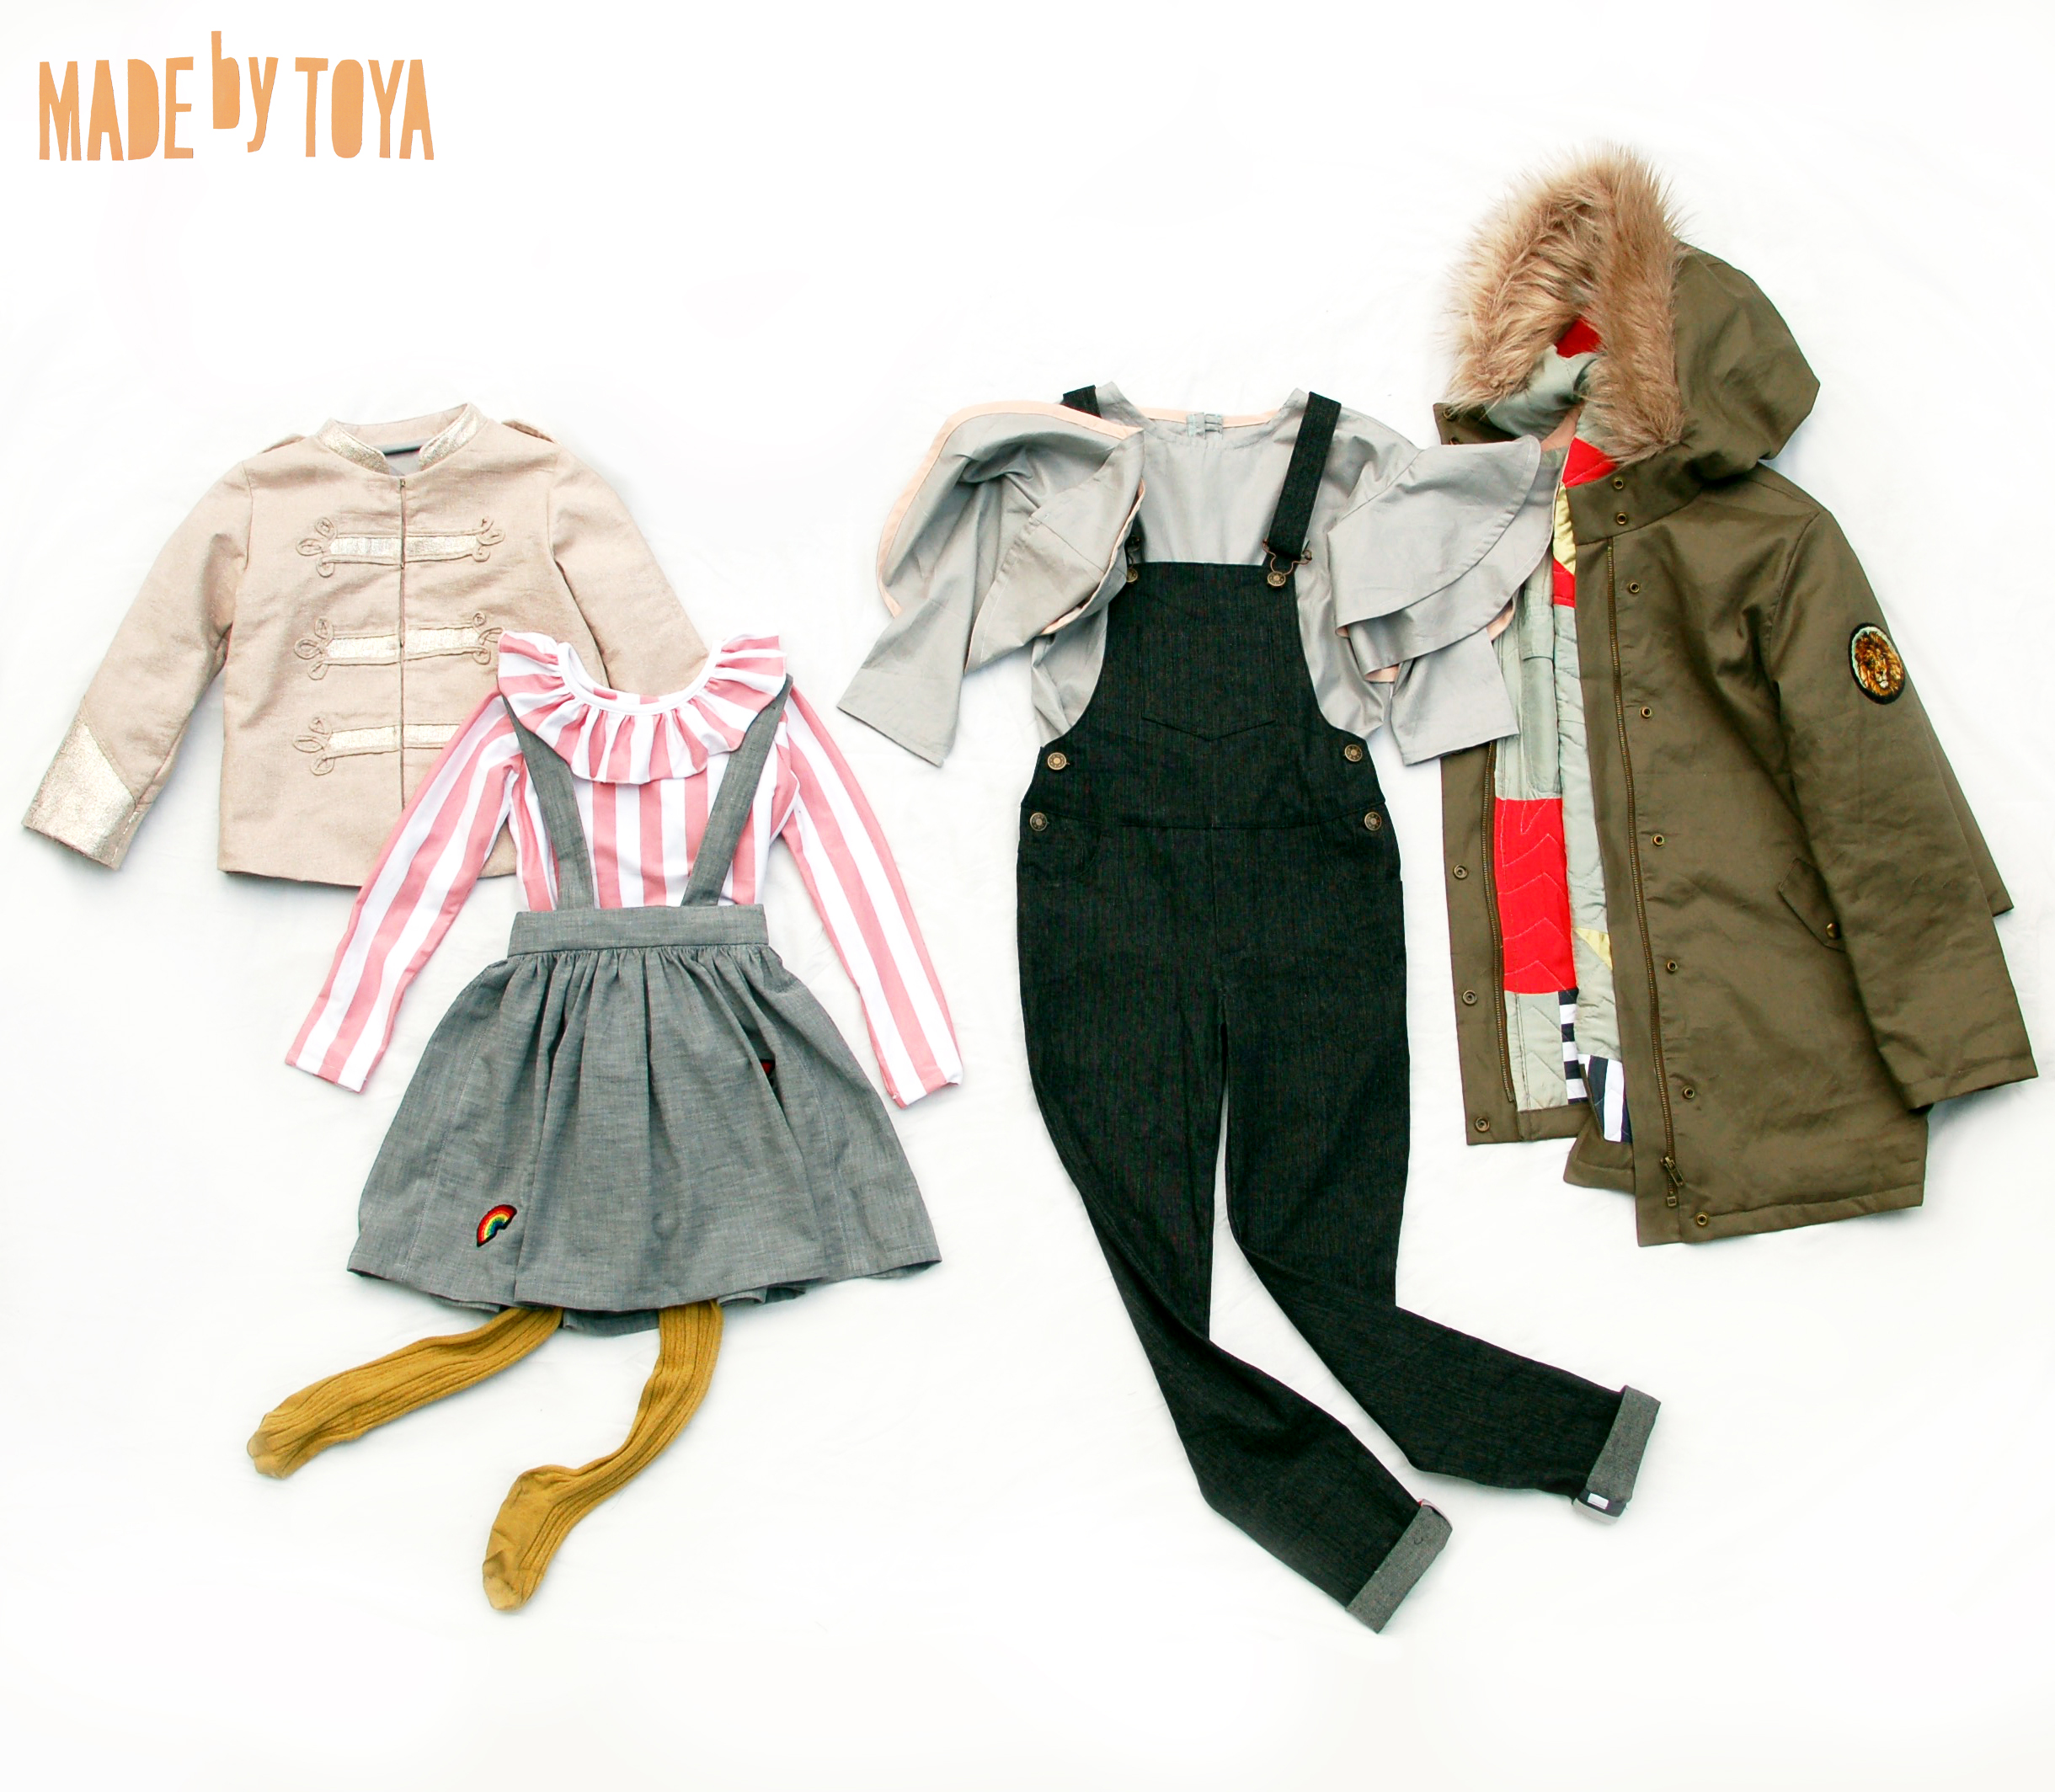
Made by Toya - Practical Magic

The final week is here!- I'm very pleased to be able to show my 'Signature Style' outfits alongside these other talented makers, but I'm sure I'm not alone in finding such an open challenge, um, challenging! The name 'Practical Magic' is not actually a homage to 90's Bullock/Kidman film, but an effort to summarise what it is I love about sewing, and clothes for children. The process of making clothes, the maths, the methods, and how useful the end product can be, is incredibly rewarding, but, after nearly 30 years of doing it, the fact that all these 2D pieces of fabric come together to make something 3D and wearable still seems magical. The vast majority of the time I am driven to create really useful garments that I know will be weather and activity appropriate and get lots of wear, but with those special touches that the wearer will (hopefully) love.
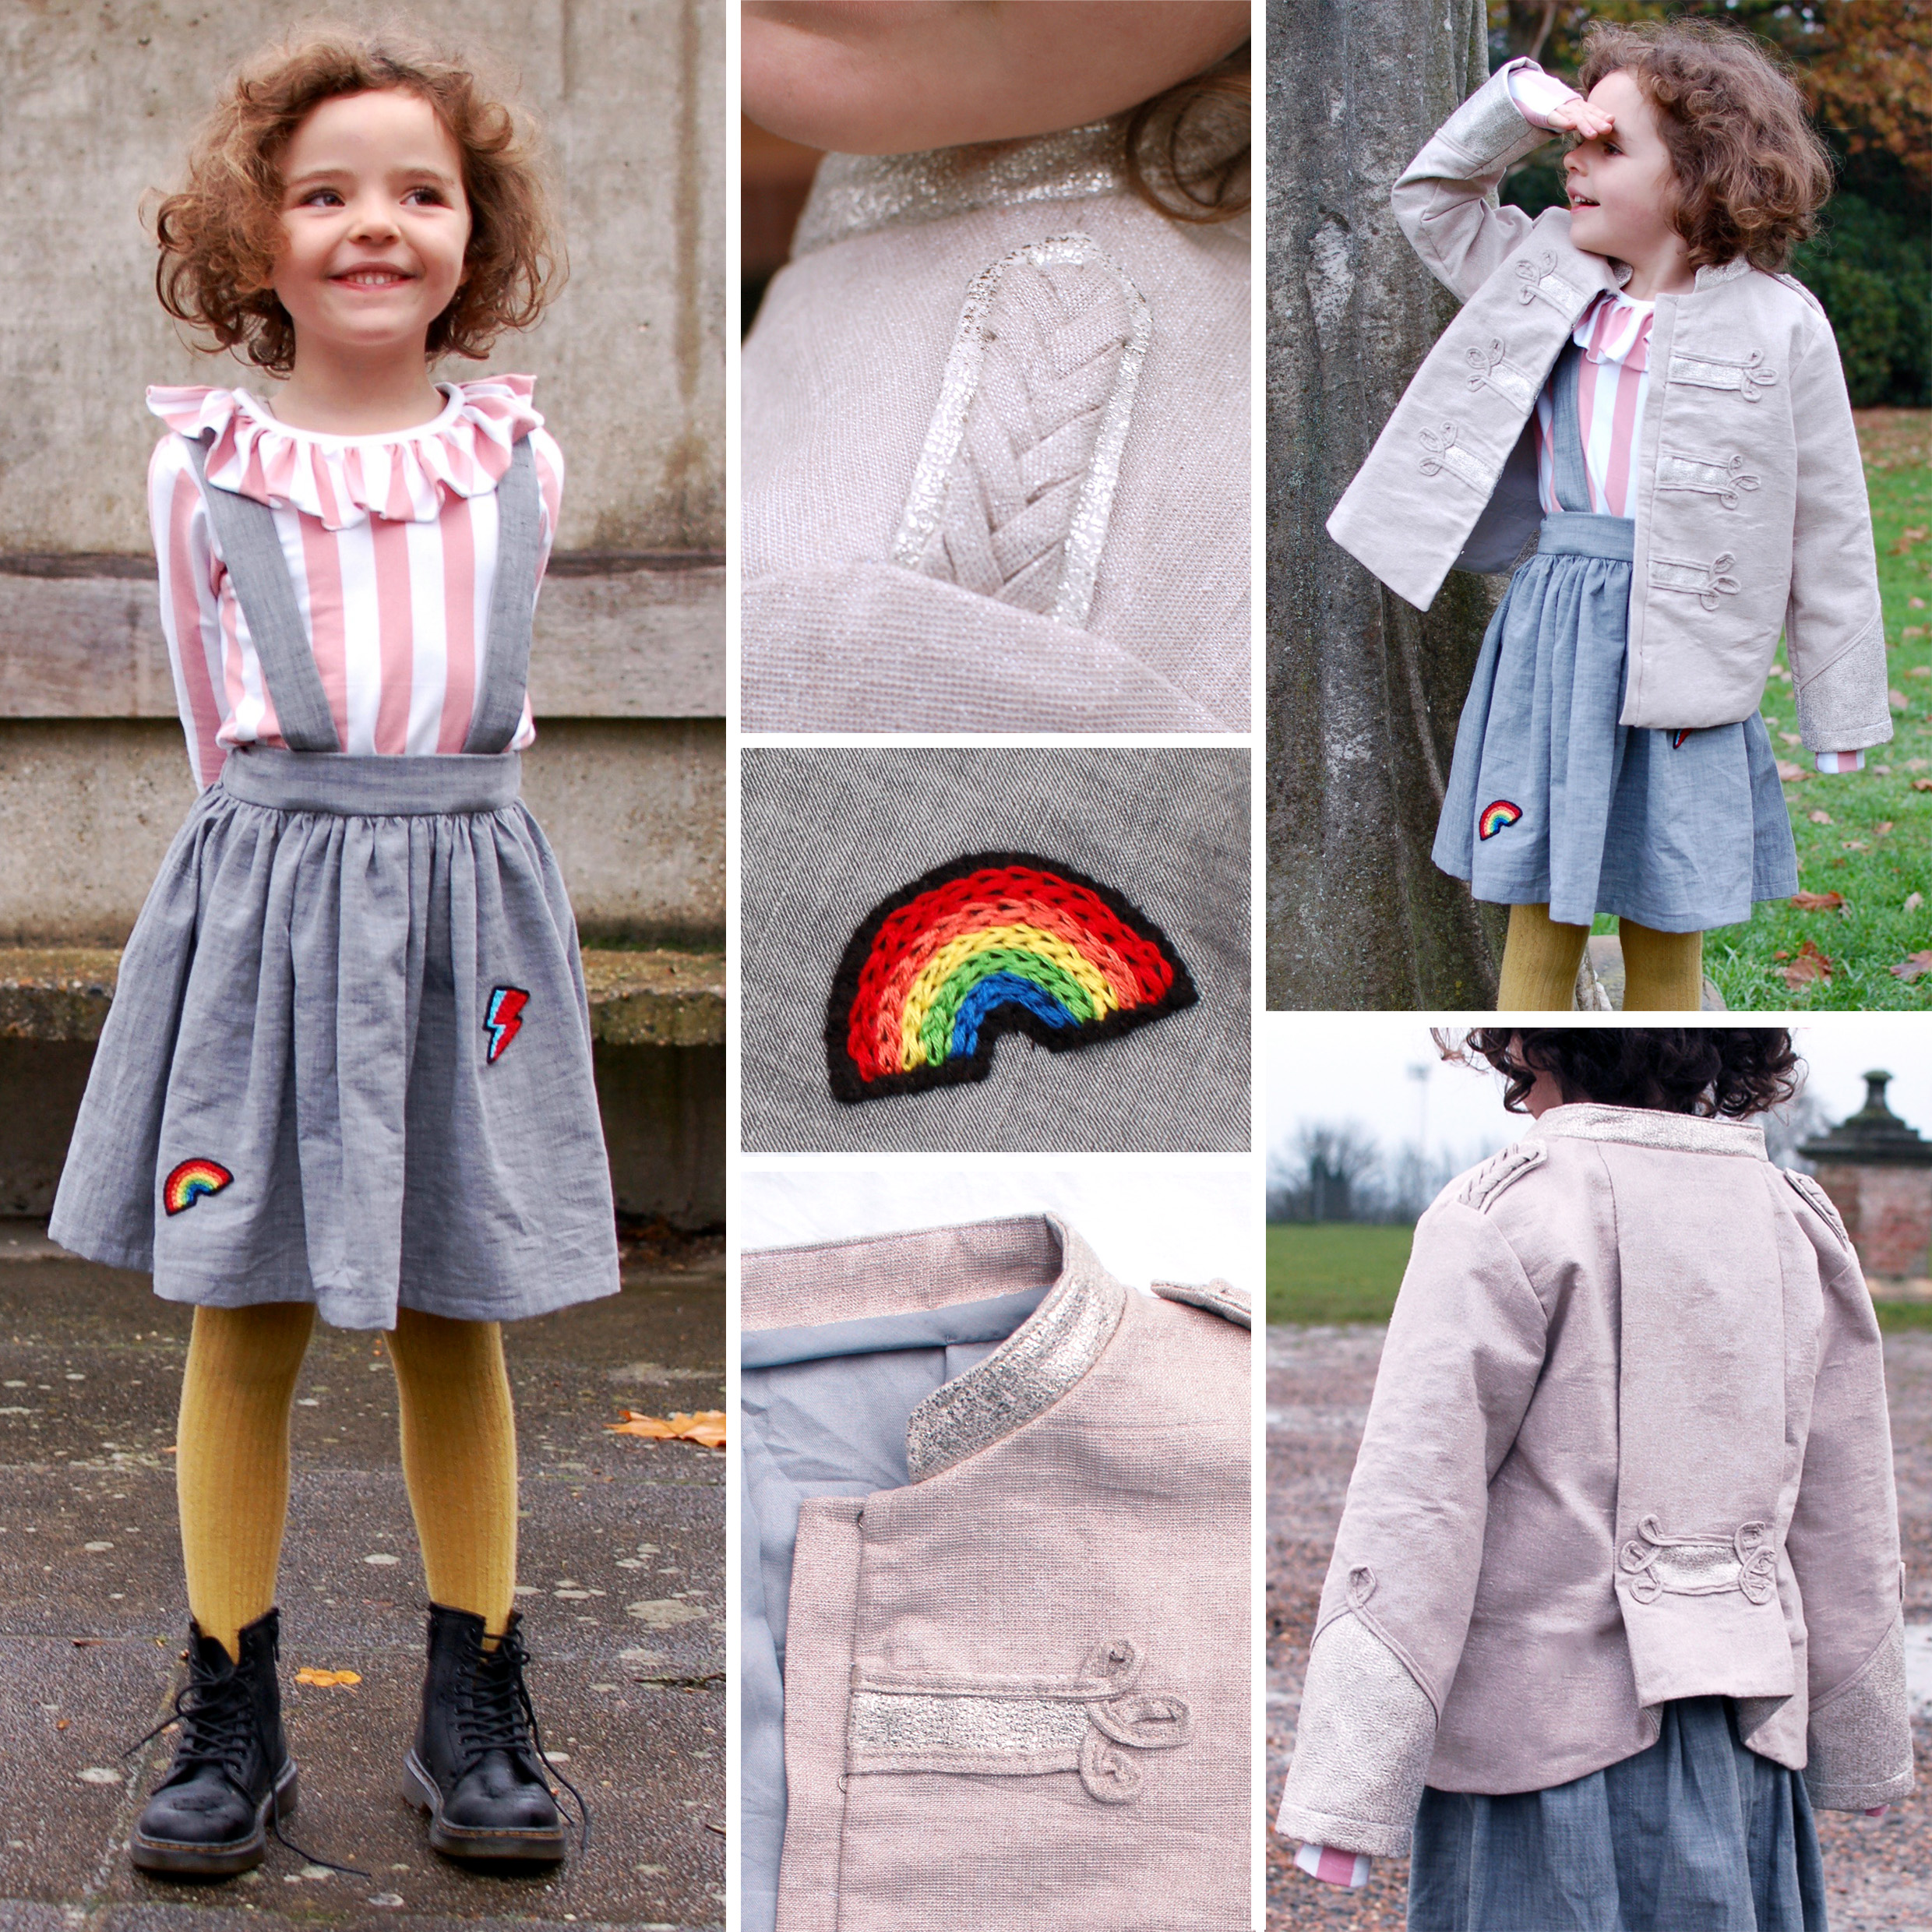
When it comes to making clothes for my children, the style choice is as much (if not more) about their individual tastes and personalities as it is about mine. For my youngest I made a striped long-sleeved jersey t-shirt with a ruffle collar in soft striped cotton jersey from Minerva crafts. The basic pattern is the Rowan Tee from Titchy Threads graded from a size 3 in width to a 6 in height for a slim fit with an added gathered ruffle at the neckline. I finished the edge of the ruffle with a rolled hem on my overlocker(serger). The skirt is upcycled from a grey cotton chambray shirt bought in a charity shop. In order to get as much volume in the skirt as possible from the salvaged fabric I had to sew quite a lot of panels together. The actual pattern for the skirt was just a series of rectangles of fabric, making a gathered skirt with flat front waistband, elasticated back waistband and straps that cross over at the back and fasten with buttons at the waist. I added the embroidered patches to give the skirt a more informal feel. They were embroidered with cotton embroidery thread onto black viscose felt (again from Minerva Crafts.) The Bowie inspired lightning bolt is made using satin stitch and the rainbow is just a series of arches in chain stitch. The military style jacket is self-drafted with a simple shape at the front and a fold detail at the back (inspired by a more complicated folded kimono jacket I made myself a couple of years ago.) The main fabric is actually a shimmery metallic linen that doesn't show up so well in the photos, which I paired with some scraps of gold crepe left over from the dress I made in week 3. The jacket is fully lined with blue grey cotton with gold crepe pieced in at the back where the lining shows at the bottom edge of the fold detail. It has a hook and eye closure and embellishments added in rouleau made from the main shimmer linen fabric. Making the long lengths of rouleau in metallic linen turned out to be a frustrating process, even using my trusty hairpin method to turn them, but once there was enough I stitched them onto the jacket covering the edges of the applique crepe and adding some extra flourishes. The epaulets were made in gold crepe with a 5 plait detail of linen rouleau. I also added gold sections to the sleeves and for the collar.
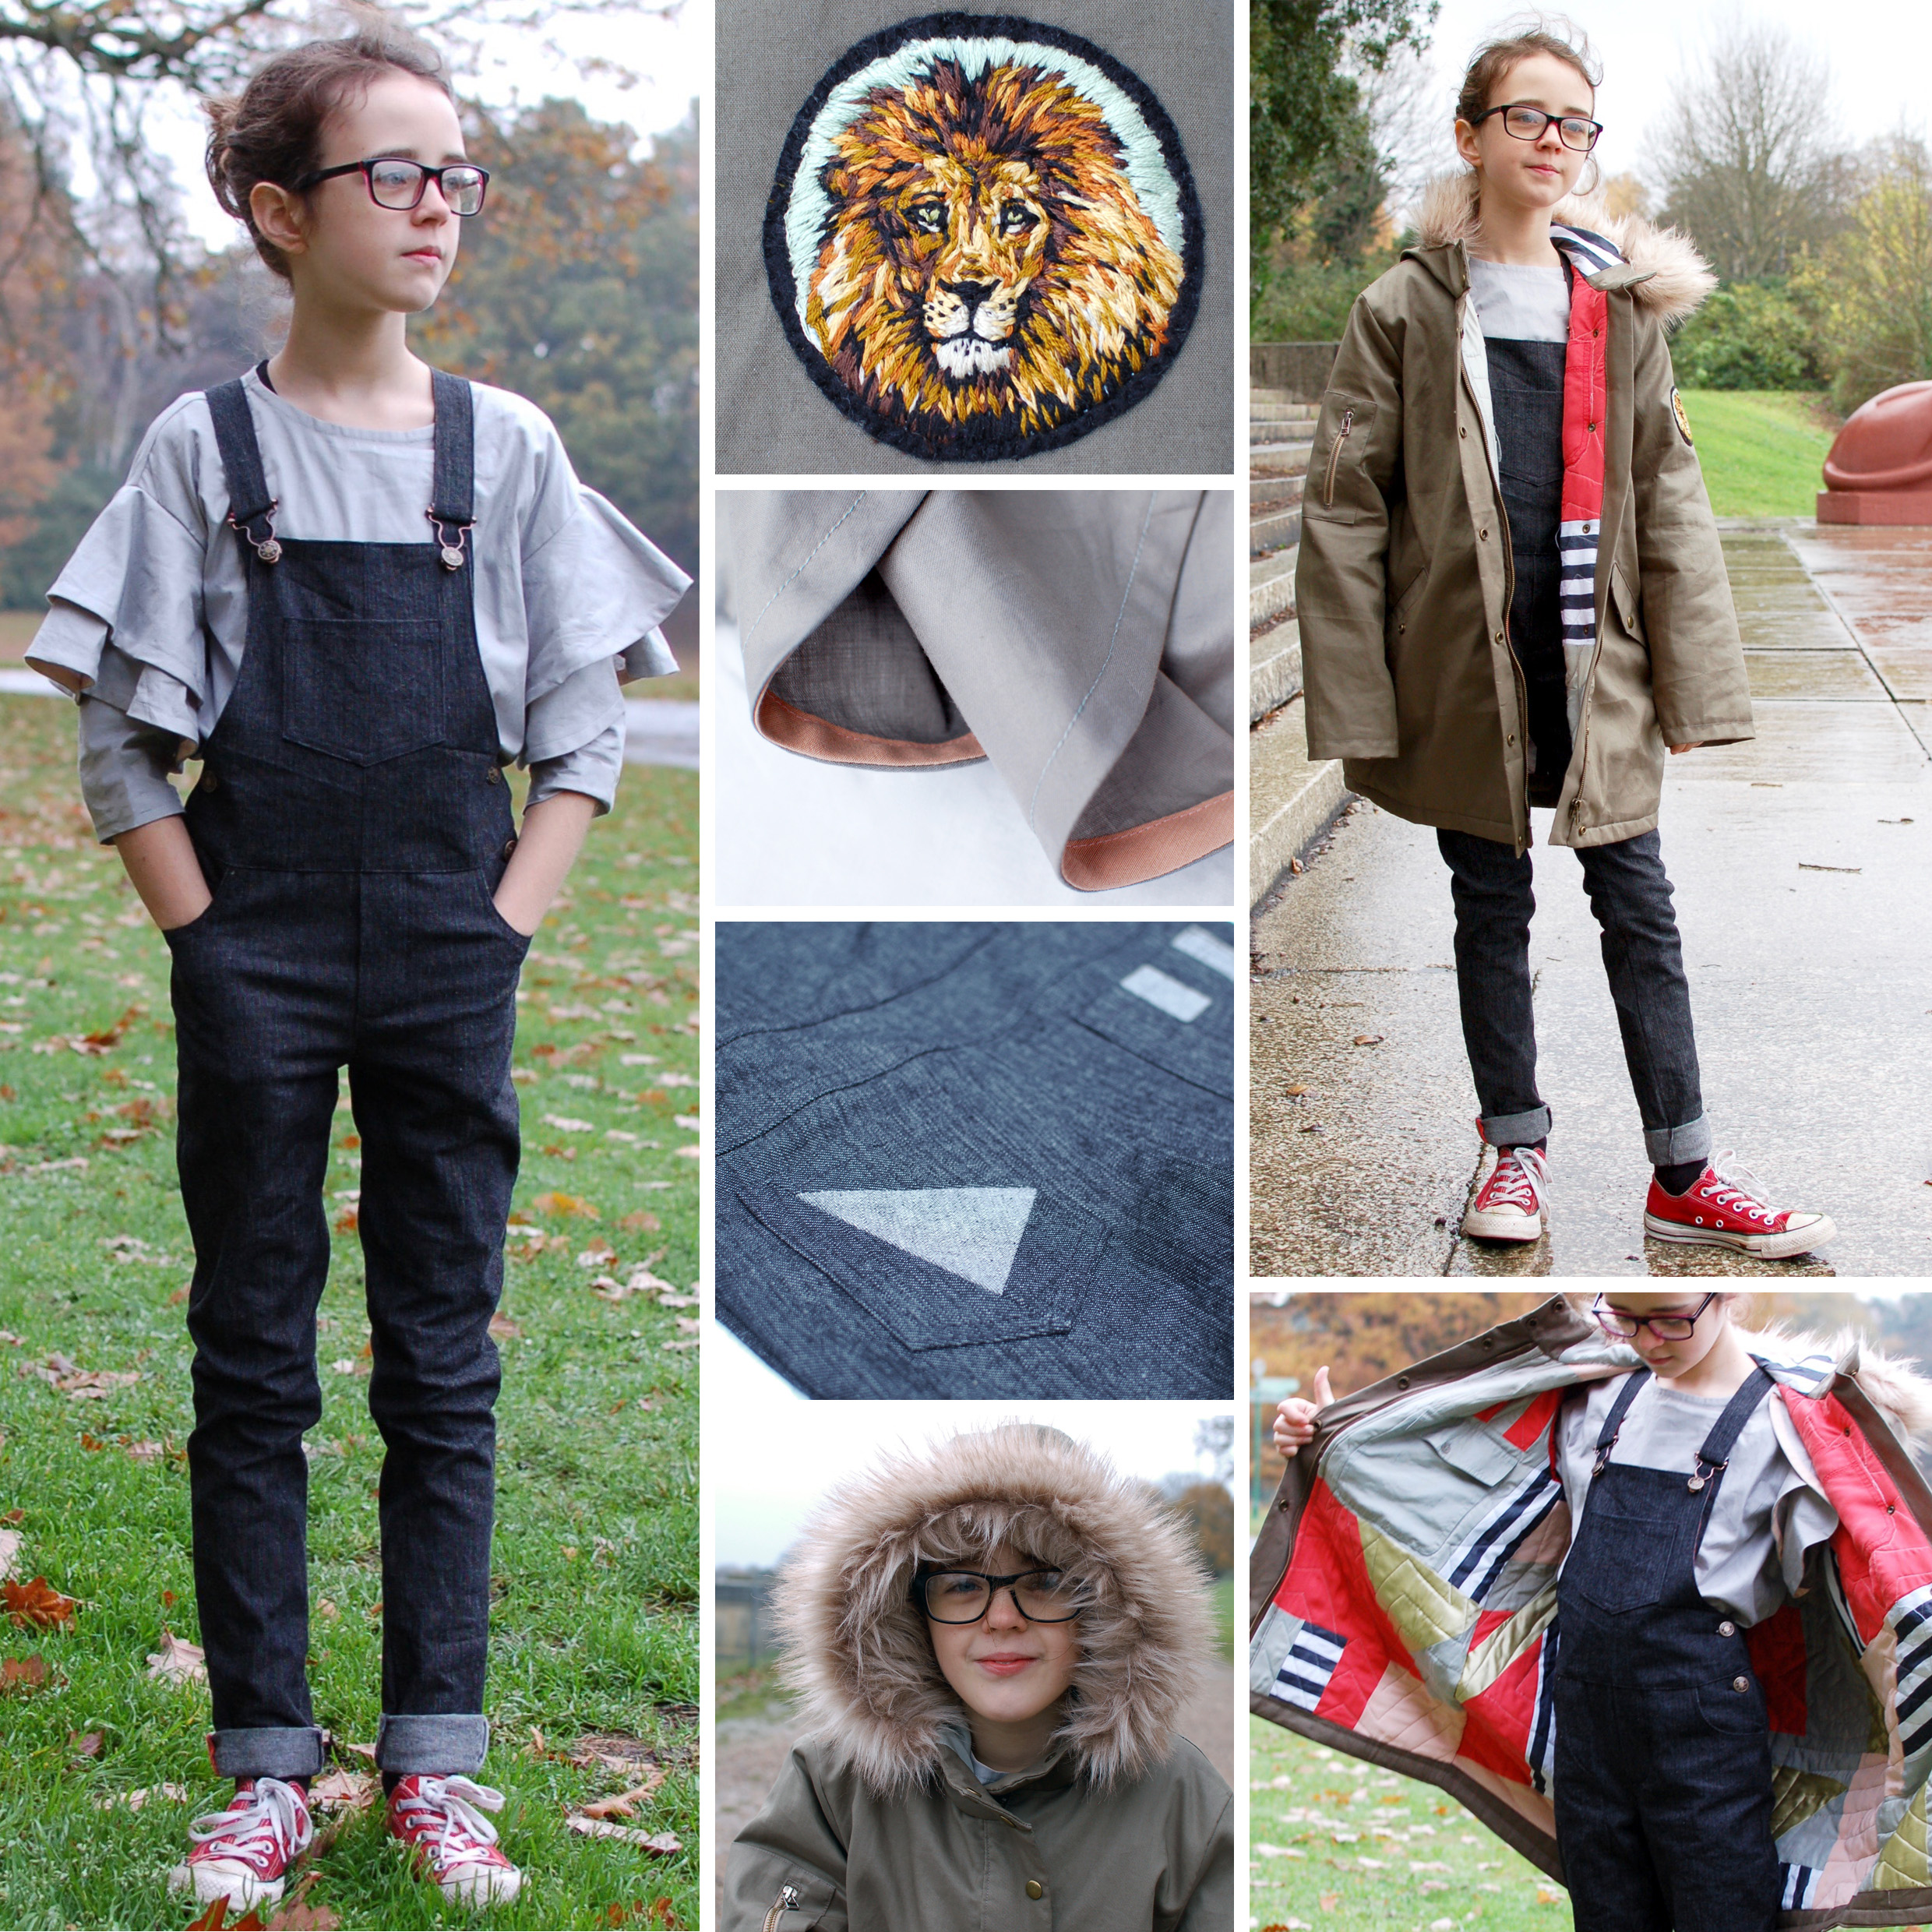
It doesn't get much more practical than a warm, waterproof, winter weather, parka coat. It also turns out to be something that seems hard to buy, with RTW coats often being warm or waterproof but rarely both. Sadly my daughter had outgrown the one I made her last year so I knew I needed to make her another, this time large enough to wear over her blazer on the way to and from school. A patchwork, quilted lining and large fur trimmed hood has been a feature in her last 3 coats and I knew she would appreciate the same again. The coat is self-drafted with an outer layer of double-faced cotton, bonded with PUL, so it is waterproof but breathable and a polyester wadding interlining that the silk patchwork lining is quilted to. There are three external pockets, two flap pockets on the front (one is lined with red silk, the other with blue grey silk) and a zipped patch pocket on the arm. The patchwork lining was made with some silk scraps, a small amount of fine striped cotton lawn scrap and two second-hand silk shirts that had areas of damage so were no good as shirts anymore. I pieced them to create an interesting, but not too ordered design, keeping some of the original shirt pockets and placing them so as to create useful internal pockets for the coat. The patchwork was then quilted onto polyester wadding with a starburst pattern. The coat is completed with a fair bit of hardware, triglide strap on the back of the hood, a fur trim (that my machine did not thank me for) and a hand embroidered lion patch for the sleeve. The volume of the large coat is balanced by the slimline shape of the dungarees, made using Petit a Petit and Family's Loveralls pattern. The only changes I made to the pattern were to alter the shape and height of the front and back bib to a more traditional design and to adapt the shape of the bib and back pockets. I graded between a size 8 in width and 12 in height. The fabric is a grey/black denim with stretch and it is lined with patchwork fabric I had left over from the lining of the coat. The back pocket design nods to the shapes I used in the patchwork lining in a more subdued way, piecing in triangle and striped sections using the reverse of the fabric. As there is a little extra length in the leg to allow for growing room, I finished the seams on the inside of the lower legs with Hong Kong binding in patchwork fabrics which only show on the turn-ups. The blouse adds some understated drama with its tiered fluted sleeve. The pattern is self-drafted with a simple boxy shape and button back closure. The blue/grey cotton fabric is complemented with pink bias binding on the inside hem finishes which can be glimpsed on the sleeves. And that's it! If you'd like to see any more pictures of details or process please head over to my blog.
Girl Like the Sea - Wild Life

WILD LIFE // signature style Many elements of my style got woven into these looks. I love simple looks with visual impact, wolves and wild things, bold graphics, natural fibers, animal inspiration, obscure personal references, a well placed bit of faux fur, capes, and gorgeous knits. Like whimsy........ with edge. If I spend time and money sewing something high quality for dress up, it needs to be able to function reasonably well in the everyday, and I love making things you'd never find on a children's rack at a store. .......................... I invite you to see my menagerie of looks!

Starting with my little wolf, Hawthorne has been begging me for ages to recreate this old raggedy wild things wolf suit I made for his sister when she was a toddler and I was just beginning to sew. He wore it as a hand me down till the ankle cuffs were up to his upper calves, and the seams were a mess. If you want to feast your eyes on one adorable little kid, heres the link to my 2012 blog post. So I made wolf suit 2.0 as sort of a greatest hits item, with several more years of sewing experience under my belt, and I hope this one lasts even longer!
Using the Hatteras ip hoodie from Hey June, and the mini hudsons from True Bias, I mashed things up with some tweaks and came up with this whole body wolf suit in an organic cotton french terry, complete with oversized ears, crown, and ridiculous furry tail. Honestly, this fabric was a total nightmare to sew with because it wanted to grow and warp and never return to its original shape. I spent hours babying and interfacing and steaming it, avoiding shedding blood from my hand sewing wounds on it till it looked as close to perfect as possible, and just how I'd imagined it. I love the slouchy bottoms paired with the fitted top. And I added extra reinforcements in stress areas, including the knees where I built in kneepads and added wolf ear shaped quilting. The gold spandex hood lining just makes it for me. I love the pop of shimmer and drama.
To accessorize, I made a where the wild things are crown inspired belt with fur tail so he could take the tail on and off depending on the situation. Not all life experiences necessarily call for a tail, you know? Bedtime...Rainy days....bike riding. And to match with the scribble embroidered wool stuffed wolf ears, I made him a wool felt crown in one of my all time favorite colors, MUSTARD. He's completely obsessed with this outfit, everyone. Obsessed. I'm sure you can tell he's totally feeling it in the photos. haha

Anyone who's known me for any length of time will also know that I'm super into Bill Murray. He's like a family spirit animal, originating with my dad. What about bob is our all time favorite movie. I've painted and drawn more bill murray portraits than I can count at this point. There was no way I could do Signature Style without putting a Bill Murray on it.
So in a totally ridiculous move, I hand painted this original abstract portrait of him onto my two year old Asher's french terry cape tee. With like, paint brushes and acrylics and interfacing on the back of the fabric to keep it from moving around. Putting an original piece of portrait art on a toddler's shirt now feels slightly insane, but hey. It's the finale! There's also so TOTALLY a built in cape. Because that's one of my trademark moves, and I can't believe I got 4 weeks into a sewing competition without making one! Many years ago, I figured out a way to build a cape into the neckline of a tee shirt, which till that point I'd never seen anyone do. And I've been cape shirting like crazy ever since. I think it was my first sewing tutorial. So, I'm going to guess that this is the first ever Bill Murray portrait cape tee ever made. Ever. Lol. To go with, I sewed him some "kitty pants" because he loooooves kitties. I used gorgeous cotton and steel tiger print linen that I've been hoarding for some sweet little pleated trousers with a scribble embroidered kitty face of my own design on a canvas knee pocket. I can't handle the cuteness factor of a little kid in pleated linen trousers. It does me in. His fur hat is a relic of my sewing past from Stylo magazine. Handed down through three kids! ...........................................................
Clover loves wearing her pajamas all day if she can get away with it, so I tried to make her an outfit that felt as similar to PJs as possible, while also being stylish and personalized. She's got a pair of hemp/cotton striped trousers I used Toya's graphite trousers pattern for. And I created a rainbow contrast pocket textile out of some colorful Guatemalan style woven ribbon all sewn together in lines. Clover loves rainbows. She was upset when I took the trousers away so I could do flat lay because they're so comfy! Her tee is a totally obscure dorky reference that she's really excited about. Zork is an old text based computer game invented by some MIT students in the 1970's that her daddy introduced her to a while ago. I've called her Zork dork on many occasions. I hand stenciled and painted this custom cropped tee to compliment the high waist of the trousers for an innocently dorky but rather classy looking outfit, which suits her perfectly.
I'm honored and surprised to have made it this far in Project Run and Play! If you'd like to see more photos of my looks check out my blog or instagram.

The Crafting Fiend - Bundled Up Boho!

I am so excited and thankful to be here showing you my week 4 signature style pieces! Each week I've shown glimpses of my personal style. So, this week I really thought hard about what makes my projects recognizable as mine and what stands out - how these looks are ME yet also represent styles my daughters enjoy wearing. Bundled Up Boho represents my love of boho style in wearable, playable clothing for kids with clean finishes and lots of details that tie each piece together - while adding my personal art and whimsy. Everything transitions and mixes and matches together along the theme with pops of bright florals and natural prairie colours and a little blue and gold! I made sure that every outfit had a Canadian element! I'm a Canadian, and as much as I dislike winter, it can be fun to sew for! Manitoba is known for polar bears and bison and is my home province. I love to dress my girls matchy but NOT matching. Coordination allows them to be recognized as sisters but still reflects their own individuality. I am so excited to tell you about each piece and how it ties to who I am and what I love.

My oldest is a kind and free spirited girl, the kid who laughs and follows butterflies as they go from flower to flower. The Dress uses the Violette Field Threads Pixie dress pattern, which I modified by extending the bodice sides. I then added a little extra room to the front for a pleat so she has better movement and wearability. The front and back are made with corduroy for warmth and practical wear. I added welt pockets to the front and changed the sleeve style from short dolman to long, billowy dolmans for a fun wintery boho vibe in a soft brown fabric. On the sleeves, I extended the bodice side panel fabric and added texture contrast with the brown corduroy. I also added a bottom band of the main fabrics and free motion appliques of floral from the vest fabric. The Vest is the Little Lizard King Madison with some slight changes. I used a soft white short hair faux fur to represent our polar bears here in Manitoba and added a zipper pocket to the inside of the vest. The pocket kitten, created with the Swoodson Says pattern, is her most loved feature of this design, and as she often has times of feeling a bit lonely at school, this will be a great solution to help her know she is not alone and is loved during her day. On the hood, I added a little cap to help with snow blindness. Along the edge of the hood and the bottom of the vest, I used a heart stitch in bright pink (my favourite colour and shape,) and this will be a repeating theme amongst both girls’ looks. The shirt is Laela Jeyne Patterns Emmy Tee in a bison and wheat fabric I designed, using Adobe Illustrator, to represent my home province of Manitoba. The skirt is the free Lazy Days skirt from Oliver & S. I sewed french seams and used a gorgeous wide hem. I really love great finishing techniques to enhance the longevity of the items I create. The Purse is made from the front pocket pattern from Sincerely Jen's On a Break crossbody pattern, which will be releasing soon. I added a free motion applique flower to the front flap and used a soft green vintage velvet ribbon for the strap.

For Cheeks’ dressy look, I made my own pattern for the dress with an upcurved front bodice and a down curved back bodice. I love using zippers when I make clothing for the kids, because her hair is so long it tangles easily around buttons. On the front bodice, I created a trellis look with handmade bias tape and free motion applique flowers to represent our love of gardening. My kids love to plant anything that will attract butterflies to our garden, so I made a few butterflies using a strong heat and bond and sewing around so they won't fray in the wash. I stitched them to the dress just in the middles so they maintain a sense of movement and whimsy, and the bottom hem and sleeve hems also include a pink decorative heart stitch. The tights are the Made for Mermaids Bonny pattern. As it’s a Canadian- themed look, it seemed fitting to incorporate a little plaid. For the jacket, I started with SLPC’s Braxton Blazer as I loved the low tulip hem back; made in green corduroy from Cali Fabrics. I changed the pattern front up to have a moto-esque shape and used a funky visible zipper with that free motion flower at the top to match the free motion applique along the front of the jacket and on the sleeves. On the sleeves I added button bands, and I naturally included vintage Canadian maple leaf buttons! This jacket is cute open and closed and with the collar partly flipped to create many different looks for this mini capsule wardrobe. For her Casual look I made her tee using the Bubby and Me Darcy pattern. I changed it slightly by adding flat piping to the sleeves. The tee is sewn in another fabric I drew and designed with Adobe Illustrator to represent the mountains of Alberta and the Rockies I used to live near. Her little “hello” hair clip is from the One Thimble subscriber bonus pattern by Little Seren. The pants are the Little Lizard King Cambridge pattern, made in a low-stretch grey denim. On the front pockets I again used the heart stitch in bright pink to carry through that theme and tie the look together. I also added a free motion applique flower to one of the front pockets. Everything is double top-stitched in the bright pink that I’ve used throughout both girls outfits. On the back of the pants I added darts for bottom fit and fun pockets with the decorative hearts stitching and a cat (because she LOVES cats) all in the bright pink contrast stitch. All the florals from both looks are from different collections by Jennifer Paganelli for Free Spirit Fabrics.

Now it's time for YOU to vote! Use the widget below to VOTE.
Our celebrity guest judges really have their work cut out for them this week! But since they're the amazing Ericka and Jessica from Violette Field Threads, we know the designers are in good hands.
The designer's score is determined as follows:
1/3 of the score is based on YOUR vote
1/3 of the score by this week's celebrity guest judge Ericka and Jessica of Violette Field Threads
1/3 of the score comes from the panel of judges

No way just one person should win this season - so many amazing creations! Fantastic work, designers!
ReplyDeleteBeautiful talent!
ReplyDeleteLovely work ladies!
ReplyDeleteWow. Just wow
ReplyDeleteEach collection shows so much work and effort. Bravo!
ReplyDeleteInspiring! Well done ladies!
ReplyDelete