Today we're learning how to create a whole mix and match sewing capsule using just one swimwear pattern. One of our Project Run & Play ambassadors, Leslie, is here to give us all the details.
Use the code swim20 at checkout. HURRY!!! Code expires July 1st, 2022.
About two years ago I took the plunge and sew my first swim! And I haven't looked back since. I was hooked. Swim is one my absolute favorite things to sew. My husband says "Our daughter has more swimsuits than Target!"
Once you've gotten comfortable with the basics of swim, you'll no doubt be ready sew multiple suits at once!
And what better way to do than a mini swim capsule?!!?
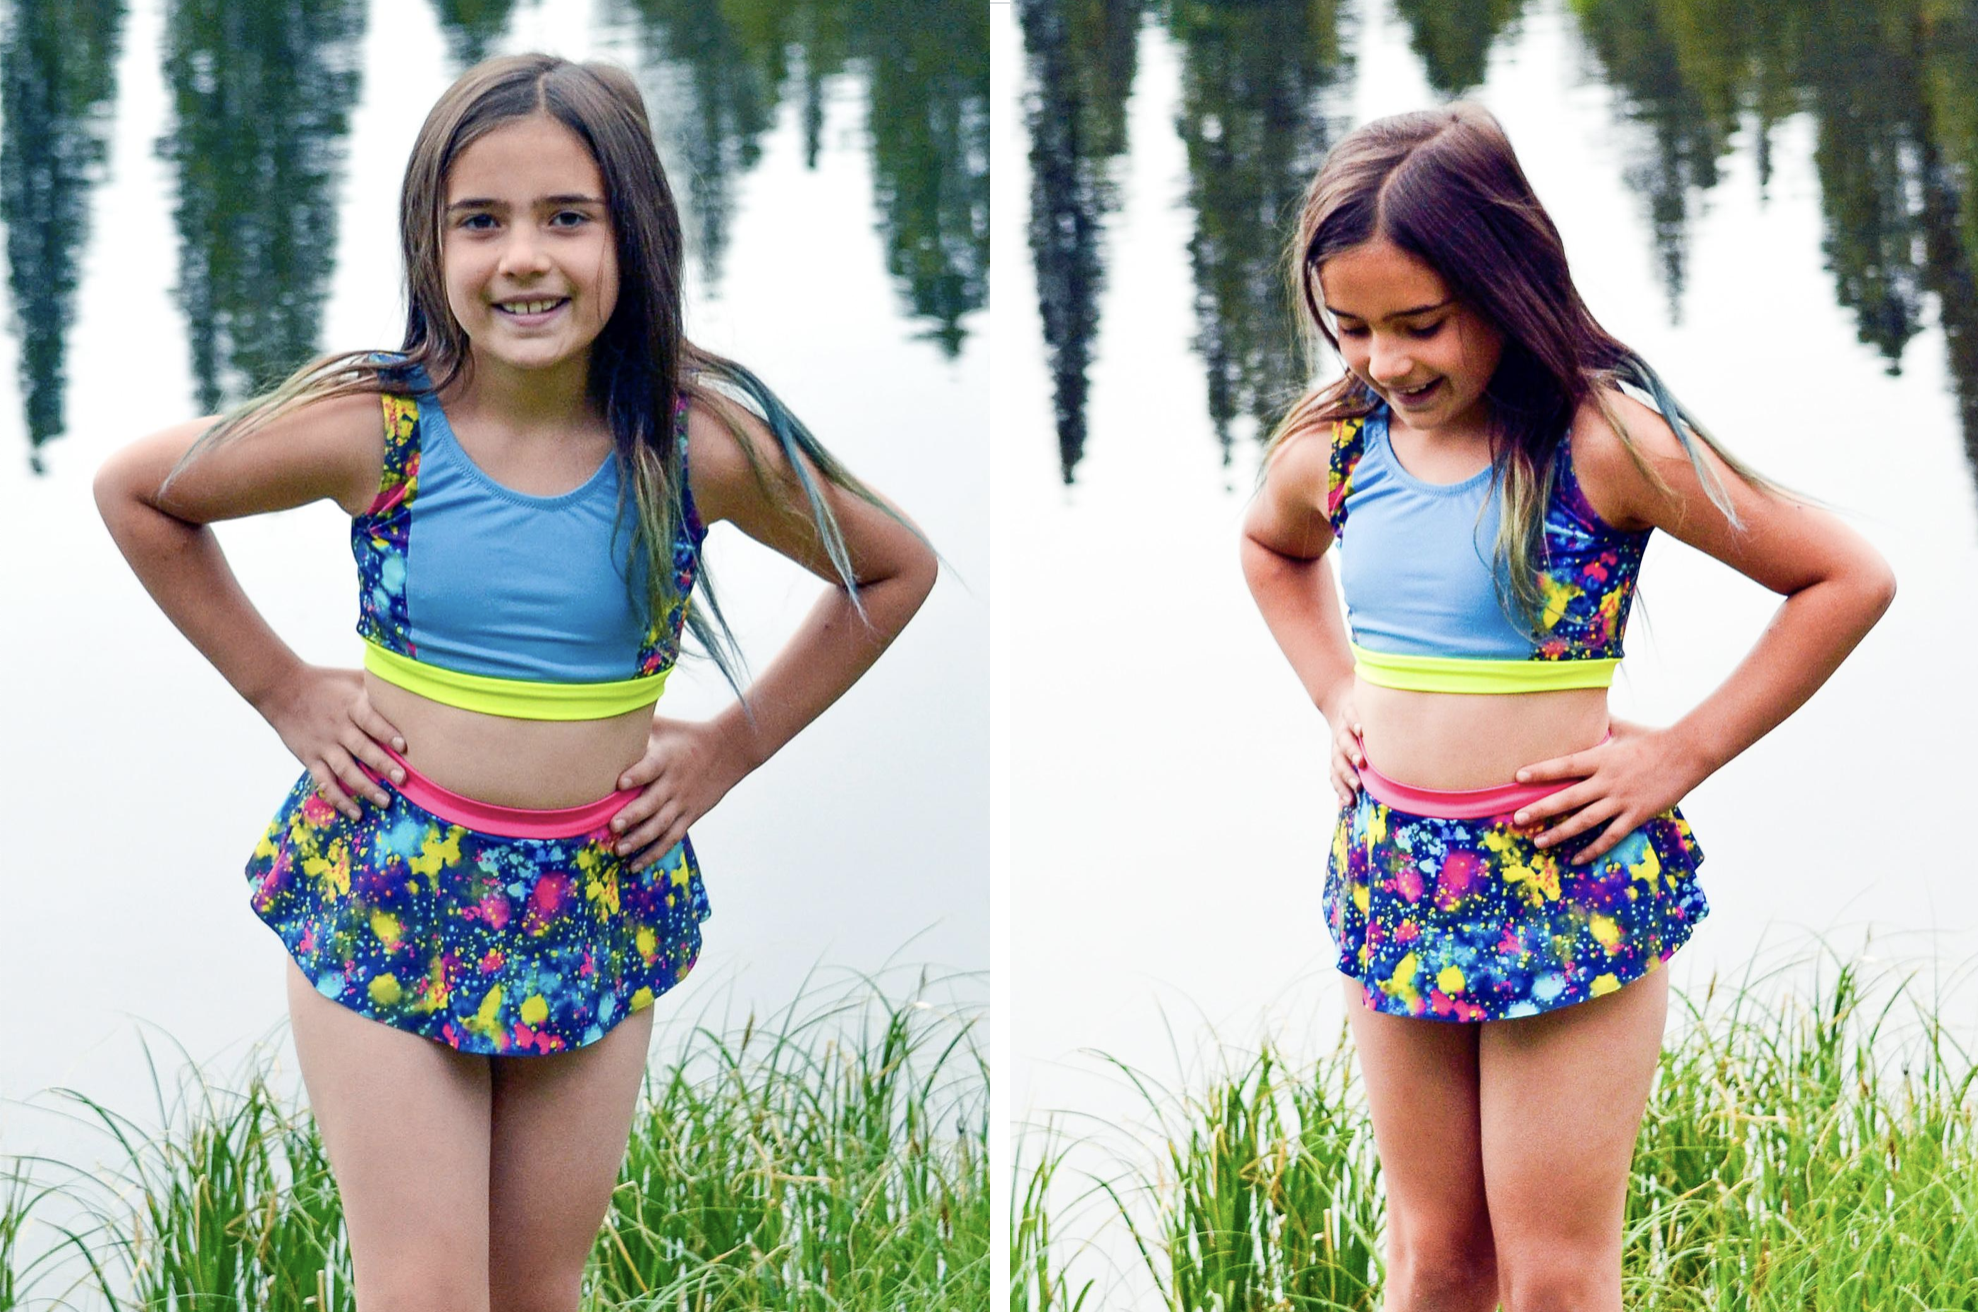
Project Run and Play's Viridian swim pattern was perfect for my vision of a mini swim capsule because it offers so many looks in one. My vision was to have multiple pieces that could be mixed and matched to create different suits.
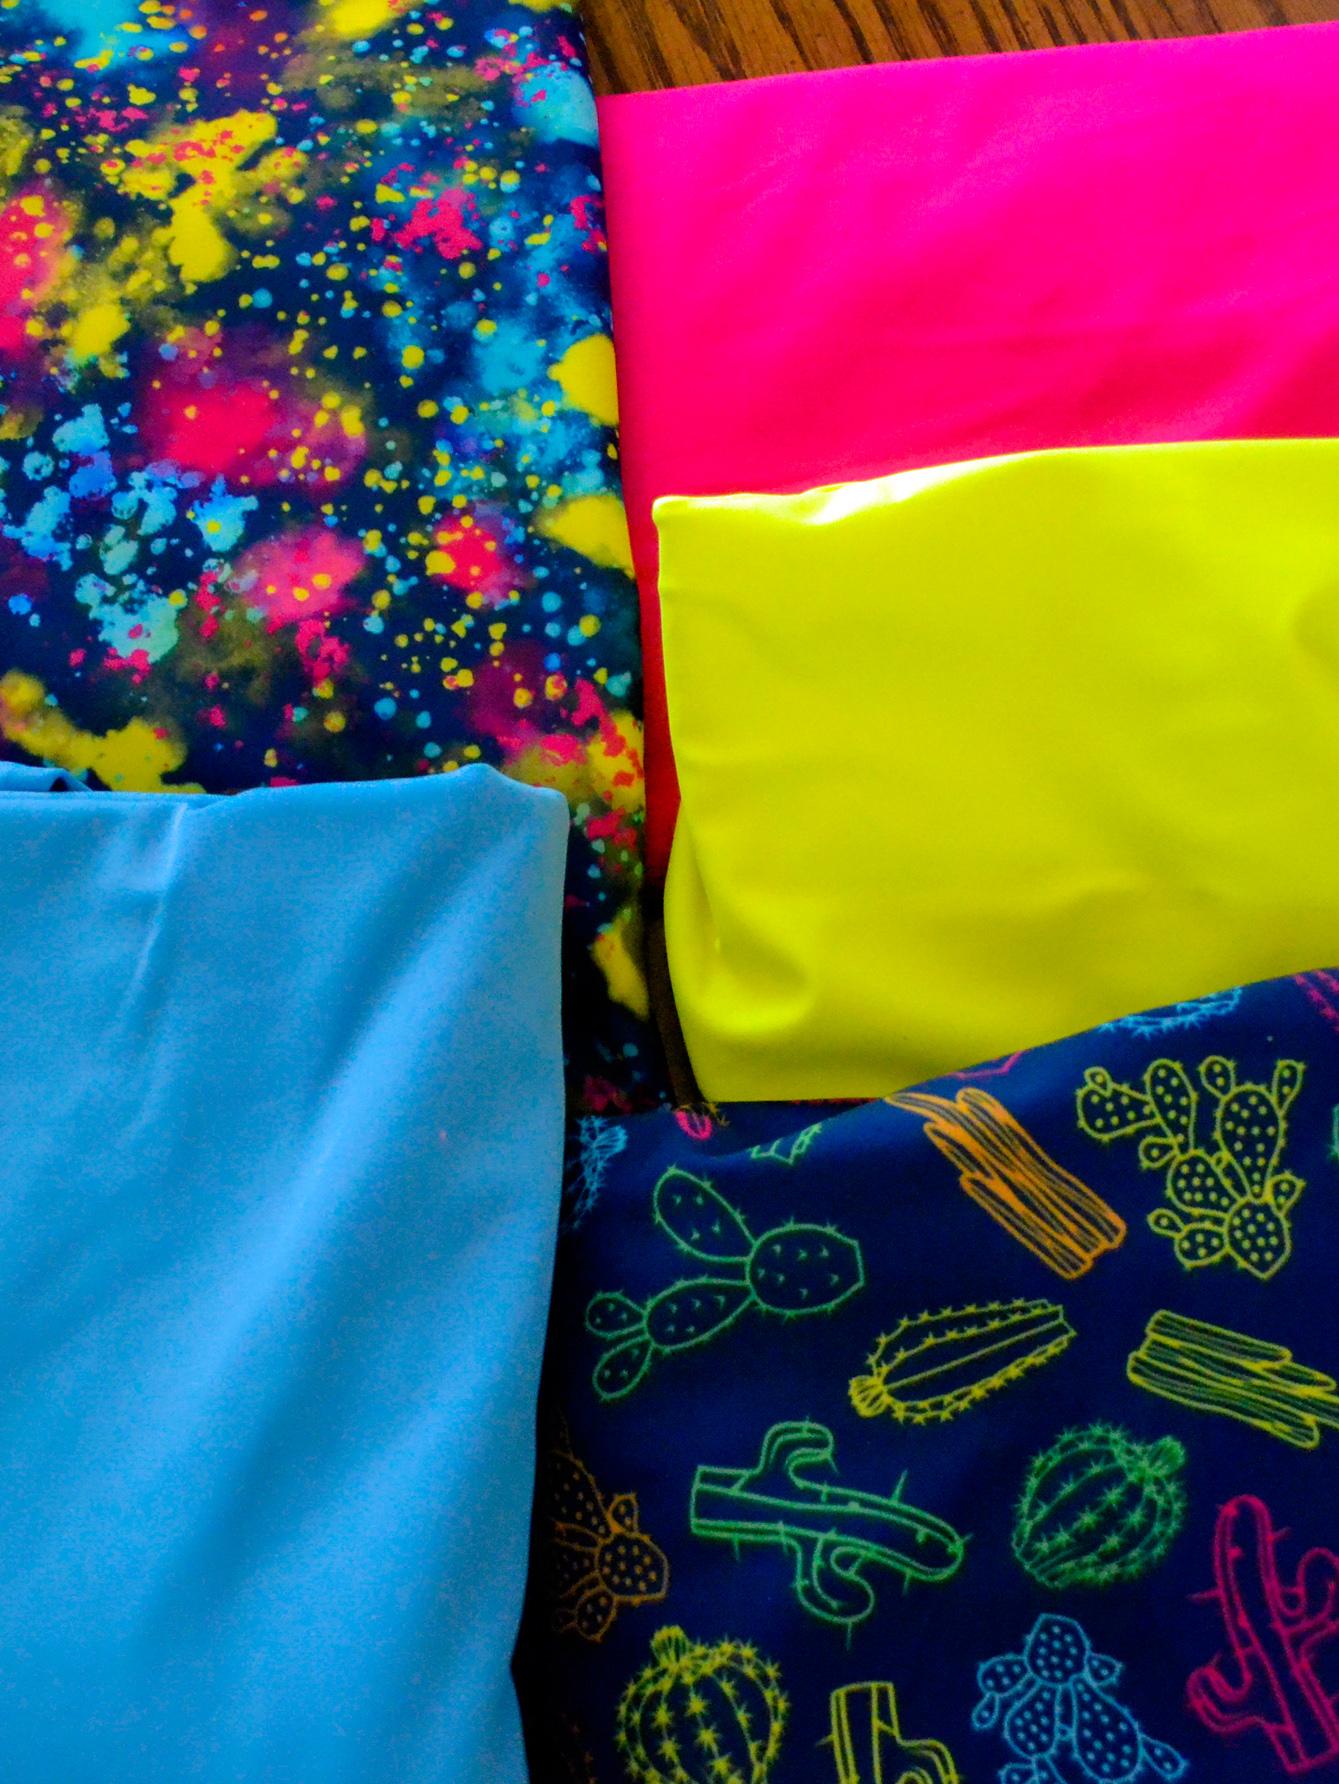
First, I had to pick my swim fabrics. I selected these fun neon prints from stash, both from Raspberry Creek Fabrics and found coordinating solids to match.
Once I picked my fabrics, I decided to make 2 tops, 2 bottoms and then I couldn't pass up the one piece to complete the capsule. This would give my little 5 different from our mini capsule!
We love all these different looks so much....it's hard to pick our favorite.
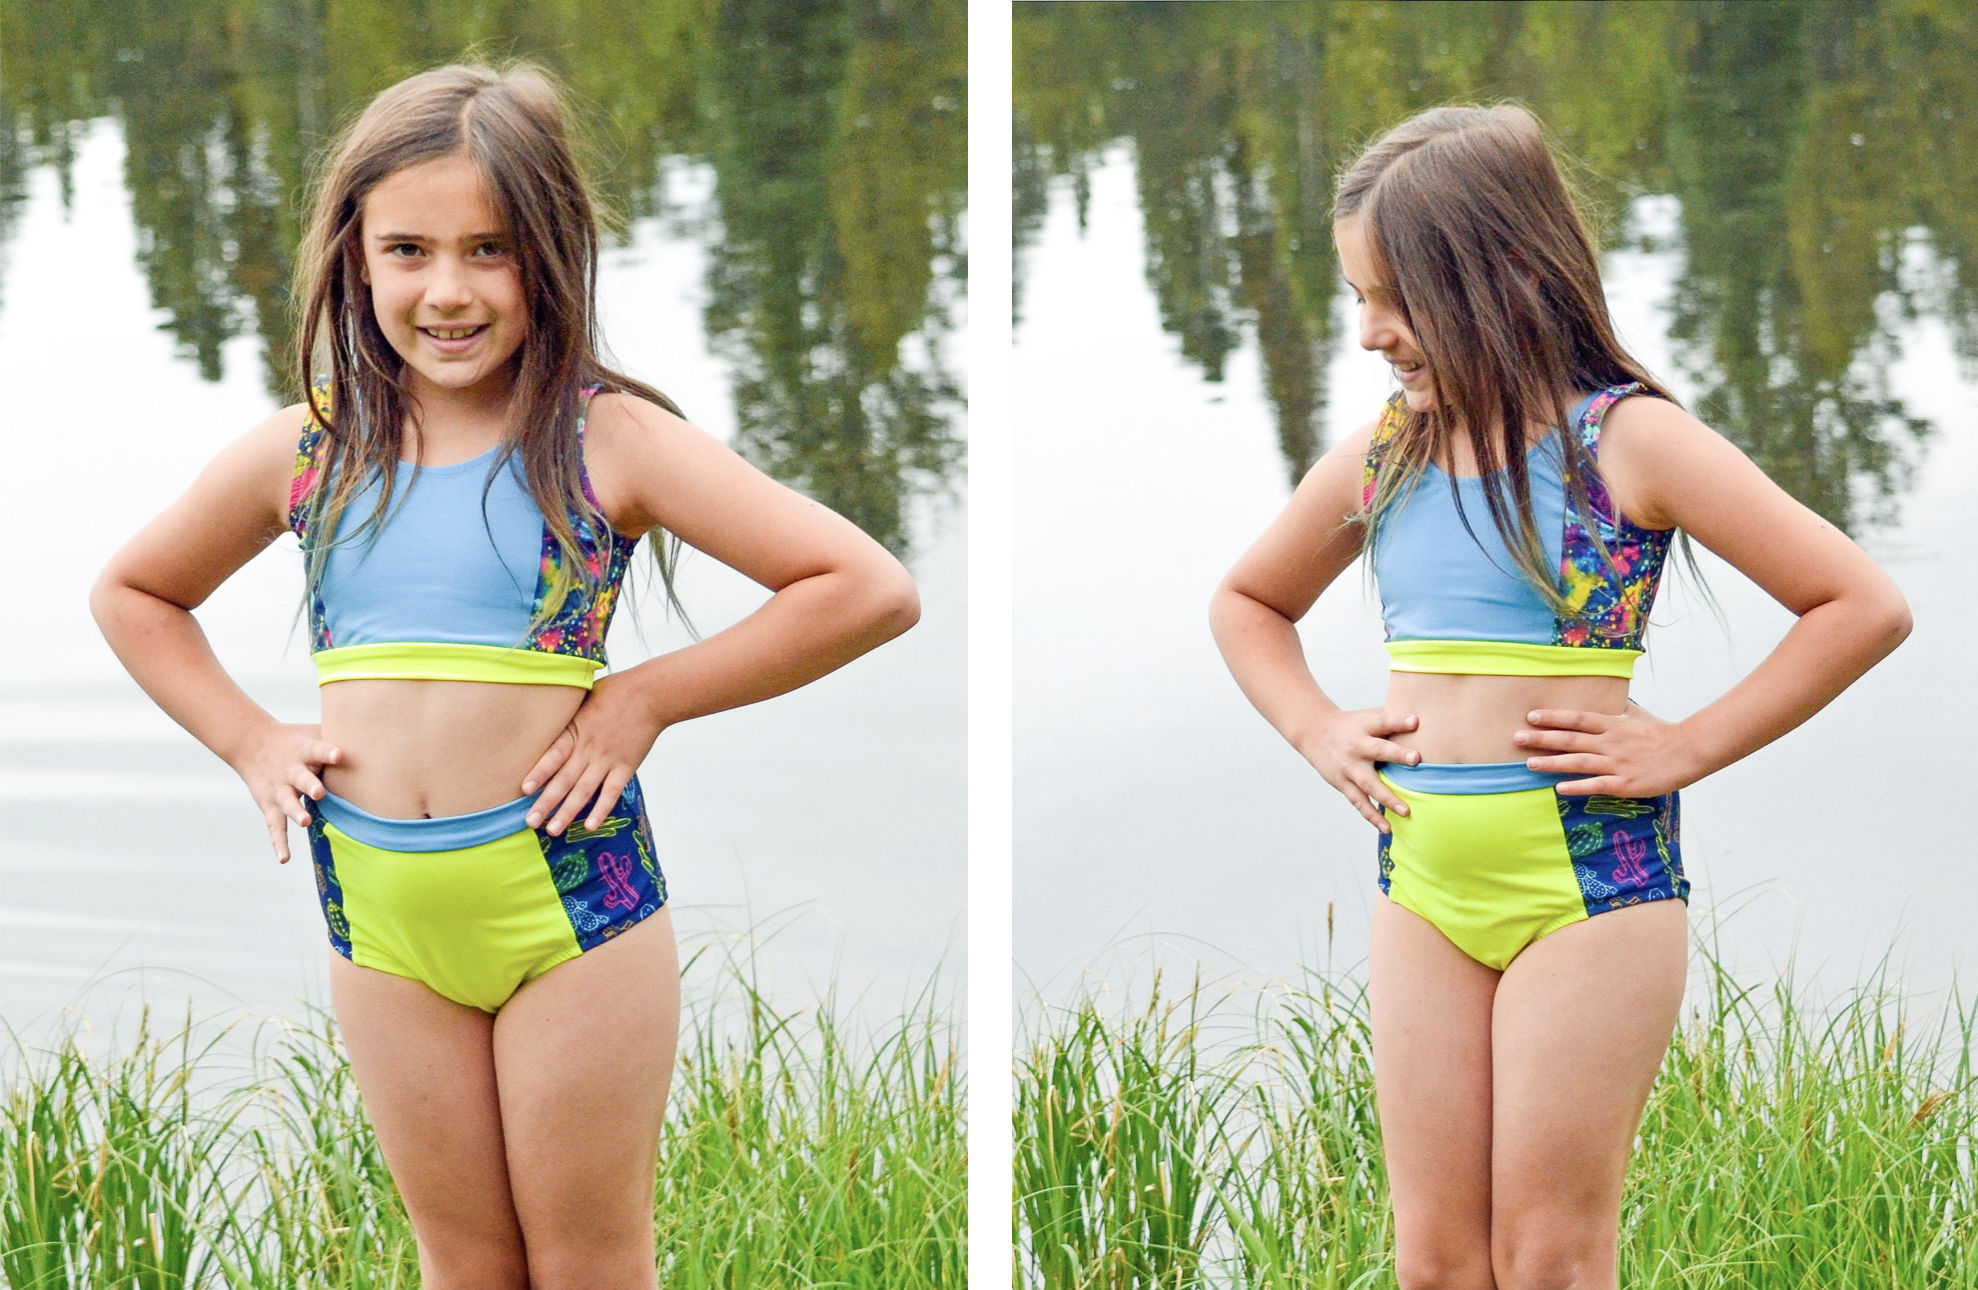
I embraced the colors blocking the Viridian offers to really use those coordinating colors and make the mix and matching easier.
With the one piece I really wanted to tie the capsule together so I decided to use both prints. I love how it turned out, it might be my favorite piece from the mini capsule.
Thanks so much reading along!
- Leslie
Be sure to follow Leslie on Instagram for your chase to win a free swimwear pattern from the Project Run & Play shop!!!
Use the code swim20 at checkout. Code expires July 1st, 2022.
I personally consider sewing boardshorts/board skirts an intermediate sewing skill. Simply because if the fact boardshort fabric is woven and needs to be treated differently than stretchy swim fabric. And if you are new sewing woven it is different from sewing knits.
Microfiber Boardshort is a woven fabric with no spandex in it, so it does not stretch at all. It also frays, so the seam edges will need to be finished somehow. You can construct board shorts on your serger or you can construct on your sewing machine. If you do construct on your sewing machine you will want to zig zag or serge the seam edges to prevent them from fraying.
You will want to sew boardshort with a regular universal or a microtex needle, not a stretch needle.
There is a right and a wrong side of boardshort fabric. The right side has a slight suede feel to it, like peach fuzz. The wrong side is a bit slicker and has a bit of a sheen to it. Because it's a woven fabric when you cut out your pattern you want to make sure it is cut on grain. Woven fabrics are constructed differently than knits and drape and fit differently. Cutting on grain will help your garment to fit properly.
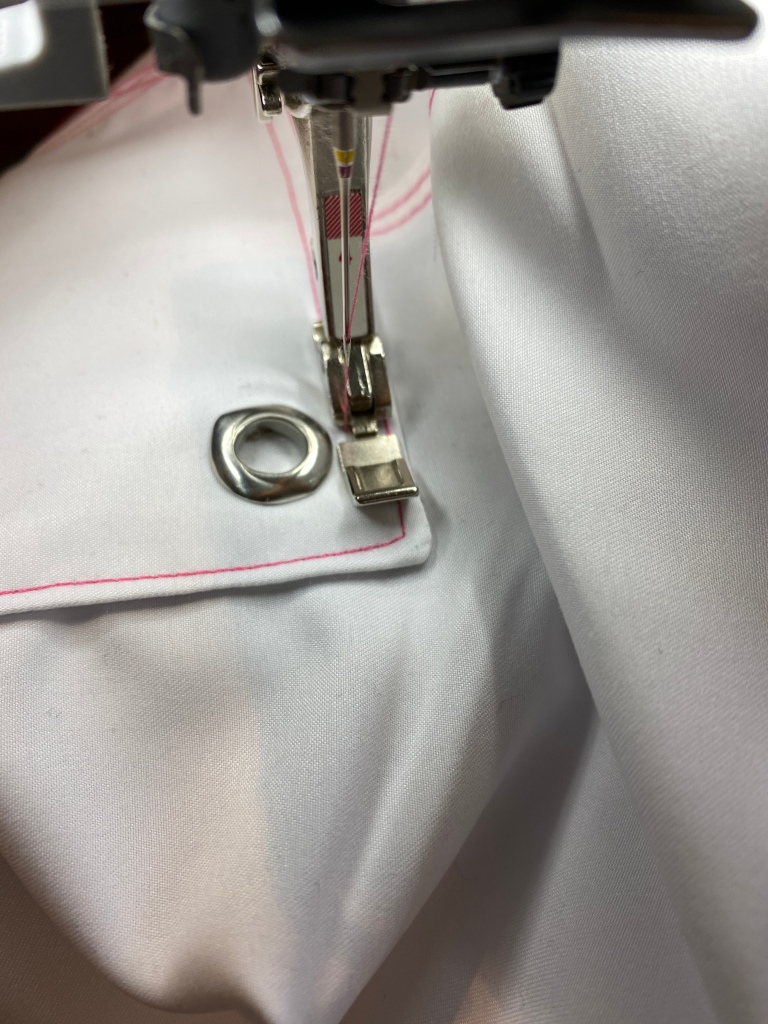
Another tip when using boardshort is adding a gromet or eyelet on pockets so they don't fill up with water when you get out of the pool.
To add a grommet, make sure you back your pocket with a square of interfacing in the spot you're adding it too. Get your pocket prepped then install your grommet according to the instructions that come with your grommets. Then you are ready to sew your pocket on. You may need to use your zipper foot when topstitching so you can easily get around your installed grommet.
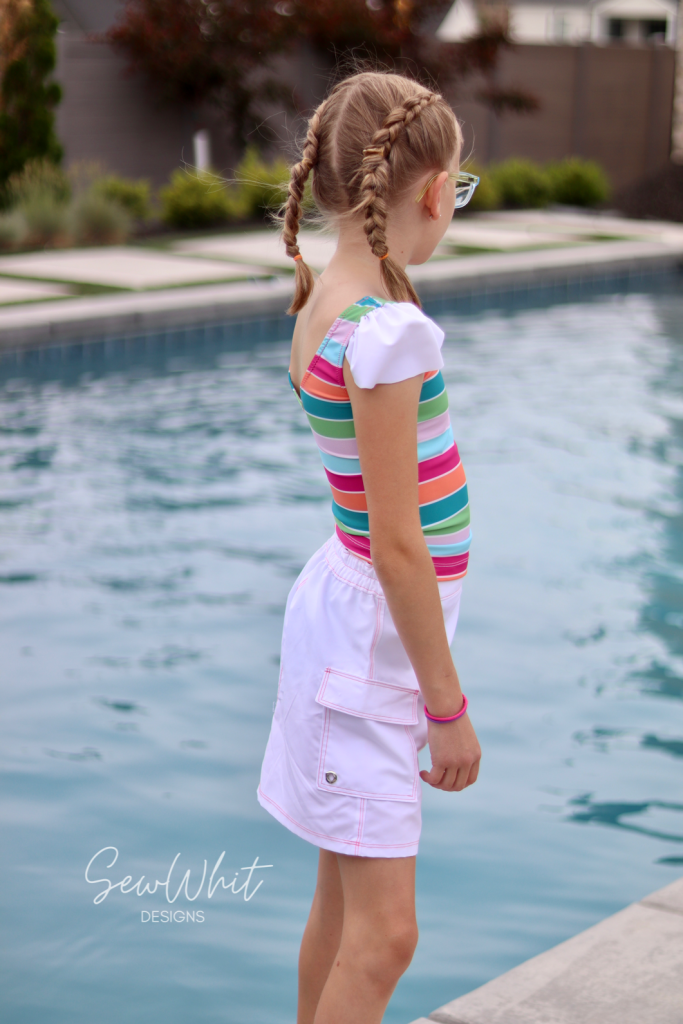
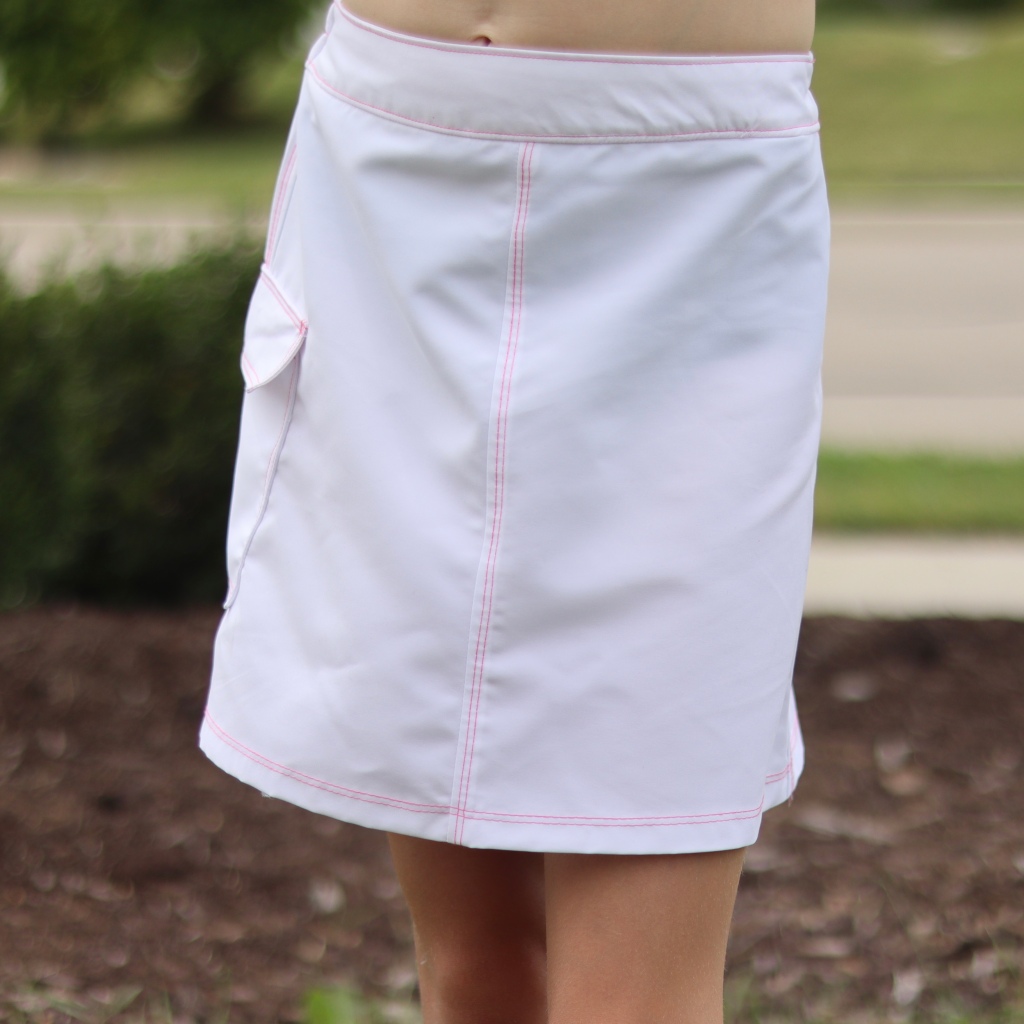
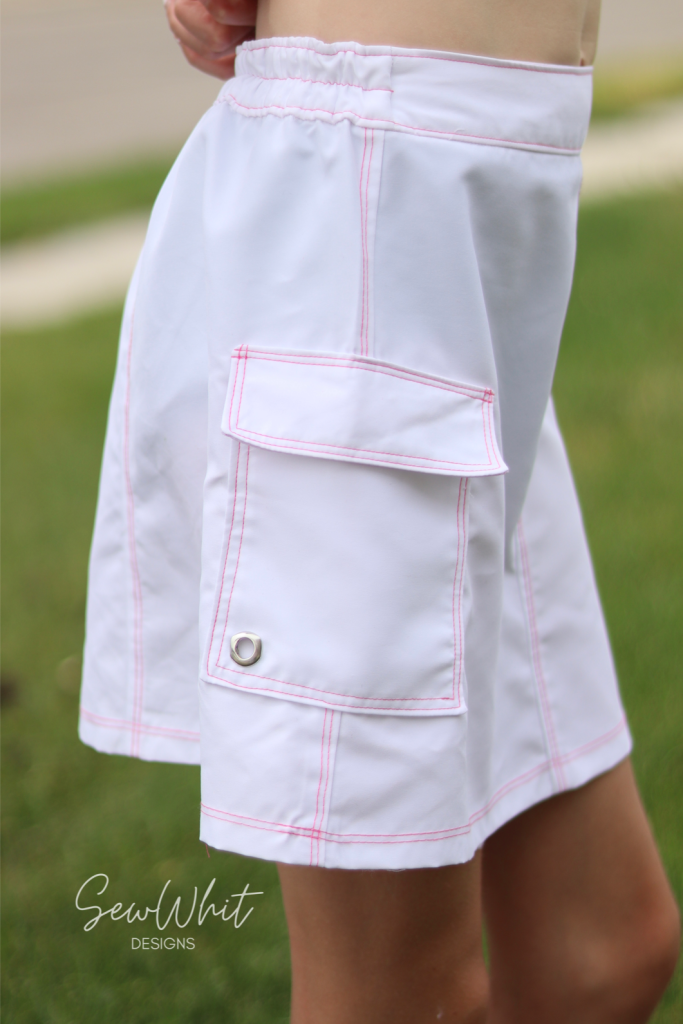
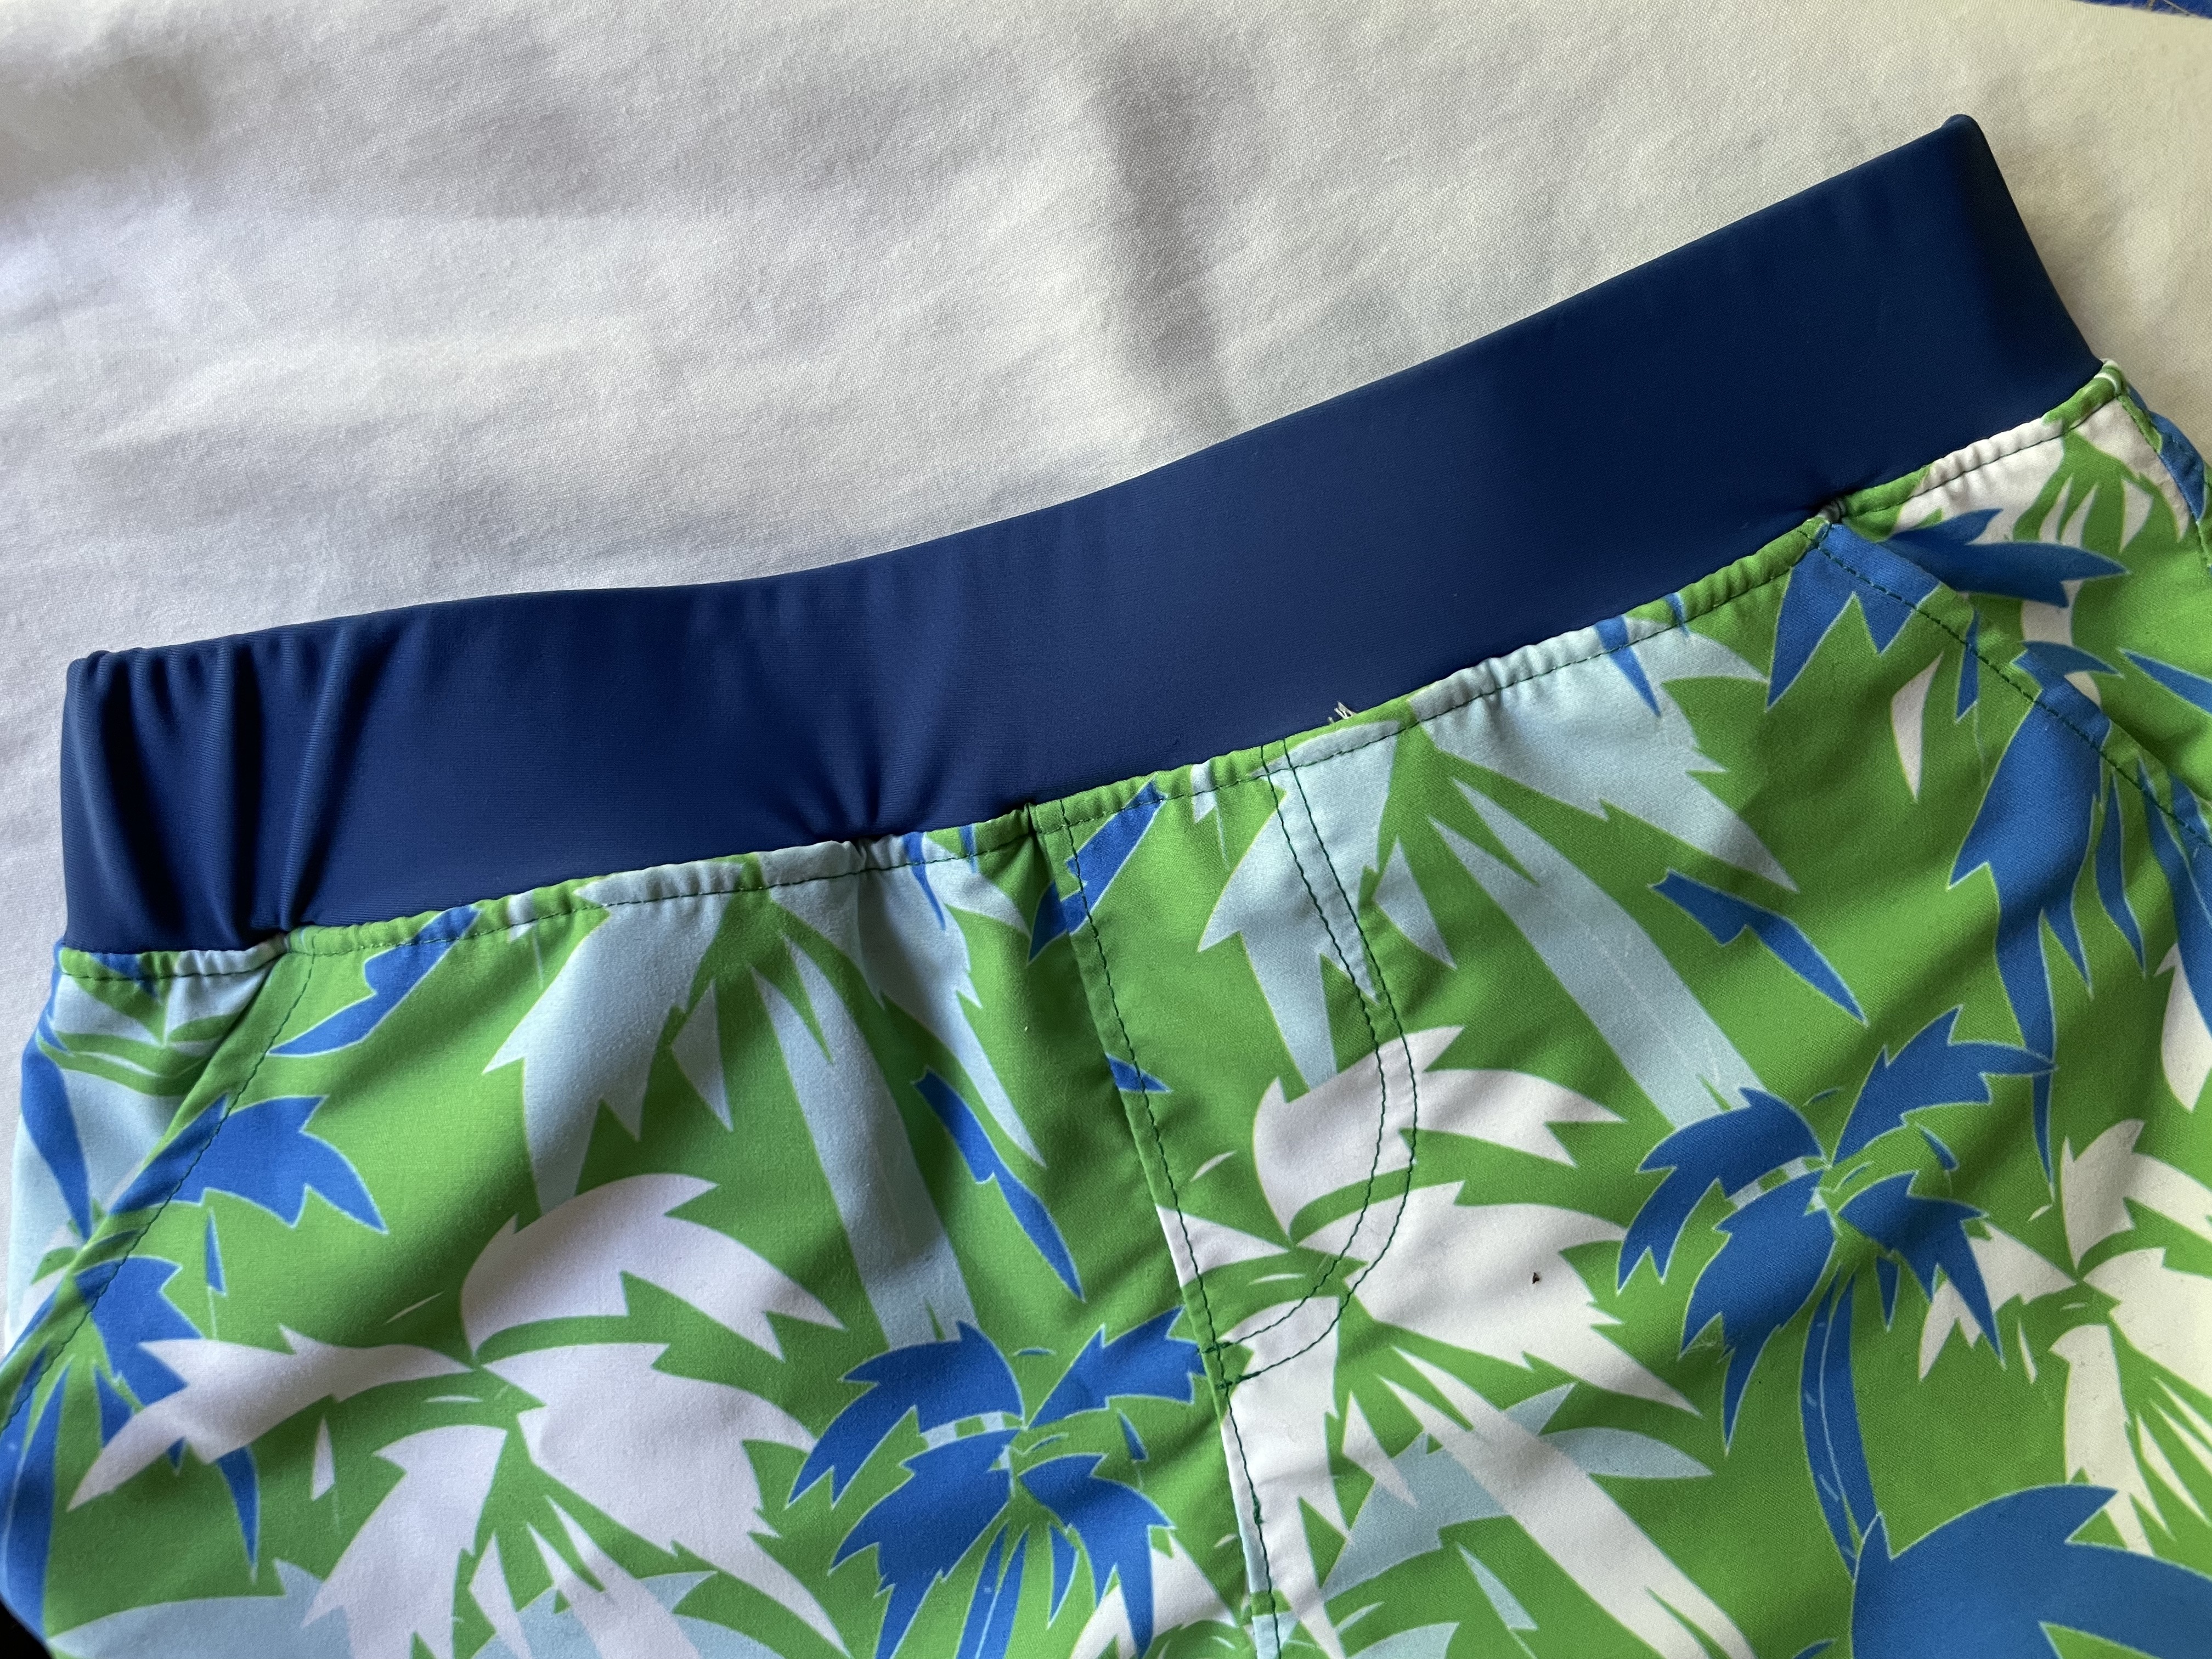
This was my first time making a board skirt. Although, I have made lots of board shorts and the same tips apply. I chose to do all my topstitching with a contrasting thread color this time to make it stand out against the white fabric.
While we are talking boardshort fabric I am going to put in a plug for my all time favorite lining for boardshort. Let me introduce you to sports mesh!
This is what you want to line your boardshorts with. And let me tell you it is AMAZING!! It is so much better than most of the lining you find in store bought board shorts. The holes in this are so tiny that nothing will get caught or pinched, it is very breathable. It is incredibly soft. This stuff changed my life, and my boys love having some extra coverage and built-in undies in their boardshorts.
The white board short fabric came from Raspberry Creek Fabric where I get most of my swim and board short fabrics. This white is the base fabric that they print on, but it's also so great on its own. With these few quick tips, you'll be sewing up your own board skirts and boardshorts in no time.
My daughter has oodles of handmade swimsuits and was super excited to get this skirt to wear as a cover up!
Join me over on my Instagram for another swim pattern giveaway form the Project Run & Play Shop.
Today we've got a tutorial for you on how to use a regular shorts pattern into board shorts! Here's Audrey from Skirt Fixation with the tutorial. Be sure to follow her on Instagram to be entered to win a swim pattern from the shop!
You may remember from the Project Jet Set lookbook that I used the Singapore Shorts & Pants pattern to sew board shorts for my boys. I did this by adding a swim liner underneath using the Saltillo Swimsuit as a starting point. Here is how you can do the same.
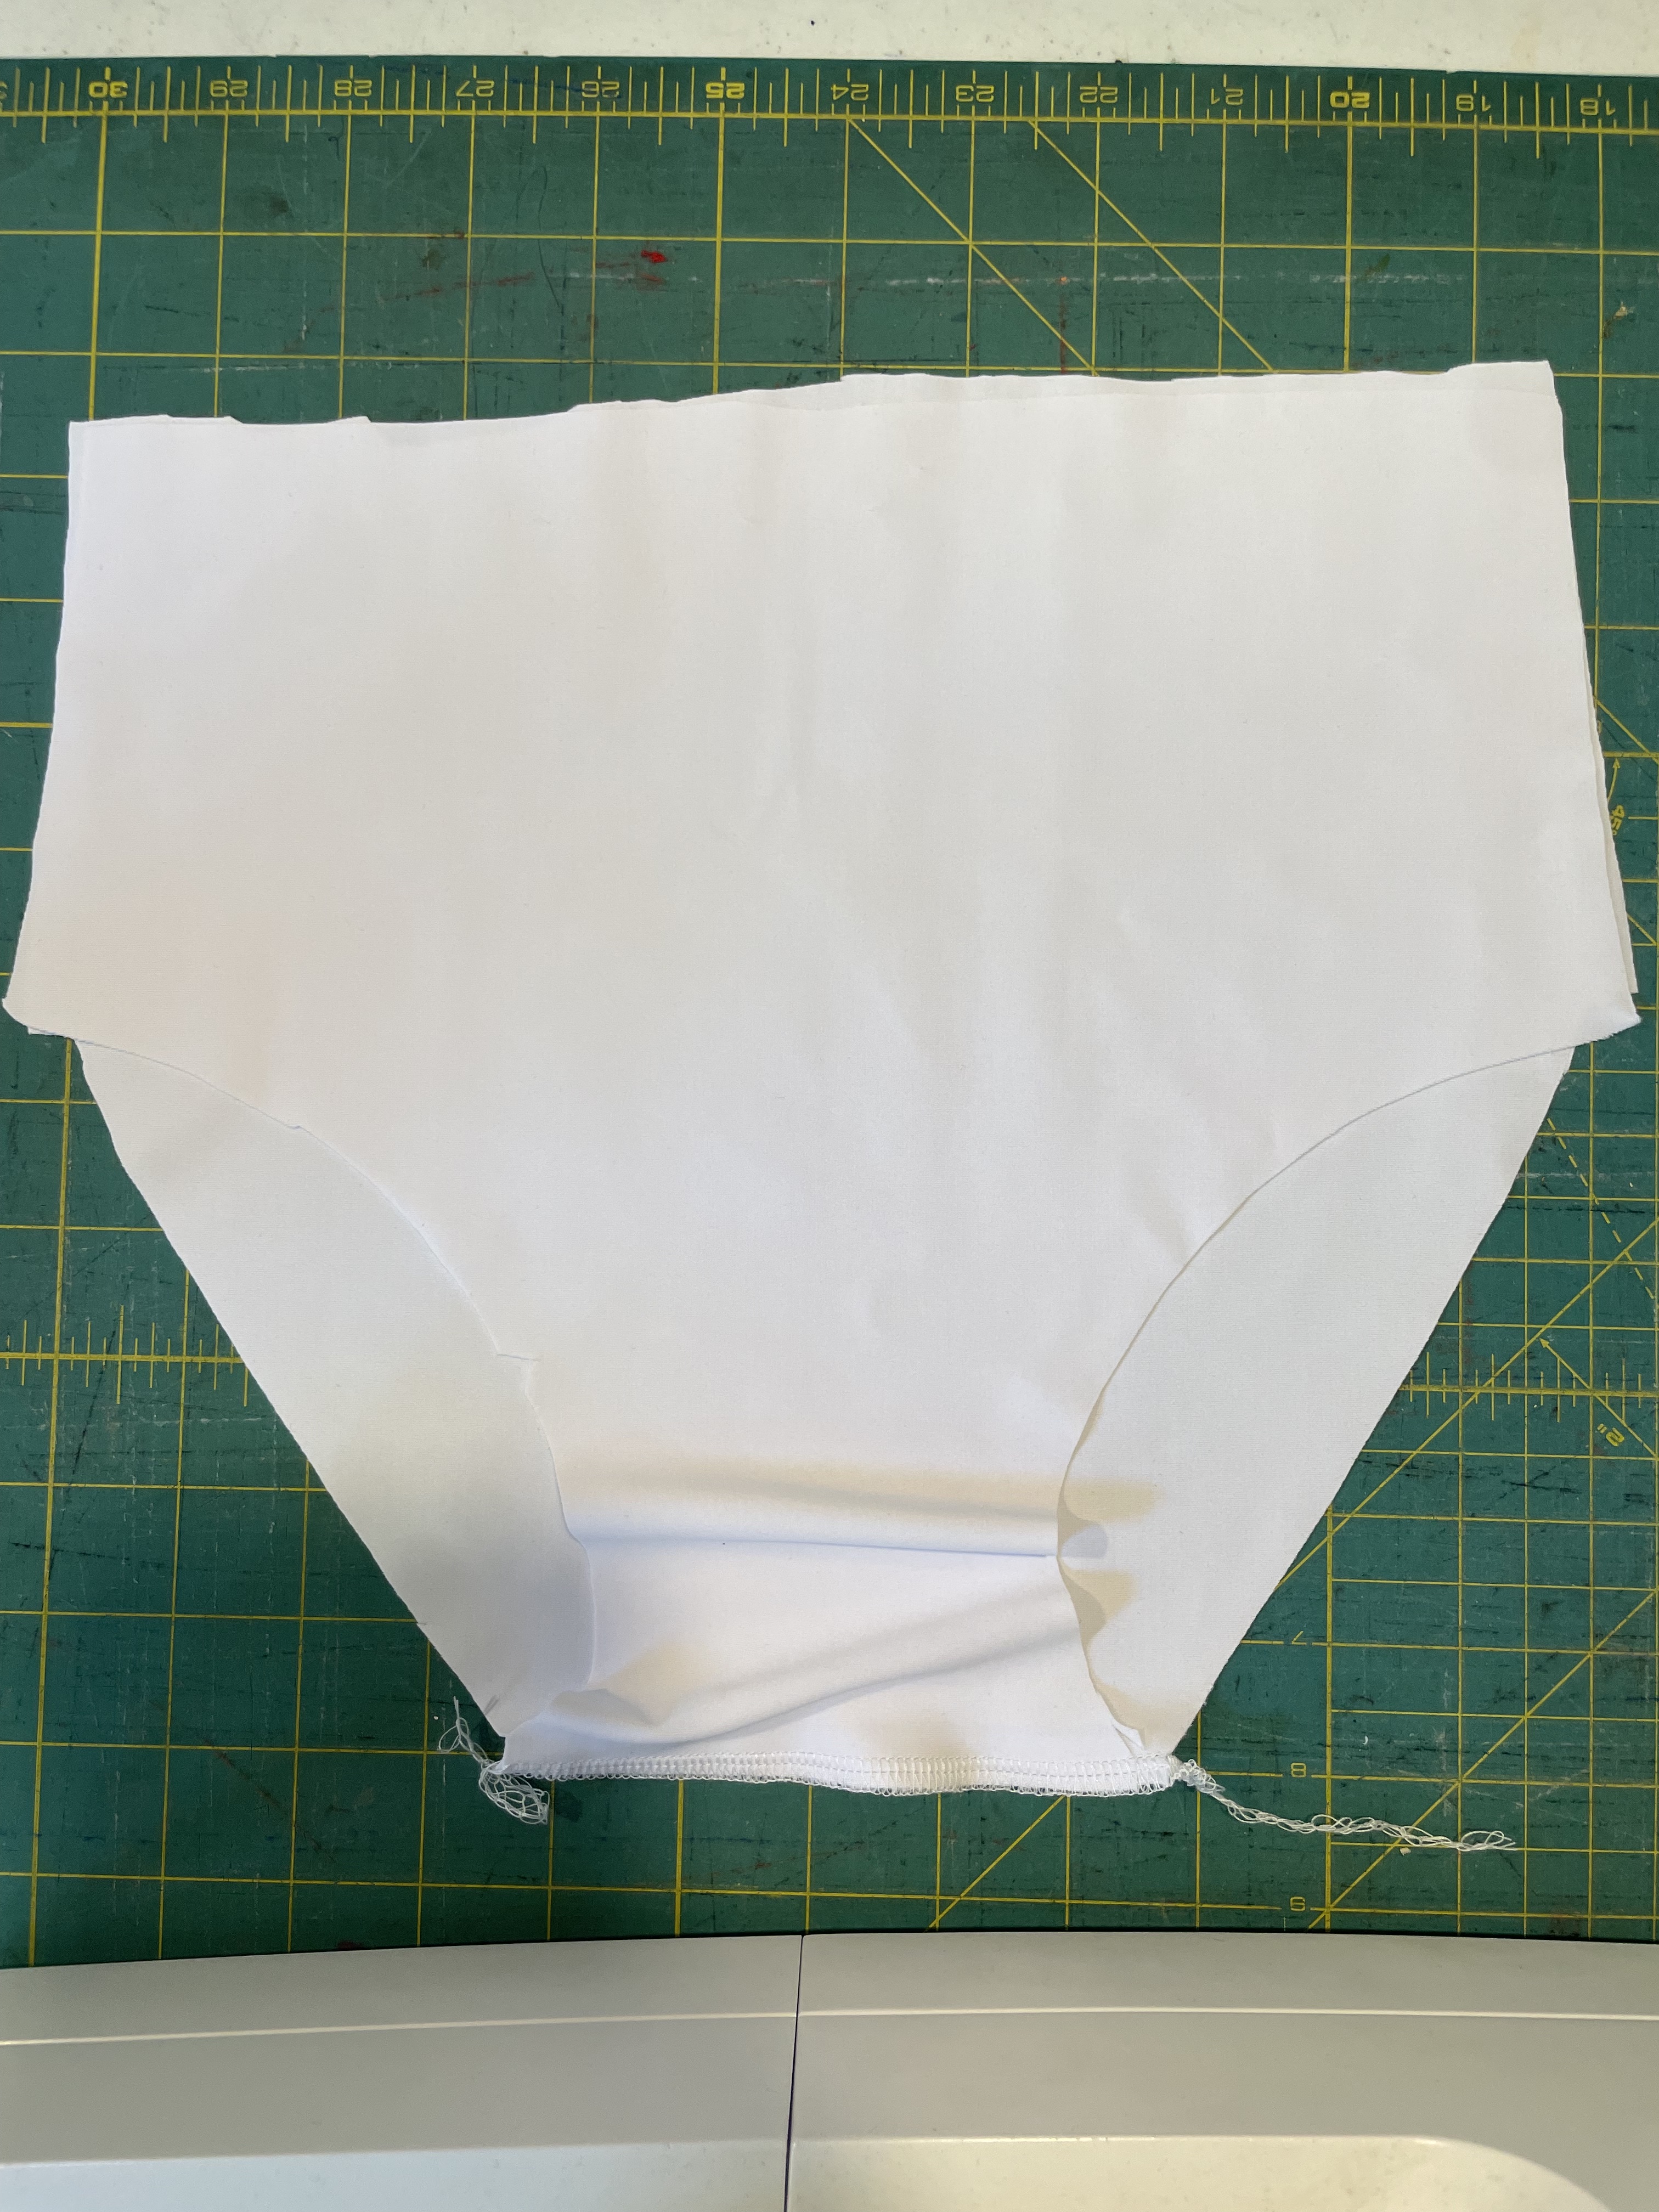
Begin by cutting out the bottom half of a swimsuit pattern from swim fabric. Here you can see I am using the Saltillo Swimsuit pattern. I've allowed *more* than I think I will need for height as that will be evened up later, and too much is better than not enough.
Now line up the bottom of the front and back with the right sides together and sew with a 3/8 (1cm) seam allowance.
After the crotch seam is sewn together, sew up the side seams, again with the right sides together and a 3/8" (1cm) seam allowance.
Now it's time to add the leg elastic. On the wrong side of the swim liner, use a zigzag stitch to sew swimwear elastic to the edge of each leg hole. (The Saltillo and all the swimwear patterns in the shop have an elastic measurements chart. You can also just stretch the elastic as you go if you are experienced in sewing swimwear and have a feel for how much to stretch.)
Now turn that zigzag stitch in toward the wrong side again and zigzag a second time. Repeat these steps for the other leg hole.
Ta da! Now you have a swimsuit liner! Let's add it to the shorts pattern.
Before inserting it into the shorts, you need to trip some off the top of the front. This is because most patterns are higher in the back than the front and the extra fabric in the front of the swim liner would bunch weirdly. Also, this is a good time to trim up any excess fabric (remember we allowed a lot extra when cutting out the liner?) Just measure where the crotch levels are and trim any excess off the top of the liner.
With both the liner and the shorts right sides out, slide the liner down into the shorts. You can baste around the top edges to keep these layers together as you are attaching the waistband.
This is what it looks like from the inside! Swim shorts with a liner! These instructions can also be used with the Bodhi Board Skirt, and now I'm off to make about 10 of those...
The Singapore Shorts is a perfect pattern to use for this tutorial because the waistband can also be made from knit fabric! We used swim fabric as shown above.
Today we're in luck because Janelle from the ambassador team is here to share a great tip for intermediate level swimwear sewing. In a nutshell it can be summarized like this: use cotton lycra to sew a more difficult swim pattern. Cotton lycra (or jersey as it's also known) is a lot easier to work with than nylon lycra/swimwear fabric. This little tip will let you try out a TECHNIQUE without having to deal with a more challenging fabric too.
Be sure to follow Janelle on Instagram because she's giving away a swim pattern from the shop for FREE!!
And why not make a dress from the cotton lycra fabric while you're at it? Here's Janelle to share the HOW:
Ripley Swimmers Dress
It is apparently the coldest start to Winter here in 70 years, and here I am sewing a Summer dress! It’s pretty cute though, as is my model! But that is why I have played around with a background remover app for my photos, as they definitely needed to be taken indoors! It’s not perfect, she’s missing a finger on her right hand, but it was very easy.
Only a few years ago I’d never sewn with swim fabric. I’d never sewn elastic to a fabric edge, only added it into a casing. I’d never sewn binding. Once I took that first step I was hooked. Now spandex is one of my favourite fabric bases. But not just for bathers. I especially love sewing fancy leggings, shorts and crop tops for my kids to wear to acro class. I also choose to change patterns to use binding instead of the recommended technique.
But I thought a good way to take the first step to sewing swimwear might be to use a swim pattern and a fabric base you are already familiar with, and create a dress. Then once you’ve nailed that you can create a pair of togs from the same pattern. I’ve used the Ripley Swimmers Pattern but this would also work with Saltillo, Sorbetto or Viridian. Azur too, with a low back to really highlight the high low hem.
The fabric I’ve used is a bamboo elastane, (an Aussie term for spandex) which has a lovely drape. When I came up with this idea I was sewing for my dance concert, and I imagined a soft pastel with layers of stretch tulle, or lace ruffles and overlay. But my daughter wasn’t keen and pulled these fabrics from my stash. I wasn’t so sure at the start, but now that it’s finished I love it.
I sewed up the bodice exactly as per the pattern. I basted the front together.
Then I cut the biggest circle I could out of the fabric and marked the centre of the circle. I found a great website to work out the dimensions of the inner circle https://www.thecreativecurator.com/full-circle-skirt/ with this awesome graphic:
I offset the centre of the circle by about 3 ½”, to create a high low hem.
Then I sewed the circle skirt to the bodice, hemmed the skirt and attached the back straps. After she’d tried it on to make sure the length was ok. I added some clear elastic to the waist seam to help hold it up, as a circle skirt can be quite heavy.
If I make this again I’d pay more attention to how much I overlapped the bodice at the front, as I think if it was overlapped a little more it would fit a bit better, and I don’t think it’s overlapped by as much as the pattern suggests. But I think the next one might be the Saltillo with the top ruffle or the Sorbetto with those sleeves…
Today we are blessed to have Whitney from Sew Whit Designs here sharing her advice for anyone sewing swim for their 1st time. Whitney is an AMAZING swimwear sewist, so you can depend on any and all advice she shares. Be sure to follow her on Instagram for your chance to win a swimwear sewing pattern from the shop!
I’ve been a sewing swimsuits since I was in Highschool 20+ years ago. Back in the day there wasn’t a lot of info on how to sew your own swimsuits. I was stuck with one or two paper patterns and whatever fabric I could find at the local fabric store which was usually 3 or 4 prints. Now there are hundreds of digital patterns, oodles of fabrics, and lots of info available online.
If you are new at sewing swimwear start here. This is a post I did a few months ago for Raspberry Creek Fabrics. I compiled all my most Frequently Asked questions and did a little breakdown of different fabric, elastic, notion types. I was a labor of love and worth the read.
Usually, you know where you want to end up, but sometimes it’s hard to know where to start. Here is my best recommendation for true beginners. Start with a Rash guard and some Euro Shorties. This type of swim wear will allow you to practice your skill on the swim fabric, which does have a bit of a learning curve, without overwhelming you with new technique. It's pretty similar to sewing any other knit fabric but sewing with swim fabric can be tricky because it can be slippery.
With these types of patterns there isn’t any elastic involved (except for the waistband) there isn’t extra support/cups that need to be added and fitting is as easy as any knit shirt or shorts. Rash guards and shorties are the perfect way to dip your toes into sewing swim.
I’d already sewn up the Rashie for the Project Jet set tour in regular jersey. When I initially made it, I sized up because I wasn’t sure how much negative ease was included. But as a rash guard you want the top to fit a little more snug so it’s not baggy in the water. So, recommend choosing size according to the child's measurements.
We chose just the basic design for these. If you're a true beginner, start with that view on the pattern. But the Rashie Pattern is awesome because it does have a color blocked view and an option for a zipper! So when you're ready to up your game a little bit choose one of those fun options.
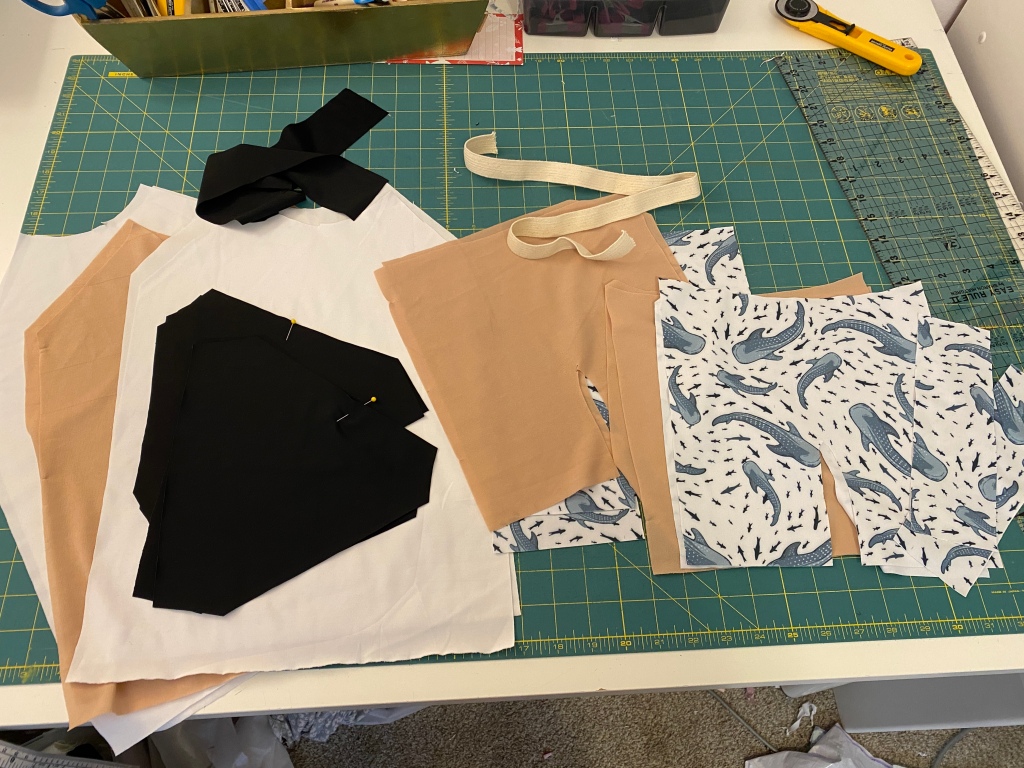
I used my go to Raspberry Creek Swim fabric solids for the top. I went with classic black and white. I debated on adding a shark with some heat transfer vinyl but decided to leave it plain because it will coordinate with more swim bottoms.
One tip I have for sewing with swim fabric is a regular old washable glue stick. It's helpful to "glue" the lining to the fabric to keep it from slipping as easily as you sew. The pattern instructs you to add the lining to the wrong side of your front and treat it as one piece.
I typically line the fronts of my rash guards only. The sleeves and the back don't need lining. For the bottoms however, I line both the front and back with swim lining and I lined the gusset with swim fabric for a little more coverage.
Another tip I have is for hems, and that is to baste your hem at the Hem allowance. Sew a long basting stitch over both the fabric and lining where you plan on FOLDING your hem. I basted the rash guard, and the shorts hem this way.
After basting your hem at the hem allowance line, you can turn up your hem. If I'm sewing anything but swim, I press the hem up. (You can press swim fabric, on a low setting, but it doesn't hold the crease well.) At this point you can easily see where you are supposed to fold the hem up. You can glue or pin it if you need to before you sew the hem. Or if you are confident, you can use your stitching line to fold and stitch as you go along.
I hemmed with my cover stitch. And it was so easy to know where to fold because of the basting stitch. Then remove your basting stitch. If you don't have a coverstitch machine no worries, you can use a twin needle on your sewing machine or a zig zag stitch. But work awesome too. For info on needles and stitch types for swim refer to my FAQs post.
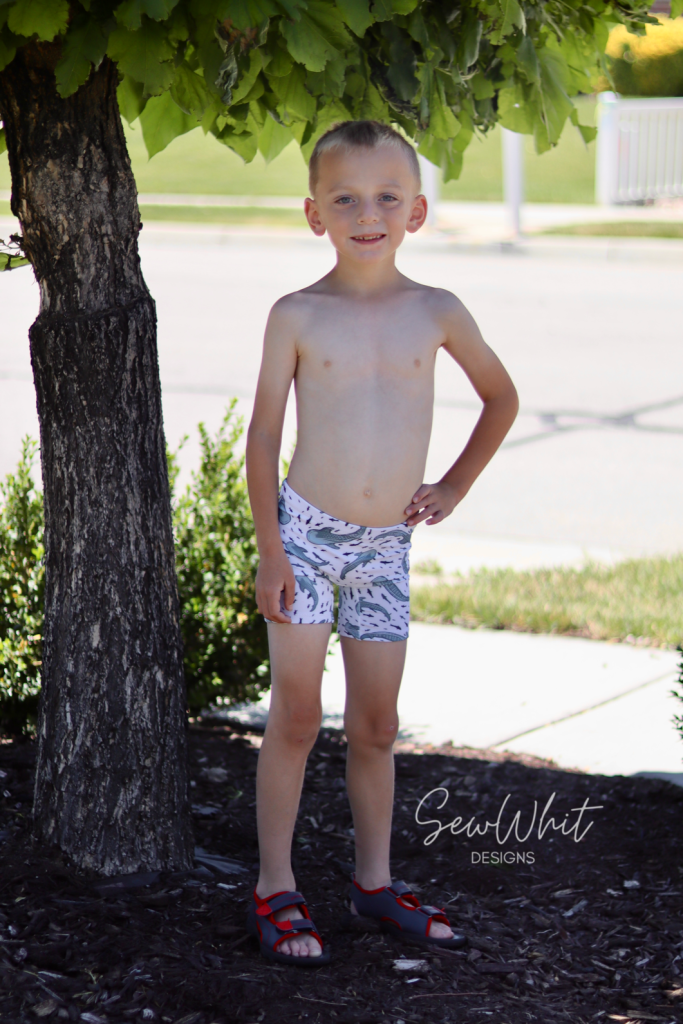
For the Shorties I also went with the basic option. I can't wait to make the rouched side version for my daughter but today we are talking beginner options. This is the long version of the Shorties. The shark fabric was a custom print from Raspberry Creek Fabrics. Hopefully, the designer will add it to their Designer Studios soon.
My boys are now working on darkening their farmer's tan. And living in their new suits.
Stay tuned all month for great tips and inspiration on sewing all the swim! Thanks for having me Project Run & Play!
And for a bit more fun head over to my Instagram account where I get to give away a Free Swim Pattern from the Project Run & Play Shop! Keep your eyes open for that giveaway!
Thank you so much Whitney! We definitely added some tips to our swimwear sewing arsenal too. Remember, all swim patterns in the shop are 20% off!!!
Use the code swim20 at checkout. Code expires July 1st, 2022.
Now that we'd learned about swimwear patterns and swimwear fabric, it's time to discuss what else is needed to sew swimwear. The good news is that very little else is needed!
Swimwear elastic - this is a must! Do not substitute non swimwear elastic as it just won't hold up to swimming conditions and does not have the same stretch properties. We also don't recommend clear plastic elastic because in our experience, it will decay in heat or chlorine. Swimwear elastic comes in various widths, 3/8" and 1/4" is what most patterns recommend.
Swim lining - many patterns call for lining. We recommend you always include it when the pattern requires it as omitting it will affect the fit of the finished suit. Usually swim lining comes in nude/tan, white and black.
Stretch needles are a MUST when sewing swimwear! If you are seeing skipped stitches, you probably aren't using the correct needle! In a pinch, you may be able to get by using ballpoint needles, but we 100% recommend stretch needles when sewing with swimwear fabric.
Bra cups - older girls may prefer bra cups in their swimsuits. Be sure to get ones designed especially for swimwear sewing as other kinds may dry at different rates than the swimwear fabric. Bra cups can be purchased in nude/tan, white and black. A really great source is The Fabric Fairy - they have swim bra cups in specific sizes. Pro tip - if you are unable to find bra cups, or don't have time to wait for an order, head to your nearest thrift store to purchase swimwear there. Then you can harvest the bra cups from in them and add them to the suit you are making!
If you are sewing board shorts, you may wish to use stretch mesh for the hidden bottoms inside.
Machines:
Big question: do you need a serger to sew swimwear: NO!!! Very many of us have sewn swimwear on a regular sewing machine using stretch stitches, zigzag stitches, and double needles! The key is to use really good patterns, fabric and supplies to make your experience as smooth as possible.
We're excited to let you know that now that you've completed your pre-swim sewing lessons, tomorrow you get to get in the water!!
If there's one thing that can make or break sewing swimwear, it's the fabric. It is crucial to use good quality fabric. Today we're going to share some of our favorite places to get very good quality fabric for sewing swimwear.
When buying swim fabrics, look for nylon spandex, poly spandex, tricot, or athletic fabric. Also, swim lining is very important, and sold under that name.
Buying fabric online (without being able to feel the quality) can be a tricky thing, so it's especially important to buy from a source that stocks high quality. We asked the designers in our community for their favorite places to shop for swim fabrics. We can confidently recommend the shops we are sharing here today, as we have used and loved their swimwear fabrics over and over again.
Boardshorts fabric
Knitfabric.com stocks a great variety of board shorts fabric. The ones that we've used are slightly sueded on one side, which makes them MUCH easier to sew with. The prints are adorable, and the solids are so good too.
We absolutely adore the board shorts fabric from Raspberry Creek Fabrics! It is super good quality, great to work with, and lasts through many, many wearings.
The Fabric Fairy has a huge selection of board shorts fabrics. They divide it up into prints and solids, and the variety of both is astounding!
Swimwear fabric
Does it get any cuter than the swimwear fabrics at Raspberry Creek Fabrics? We don't think so. Plus, if somehow you can't find the fabric that's perfect for your project, you can design your own!!!
CaliFabrics has a wide variety of fun swim fabrics. Look for nylon spandex or poly spandex and usually a recommendation for swimwear in the description. All these fabrics are also deadstock fabrics, so you get to feel great about that too! We can recommend their solids very confidently too.
Knitfabric.com is a swimwear source we turn to over and over again. They have cute prints and amazing quality solids in every shade of the rainbow. You can also find some textured swim fabrics like seersucker. Plus many of them have UV 50+ protection.
Of course we have to begin our swim lessons by talking about swimwear patterns!
All of the swimwear patterns in the Project Run & Play shop have very good instructions, and that will help you learn to sew swimwear better than anything else. Don't be afraid to dive in (yes, pun intended!) and try sewing swimwear! With a great pattern to teach you, you'll gain confidence in no time.
And just for you, all swim patterns in the shop are 20% off!!!
Use the code swim20 at checkout. Code expires July 1st, 2022.
We do recommend beginning with an easy sewing pattern. We've categorized all the patterns for you into easy, intermediate and advanced.
Easy swimwear patterns (in 3 baby steps!)
These are all perfect patterns to begin sewing swimwear.
1. As easy as it gets: sew a pattern that won't get wet!
Cancun Cover Up is such a cutie! This fun (plus fast and easy!) pattern can be sewn from knit or woven fabrics. Plus that cute pixie version hood gets us every time...
Ultramarine Coverup This coverup has some light shaping that elevates it just a little beyond the ordinary!
2. Take it up a notch: sew with board shorts fabric, a woven fabric that doesn't have stretch.
Bodhi Board Skirt is dream come true for skirt lovers! Wear this one in the water...or beach side too.
Cobalt Board Shorts is just like the ones you buy at the store...but better because you can personalize to your child! A swim staple for sure.
3. Dip your toes in the water: Next try sewing with swimwear fabric! Neither of these patterns has elastic in the arms or legs which is a little bit trickier to learn or straps (which can be harder to fit.) Using one of these patterns will allow you to conquer sewing with swim fabric first before moving onto learning some of the special swimwear techniques in the intermediate level patterns.
Reef Beach Rashie - Maximum protection from the sun...guaranteed! With options for sleeve length, color blocking and more, this one has got them covered. Literally!
PB Swim Shorties Our kids squealed with delight when they saw this pattern in the collection, and we're confident your kids are going to feel the same!
Intermediate swimwear patterns
It's time to level up your swimwear sewing! These patterns all have amazing instructions, and some have video tutorials to keep you afloat through the entire process.
Viridian Swimsuit is a one piece, or a two piece with some very cute ruffles, or not! Mix and match to your hearts content.
Saltillo Swimsuit the basic version of this pattern is intermediate level. You can do it!
Sorbetto Swimsuit has some really awesome color blocking options and optional sleeves!
Advanced swimwear patterns
You did it! Now that you've dipped your toes in with beginning swimwear, and stayed afloat while learning special swim techniques, it's time to advance to the final level! These patterns take a little more time and effort but are 100% worth it!
Saltillo Swimsuit is THE suit you've been waiting for! It has options for ALL the frills, bows and ruffles, or a sporty plain version too.
Ripley Swimmers Pattern has deep v-neck accentuated by a ruffle makes this pattern a delight to sew and wear.
Azur Reversible Swimsuit is reversible!!! Two suits in one, and if that wasn't awesome enough, there's all those fun detailed seam lines!
Remember, all swim patterns in the shop are 20% off!!! Use the code swim20 at checkout. Code expires July 1st, 2022.