Today we have two ladies we've been smitten with since their first entry into the flickr group. And I'm sure after you see their clean, polished style you'll know why. Here they are----Emily and Ashley from Frances Suzanne !
Hello Project Run and Play readers! We are absolutely thrilled that liZ and Elizabeth invited us to be here today! Two seasons ago, we participated in our first pr&p sew-along with the flickr group. The camaraderie and sewing support 'hooked us' from the onset.
Unlike previous guest bloggers, we are "sewing aunts," rather than "sewing mommas." We are two sisters, Ashley {frances} and Emily {suzanne} who love creating and sewing children's clothing for our two nieces {our 'baby' sister's children}.
When trying to determine our tutorial focus, we decided why not go with what we love? Accessorizing with PIPING!
And, since there was plenty of white sheet to spare from season 5, white sheet challenge (here and here), we put it to use!
Piping is probably 'old news' to a lot of you, but to add intrigue, we opted to use multiple piping layers to add effect on an outfit.
We used this technique in one of our flickr entries, and a friend asked, "How did you make double piping?" Hence, the tutorial idea was conceived. Then, for a bit of a twist, and since we were doing multiple layers, we thought: why not make ombre piping?
Since Christmas is quickly approaching, we decided use the opportunity to make one of our niece's Christmas outfits. *Although in order to do this, we broke our "standing rule" of not wearing Christmas clothes before Thanksgiving albeit only to make pictures.
Truth be told, pattern drafting is practically foreign to us at this point, so we chose to start with a pattern and modify it, although the ombre piping technique could be used on practically anything.
We began with the Oliver + S After School Shirt, which we lengthened to dress length (see figure below for measurements). We also added 1" to the sleeve length (right above the notch) to accommodate for piping seams.
Knowing that we were going to need loads of piping, we used Katy of No Big Dill's tutorial on how to make continuous bias strips.
This tutorial eliminates the need to piece individual bias strips together, which to us was just lovely. We chose to cut our strips 1" wide, and then ironed them in half.
Next, we inserted "baby piping cord" into the fold. Of course, you could use any size cording that you prefer.
Then we stitched as close to the cording as we could, so we would end up with "fat" piping, rather than "flat" piping.
Fortunately, we have a handy sewing foot that makes this all possible. It has a small groove where the cording feeds almost effortlessly.
Our goal was to make a piped ombre effect going from lighter to darker down the dress. So, we incorporated the lightest colored piping around the entire yoke. Here are some pictures to give you a general idea, but you can find a very detailed tutorial here.
After we had made the single piping cords of all three colors and completed the above-mentioned steps based on the pattern instructions and tutorials, we were ready to get down to the real fun: ombre piping.
Starting with the sleeves, we lengthened them 1" to accommodate 1/2" seam allowances on either side of the cut for the piping. The inch was added above the notch.
We had decided we wanted the darker color to be at the edge of the sleeve and the hem of the dress. In order to accomplish this, we stacked and sewed all three piping ombre pieces to make one piece of piping. We first sewed the medium green piping on top of the darkest green piping.
Once those two were attached, we added the lightest green piping on the top of them.
*Ignore the clipping of the seam....this was left over from the yoke piping....
Next, we cut the sleeve 1/2" above the notch, and pinned the piping to the right side of the main part of the sleeve, and stitched on top of the piping stitch closest to the sleeve's edge.
Finally, we placed the end of the sleeve on top of the piping - right sides together (piping sandwiched in between) - and sewed on top of the stitching line that we just sewed. You will possibly have to flip the sleeve to the opposite side to see this.
Then, we referenced the pattern instructions to finish the sleeves.
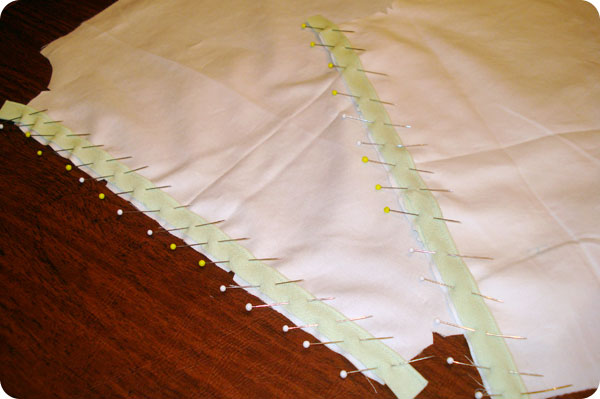
After attaching the sleeves, we seamed up ONE of the side seams. This allowed piping to be attached at the bottom of the dress in one continuous line.
We determined that we wanted to have three tiers of piping at the base of the dress. The first tier would consist of a single piping cord made of the lightest green piping. Then, we would move down the dress 1.5" and have double piping made of the lightest green piping on the top and the medium shade of piping on the bottom. Finally, on the third tier, we would move down the dress an additional 2.25" and have triple piping made up of two medium green piping cords and one of the darkest green piping. We would finish it off with a bias strip of the darkest shade of green.
To prepare for this process, we sewed each tier together as one piece.
Then, we cut 5.75" from the bottom of the dress, and began with the top tier.
We laid the single piping cord on top of the main dress, right sides together, and stitched.
Next, we added the bottom part of the dress right sides together (sandwiching piping in between), and stitched following the previous stitched line. Although some brave souls might be able to do this step in one fatal swoop...not us. Then, we ironed the seam down toward the bottom of the dress. Do NOT leave this step out! The more you iron the happier your dress will be. We then edgestitched on the right side of the dress (under the piping) to allow the seam to lay flat against the dress.
For the second tier, we measured 3.25" from the bottom of the main dress, and cut.
We went through the same process as above, only this time we were adding double piping and sewed on top of the piping stitch line closest to the bottom of the dress.
After everything was attached back together (by sandwiching the attached piping and main dress with the piece you cut off), we pressed our seam up this time, and edgestitched.
For the third and final tier. . .we measured up 2.75" from the bottom of the dress and cut one final time.
This time, however the triple piping layer was sandwiched between the main dress and dark green bias band (ours was cut 7" to accommodate for 1/2" piping seam, 5/8" band, and hem facing to cover ALL piping seams).
We created a bias band by ironing 5/8" from final piping. The folded hem facing easily fell above the first tier of piping. Then, we edgestitched the hem facing to the main dress directly above the first tier to complete the ombre effect.
Is this a difficult way to add a little "pop" to an outfit? Absolutely not. Trust us, if we can do it, anyone can!
Is it time consuming? Yes, definitely.
Was it worth it? We'd like to think yes, and one precious little girl seems to think so too!
We couldn't stop with ombre piping though....we had to add just a tiny bit of handstitching to finish the dress off! The hardest part: keeping it simple, and not 'overdoing' the simplicity of the outfit. So many ideas....so hard to simplify!
We added a Christmas tree above the 1st tier (lightest color) of piping.
The tree was stitched with a straight stitch of medium green thread, and the trunk was stitched with a light taupe color. Then, red French knots were added on the tree to accentuate the red buttons.
Finally, a few red French knots were added above the ombre sleeve openings.
And the finished product was...........
Now, we'll be the first to admit, our wheels are turning with what we might do next because the possibilities are endless (thicker cording, various color combinations, vertical piping, etc)! But first up will be a Christmas / winter outfit for her little sis, so we'd love for you to tune into our blog to see what we have up our sleeves!
Thank you again liZ and Elizabeth for having us today, it truly has been fun!


I was a sewing Aunty for many years too(youngest of 6)
ReplyDeleteGorgeous!
This is simpley gorgeous! A great way to use the Afterschool pattern!
ReplyDeleteOnce again you out did yourselves, but kept it oh so simple and classy! Love this touch of holiday cheer!
ReplyDeleteThat dress is just gorgeous - simple and classic, yet modern and elegant. Love it!
ReplyDeleteBeautiful dress.
ReplyDeleteLove the details, especially the ombre piping at the sleeves. And the tutorial looks great too :)
ReplyDeleteinanılmaz güzel.tebrikler
ReplyDeleteI love this simply little dress with the beautiful details. I enjoyed reading your tutorial too. I've never thought about making triple piping, and the effect of light to dark was perfect. Thanks for sharing your techniques with us, and the pictures made it so understandable.
ReplyDeleteDeborah
You ladies sure do know how to make us feel loved..... Thank you all for those sweet, kind remarks! They completely made our day!!
ReplyDeleteThis dress is so beautiful! I love all the piping and the classic, clean look.
ReplyDeleteSo beautifully done. Thank you soooo much for this tutorial can't wait to use it :D
ReplyDeleteYou always do such beautiful work. This is no exception. Lovely.
ReplyDeleteGorgeous dress and fabulous tutorial. I will try adding piping one of these days. :)
ReplyDeleteBeautiful work. I am going to have to pull out my piping foot and give it a try.
ReplyDeletenow we're even on the "who would have thought it" quotient! Triple piping?! Awesome. Now on my "must try list!"
ReplyDeleteI am always drooling over your clothes!!! Such a beautiful dress!
ReplyDeleteSo cute baby, so nice dress, you knitting is great, love you
ReplyDeletelove, thanks for sharing your techniques
ReplyDeletelove, thanks for sharing your techniques
ReplyDelete