Thank you ladies for all of your hard work and for sharing your talents with all of us.
This season has been delightful.
We appreciate all of the designers who worked so hard this season and all of you who joined in our sew along group. We talk about this all the time but we feel so very lucky to be able to be involved in such a talented a supportive community.
We hope to see you back here on Monday to talk prizes, upcoming seasons, and the summer schedule.
Thank you again. We love this place in cyber space.
I cannot believe this is the last week, where has the time gone by? I cannot thank you all enough for the amazing support and lovely comments- I've had such fun making my outfits and I've enjoyed meeting so many new people and making new friends in the process. I am excited to show you my last look, are you ready to be Heart Broken?
If I had to describe my signature style I would have to say it's a mishmash of things. I love mixing old and new together, I have a lot of fun putting patterns and textures together you would never think would fit. I am definitely influenced by indie designers, I love European fashion as well as anything Japanese. The thing I love the most about making clothes for my kids is being able to do what I envision, create designs that are fun and comfortable and that you wouldn't normally see anywhere else. This week I took all of these elements, I decided to go for a 50's retro vibe mixed with some modern pieces. I used some baby blues, red and mint tones to complete my look.
Let's break it down... The oversized quilted coat is where my love for Japan and recycling comes into play. I wanted something boxy and comfortable. I drafted the pattern and cut into 2 pillow cases I've had in my up-cycle pile for a while now. I added some bias trim all around and a unique fake shawl collar, it is fully lined in the softest red polka dot fabric ever. I used that same fabric to make the little headband. The blouse was also self drafted, it has lovely inverted box pleats and large circle double layered flutter sleeves. I wanted to create something girly, light and breezy. The floral is lovely rayon silk blend. I made rolled hems for the first time and the seams are all french seams. This was my homage to the french designers I love so much. Next I remixed the Small Fry Skinny jeans- I made them a size bigger, added some pleats, changed up the waistband and added the heart breaker suspenders. These pants are as nice on the inside as they are in- all the seams are either flat felled seams or bias trimmed. The heart suspenders are removable, making these pants multi functional. And finally no outfit is complete without its accessories- I painted and added some flowers to some sunglasses and drew on some sneakers to re-create saddle shoes. We are ready for Spring!
I have many more details and photos on my blog Petit a Petit and family, come over and say hello!
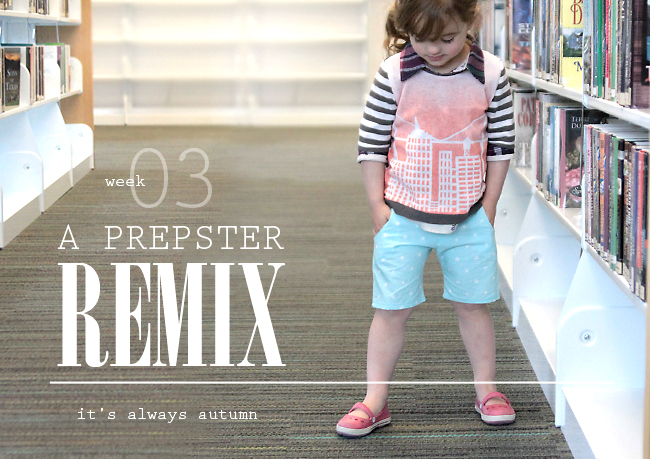
It's Always Autumn: Counting Stars
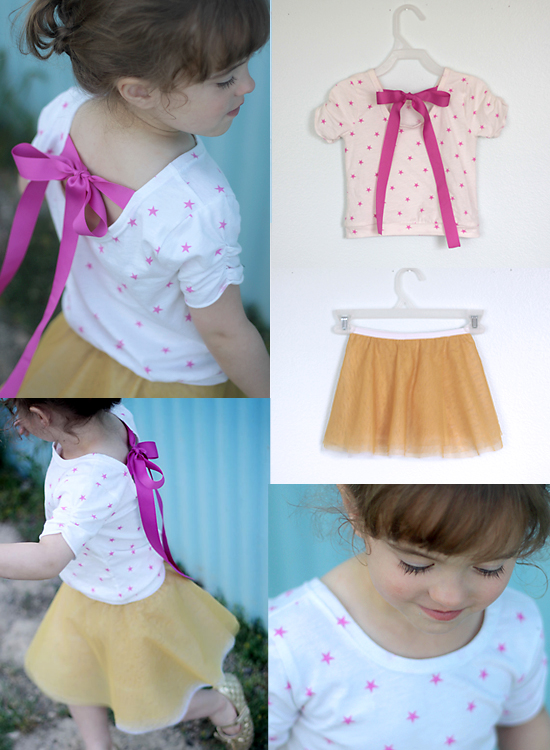
I am so excited to have made it to the final round! My "signature style" is usually a compromise between what I love (sophisticated colors and styles) and what my daughter loves (pink, ruffles, etc.). Additionally, I usually gravitate toward simple pieces--I love projects that can be completed in one nap time--and things that are comfortable and wearable. Finally, many of my projects involve upcycling existing garments. For this week's look I combined all of these elements in a look that's girly enough to make my daughter happy and polished enough to make me happy. I wanted to show that simpler items which are quicker sews don't have to be boring, so I decided to put a twist on a classic tee using fabric from a thrifted t-shirt. I sewed up a top with a pretty cutout neckline in the back, adding ribbon ties for a romantic look. Necklines on knit garments are often the "giveaway" that the item is homemade, so I made sure this neckline looked professional by finishing it with knit bias tape and a double needle. The shirt hits at the natural waist in a gently gathered banded hem and the sleeves are ruched to complete the lovely feminine look. I wanted to pair this shirt with a tulle skirt, but I don't like the way gathered tulle bunches up on itself, so I used foiled tulle instead of normal tulle. Foiled tulle washes beautifully, doesn't snag, and is much softer than normal tulle (and it gets softer with each wash). To make the skirt twirly without it looking like a tutu, I cut it as a half circle skirt and finished the waist with soft, fold over elastic. The result is a sophisticated look that's also very practical for a child.
The skirt has three layers of white tulle underneath three layers of gold tulle, each of which is cut a little bit shorter than the layer beneath for a graduated hemline. The best part of the skirt, however, is that there are comfy knit shorts attached underneath and trimmed with stretch lace - pretty and super practical for a preschooler (visit my blog for a photo of the shorts). I completed the outfit with a beautiful ruffled coat. The coat is made from a gorgeous grey herringbone flannel, meaning it's soft, washable, and wrinkle resistant. The four rows of ruffles are all made from one large curved piece of fabric which was gathered in five different places and attached to a flannel lining. The bodice and sleeves are lined in a yellow and white floral cotton, and three yellow buttons add color and personality. An oversize collar gives it a bit of a retro feel. I love this coat! It's the perfect combination of a girly, ruffly silhouette (which makes my daughter happy) and a modern, sophisticated color scheme, which makes me happy.
As with my other looks, all items were self drafted using other clothes as reference. Thank you so much for your votes, comments and support! Visit It's Always Autumn for more photos and details.
The Crazy Tailor: Pearls & Grace
Timeless. Graceful. Modestly stylish. This is what comes to mind when I hear the names Audrey Hepburn, Jackie Kennedy Onassis, Grace Kelly....and this is also what I thought when looking back at what I've made so far this season. I am very much a lover of the classics. I adore plaids, pleats and stripes, big bows, and little details like hand-sewn button loops. I strive to make clothes for my daughter that are modest, yet tasteful and also practical. And so I present to you my Signature Style, Pearls & Grace: style that transcends time. Pearls are enduring. Simple and classic, and never out of place. Grace, because the most beautiful, costly garments are worth nothing if worn by a woman without a gracious spirit. What a life lesson to teach our young daughters!
I started off my look with a self-drafted box-pleated skirt. The ever-classic awning striped skirt got a modern twist with an exposed zipper in the back of a perfectly fitted waistband. I drafted the waistline on this skirt to fit better under J's toddler belly. On the inside of the hem in the front, I embroidered "I'll love you forever." J loves that Munsch book, and it's a sentiment that's heard frequently around here! Then I drafted a floral blouse with a billowy silhouette. There are faux cap sleeves, a sweet little pleat at the front neckline and a hand knotted back button closure. The bottom hem is cinched in with ties for a draping bow finish.
I finished off this look with a very feminine military-inspired jacket, also an enduring fashion, modified from the Cali Faye Cadette coat. I cropped it to a swing coat length, rounded the collar and cuff corners, and changed up the back a bit. This was made in a textured sport knit (bargain bin score = no fiber content) that washes and wears so nicely. White is the best color for kid's clothes sometimes - wash it and then throw it in the sun! This outfit has a decidedly Jackie O influence, from the classic lines of the skirt and jacket, to the black & white contrast, so we played it up with the quintessential fabulous sunglasses and pearls! For more photos and pattern details, and to see how all of my PRP outfits mix and match together, head on over to The Crazy Tailor!
Soooo...we've come again to both my favorite and least favorite week of each season. Favorite because I love Signature Style week. I love reading about all of your Signature Styles...what you enjoy sewing...and seeing your strengths. But it's my least favorite because that also means it's the last week of the season.
Bitter sweet.
But....for right now I get to announce something that is all sweet and that is the winner of the sew along from last week! And that person is....
Today we have another exciting giveaway from one of our newest sponsors
Elizabeth (or e-beth as her grandpa nicknamed her) has sewn all her life and loves creating things. She even went to school for fashion design but with health problems (Cystic fibrosis and type 1 diabetes) and wanting to be a stay-at-home mommy, she opened up a fabric shop and started designing patterns.
Today she is doing an AWESOME giveaway on her blog of all of her current patterns (FOUR!). Look at how cute the Lorelei is....I think it is so darling!
Just when we think the results can't get closer!!!! And then they do.....phew, these ladies were dynamite with their creating fabric challenge this week. I seriously think it was one of my very favorite challenges of all time on PR&P. So many fantastic ways to make their own fabric...and all the details of each of the outfits were spectacular!
And sadly we are saying goodbye this week to our good friend Ajaire from Call Ajaire. She has been sewing along with Project Run and Play for what seems like forever and makes children's clothing that are some of the most creative I have ever seen. And this week's challenge with her making fabric from SCRAPS was so awesome....we are so sad to see her go.
But luckily she is not leaving us empty-handed....Ajaire is going to receive a $25 gift card to one of our favorite fabric stores--lowpricefabrics.com
Have you seen their Spring fabrics right now? (Especially the chambray is making me swoon lately!)
A huge thank you to www.lowpricefabric.com for being such an amazing sponsor of Project Run and Play.
We'll see you back tomorrow for an amazing giveaway...and then on Monday with the results of our Sew Along Contest this week! And I am going to spend the weekend perusing all of the creative fabrics you made for your outfits....
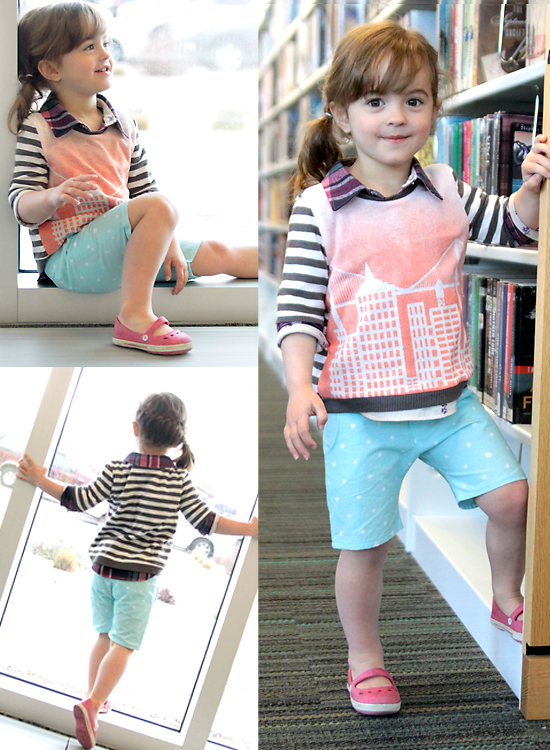
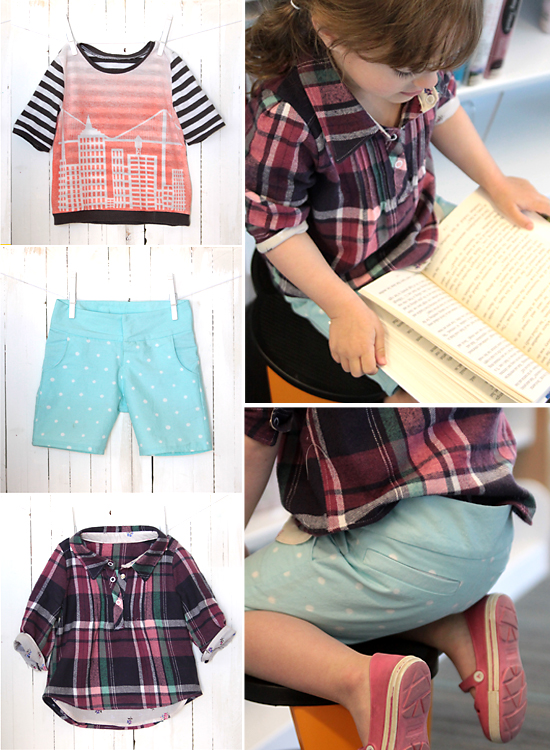
My goal with this week's "design your own fabric" challenge was to make something that looked commercial as opposed to crafty without spending more money than I would on an outfit from the store. I tried a number of techniques that didn't result in a professional look, so they got ditched. I considered using a service to print my own design on fabric, but it was seriously pricey. In the end I settled on two techniques that produced great results for just a few dollars each: I used a bleach pen to create white polka dots on a pretty aqua quilting cotton, and I used a stencil and spray dye (made for tie-dyeing) to create a graphic skyline print on a white sweater knit. I wanted to play with mixing prints this week, so I added three more prints to my look: a stripe, a plaid, and a floral. I love how the mix of five different prints adds a lot of personality to the preppy-casual outfit I made for this week.
My looks from the first two weeks have been a little on the dressy side, and since my daughter is only 3 I really wanted something she could wear and play in regularly, but still look stylish. I started with a basic pair of knee length shorts and added some sophisticated details, like back welt pockets, a wide contoured waistband that's perfectly tailored to her waist without the use of elastic, and a half fly with bar closure. Then I sewed up her sweater, using the stenciled skyline sweater knit as the front, and a striped knit pulled from a thrifted cardigan for the back and sleeves. The neckline and elbow length sleeves are finished with ribbing (also from the thrifted cardigan). The style is simple and on-trend, and without other added embellishments the stenciled skyline remains the focus. Finally I made a soft flannel shirt with a front snap placket and tiny pin tuck detailing across the chest. The 3/4 sleeves have a small box pleat at the shoulder to add roominess without a puffed shoulder. The inside of the collar stand and cuffs are lined in a coordinating floral (from another thrifted shirt) for a pop of femininity, and you see more of the floral in the layered-look front hemline. The flannel shirt looks great on it's own or layered under the sweater. All three pieces combine in a comfortable and wearable look with plenty of style. All items were self-drafted using other clothes as reference.
For more photos and more details on both DIY print techniques, visit my blog, It's Always Autumn. Thanks!
The Crazy Tailor---All Hands On Deck
Thanks so much for the love, guys! I'm so happy to be able to share with you my "Design Your Own Fabric" look this week! I've not done a lot (any?) of fabric modifying...I kind of like buying my fabric pre-liked. Haha. As in, If I like it, I buy it. I never have thought to do anything to it! So this truly was a challenge for me, and I had a few fails along the way. I tried a couple of different techniques that didn't turn out how I planned: shibori - have you tried this? It's beautiful when it's done well. Mine was not! Next I tried some glue resist (like wax resist). That was a HUGE failure! I did dye my nails a lovely shade of blue, but was not satisfied with the results on my fabric. So I turned to a more predictable fabric manipulation: block printing. I used a sweet potato and carved out a cute little anchor shape and stamped it onto some bottomweight twill using fabric paint. Then I made a pair of Bermuda's for my little guy, with a double welt pocket detail (one with a snap flap) and then finished those off with some suspenders made with leather and elastic. For the shirt, I did a freezer-paper design on one of daddy's repurposed shirts to mimic a Breton stripe nautical tee and then cut out a raglan (yes, again ;). I added a little snap placket on the side shoulder seam to facilitate dressing this kiddo. He has a big noggin!
I decided to go with a more subtle design on the dress. I began with a Geranium dress in chambray, but added epaulets to the shoulders and some cute little bow welt pockets (I'm on a welt pocket kick!) in the front.I also modified the shoulders a bit by adding a slight curve. Then I did a french knotted border around the neckline and a wave motif at the hem. I love the simplicity of the chambray with the white french knots and the slight nod to the whole nautical theme!
For a lot more photos and details on pattern modifications, head on over to The Crazy Tailor!
Petit a Petit---One of a Kind
Hello again! It is so nice to be back this week and I am very excited about the fabric challenge. When I sew for my kids I love making things that are unique and that you can't find anywhere else, but what I also particularly love is to play around with the fabrics and then really create one of kind pieces.
If you already read my blog then you probably know how much I love to dip-dye, potato stamp, stencil, use fabric markers on everything, you can just look at mytutorials page! So for this week's challenge I decided to do all that and even try a little something new. I have been wanting to print fabric at Spoonflower for while now. I took my blog header, which is a photo of my kids taken 2 years ago on vacation, blew it up and had it printed on some cotton. I really love how the Europeans have been using photos in their designs and thought I would give it a try. I used a C'est Dimanche pattern which I've been in love with since Trine made one for Stylo Magazine and just knew it would be the perfect fit. I dip dyed my fabric for the bodice part, created my own piping and modified the back to a slight V to accommodated the orange zip I had. The sash makes it a little dressy, but worn without it it's the perfect everyday summer dress. I also dip dyed the tights with two shades of blue. I am just a little emotional about this dress, the photo means a lot to me- it's the photo I used for when I decided to be serious about my blog, it also evokes happy family times and reminds me of how fast my kids are growing. I might have to frame this dress once my daughter outgrows it.
Next, I made a coat with a high low hem, and oversized hood. I bleached some denim I found at the thrift store, you can see the original color in the belt. The coat was self drafted and has some really interesting details, because of how the hood is curved and gathered at the front and back. Let me tell you I had to create some crazy pattern pieces. The hood can be worn up or down, it can also be rolled to give a shawl effect. The jacket also has inseam pockets and is fully lined. For the lining, I used a cotton batik print and some silk which I also used for the scarf. I potato stamped the silk with some stars and used some glittery black fabric paint. I also made some large neon orange pompoms for an added touch of fun. I love how the jacket looks like a cloudy day which goes which the beach scenery of the dress. You can come see more photos, stories and details on my blog, Petit a Petit and Familyand find out why my daughter is so happy in her photos!
Call Ajaire---No Scrap Too Small
This week I took all those teeny scraps that come from serging and squaring up quilt blocks and turned them into fabric! Pretty cool, huh? I had been saving piles of the smallest scraps for a different project, but when this idea hit I set to sorting those cast offs by color and crossed my fingers that this would work. I used a simple white muslin fabric for the backing and then sandwiched the scraps and thread and even some cording with wash away stabilizer on top. Then it was a matter of stitching over the stabilizer until I thought the scraps would stay put. I decided a grid would contain everything best so I stitched rows 3/8" apart both vertically and horizontally across the fabric. For the skirt I placed the scraps in a blended rainbow order and for the bodice tops I used all of my shades of pink. Once everything had been stitched I soaked the fabric in water so the stabilizer would dissolve. The resulting fabric is soft and the weight isn't much different than the weight of the original fabrics would have been. It is as easy to sew as a heavy denim might be in some of the thicker areas, but totally malleable and even WASHABLE which is great for a child's garment.
I used a white stretch sateen fabric for the middle bodice (and the bodice lining as well). I love the stretch of the sateen and it's really soft against Bean's skin, but it is also a bottom weight so it has enough heft to hold up the skirt without pulling. The white has a subtle sheen to it so I thought it would help brighten the dress even more. I drafted a fully lined drop-waisted dress with faux cap sleeves and a 3/4 circle skirt. Bean is growing up more than out right now so the drop-waist should allow for wearing this dress through the summer and maybe beyond. The back has an invisible zipper than extends below the skirt so there should be plenty of room to get it on and off as she grows. And finally the circle skirt is bound with a piece of double fold bias binding that I made from one of my bleach-dyed cast offs from last week. The color was too berry for the Nantucket red look, but works perfectly with the colors of this No Scrap Too Small Dress. Please come by and see ALL the details including more of the fabric process pics at Call Ajaire.
Good morning!
Welcome to week 3 of PRP Season 9.
Now before we get started with the all the festivities for this week....
Its time to announce the results from week two (our Spring Break inspired challenge). Thank you for all your patience! (We were just as anxious as you have been!)
And now....after combining the judges scores with the readers votes or winner for the week is:
And sadly, very sadly after combining judges and voting scores we have to say goodbye to GoogieMama .
Her looks last week were amazing (and had me wanting to make a pair of pants for myself exactly like her daughters!)
If you haven't already been over there pop on by her blog and read about this look....so many pieces...so much sewing awesomeness.
(Shannon will be leaving us our thanks and with a gift card for more fabric.)
What a fun week we had last week. Thank you to everyone who participated. We have thoroughly enjoyed seeing and reading about everyone's spring break inspired clothing. (Now if only we could all gather together in one of those destinations and have a sewing party....)
Alright!
It's time to get week 3 started!!!
This week is our theme is all about the fabric....It is the Design Your Own Fabric Challenge!
What does that mean?
It means create your own fabric or print (however you can....stamping, screen printing, sharpies, embroidering, dying, whatever!) and then design an outfit featuring that fabric.
We KNOW this week is going to be awesome....so let's get this party started!
Link up your looks!
Today we have a great giveaway from one of our newest sponsors---Compagnie M!
Compagnie M is run by Marte a seamstress and pattern maker extraordinaire, who started sewing on an old hand-cranked Singer sewing machine and then turned her passion into her life's work.
And today she is giving away a fantastic prize.
Head over to Compagnie M for all the details and to enter this amazing PR&P giveaway!!!!
Go...now and see her patterns they are delightful classics with fun modern details that are to die for.
I began with a completely different idea for where this week was going to go...but as it turned out, I rather like where it went! As I was drafting, changing my mind, and generally ripping out seams, it just started feeling more and more like a European look. I've always admired European children's fashion, and just lately have been loving Kelly's amazing Parisian photography over at Wild Wandering. The travel bug hit, and off to Paris we went! Springtime in Paris is still an unpredictable time of year, so layers are ideal. I started this look off with a self-drafted skirt with some fun little details! The front and back yokes are lined in a cotton print and the small pleats give lots of room to run and play in. The front yoke has working buttons to allow for easy dressing, and the pockets are a nice little part of the whole front yoke design.
Then I made alightweight raglan sweater with 3/4 length sleeves and added a sweet little peter pan collar. The front of the sweater was embellished with sequins, and the cuffs and hem were finished with binding.
Finally, I finished off this look with a cropped trench coat. This really was a labor of love...I think I redid every seam in this jacket as I changed my mind! It turned out as a lined, bubble-hem, cropped trench, with the signature storm flap and double-breasted look. I did bound button holes for the first time and really love how they turned out! This is a classic little outfit to get my daughter through the spring...even if we never see Paris! Head on over to The Crazy Tailor to see many more photos, and find out more about the Eiffel Tower on my wall!
Petit a Petit + Family--California Dreaming
Oh, how lovely to be back again this week! Thank you for all the lovely comments and for the votes. Today, I am headed to sunny California for my spring break. Since I've never been on the west coast, I figured California had everything I was looking to create a unique little outfit- it's a little retro, a little bohemian, a whole lot of awesome.
When I think of California, I think the beach, surfers, skate boarding and taking it easy. I think I am a beach bum at heart! So I created a reversible bathing suit- I make everything reversible when I can! I used the Fancy Pants leggings as my starting point, modified the leg, scooped the back, doubled the front panel and extended it to make the bodice. I even added some elastic to the back to keep everything in place. I made one side solid with some tie- dye fabric I had in my stash and I color blocked the other using some thick lycra I found at my local fabric store. I am really excited to say that this will be my next pattern release in collaboration with Laura who created the Fancy Pants Leggings. You've got to have a camera to capture all the special moments while vacationing! So I made a Polaroid bag, with some cotton canvas I had, some grosgrain ribbon, a tiny bit of red felt and a some striped ribbon for the straps. I deliberately made the camera with raw edges and white stitching and stuffed it to give it the 3-d effect, and added a functional pocket at the back to keep small valuables such as seashells and other treasures. I had so much fun coming up with this bag and just love the added retro vibe it gives to the whole outfit.
Next up, is the cover up wrap around tunic. No patterns were used for this little number, it was completely draped on a mannequin, pinning and pleating until I got it just right. It has taken me a year to cut into this Nani Iro fabric I bought from Miss Matatabi and I am so glad I finally did. The lace is from a vintage table cloth my mom gave me. I created a hi-low hemline and the entire tunic is finished with bias tape as well as a facing at the hem. I call this my little work of art! It wraps around and closes with a fine lace ribbon, making it quick to go from roller-skating to swimming. Since the top is a tunic length at the front, I also created some shorts. They are self drafted and made from a lush double striped knit. I created faux pleat and added some vintage buttons to give it that sailor look. The facing at the waist and bias at the leg is also a fine jersey knit I had on hand. Lastly, I created a reversible visor- one side has the pastel colors to go with the tunic and the other has a bold pink to match with the color blocked bathing suit. I used some striped picot jersey on one side and some terry on the other, tying at the back with a large ribbon. The visor part is made from a plastic binder I found at Staples, which I cut into and finished the edge with some bias tape for a sleek look.
Don't forget to check out my little blog Petit a Petit and Family for many more details and some really fun photos. Hope to see you here again next week!
Call Ajaire--Cape Cod Casual
When choosing a favorite vacation spot for this week's challenge I didn't even have to think. Though I live in Maryland now, I was born and raised on Cape Cod and it will always be my favorite place - vacation or otherwise. Since the theme was Spring Break and it's not exactly hot in Massachusetts in the spring, I stayed away from bathing suit/beach wear and stuck to a very traditional (and really en vogue this spring) Cape Cod casual look.
My first thought was of a pair of Nantucket Red capri pants with a "critter" style embroidery on them. It was hard to find the right shade of red so I bleach dyed some fabric to get that pinky/berry/more-red-than-salmon color. And of course if I'm going to choose a critter to embroider then it's going to be a panda, hehe. I designed a little baby panda profile and hand embroidered them onto the fabric prior to cutting out the pants, using a dark navy and white floss. The pants themselves were modified from a self drafted pair of pants I made for Bean way back when she was just learning to stand. I took my pattern (originally used for knit fabric), graded it up, added some ease, made side vents at the ankles, and created a working zipper closure. I also added functional welt pockets to the back to match the angle of the yoke pieces.
The rest of the outfit fell right in line. A basic boatneck shirt (I used the bodice I drafted for the shirt in last week's look, changing the neckline and sleeves) made with stripe and lace fabric, was lined with a soft navy ponte de roma fabric to really make the white lace stripes stand out and offer some coverage. I designed a cropped, fully lined blazer with princess seams on the front and back. Using more of the navy ponte de roma made it soft and more kid friendly than a traditional woven blazer and functional welt pockets helped to tie the blazer in with the capri pants. The accessories really pulled the look together: traditional rope bracelet, headband with a Josephine knot, floral infinity scarf, and boat-shoe Toms. To see more details of the accessories I made and hear about how RAINY and WINDY the harbor photo shoot was please head over to Call Ajaire.
It's Always Autumn-- A Little Jane
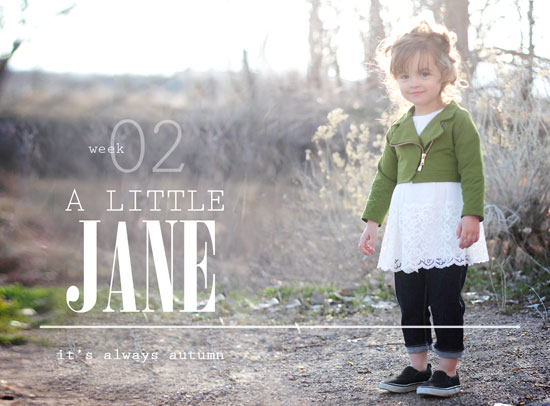
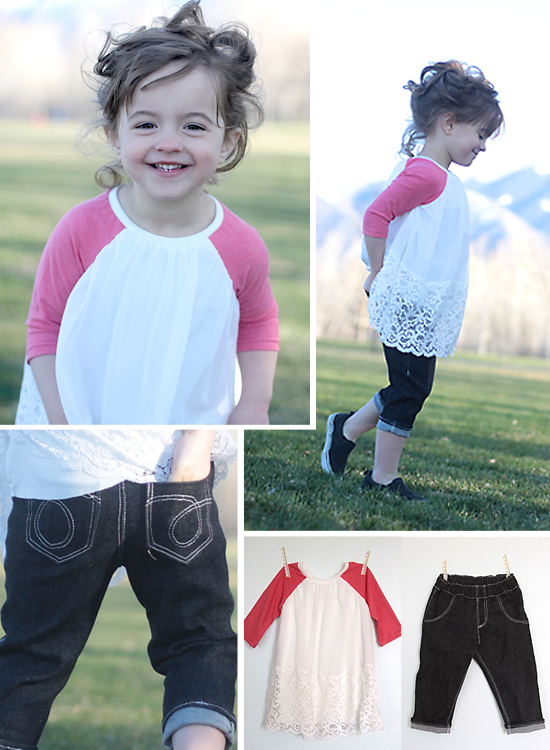
When I saw the week 2 theme was a look inspired by a favorite (or dream) vacation spot, I immediately thought of the English countryside where many of Jane Austen's novels are set. If I could take a "dream vacation" I'd travel not only to the village where Lizzy Bennet grew up, but also to the time period in which she lived. I decided to make an outfit clearly inspired by Jane Austen's time and place, but translated into a modern, wearable look. So my outfit for week 2 is based on the standard Jane Austen heroine's "uniform": a long, white empire waist gown and a solid colored long sleeve jacket that hits just under the bustline. (Anyone else ever watched those movies and imagined herself in one of those gowns? Click through to my blog to see my look side-by-side with the inspiration photo.)
To modernize the look (and because my daughter doesn't have many places to wear a gown), I ditched the dress and made separates instead. I made a comfy raglan sleeve tee with a gathered sheer panel layered over the body of the tee, complete with a gorgeous wide lace trim. The soft overlay gives the shirt a bit of a romantic look, but the trendy color blocked baseball sleeves keep it modern. The tee is paired with slim-fitting cropped jeans that feature plenty of double top stitching along with back pocket detailing. Faux front pockets and a faux fly complete the stylish look while keeping the stretch denim jeans super comfortable for a 3-year-old who changes clothes a million times a day.
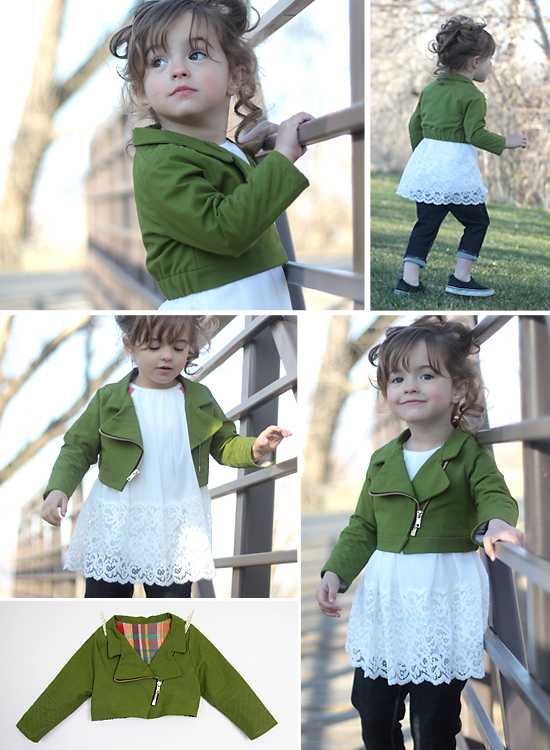
Finally, I updated the standard "Jane" jacket into a cropped motorcycle inspired jacket with an asymmetrical zipper. I added quilting on the shoulder panels and lower half of the sleeves, elastic across the back hem, and a bright gold separating zipper to give it the "cool" feel of a motorcycle jacket. I sewed it up in a pretty green bottom weight cotton to reflect the green countryside in Britain and lined it in a pink and green plaid for warmth on windy spring days. I like that the romantic inspiration is clear in the finished outfit, but there's also a strong modern feel, especially when the jacket is worn unzipped and there's a peek at the pink t-shirt sleeves. All pieces were self drafted using other clothing as a reference. For more photos and details, remember to visit my blog - thanks!.
Googie Mama--Tale of the Cod
when i first read this week’s challenge my idea was immediate and definite: PARIS. it’s my dream vacation, and one day…one day. but that’s been done, and done well. my next thought: bermuda, where the googiedaddy and i had spent our 15th anniversary last fall. but i think the chances of getting my soon-to-be-12 son in a pair of pink bermuda shorts and knee high socks is < 0, to be honest. so back to the drawing board i went, and it wasn’t too hard to come up with the winner. the place my family has been vacationing at every year since i was 8 and it was just my parents, my brother and i—clear through until now, when it’s parents, brothers, daughter-in-law, son-in-law, grandkids, and sometimes friends or other family.
CAPE COD, MASS. it’s practically a second home at this point. and the transient weather—one minute sunny and warm, the next cool ocean breezes making you shiver and reach for a jacket—inspired both looks for my kiddos this week. let’s start with ava.
AVA is wearing a very traditional pair of sailor style pants—from the high waist to the wide leg and the shiny buttons in between. they have an invisible side zipper, the top is fully lined, and the lining was hand stitched down for a smooth finish. and they fit PERFECTLY. she has just the right shape to rock these pants. i knew i wanted a simple blouse tucked in to the pants, and this white fabric is sooo cool. it’s alternating stripes of woven fabric and elastic strips. i trimmed out the boat neck with a tiny coral and white trim, and finished the back with a cool turndown and four coordinating coral buttons. it needed a little more, so i drew out an anchor shape with my vanishing fabric pen and randomly filled it in with coral thread using my free motion foot. then i hand stitched the gold chain trim around the anchor. the jacket…ahhh, the jacket. 150% a labor of love. i went for a military styling—the gold button epaulets, the high collar, and the double breast. it can button up for warm or button open for style. to keep it feminine i gathered the neck slightly in back, gave it a high-low hem and finished the inside with a fun fabric and more of the tiny coral trim. i took time making sure the inside of the jacket is just as beautifully finished as the outside, and i am in love with this jacket—in fact, with this whole outfit. and i’d wear it if i could. all the items ava is wearing are self drafted.
HARRISON is pulling double duty—he’s my spring break look, and my upcycle look. his pants began life as a pair of men’s 42x32 cords, and they were so beautiful i almost hated tearing them apart. but i did it—recut the legs and waistband, took out the front pockets and reinserted them, along with some cool green and white striped trim on the outside seam. i love the way they turned out—enough little detail to make them mine, but cool enough that he wore them to school. his tshirt came from some raw yardage, a maternity t, and a large men’s t. i pieced them all together to create a baseball sleeve top, then freezer paper stenciled across the front. harrison’s jacket was another labor of love—i used a man’s 2XL rain coat, and XL fleece. i broke the raincoat completely down and recut all new pieces, creating this stylish raincoat with grey and blue trim. i used the zipper to add a little decorative element to the back, and reset the pockets in the front—one on the bottom and one sideways towards the top. then i used the fleece pieces to give it a layered look, but without the bulk. i kept the zipper for closure, and the bottom hem so it can be pulled snug. i also finished the inside of this jacket with trim to cover any raw edges.
for more details, and some shots of my abbott and costello being their usual goofy selves, head over to my blog! thanks!