Tuesday, October 31, 2017

Candy Coated Challenge -- Time to Vote

Can you believe it is week 3 already??! Let's take a look at what the remaining 4 designers came up with for the next theme:
Candy Coated Challenge 
where we asked them to be inpsired by their favorite Halloween Candy.
Make sure to cast your vote at the bottom of this post for YOUR favorite.

The College Seamstress- An Ode to Reese's


I am so excited to be back for another week! This week was one of the hardest for me because I couldn't decide on a candy! However, once I finished, it turned out to be my favorite outfit for my little sister! My inspiration started with some orange stretch denim and my favorite candy of all time - the Reese's Peanut Butter Cup. I decided that an orange denim jacket with yellow snaps would be perfect for my little sister! The jacket started with the Friday dress from Petit a Petit Patterns. I lengthened the bodice pieces since I wouldn't be adding a skirt. I added welt pockets and used this tutorial as a reference. I also added cuffs and a placket to the sleeves for a classic denim jacket style. 


To make the shirt, I started with my favorite shirt pattern for kids, the School Bus T-Shirt from Oliver + S. I was inspired by the ruffled edge of the Reese's peanut butter cup and wanted to use that in my design, so I added strips of ruffles in various sizes to the front bodice. I also added a ruffle to each sleeve.  I used a light brown knit for the shirt and a dark brown knit for the skirt to represent the chocolate and the peanut butter. I made the skirt by cutting two rectangles based on my sister's waist and length measurements. The top edge is gathered and attached to a double folded yoga waistband resulting in a cute and comfortable skirt that she will be able to wear with many different outfits! 


Thank you so much for reading! Head over to my blog here for more details and a peak inside an amazing candy store! 
***
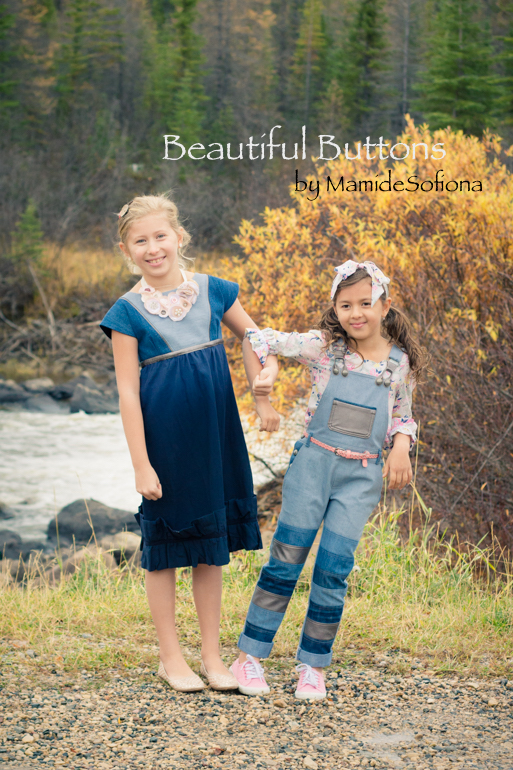
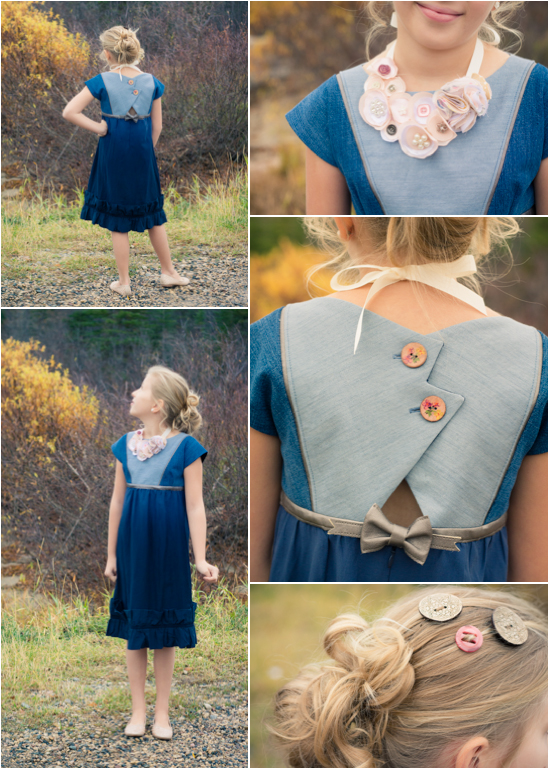
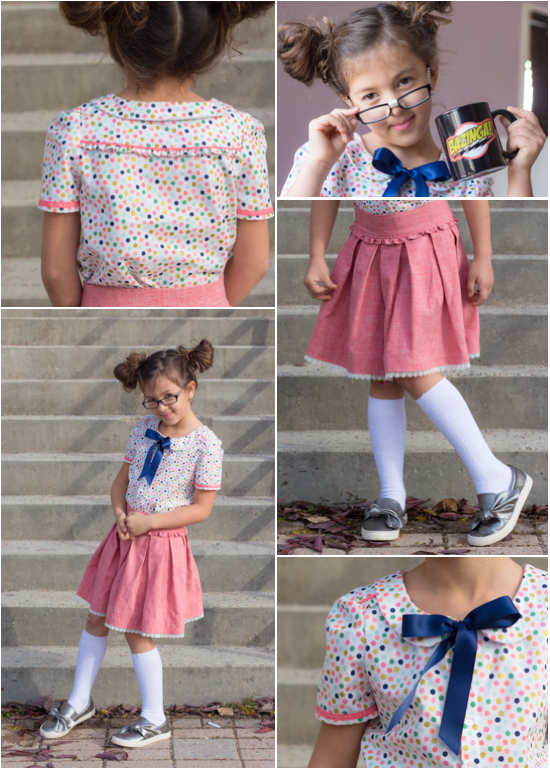
Mami de Sofiona- Starbursts and Nerds

candy-51 

This is turning out to be quite the ride! Very rarely have my plans or my expectations turned out like I thought. Some things have been so much better than I thought and it's amazing how many ideas can change while I'm in the middle of a project! And what an honour to have the winning look from last week! Now it's time to move to the next theme and with a lot of vulnerability I say, I don't know when I'll ever beat that jacket from last week. However, the challenge is out there for me to eventually tackle. For the candy week in our house we have Starbursts first and I pulled out the quilting techniques. The lone star quilt was a great pattern for Starbursts! I used some mystery fabric that I can only guess is a type of scuba knit. Definitely does NOT hold a crease! I had to apply interfacing to each piece for the front of the shirt. First, so that my sewing machine needle would actually sew it and second, so that it would iron well and allow me to match my corners. I created the star and then drafted the shirt around the star.. The skirt is some very special AGF cotton that I've been hoarding for awhile now. It is so candy coloured! I drafted a pleated skirt using a curved waistband so that it would sit nicely on her hips. I inserted an invisible zipper and, just to be difficult, I also added some inseam pockets. A pocket right in the same seam as an invisible zip was new to me!! To finish off the look I used some more black glitter heat transfer for some stars. I think this skirt is going to look very cool with a black top! More details about the inside of that shirt will be over on my blog. Too much for this space here. 

Starbursts collage 

 Our second look is Nerds!! All "nerd" inspired looks are very much about the school uniform. That means pleated skirts! So I made another one using the same ideas I used for the first skirt except no pockets this time. Instead I added a tiny ruffle at the waist and some trim at the hem. It's so perfect with knee socks!! Again this week I used only one pattern. It's the Sunki Tunic by Figgy's and it inspired the shoulders and the sleeve pleats of this top. I kept those details, but went rogue on the rest of it. I redrafted the body of the pattern into a shirt and added a collar because I needed something that would suit a bowtie. Then I sliced the back so I could insert a mini ruffle and some trim. I kept it curved so it followed the line of the collar. The "bow tie" is simply a ribbon attached just inside the collar. I really love how this still has that bow tie feel, but in such a way that it doesn't end up being a costume and is rather something very wearable for many occasions. And can we just talk about how perfect that fabric is? I jumped at this Riley Blake fabric because it was one that had scattered dots instead of dots lined up in rows AND the dots aren't exactly round. Nerds aren't round and they definitely don't fall out of the box in neat little rows! I love it! 

 Nerds collage.jpg 

Please come on over to my blog for more details and, of course, I am super grateful for your votes, should they come my way!
***

Bonnie and Blithe- Sew the Rainbow 
 

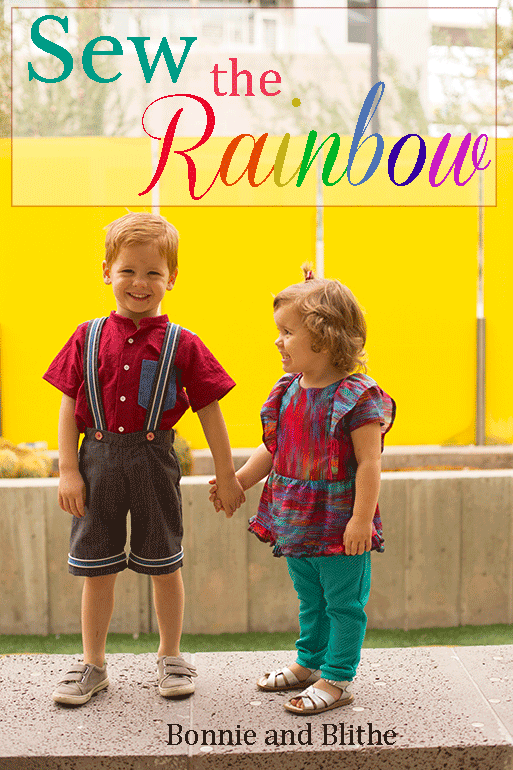
Hi friends! Thank you SO much for having me back this week! I've loved every week's challenge so far and I'm hoping to hang on for the final round because I have some awesome stuff in the works for signature week. Fingers crossed! I was initially really excited at the prospect of designing a look inspired by candy, but then when the last two weeks were done, my brain started slacking. I was having THE hardest time getting inspired for this week, until...Skittles. When I think of candy, I think COLOR, and in my mind, Skittles are the best representation of a colorful, sweet, candy-filled world! Once I grabbed onto that rainbow theme, I had a great time pulling these looks together. I began with my daughter's dress (which started as an Infinite A-line hack but turned into a tunic; read my full post to hear about the second catastrophe in my PR&P experience!) because this fabric just screamed Skittles to me. I added a rainbow array of buttons in the back and paired it with some colorful leggings in a textured knit. 


My son's look was a little trickier to coordinate because I knew he wasn't going to go for a super bright look (especially if there was any pink in there. He is a 4 year old boy, after all!) but when I snagged this burgundy linen, I knew I could work it in without looking too girly. The chambray pocket and yoke are my favorite part! I used Peek-a-Boo Pattern's Classic Oxford as a start and then added the colorblocking and went with a Mandarin collar instead of the traditional one to keep it casual. I made the flat front shorts using Made Everyday's Kid Shorts pattern and then shortened them and added trim, decorative buttons on the front and suspenders (with matching trim). I wasn't really sure about how they'd turn out for most of the process but when I put it all together I loved it! And my son loves them too, which in all honesty, is the only thing that matters. Thanks again for having me and I hope to see you all for the final week! 


***

Sew Haute Blog- Candy Coated Chic
Hey, I can’t believe that I made it to Week 3 of Project Run and Play! This week our challenge was to make something inspired by our favorite Halloween candy and what a perfect day to post. My all-time favorite Halloween candy is candy corn which most people hate. As inspiration for clothing I am also not a fan, but I wanted to show that candy corn doesn’t have to be without class. So, I muted the signature white, orange and yellow to give it a fall vibe. I attempted a trendy peplum top and skinny pant for my little fashionista. 
 

The Azure Dress by Ainslee Fox has this great bodice that was begging to be appliqued. Since I don’t embroider or have a machine for it I free-handed a free motion applique candy corn. Checkout those art skills. ;-) I also turned it into a peplum top.


For the bottoms I used the Jocole Skinny Minnie pants pattern and added pretty exposed ankle zippers. I thought they added a little je'n sais que. Let's all pretend to ignore the fact that I put the zippers in upside down and say that it adds character. The pant fabric is a calico woven from Joann Fabrics and the zippers are from Hobby Lobby. 


For more details you can head over to my blog, but don't forget to vote for your favorite! I hope you enjoyed my take on candy corn. See you next week and Happy Halloween!
***
Monday, October 30, 2017

Sew Along Inspiration and Prizes

Have you been sewing along?  There are some really awesome looks like this one entered by T's Garden for the All Buttoned Up theme.  You simply must click through to read all about where this garment originated, and how it can be used for either a boy or a girl!


You know how much we love prizes and rewarding you, so we've got an especially good one for the sew along!  One lucky winner is going to walk away with $100 to spend at Raspberry Creek Fabrics!!!  Our panel of judges for this season includes our lovely designers. 


Please go over to Raspberry Creek Fabrics and check out their amazing selection of fabrics.  Personally we are all heart eyes over their club fabrics, and they've got an amazing collection of all your favorite fabrics too!


AND, we've added a runner up prize!  Thanks to our generous sponsor Hawthorne Threads, the runner up will get a $25 gift certificate! 

Remember, this season, we're giving you all MORE TIME to sew and link up your looks!  So many of you have commented that sewing along each week is rather strenuous.  We've got kids too, so we realize sometimes you have more time and sometimes you have less time to sew!  

So take your time, you've got until November 10th at midnight (MST) to link up any and all of your looks for our 4 themes:

Week 1: "All Buttoned Up" 
Use buttons to highlight your look!

Week 2:  "Buffalo Gals or Guys!"
Buffalo checked prints or buffalo plaids are super popular right now...use 'em!

Week 3:  "Candy Coated Challenge"
Let yourself be inspired by a favorite Halloween candy!

Week 4:  "Signature Style"
Design a look that best represents your own unique style, taste, and best showcases your skill set.


All right, now it's your turn!  Link up your looks for any (and all!) of our themes here.  We loving watching all your creative makes being linked up...it's one of our favorite parts of each season.

Friday, October 27, 2017

Buffalo Gals & Guys Challenge - Results

This week our designers really showed buffalo plaid who is the boss!  They made it very plain why buffalo plaid is so on trend right now.  The scores have been counted, and this week's winner is:

excerpt title-1.jpg

Sherri of Mami de Sofiona with her Buffalo Plaid in the Snow look.

And sadly, our least favorite part of each season, we have to say goodbye to one designer and send them home.  This week we're waving goodbye to:


Michelle of Handmade Martini with her Petals and Plaid look.

But she's not going home empty-handed, our wonderful sponsor Stylish Fabric is awarding her some shopping time with a $25 gift certificate.


Have you entered the link up yet?  It's starting to fill up with so many of your darling makes!  We're going to feature one of them Monday, so hurry and link up you latest makes that fit our themes. 

Tuesday, October 24, 2017

Buffalo Gals or Guys Challenge--Time to Vote

Welcome to week 2 of Season 14! This week, the remaining 5 designers were given the theme "Buffalo Gals or Guys!" and they really did a great job! Check out all the designers' creations, then cast your vote below.


Sew Haute Blog- Persnickety Plaid 


Hey! I'm so grateful to be back this week and show you what I made for the week two plaid challenge. This week we were able to to use buffalo plaid or buffalo check patterns. Although, my post is titled Persnickety Plaid I actually used a buffalo check pattern. I've never been one to gravitate towards plaid, but once I found my inspiration I knew that I could make an adorable and trendy little plaid ensemble. My inspiration was this super cute skirt and my friend Robin's gorgeous combo of this sweet cream and plaid paired together. I found my check fabric from Fabric.com via Amazon and let the fabric at Joann's speak to me.


I put together a lace top using the Laurel from Petite Stitchery and the skirt is a combination of the CKC Antoinette SkirtBoo Designs Twirly Skirt and my own additions. The collar is actually removable and was modified from the Simple Simon and Co tutorial. I had to leave a little of the scallop edge on my sleeves. Isn't this lace to die for? I also used the same trim for the skirt and tying her dollar closed. 


 If you want more details and photos head over to my blog post, but don't forget to vote for your favorite look! Thank you sew much and I hope to be back next week!

***

Bonnie and Blithe- Plaid and Proper


  I'm so excited to be back this week! Thank you all so much for having me stick around; this week's look was really fun to create. When I heard "buffalo plaid" as the theme, the first thing that came to mind was the traditional red/black plaid and a vision of lumberjacks. So I decided to go in the complete opposite direction of that mental image, just for fun! I'm a HUGE fan of black and white, and while I'm not sure how "buffalo" this plaid is, it sure makes my heart sing! I began with the idea of a detachable circle cape for my 6 year old, to be worn on top of this sheath dress with laser cut sleeves and hem (based on my Infinite A-line bodice pattern). But my girls are also obsessed with trains and so we shot some looks with the cape tied around her waist and dragging on the ground. She was in heaven! It also made for a pretty good little picnic blanket which we laid on the grass and had them sit on. 


My 8-year-old's outfit was a fun recycled mashup: I made an Emmaline Dress from VFT years and years ago out of this floral polyester and then my big girls grew out of it. So I recycled the front of this bodice and added a full back and bell sleeves. I really loved the pattern mixing of this floral and the plaid so I added a midi-length skirt with center box pleats on the front and back. The red ribbon and vintage brooch (it was my grandma's) are my favorite touch! Lastly, while lying in bed one night thinking about the accessories for this shoot I realized I really wanted someone to wear a fascinator. So I put this simple one together and love it. In fact, I think I'll be stealing it from her in the future :) Head to my blog for more nitty gritty details and picture overload! 


 ***

Handmade Martini- Petals & Plaid 


I'm so excited to be back again this week showing you Eliza's petals & plaid look! I spent a long time deciding what fabrics to combine for this challenge! In the end I landed on black and white buffalo plaid with coral accents, including Cotton+Steel Rifle Paper Company Les Fleurs. I love them together!

The top is the Shandiin Tunic by LouBee Clothing, modified with elastic waist and side bow ties and made with cotton voile and the Rifle Paper Co. quilting cotton. The jeans are Juniper Jeggings by Peek-a-Boo Patterns, modified with an added waist band and embroidery, and made with mid-weight denim. The ballet wrap top is self drafted and made with a loose-weave slub rayon-blend knit that my machine hated. All are made with fabric from Let's Sew in Evansville. (My sister made the bow - it was already in our collection!) There are more photos on my blog, so come on over to Handmade Martini!


***

The College Seamstress- Little Lumberjack


Thank you so much for having me back for week two! I love plaid and it is the perfect choice for the fall season in Minnesota. My little brother has been asking me to sew for him, and how could I resist? I knew I wanted to use the classic red and black plaid and I found a perfect piece in my stash. It is a beautiful thick piece of wool. The jacket was the first piece I sewed for my brother's outfit. I started with the Reversible Zippy Hoodie from Kitschy Coo. I changed it to a half zip and lined the entire jacket in fleece. I also quilted all the plaid squares with "Xs". Since my journey in sewing started with quilting, I thought it would be fun to add it to the jacket! The pocket is also lined with fleece so it is soft against my brother's hands.  


Next, I made the pants by tracing an existing pair of my brother's jeans. The fabric is black corduroy from my stash and I added knee patches from the same wool plaid as the jacket. My favorite part of the pants are the back pockets. I hand sewed the letter "D" onto each pocket for my brother's name to add a little personal touch! Last but not least, I made the shirt to complete the outfit. I started with the School Bus T-Shirt from Oliver + S. I only had scrap pieces of knit plaid, but it was enough to color block! I also cut the neckband on the bias to add some interest.


For more fun pictures and details about my plaid look, head over to my blog here!

***

Mami de Sofiona- Buffalo Plaid in the Snow

excerpt title-1.jpg 

 So, here we meet again! Thanks to some really lovely people voting I have reached the week I dreaded the most. And it's crazy, because turns out I am SO IN LOVE with this look!! This one was a very big deal for me. Before I give you the condensed version, here's the link to go check out my blog for more pics and details. Out of the 5 pieces I made I only used one pattern and the rest I designed/drafted myself. The pattern used? Both pairs of pants this week started with the Jalie Eleonore Pant pattern. A popular pattern this season! This first main look I did a moto pant with zippers and using an awesome leather that I had on hand.  There's a bit of pleating in there too for variety.  I cut the front of the leg both vertically and diagonally to create the cool moto effect and then made sure to add some of that leather to the back of the pants. Next, I added a raglan shirt. That was supposed to be a super simple black T, but things get away with me. All of a sudden I realized I still had a piece of buffalo plaid knit that would work. And then I decided to try my hand at heat transfer. The fact that this girl chose a moose over the maple leaf I suggested is pretty funny since she is SCARED of moose! Facing her fears, I guess. You might notice the bottom cuff section of the shirt is quite high up the arm. I decided that since the jacket is shorter sleeves that the doubled fabric of the cuff can help keep those forearms warm. And that jacket!!! OH MY GOODNESS!! I can't believe I actually made that all by myself! You really need to go check the blog for a proper chat about it. Check out the cute closures! The hat I crocheted as well. We need something to keep our ears warm! 

jacket collage 

This second look wasn't really in the plan, but then none of these weeks had 2 looks in the plan! I just can't stop myself sometimes. The pants. The detail on these is really hard to see and that's disappointing because it really does look cool in person. I did a tone on tone criss cross pattern mimicking the squares of buffalo plaid. It goes from the hem up till mid thigh on an angle. It's also on the back pockets. I used an "upside down chainstitch" method so that the chain shows up on the right side giving a bit of texture. The sweater was another attempt to make something on my own. The cowl was an idea from one of my own Burda sweaters. The sleeves were a play on the longer cuffs of the raglan from the first look and the layered idea was just something that happened as I was cutting. You may be catching on by now that I really love leather touches in my sewing and this week was more of it. On this sweater I used a leather mesh that provided a textured look to the black sections of this sweater. To top it off I made a headband with some of the warm fuzzy lining of the coat. Again, I seem to have pleased both my girls! And again, I hope you like it!! 

White plaid collage 

***

Monday, October 23, 2017

Season 14 Prizes!

Today we get to share the prizes for Season 14!  We're always so amazed by our sponsors.  They are very, very generous and supportive of Project Run & Play.  We're sure that some of the reason for the huge sponsor support is due to your continued patronage of them!  Please help us once again thank this season's sponsors by following them on social media and patronizing their shops whenever you can!

Project Run & Play is a rewarding endeavor for all who sew, both designers and sew along participants.  It's so rewarding to be sewing as a group on the same theme and to share and see what others have made.  Often the results of what you create are worth it in and of themselves!  But we like to make Project Run & Play even more rewarding by coming up with fantastic prizes for the designers and rewarding those who sew along too.  This part would NOT be possible without our sponsors.  

So, what we are trying to say is a HUGE thank you to all of the companies that are sponsoring this season of PR&P.  We REALLY appreciate you.....{and I am sure the winners will too!}  


So, if you have fabric, crafting, notions or etsy needs....please click on the sponsors below to visit and support them.  It would mean a lot.  

And now onto the prize packages.....
Here is what our designers will receive this season:


Our 1st place winner will receive:
6 month subscription ($102 value) to Stash Builder Box 
$100 fabric bundle from Riley Blake Designs
$75 gift certificate to Fat Quarter Shop
5 patterns ($80 value) from Oliver + S
8 patterns ($70 value) from Violette Field Threads
$50 gift certificate from Jo Totes
3 patterns ($30 value) from Petit a Petit & family

Our 2nd place winner will receive:
$75 gift certificate to Fat Quarter Shop
$75 fabric bundle from Riley Blake Designs
$50 gift certificate from Jo Totes
5 patterns ($50 value) from Hey June Handmade
5 patterns ($45 value) from Violette Field Threads
$25 gift certificate from Hawthorne Threads
2 patterns ($20 value) from Petit a Petit & family

Our 3rd place winner will receive:
$75 fabric bundle from Riley Blake Designs
$50 gift certificate from Jo Totes
$50 gift certificate from Urban Sew
3 patterns ($30 value) from Violette Field Threads
3 patterns ($28 value) Paisley Roots
$25 gift certificate from Stylish Fabric
1 month subscription ($18 value) to Stash Builder Box
1 pattern ($10 value) from Petit a Petit & family

As we told you in our sew along post, this season the sew along winner will receive $100 to spend at Raspberry Creek Fabrics!

But today we've got a little surprise for you...because of the generosity of Hawthorne Threads in the form of a $25 gift certificate, we get to have a runner up in the sew along!  


And because we can't bear to send any of our designers home empty handed, we have special parting $25 gift cards donated by Stylish Fabric.


Friday, October 20, 2017

All Buttoned Up Challenge - Results

Our designers inspired us so much with their All Buttoned Up looks!  They had everyone digging through their button stash in search of the perfect buttons.  The scores have been tallied, and this week's winner is:


Bonnie of Bonnie and Blithe with her Boho Butterfly

And sadly, our least favorite part of each season, we have to say goodbye to one designer and send them home.  This week we're waving goodbye to:


Raphaelle of Deux Souriceaux with her Brooklyn Cool

But she's not going home empty-handed, our wonderful sponsor Stylish Fabric is awarding her some shopping time with a $25 gift certificate.


We'll see you next week!  Happy weekend sewing...

Tuesday, October 17, 2017

All Buttoned Up Challenge-- Time to Vote

Woohoo! We are so excited to get this season off to a start! For this first week, we asked the designers to use buttons to highlight their looks. Make sure to check them all out before voting (below). If you want to see more of one particular design, you can click over to their individual blogs for more details.

Mamide Sofiona- Beautiful Buttons

buttons-1-2 

Hello everybody! I'm pretty excited to finally be here and showing you what I have for our theme of Buttons! This is going to be tricky to keep short so you'll have to go check my blog by clicking this link for the details. I will spare you none!.... What I will tell you here is that for this week I started with only these overalls and this blouse in mind. Neither are splattered in buttons, but rather the buttons compliment and are quite necessary for these pieces. I traded in the knot style feature on these overalls for these nifty little button details and it was exactly the change I felt they needed. For the blouse, it's an altered Simple Life pattern that already has that button placket down the back making it a perfect starting point. I took the opportunity to give it a nice scalloped neckline and switch up the sleeves by adding those gorgeous ruffles. 

Overalls Collage 

Then I decided that I wanted to feature a few more buttons and so began the search through my sewing room for a second look. You'll notice I kept the look cohesive by continuing with the denim/faux leather look which came from a pile of old jeans in my stash. And you might notice the bottom ruffle of the skirt matches the sleeves on the blouse. Well, that would be a old dress of mine that I chopped the top off of . It was my inspiration for those sleeves even before I realized how cool it would look on this modified Zephyr Dress by Lil Luxe. I topped it off with a pretty necklace that is covered in buttons! Beautiful ones. That one is a pattern from Violette Fields. Oh, and the buttons in the hair? My daughter specifically asked for that and I happily obliged! 

Button dress collage

***

The College Seamstress- Cute as a Button
 SaveSaveSaveSave

I am so excited to be here for week one of Project Run and Play! I will admit that when I found out the theme for the first week, I was a little nervous because buttonholes and I do not always get along! However, I was determined to not let the buttonholes win!
I started with the Ila dress bodice from Coffee and Thread patterns. I cut length from the bodice to add a waistband. I wanted a belted look, but a waistband suits my five year old sister best. I drafted a simple half circle skirt using my sister's waist measurement. I started with this tutorial from Dana Made It, but cut a half circle instead of a full circle.


Now, on to the buttons. I wanted to make the buttons into a zigzag shape for two reasons - I like how it looks and my sister's name is Veronica - so the "Vs" in the zigzag are for her name! She is in kindergarten and knows her letters, so it is perfect! Since the front is pretty detailed, I went with some simple buttons for the back. There are 54 buttons total on the dress!


Head on over to my blog here for more details and pictures about my look!
***

Deux Souriceaux- Brooklyn Cool


Since moving to Brooklyn, I've seen a lot of kids. There's almost 1500 of them at the girls' school! They all have their very own style and aren't afraid to be themselves, fully. It's awesome to see such variety be not only accepted but also celebrated. And my guess is that it can be infuriating for parents who have children like mine. Children who have very definite ideas of what they will and won't wear. So when I started work on this outfit, I couldn't not ask for my daughter's input. She chose fabrics, modified and approved plans, gave feedback, and made one tiny concession (the bunny button)... 


 The pants are based on the Jalie Eleonore pull on jeans. I added functional buttons to the outside leg. Closed, the pants have a straight leg. Open, they look more like a flare and provide ventilation for warmer afternoons. The button and thread colors match the shirt. I used a comfortable rayon ponte that refuses to press so every single seam is topstitched.


 The shirt is based on the Oliver + S Building Block Dress, very heavily modified. Basically, I only kept the armscye, the sleeve cap, and the shoulders! The back and underside of the sleeves are made from knit for extra ease of movement, while the rest is woven. I made small dorset buttons for the cuffs and bigger ones for the button band at the front. A few of the buttons are functional but the rest is decorative, inspired by one of my own cardigans! Please visit me at deuxsouriceaux for more information. There is so much more I want to say about this look!
***

Handmade Martini - Buttons in the Urban Wild


Hello, everyone! For the button challenge, I chose to make Eliza three pieces with button closures, using them to add pops of color and detail. The knit top is self-drafted based on an old favorite shirt of Eliza's. The trench coat started with the Sunki Dress by Figgy's, and I kept only the side pockets and pleated sleeves. (I used the same pattern and similar modifications for Flip This Pattern back in 2013. I didn't keep my original, so I had to start from scratch on this one! It was Eliza's most-worn garment with buttons, so it was worth recreating.) The skirt is the Ayashe by Figgy's, and I modified it by adding knit shorts under for modesty and warmth. The knitted hat is the Barley by Tin Can Knits. All fabric, trim, and buttons came from Let's Sew, our local fabric store.

Hop over to my blog, Handmade Martini, for more pictures and details! Thank you! 


***

Bonnie and Blithe- Boho Butterfly


Hey all! I'm excited to share my week 1 look with you: I call it Boho Butterfly! I knew I wanted to create button art for this challenge and when I thought of using a butterfly as my subject, the rest of this bohemian-themed look just fell into place. I used a faux suede for this vest, based on Jennuine Design's moto jacket pattern and I love how it looks both zipped up and open. The dress was based on my Infinite A-line Dress pattern only with a lengthened skirt and fuller sleeves. This chiffon dress just says "let's go frolic in the forest and befriend woodland creatures" to me :) I love the flowy factor, the floral pattern and the ease of wear. I considered adding some ruffles to the sleeves and hem but decided against it since the vest is such a statement piece. I lined the bodice and half the skirt with a rayon, but the sleeves and bottom of the skirt are fairly sheer. Both my little model and her twin are obsessed with it and fought over it all weekend! Visit my blog for even more behind-the-scenes details of this look, including a very sad story about a naughty toddler, a pair of scissors and why I almost dropped out!
***

Sew Haute Blog- All Buttoned Up


Hey, you don't know me, I'm Teronia from Sew Haute Blog. This is my first time and first week on Project Run and Play and I can't believe I'm actually here! It's like wearing the suit of your favorite hero, but enough dramatics, let's get to this week's look. This week we we were challenged to highlight our work with buttons. I wanted to do something that wasn't just throwing buttons at my outfit. I'm not super artsy so carefully arranging an array of buttons that look like the Mona Lisa just wasn't in my cards. Instead I opted for functional buttons. This involved me inventing, YES INVENTING, a partial button placket and sort of drafting my own waistband to get the sailor pants look that I wanted. All of this so that I could have functional, purposeful buttons.  


 I based my top off of the Blank Slate Fresh Bloom Frock. It has a gorgeous feature button on the shoulder, but I wanted to step up my button game so I moved the first button down and took that placket that I invented (wink) down the front side to add more buttons and functionality, otherwise my daughter's head would not fit. I also changed the collar shape and position and turned the dress into a tunic, eliminating the separate bodice and skirt. The pants are based off f the Jalie Eleonore Pull On Jeans. I added a tuxedo stripe to give the outfit an outdoorsy feel. I was also inspired by another pattern and changed the waistband to the sailor style. If you'd like more details about the fabric, patterns and the overall look you can hop on over to my blog: Sew Haute Blog. If you do don't forget to come back here and vote for your favorite look. Keeps scrolling for the voting polls. Thanks for visiting!