
This week's theme is Transformation!
Tip Stitched - Overalls All Year
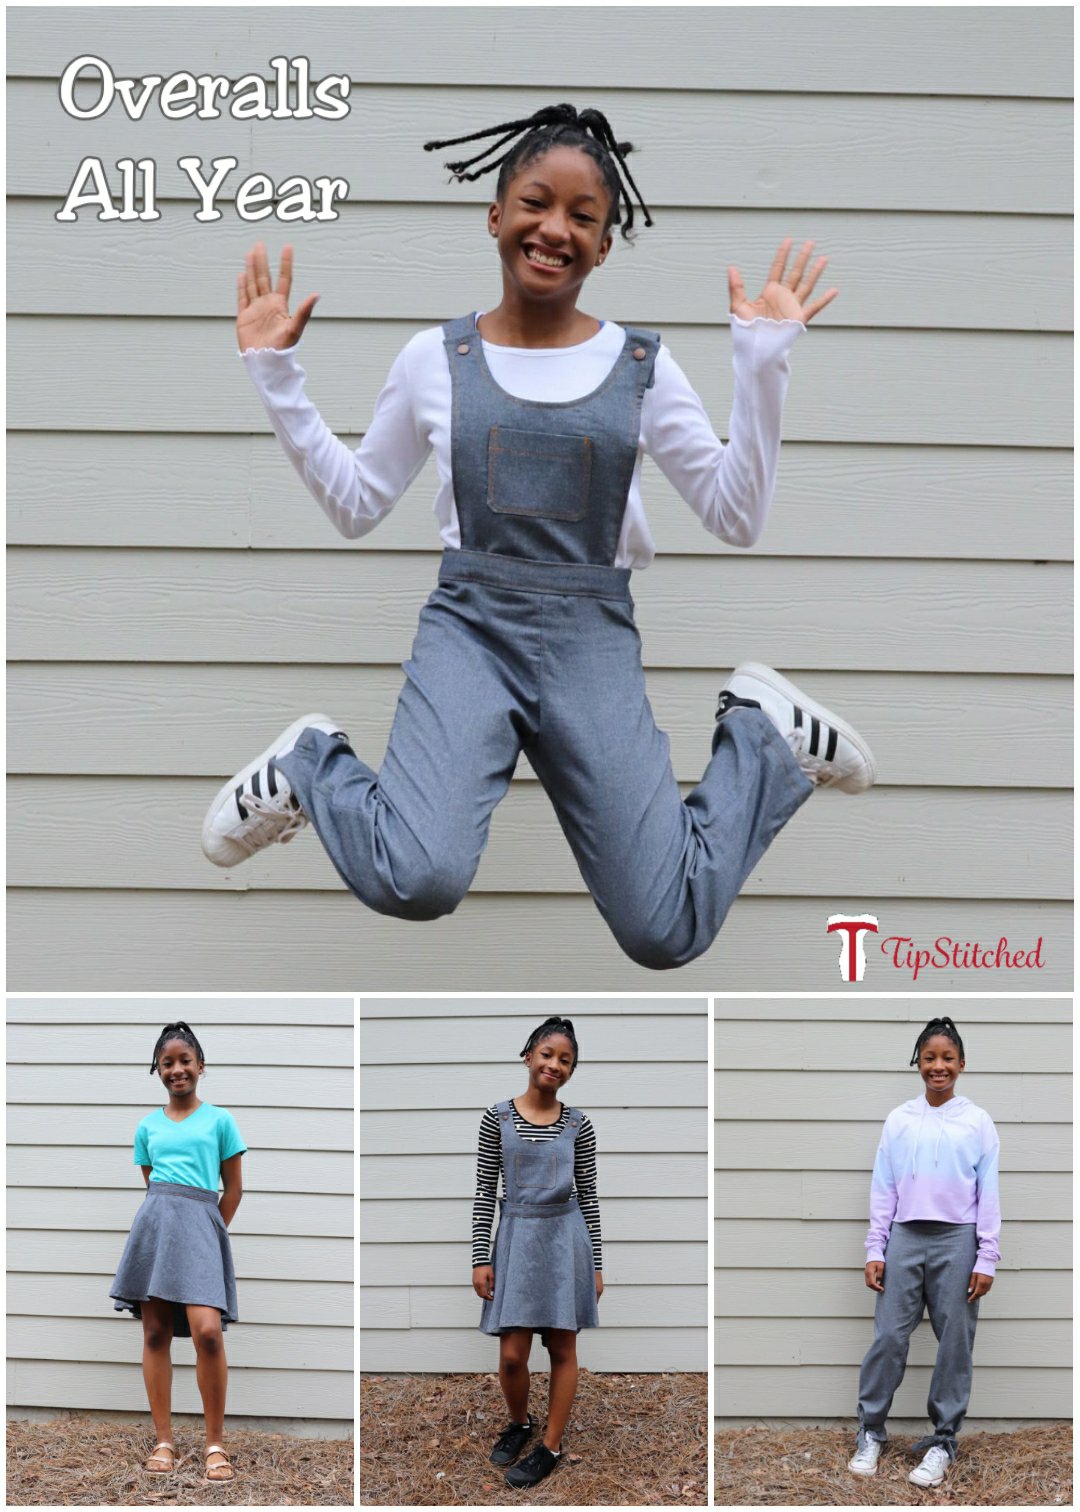
Whew, I made it to Week 2! Thank you to those who voted. I'm so excited because I really wanted to share this transitional piece with you. I enjoy making things that can have multiple uses. My first thought was to make something reversible because that is my go-to for creating something that will give me two looks. Instead I challenged myself to create an outfit that was interchangeable and could be worn all four seasons.
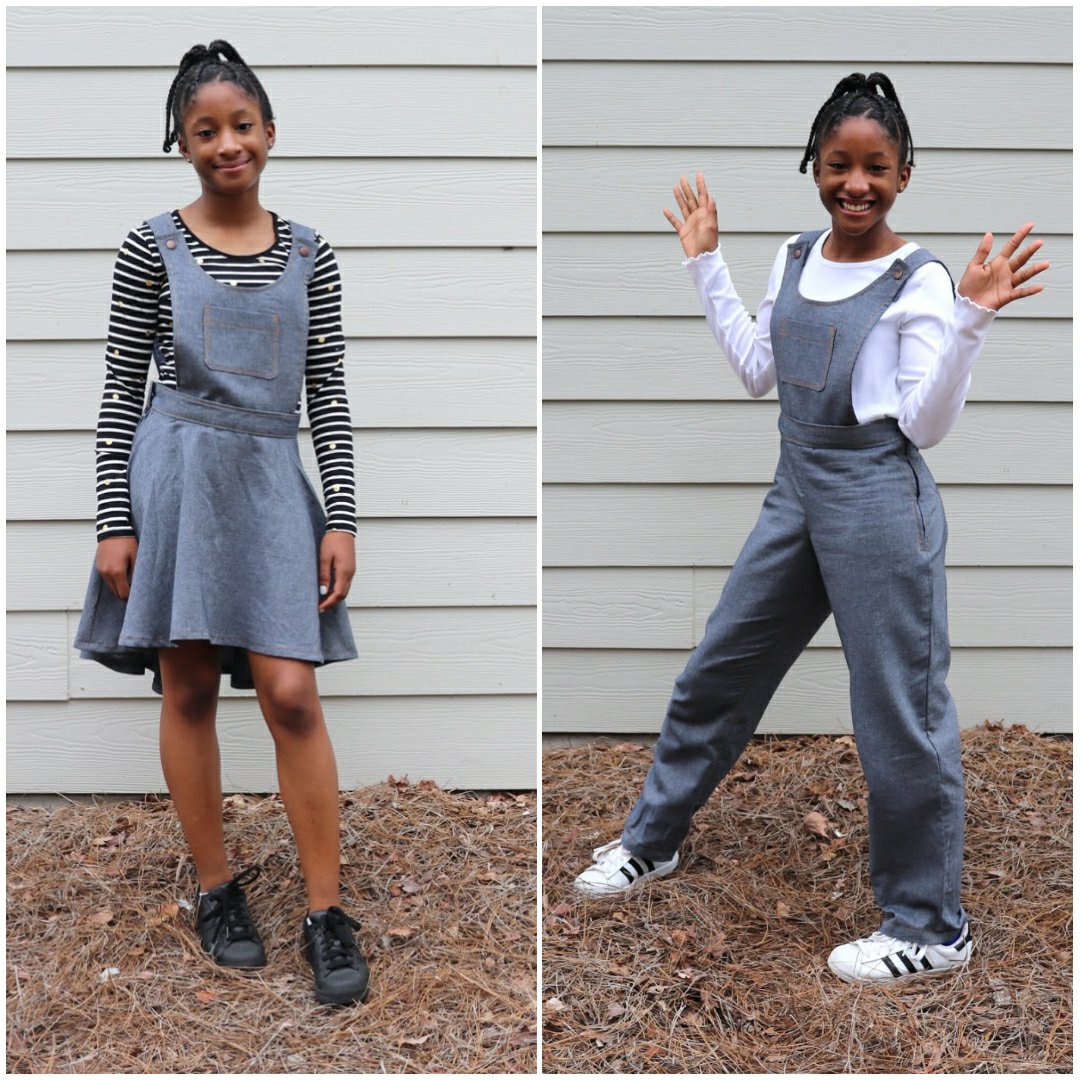
After much back and forth I decided on overalls as they are made for layering, allowing them to transition easily from season to season. I used McCall's 7459 as my base. The twist that truly makes this ensemble season-less is the detachable bib. The ability to remove the bib allows the skirt and pants to be interchangeable and provides the option to wear each separately. In the winter the pants can be paired with a sweatshirt or hoodie. Then as spring comes around the skirt-all can be worn over a long sleeve or 3/4 sleeve tee. Remove the bib when the heat of summer hits and throw on tee or tank with some sandals. As the temps cool back down for autumn the overalls work great over a light sweater or heavier t-shirt.

After considering several ways to make the bib removable (buttons, hooks, snaps, zippers and even Velcro!) I selected snap tape. I was sure to attach the female side to the waistband for comfort when wearing either bottom alone. A few changes were to the bib were necessary. I added an inch to the bottom of the bib pieces so the bib would overlap and line up with the bottom of the waistband. Additionally the bottom edge needed to be finished so I sewed the all but 2 inches of the perimeter of the front and back bib right sides facing and then turned the pieces like a pillow and top stitched. Lastly I used bronze snaps instead of buttons as a matter of personal preference.
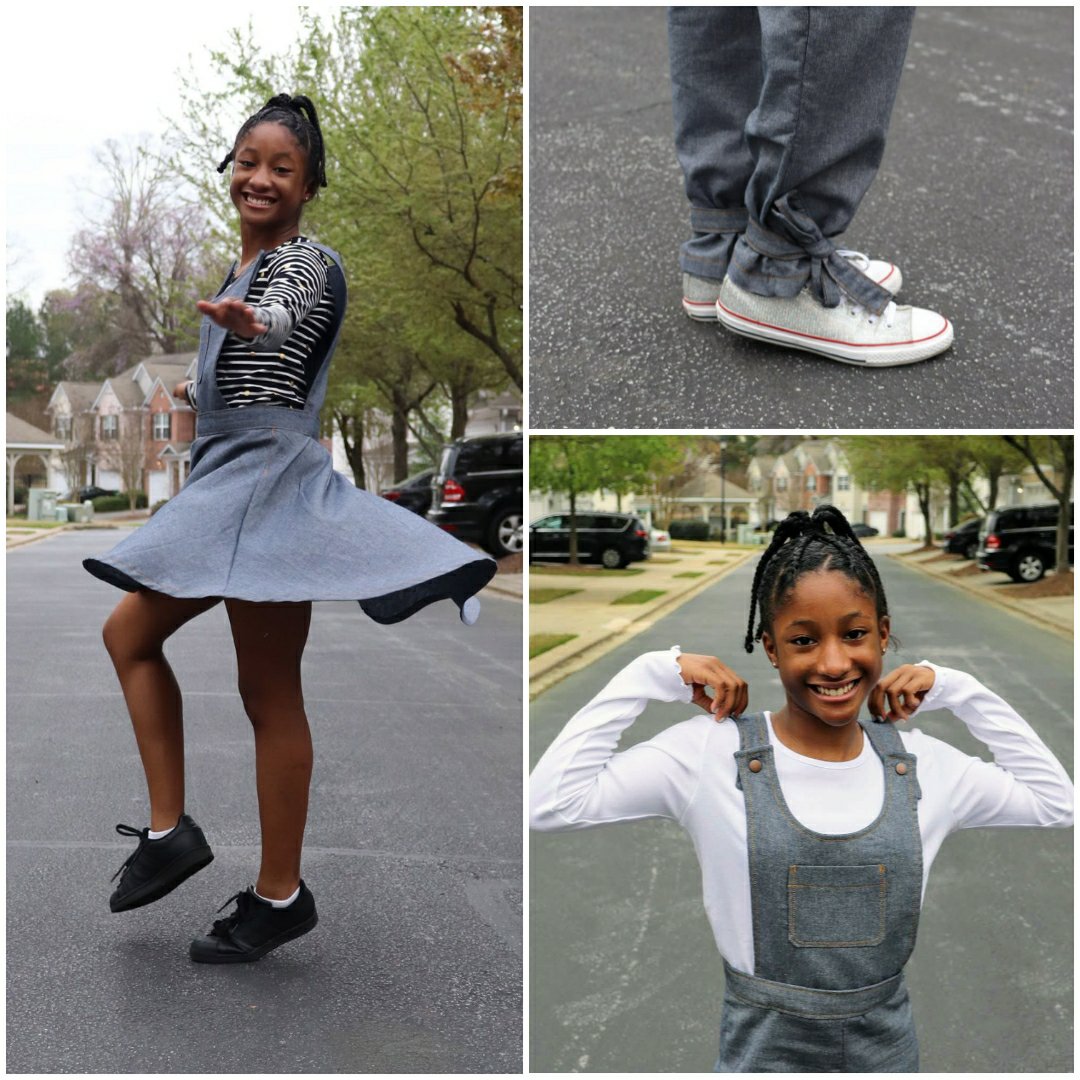
Of course no look for Miss Socialite is complete until she adds her touch. This time she wanted to add ties to the pants to create more of a jogger (or harem) look. Well actually she wanted to use a hair elastic to cinch them up and I convinced her these ties worked better. Also the skirt was too long for her liking, but instead of shortening to above the knee she requested a hi low hem. She now declares this is her favorite skirt! Which is a major win because she swore off skirts a couple of years ago. I hope you like it as a much as she does!
Be sure to visit my blog for more details and a full pattern review. TipStitched
Thank you, Tiffany
Life Sew Savory - Play Dress / Party Dress
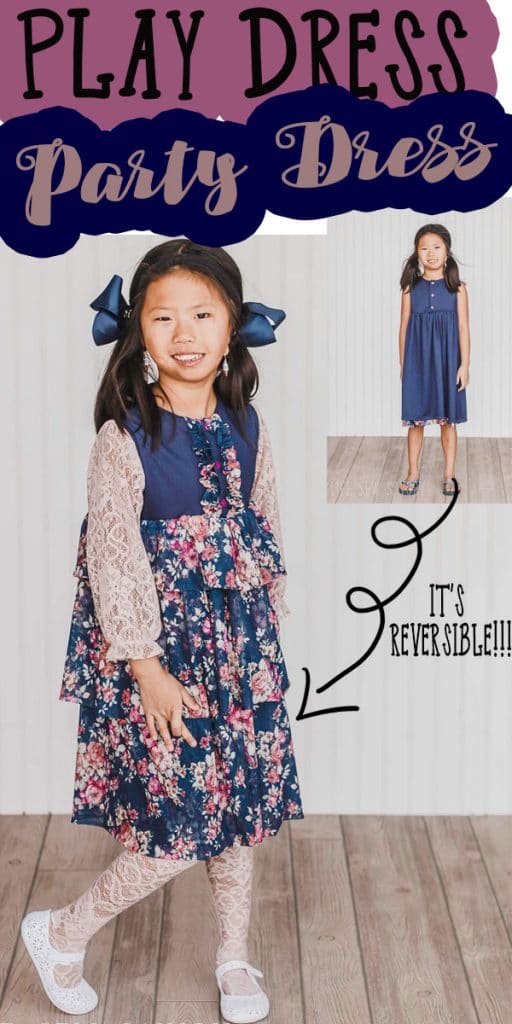
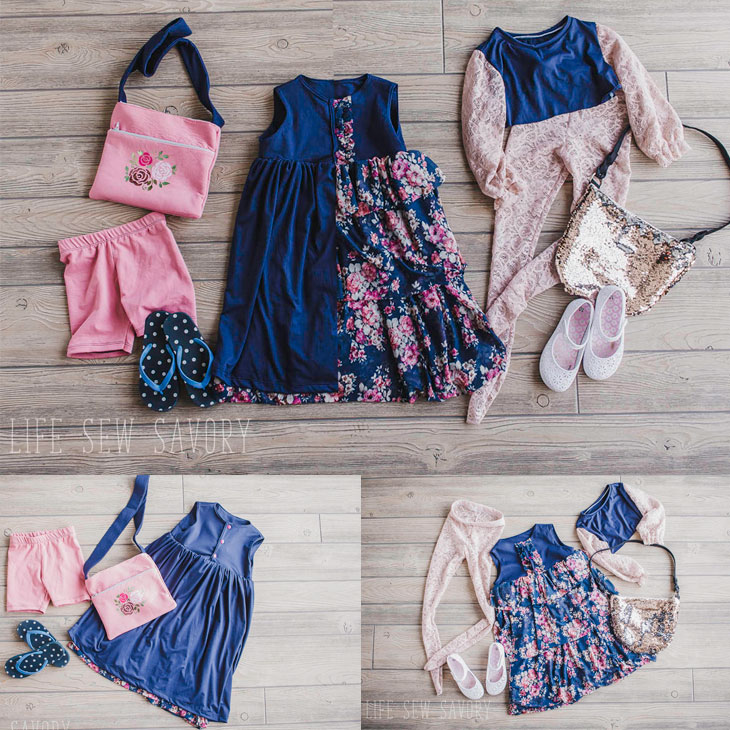
Get more wear from your dresses with TWO wearable sides. Simple and sweet on one side and ruffles and frills on the other! Play hard all day, then still have a clean side to wear the next day. My daughter is in love with both looks and wants to wear this everyday. The base dress pattern for this look is my free sweet rose dress.
Ahhh transformation... I was really thrown off by this theme. After the themes were announced I asked for transformation ideas in my sewing group and someone suggested a reversible dress. I loved the idea and ran with it. The blue and the floral mesh were already in my stash with some vague Easter dress plans and then I had this vision. I started adding details to make the play/party theme more transformational.
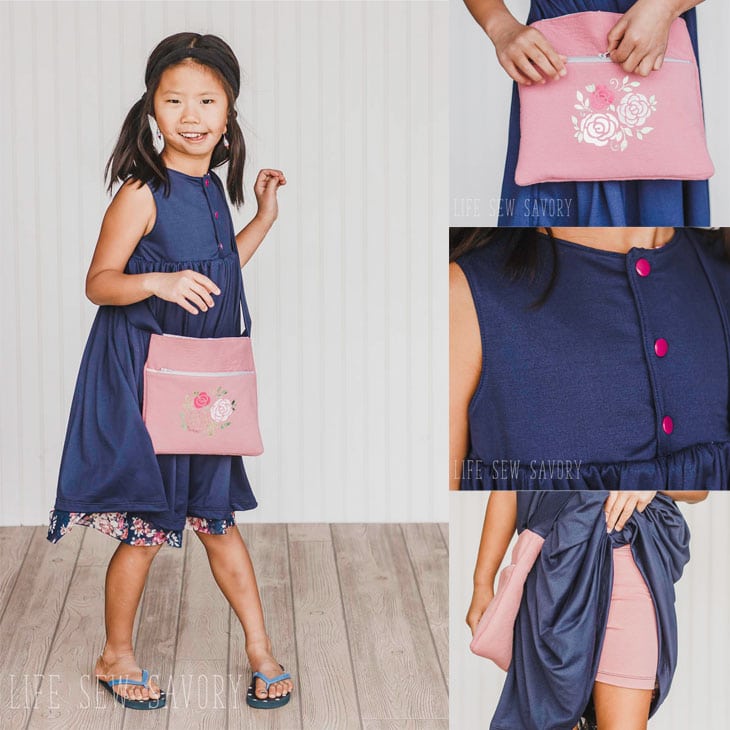
The Play Side: A sweet simple blue dress. Snap front to help the dress go over the head, but easy to snap or unsnap. I also made a cute mini messenger bag for my daughter to carry around all her playtime treasures. She may be six, but my daughter is still no lady {haha} She wears shorts under her dresses all summer so she can play hard and still look cute.
Free patterns used: Summer Shorties and Mini Messenger Bag
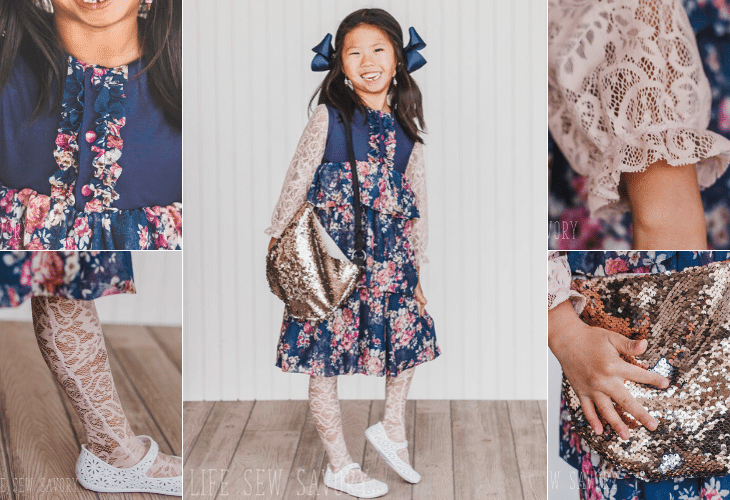
The Party Side: All the frills! You can see in her face she LOVES this dress. From a simple play dress a simple flip will transform your dress to a look that will impress. The simple snaps now have ruffles down the sides and the skirt is three layers of double floral mesh. I sewed up some lace tights {I adapted a legging pattern}, and some lace sleeves. The lace sleeves are attached to a simple tee base and have elastic at the cuff for an extra touch. We topped off the look with a sequin purse - the kind that changes colors as it's SO fun.
Free Patterns used: Girls Leggings, Sweet rose dress
See my full blog post for even more details of how I adapted patterns to create these looks... and of course... outtakes!!
That's Sew Kari - Catch You on the Flip Side

Woo-hoo!!! It's Week 2 - Transformation Week! No, I didn't exchange my younger daughter for a clone of my older daughter.... LOL This week, I chose to sew for my oldest because she's in the midst of her own transformation -- from elementary school to middle school. I couldn't think of a better way to celebrate her growing up than to give her a mini-capsule that F-L-I-P-S to suit her mood. I came up with a 4-piece collection that she can style multiple ways depending on what she picks.

My inspiration for the entire collection started with the Black & White Polka Dot Oil Cloth that I selected from Cali Fabrics in my pre-season shopping spree. I hadn't used oil cloth before, but it really caught my eye and knew Marissa would love it too. From there, I selected hot pink and black -- two of her favorite colors. Finally, I chose a funky hot pink, neon orange and black print that I had bought for her last year.

Piece 1: Reversible Skirt/Dress Combo -- This tube style dress contains a skirt on each end so one side can hide inside and act like a built-in pettiskirt. The waist also folds down yoga style for a skirt option. Pattern is self-drafted with the exception of the pockets on the pink side. Pockets are from Carmelo by Little Lizard King.
Piece 2: Reversible Ruffle -- This ruffle can be worn on one shoulder, or halter style. The halter tie doubles as a decorative bow when not used as a halter. Hidden elastic sits between the layers. This piece is self-drafted.
Piece 3: Reversible Tank Top -- I turned to my favorite knit dress bodice for this one. I used Wimberley by Little Lizard King and lengthened to tank length and hemmed each side individually.
Piece 4: Reversible Mini Backpack/Purse -- I began with the Animazing Backpack Add-on by Little Lizard King. For the outer shell, I created double usage straps -- backpack or cross-body. The inside is plain black for more reserved occasions and has a removable shoulder strap. We had quite the photo-shoot, trying as many of the combinations that we could and I'm certain there are more than what we captured! Many more details on my blog!!!
P.S. Thanks to the magic of Photoshop, I can share all sides in one picture 😊

Sew a Little Seam - Whatever the Weather
I'm so happy I made it to week 2 for Transformation Week! I've really enjoyed sewing based on themes. When designing patterns, I create whatever comes to mind, but having a set of boundaries has been a great way to come up with some fun and different ideas than what I normally would.
My look for transformation week is an outfit that changes with the weather, because as Mark Twain said, "If you don't like the weather in New England, just wait a few minutes." This outfit can be worn in five different ways. For chilly days she has the zippered jacket, then when it warms up, the sleeves zip off to create a vest that is reversible. The sleeves can be worn separately as a cardigan, or if it gets really warm she could just wear the white long sleeve tee.
Now let's talk details. The solid pink side of the vest has welt pockets and can have the sleeves added by zipping them on. When the sleeves aren't on I like how the zipper adds some extra detail to the vest. The plaid side of the vest has zip pockets. I thought about adding a zipper to this side too so you could add the sleeves, but I wanted it to have a more traditional look. As an added bonus the sleeves look really cute as a cardigan. I sewed up a white, long sleeve tee to go underneath using the Brynn pattern. I altered the shoulder so I could add some pom pom trim and lace for a little extra detail if worn alone. And of course she needs a bag to carry the pieces she takes off, so I made a reversible drawstring bag. This will be great for hiking or camping. The jeans are the Grady pattern. I shortened the back pockets a bit to make them a bit more feminine, added some heart details, and pink topstitching. I also made them fully lined so when rolled the bottoms have the little pop of fabric to match the plaid vest. Plus, my daughter loved how soft they were with the lining.
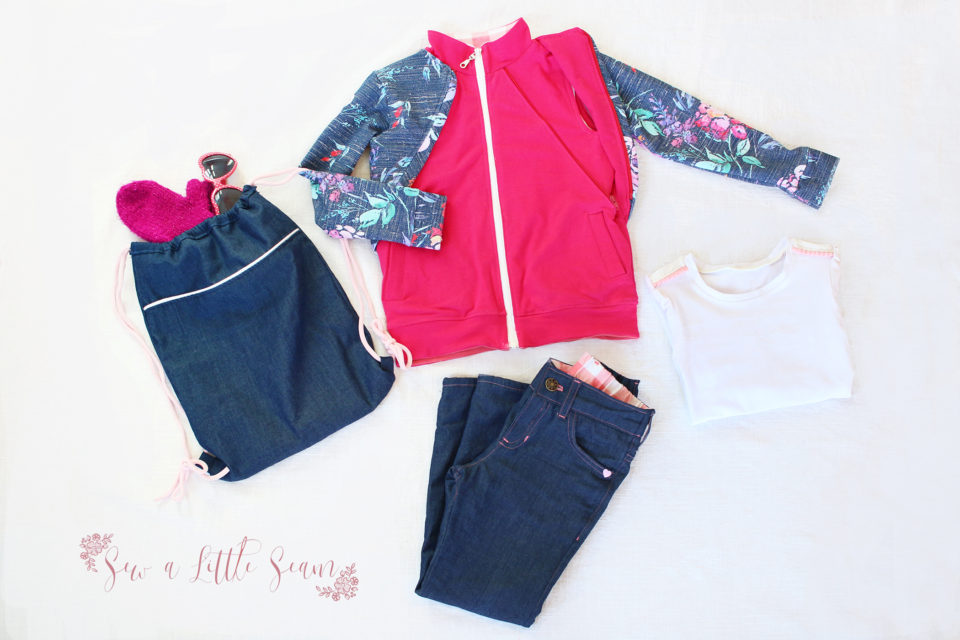
The floral fabric was from Blended Thread Fabric, the pink plaid was from Raspberry Creek Fabrics, and the solids were from Purpleseamstress Fabric. I had a hard time narrowing down the photos, so if you'd like to see more, make sure to head over to my blog. Thanks for checking out my look this week!
Baby Nest USA - Turn Back the Time

Hi again! This is Richelle and Reine for the Week 2 - Transformation Theme.
1. Pattern modification / Fabric transformation
2. Mini fashion capsule that is wearable throughout four seasons and can be mixed and matched.
3. Transform something old and broken into a fresh and new item.
4. Transform home decor into a wearable garment.
With new movies and shows set in the 80s coming out, from Stranger Things to The Goldbergs, it’s no surprise that my daughter fell in love with that era. I’m glad it’s coming back! It’s my decade, and this project has been a good homeschooling lesson for us, especially during this difficult time. Reine and I were able to discuss the expressions, toys and gadgets, the famous singers, songs, movies and of course - the fashion! I tell ya, my daughter had a LSS (Last Song Syndrome) from the song “Wake Me Up Before You Go Go!”. She won’t stop singing it! Born in ‘86; I knew I had to make my daughter’s request for a super tubular 1980s inspired outfit. The ‘80s has pretty audacious trends - bold colors, bold prints and bold silhouettes. It embodied the mindset of more is more. Having said that, we decided to go for bold, fun 1980s prints and silhouettes but with subtlety. We want it to be 1980’s inspired but still 2020 trendy and something that can be mixed and matched with today’s garments.

First is the top. I wanted to transform a vintage cotton curtain into a wearable garment that can be worn in this modern world. I love this curtain’s print! It’s true vintage, fun and colorful! The base of the top is Little Lizard King’s Sausalito Sweater Top. The pattern is intended for knits but I wanted to challenge myself to modify a knit pattern to work on a woven fabric. I kept the relaxed drop shoulder, omitted the neck, sleeve, and hem bands and used bias binding around the openings. I also used a Hong Kong Binding on the side seams. I hacked the shoulder with a shoulder button placket, so it’s easy to put on and off. It’s also a fabulous way to show off these teal colored wood buttons. To give it a boxy, swing style effect, I modified the pattern pieces by slashing the bust apex and lower portion of the bodice, extending the originally cropped top length, and giving it a lil bit of hi-lo silhouette to highlight the contrast from the hem’s striped bias binding.
For my all season fashion capsule, I made a bomber jacket based on Petite Stitchery’s Billie. I used cotton fabric from Ziggie Lane that has this cool acid-washed denim look, as acid wash is evocative of all things 80s. I also love that it’s a soft 100% cotton for comfort, wearability and breathability. I paired the jacket with Hawthorne Supply Co.’s Black and White Artisan Stripes. The grey binding was made from Raspberry Creek’s grey cotton lycra. I love using cotton lycra for binding, since it has a good structure and recovery. I modified the jacket to be reversible with a matching removable and reversible hoodie. It’s a super fun way to transform the look! Oh - It has pockets for snacks, cassette tapes, scrunchies, etc.

I also self-drafted a pair of pants matching the fabrics from the jacket and incorporated stripes so it will also go well with the boxy top. I gave it a semi-harem style with a slightly fitted look. I also wanted this piece to be wearable from one season to another so I decided to add a zipper that would transform it from pants to shorts, allowing Reine to wear them throughout the seasons.
Now for the fanny pack, I had this old purse that had broken zipper teeth that was really showing age on the bottom part. I wanted to transform an old, broken item into something fresh and new, so I decided I need to make an accessory that will complete the look. What’s more 1980s than a fanny pack, right?! The fanny pack is self-drafted and the materials were upcycled from the old purse. While making this fanny pack that transforms from shoulder to waist pack, I realized I can make a strap #2 that can transform to a belt. I used this cream/gold webbing and plastic buckles from Hobby Lobby. The strap is removable so it can be used for the fanny pack or as a belt.
To be honest, this project really pushed me to think beyond my limited self-taught fabric engineering and pattern drafting skills. The finished products were totally worth it! I have one happy kid! I hope you like them too, and don’t forget to vote!
For more pics, videos and behind the scenes visit me on Instagram and Facebook. For free coloring pages click here.
This week's celebrity sewing guest judge will certainly have her work cut out for her!! Sherri of Mami de Sofiona created STUNNING looks when she was a designer on Project Run & Play and is well qualified to preside of the Transformation theme!

I continue to be amazed at how creative and talented you all are!
ReplyDeleteLove them all.
ReplyDeleteSo many great ideas this week!
ReplyDeleteLove what you came up with Emily. Very cute indeed. If only I had a daughter to sew for. My only hope now is a grand daughter some day.
ReplyDelete