

I'm a big fan of hacking patterns, from the most simple hacks (like shortening a dress skirt to become a blouse) to some more complex hacks. Sometimes it goes well and sometimes it doesn't, but I always learn something with it.
For this blog tour the challenge was to do a hack, simple or not, so I went all out and made one dress using elements from three patterns. I like how it turned out and my daughter loves it. The three patterns used for this are the:
- Maria Blouse (for the bodice)
- D'Anjou Dress (for the pleats and skirt)
- Odeline Dress (for the large skirt pockets)

It's summer here right now and I'm already sewing my children's cold weather clothes so I wanted to make a dress with the bodice in warm cotton vyiella and the skirt in a drapey thin corduroy.
For the bodice I used the Maria Blouse pattern. I love how it fits my daughter and I've hacked it into a dress twice before. One of my favorite ways to hack this pattern is by moving the button placket to the back and having a solid front. The first time I did this was for the blue dress that I made for Season 20 week 2. Just like on that dress this time I also omitted the collar and finished the neckline with self-made bias. So here's how to do it:
Print out the front pattern piece for the blouse and measure the width of the placket and the width to the center front. The pattern measures 4cm from the center front to the edge, 3cm of which are to fold back the placket.

Transfer those measurements to the back pattern piece, adding them to the center back. The back piece will now be cut twice mirrored instead of on the fold.

On the front piece fold back the placket up to the center front mark (where the button holes were). The front piece will now be cut once on the fold.

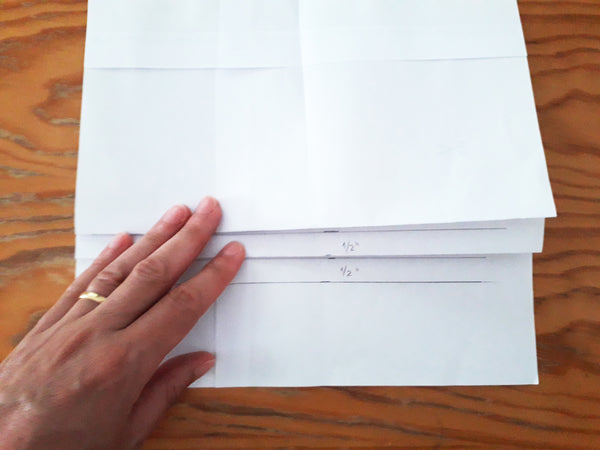
One detail that I particularly love about the D'Anjou Dress is the pleats, so I added two horizontal pleats to the bottom of the bodice. I haven't made pleats many times before and I always get confused when I start calculating and sewing them, so I find it helpful to make a visual aid with paper first.
On the D'Anjou dress the pleats measure 1/2", so I went along with that measurement too. Draw several paralel lines 1/2" apart until you can fold them down to create two pleats. This means seven lines measuring a total of 3". This is what needs to be added to the bottom of the bodice.

On the front and back bodice add those 3" down from the cutting line marked on the pattern. Add another 1cm as seam allowance, and cut the pattern pieces along that line.

These are the finished bodice pattern pieces.

To make the dress you'll also need the sleeves of the Maria blouse, the skirt of the D'Anjou dress (or lengthen the peplum of the Maria Blouse), and the pocket from the Odeline dress.

Cut out your fabric and the bodice part should look like this: two mirrored sleeves, one front on fold, two mirrored backs, self-made bias tape and fusible interfacing for the button placket.

Start by sewing the bodice according to the instructions of the Maria Blouse. Because you're not making a collar, finish the neckline with the bias tape:
- Fold the tape in half wrong sides together
- Fold the placket to the right side of the back as shown below and
- Pin tape to the right side of neckline, pining it on top of the folded placket, and sew
- Trim back the seam allowance and clip notches to reduce bulk
- Fold the bias tape down to the wrong side of the bodice, folding the plackets along with it.

Pin the bias tape along the neckline and sew. I messed up when placing the tag in this photo and sewed it to the center front. I unpicked it later and sewed it in the correct place, on the back of the bodice.
The neckline is all done and you can continue following the instructions on the pattern.

With the sleeves and side seams sewn it's now time to make the pleats on the bottom of the bodice. To make it easier draw all the lines with a removable pen or tailor's chalk. Now start from the bottom and work your way up:
- Fold the first pleat wrong sides together, sew and press it down.
- Fold the second pleat in the same way, sew and press down.

Sew the button holes on the right placket and the buttons on the left placket, and the bodice should look like this.

For the skirt, cut two skirt pieces and two pockets.
- Sew the skirt along the side seams, right sides together.
- Finish the top raw edge of the pockets, fold it 2cm down to the wrong side and sew.
- Finish both side raw edges and press them 1cm (3/8") in to the wrong side.
- Place each pocket on the side seams of the skirt, aligning the center top and bottom of the pocket with the side seam of the skirt, and the bottom raw edges of the pocket and skirt together.
- Topstitch the sides of the pocket to the skirt and baste the bottom.

Then gather the top of the skirt, pin it to the bodice right sides together and sew. Finish the hem of the skirt, fold it 2.5cm (1") to the wrong side and topstitch.
Give it a good press and the dress is all done.

I love those big pockets and think that they give a fun look to a classical looking dress.

Thank you so much Susana! What a special dress! Today's giveaway:

No comments :
Post a Comment
Note: Only a member of this blog may post a comment.