And now it's time to see what in nature inspires our designers! Sit back and enjoy today's post, they have really made this one stunning! Be sure to make it through all their creations and VOTE at the end of the post.
Girl Like The Sea - Heavenly Bodies
{HEAVENLY BODIES} (space punk) : wolf constellation jacket, black hole tank, nebula bubble skirt, star tutu and neck ruffle harness It's week two! For the nature theme, I really could have gone a million different directions. Nature is so full of beauty and curiosity for me and my kids, and we've spent a lot of time exploring and wondering and collecting. When I go outside look at the night sky I get such a deep feeling of meaning and mystery, and that's what I decided to go with for my theme this week. I've been in a season of transition, uncertainty, and some depression lately, even as some of my biggest hopes were coming true, and when I look at the heavens and think about how ancient and almost immovable they are.... How people for centuries before me looked at the same canvas overhead and gained meaning from it, I feel more in tune with how things are bigger than just what's happening inside of me. The dark mixed with light and color and energy in the heavens seemed like a good way to translate some of that into fashion. As an artist who also paints and draws, I'm very tuned in to creating a color story and a feeling experience through what I create. The way the colors, textures, and silhouettes play together mean a lot to me as I'm putting my ideas together. My very first inspiration for the whole look revolved around Violet's black hole tank. She's been interested in black holes for a long time and I knew she'd love a sort of space punk outfit with a black hole tank. I was right. She LOVES it. The whole outfit! And she doesn't usually even like skirts or pink, but these are just her her somehow.
Starting with her tank, I created it by using the megan nielsen briar top as a base with a gorgeous organic jersey from a local fabric shop, and then changing the armhole and neckline to make it tank shaped. I also cropped it shorter and eliminated the extra length in the back. Then I got to the part I'd been dying to do. Black hole bleach tie dye. I knew that if I bleached black fabric I'd get the perfect galaxy rust and rose colors. I love the way it came out. The moody center and energy of the perimeter. My only disappointment is that I had the fit absolutely perfect when I first sewed it, and the bleach relaxed the fibers of the fabric a bit, making it grow about a size bigger than I intended it to be. It still looks great, it's just less cropped than I wanted. To go over the tank I sewed her a swing coat in black canvas from cali fabrics and some upcycled fabric for the lining from a weird giant twill jumper I thrifted. The mauve color was perfect as a planetary color. The hood is lined with a pretty blue night sky fabric my parents gifted to me. I added big copper starburst looking buttons to the jacket to compliment the look. On the hood I chalked out the Lupus constellation dots because I love wolves, and then free motion quilted between the dots with metallic gold thread like I was making one of those string and peg projects. I love the prism that emerged. And on the back of the jacket I designed a howling wolf and reverse appliqued it in gold thread.
The nebula inspired bubble skirt is made with some super delicate fabrics from a thrifted bettsey johnson dress. Omg. It should never take that much effort to sew a bubble skirt! Haha. It was worth it though. It has that cloudy look about it. Because I used sheer fabric for the outside of the bubble skirt, I had to change the way you'd usually sew one, or you'd see the seam through the outside. And to layer over the top and give it extra volume and drama I made her a twinkly star inspired tutu. I love this delicate tulle from cali fabrics. It feels expensive. And I was pleased that I could get it to fray at the bottom to look like shooting stars or sparkles. With the same tulle, for extra extra drama, I did a lot of gathering and hand stitching and made this crazy neck ruffle harness piece with wired glitter ribbon. I can tell it's going to be used a lot in dress up in many ways around the house now that I'm done taking pictures. Apparently it makes a great lion mane. Thanks for another fun week of sewing! I'll have more photos over on my blog at girl like the sea, and on my instagram feed if you'd like to take a closer look!
The Crafting Fiend - Faery in the Woods
I'm so excited to share my nature inspired look! When I think about nature my mind goes straight to fae and magic in the woods, spirits in the trees and all sorts of fun and mystery to discover. I love the idea of magic in nature and have since childhood. My oldest daughter is the same way and our favourite books to read involve these elements. One of our favourite things to do together in nature is to grab our current read and go sit outside and enjoy the outdoors with our books. So, this week's look was inspired by our love of reading outdoors, faeries and the magic that is fall in the woods!
The overall look is tree inspired, soft brown upcycled corduroy for the skirt and a soft green french terry shirt. For the skirt I self drafted this pattern 100%! I started with my idea for reading in the forest; the skirt HAD to have pockets! The two side pocket panels each have a large upper pocket for collecting acorns and pretty rocks and things we see along the walk, and a large pocket on the bottoms to hold books to read when we get to our spot! The book pockets each have a button closure so we don't lose our reading material along the walk. I had my oldest sit down and pose for me to draw the reading faery that I turned into a free motion applique! She was so excited that I turned HER into a reading faery on her skirt. I then hand embroidered a reading tree and falling autumn leaves. On the other pocket I free motion appliqued leaves I drew onto the pocket. For the center skirt panel I did 3 large pintucks and then a pleat in between each pintuck. On either side of the center panel I made flat piping in a citron coloured fabric to represent the changing leaves! I hand scalloped the flat piping for some feminine detail to softly represent leaf edges. The skirt is gathered around the back and through the pockets and left flat in the front center and a flat front waistband. The back of the skirt is slightly longer than the front for some cold weather practicality when sitting on a log in the forest to read. A little crochet trim along the bottom edge to tie with the shirt and add continue the cozy autumn feel of the look.
The shirt is a lovely soft french terry made with the base of the Hey June Camden Raglan. I chopped the pattern several times so I could create pintucks running in different directions. Along the top of the shirt to the sleeve seams run a set of pintucks and the bottom of the shirt has three rows of pintucks down the center to continue the 3 rows of piping from the skirt to give the impression of the tree holding up the leaves. For the shirt I also changed the sleeves to widen them and give them more of a blouson effect that fits with the look of the shirt tucked into the skirt. I also drafted a asymmetrical collar to go on the shirt that wraps around to the back sides to the edges of the raglan sleeves. I added a slit and a vintage round white button to the back for ease of dressing. Wide cuffs are on the sleeves to keep the chill air out. I then drew a button up and converted it in fusion360 to create a file for our 3D printer and printed a 3D leaf button that matches some of the leaves on the skirt. I painted the button in a bright green with some yellow wash and a little roughing the edges for the leaves that have not yet fallen, but are getting close. The trim on the shirt adds the soft delicate feel and ties in with the skirt giving it an all over soft forest faery feel. This outfit is completely ready to visit the woods, run in the leaves, climb the trees and then find a reading log to enjoy the smells and sounds of a magical fall afternoon with our books.
For more details on my look please visit my blog post and you can also find more pictures on my Instagram account!
Confetti Unicorn Design Studio - The View from Here


It's Nature week! I was so excited about this theme that I had it done way ahead of time...like before week 1 even posted. haha! I'm a big old nature nerd, so this was right up my alley. We were told to think of a place in nature that calms or excites us most. I picked something that does BOTH: The beauty of the stars. No matter where I pictured myself in nature, the time I'm calmest is at night when I'm staring up at the stars. And the possibilities of what's out there excites me beyond words. This was a really great theme with a world of opportunities (literally.) So of course, I ventured outside of this world. The natural universe is such a vast and amazing subject and it just seemed "natural" for me to choose the stars to get inspiration from. There's nothing better than the view from here.
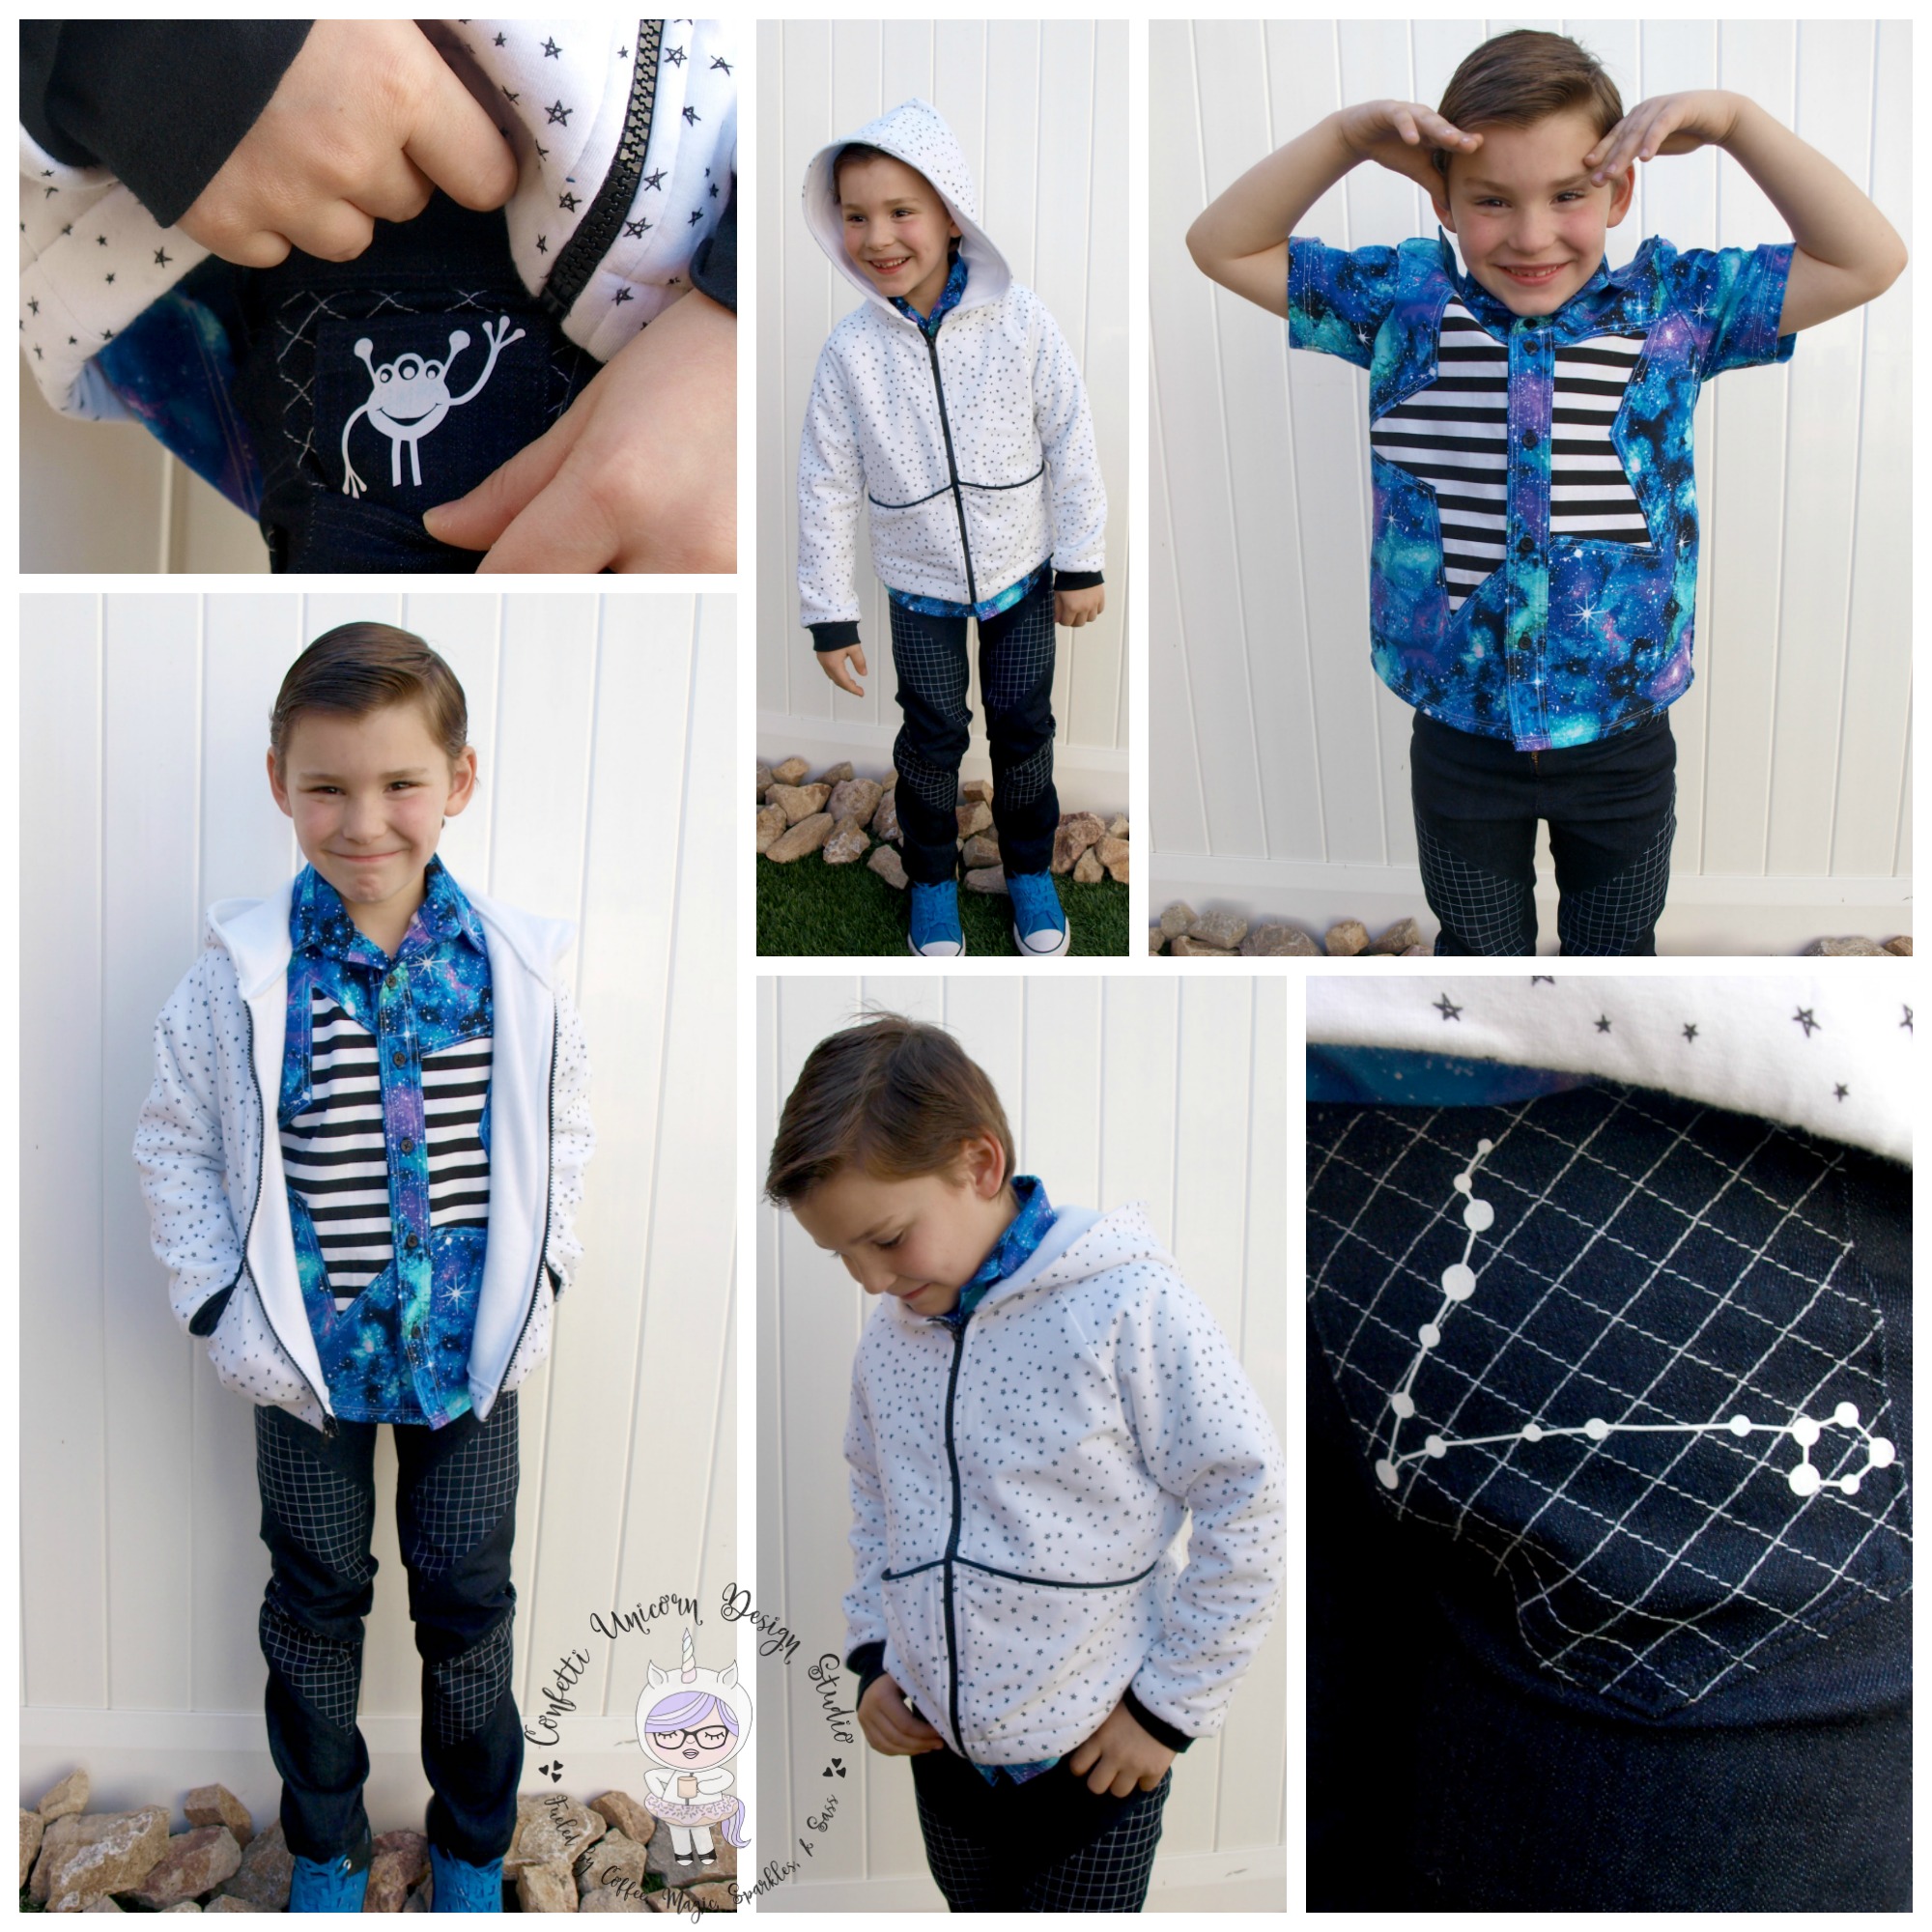
My boy's look is an ode to all things astrological. I made his shirt using The Yoke Shirt from Puperita, ditching the decorative yoke and reverse appliqueing a star. I slanted the star so I could get all the points in there and to add a little visual interest. I used double top-stitching throughout because...why not? The galaxy print cotton is FAAAAABULOUS. It gives the color PaPow! I needed. His pants were made by hacking the Small Fry Skinny Jeans from Titchy Threads into a bunch of pieces for blocking. I stitched a graph paper like design onto the blocked pieces to make fun of my husband. You see, he's the king of graph paper. He NEEDS it for everything: Math, drawing, making maps, and of course, charting stars. So naturally I wanted to reference it somewhere. I stitched it a bit slanted for style :::puts cool guy shades on::: On the little tooshie pocket, I put an Iron-on applique of the Pisces star constellation (my boy is a Pisces) that I made using my BFF's Cricut. I invited her over for a weekend with her kiddos so I could knock everything out for Project Run & Play. I feed her and give her kids some distractions, and I get to use her machine. YAY! Real friends share their cool sewing toys. I also added a little alien in his pocket because I can't talk about stars and space and not include and alien...it's just not possible. I finished his look with a Jacket I made using Simplicity 2292 as a starting point. The pattern was only ever made up to size 4, so I had to grade it out 3 sizes by hand. I also made a hood, lined it, and changed the cuffs. WHEW! It's perfect for those chilly nights out looking at the stars.

My girls look starts with the deep blue jacket that represents the night sky. The pattern I used to work from was in the Ottobre Winter 6-2014 issue. The original pattern is made to use with stretch fabrics, but I wanted to use this awesome Shetland Flannel I had. I graded it for non-stretch fabrics and changed the construction up a bit for nice clean finishes. Her pinafore was made starting with a pattern I am pretesting right now. The original pattern has a rounded bodice. I made it into a V and shortened the skirt. I used the galaxy print for this because YES! It's just an amazing print. The turtleneck was self drafted. My girl LOVES turtlenecks. She tells me that she just wants to wear them all day and all night because they're the coziest ever. Haha! Little weirdo. Her socks were made from the Jalie 2448 (I added the cuff.)

Check out my blog for more pictures and fun!
Art Bella Creates - The "Fall"ing layers of Change
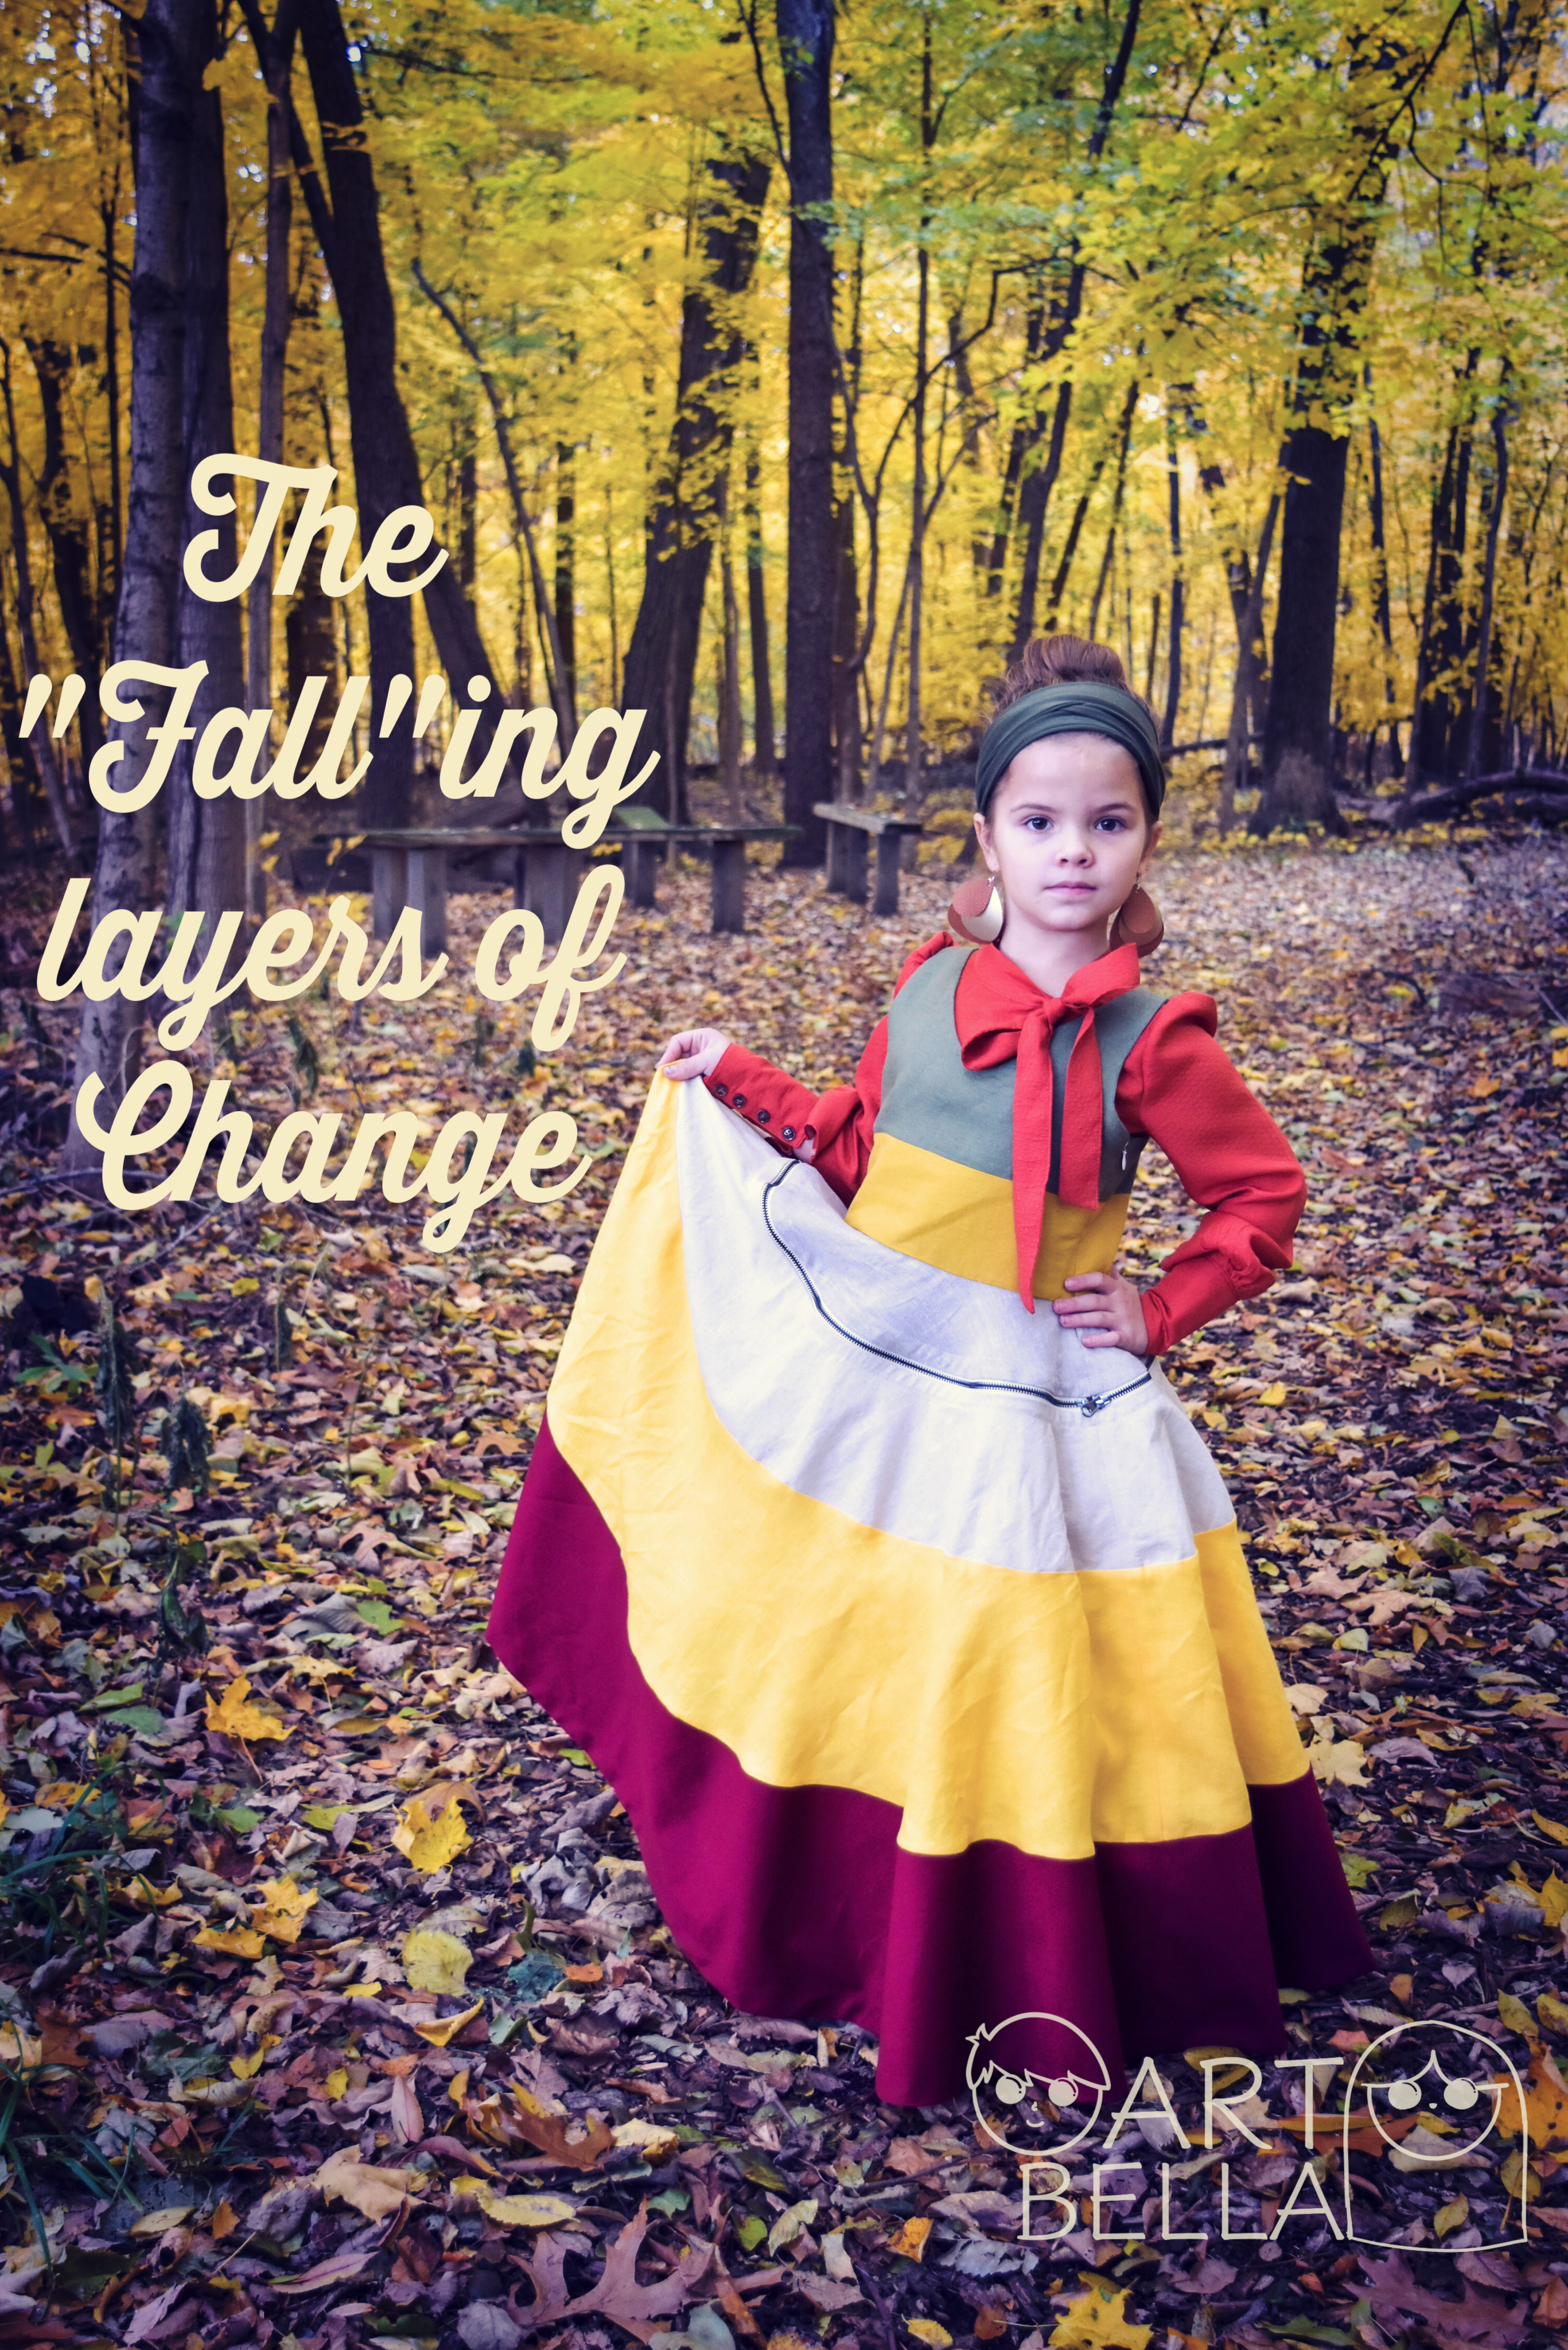
Week 2 is here - Nature inspired. The Thought process: This one I immediately knew the direction I wanted to go. My very favorite thing about nature is how the leaves change color in the fall and one of my favorite sayings is this
"Autumn shows us how beautiful it is to let things go!" - anonymous
Isn't it awesome and magnificently beautiful how the trees' leaves just start to change colors and then let them go, and next spring they grow those beautiful green leaves again?! No matter if it was a bad year, next year is a brand new start. I've had the fall rust colored fabric I used for the shirt in my stash forever ( 4 years maybe?!) but that's where I started. My vision was a very chic blouse that was princess-style cut with the three panels in the front and instead of the seam lines to go in the direction of the armpit, I directed them to the neck, left a bit open so my girl can get it over her noggin and added a neck tie collar, puffy sleeves with wide cuffs around the wrists with buttonholes (and I didn't swear) and buttons.
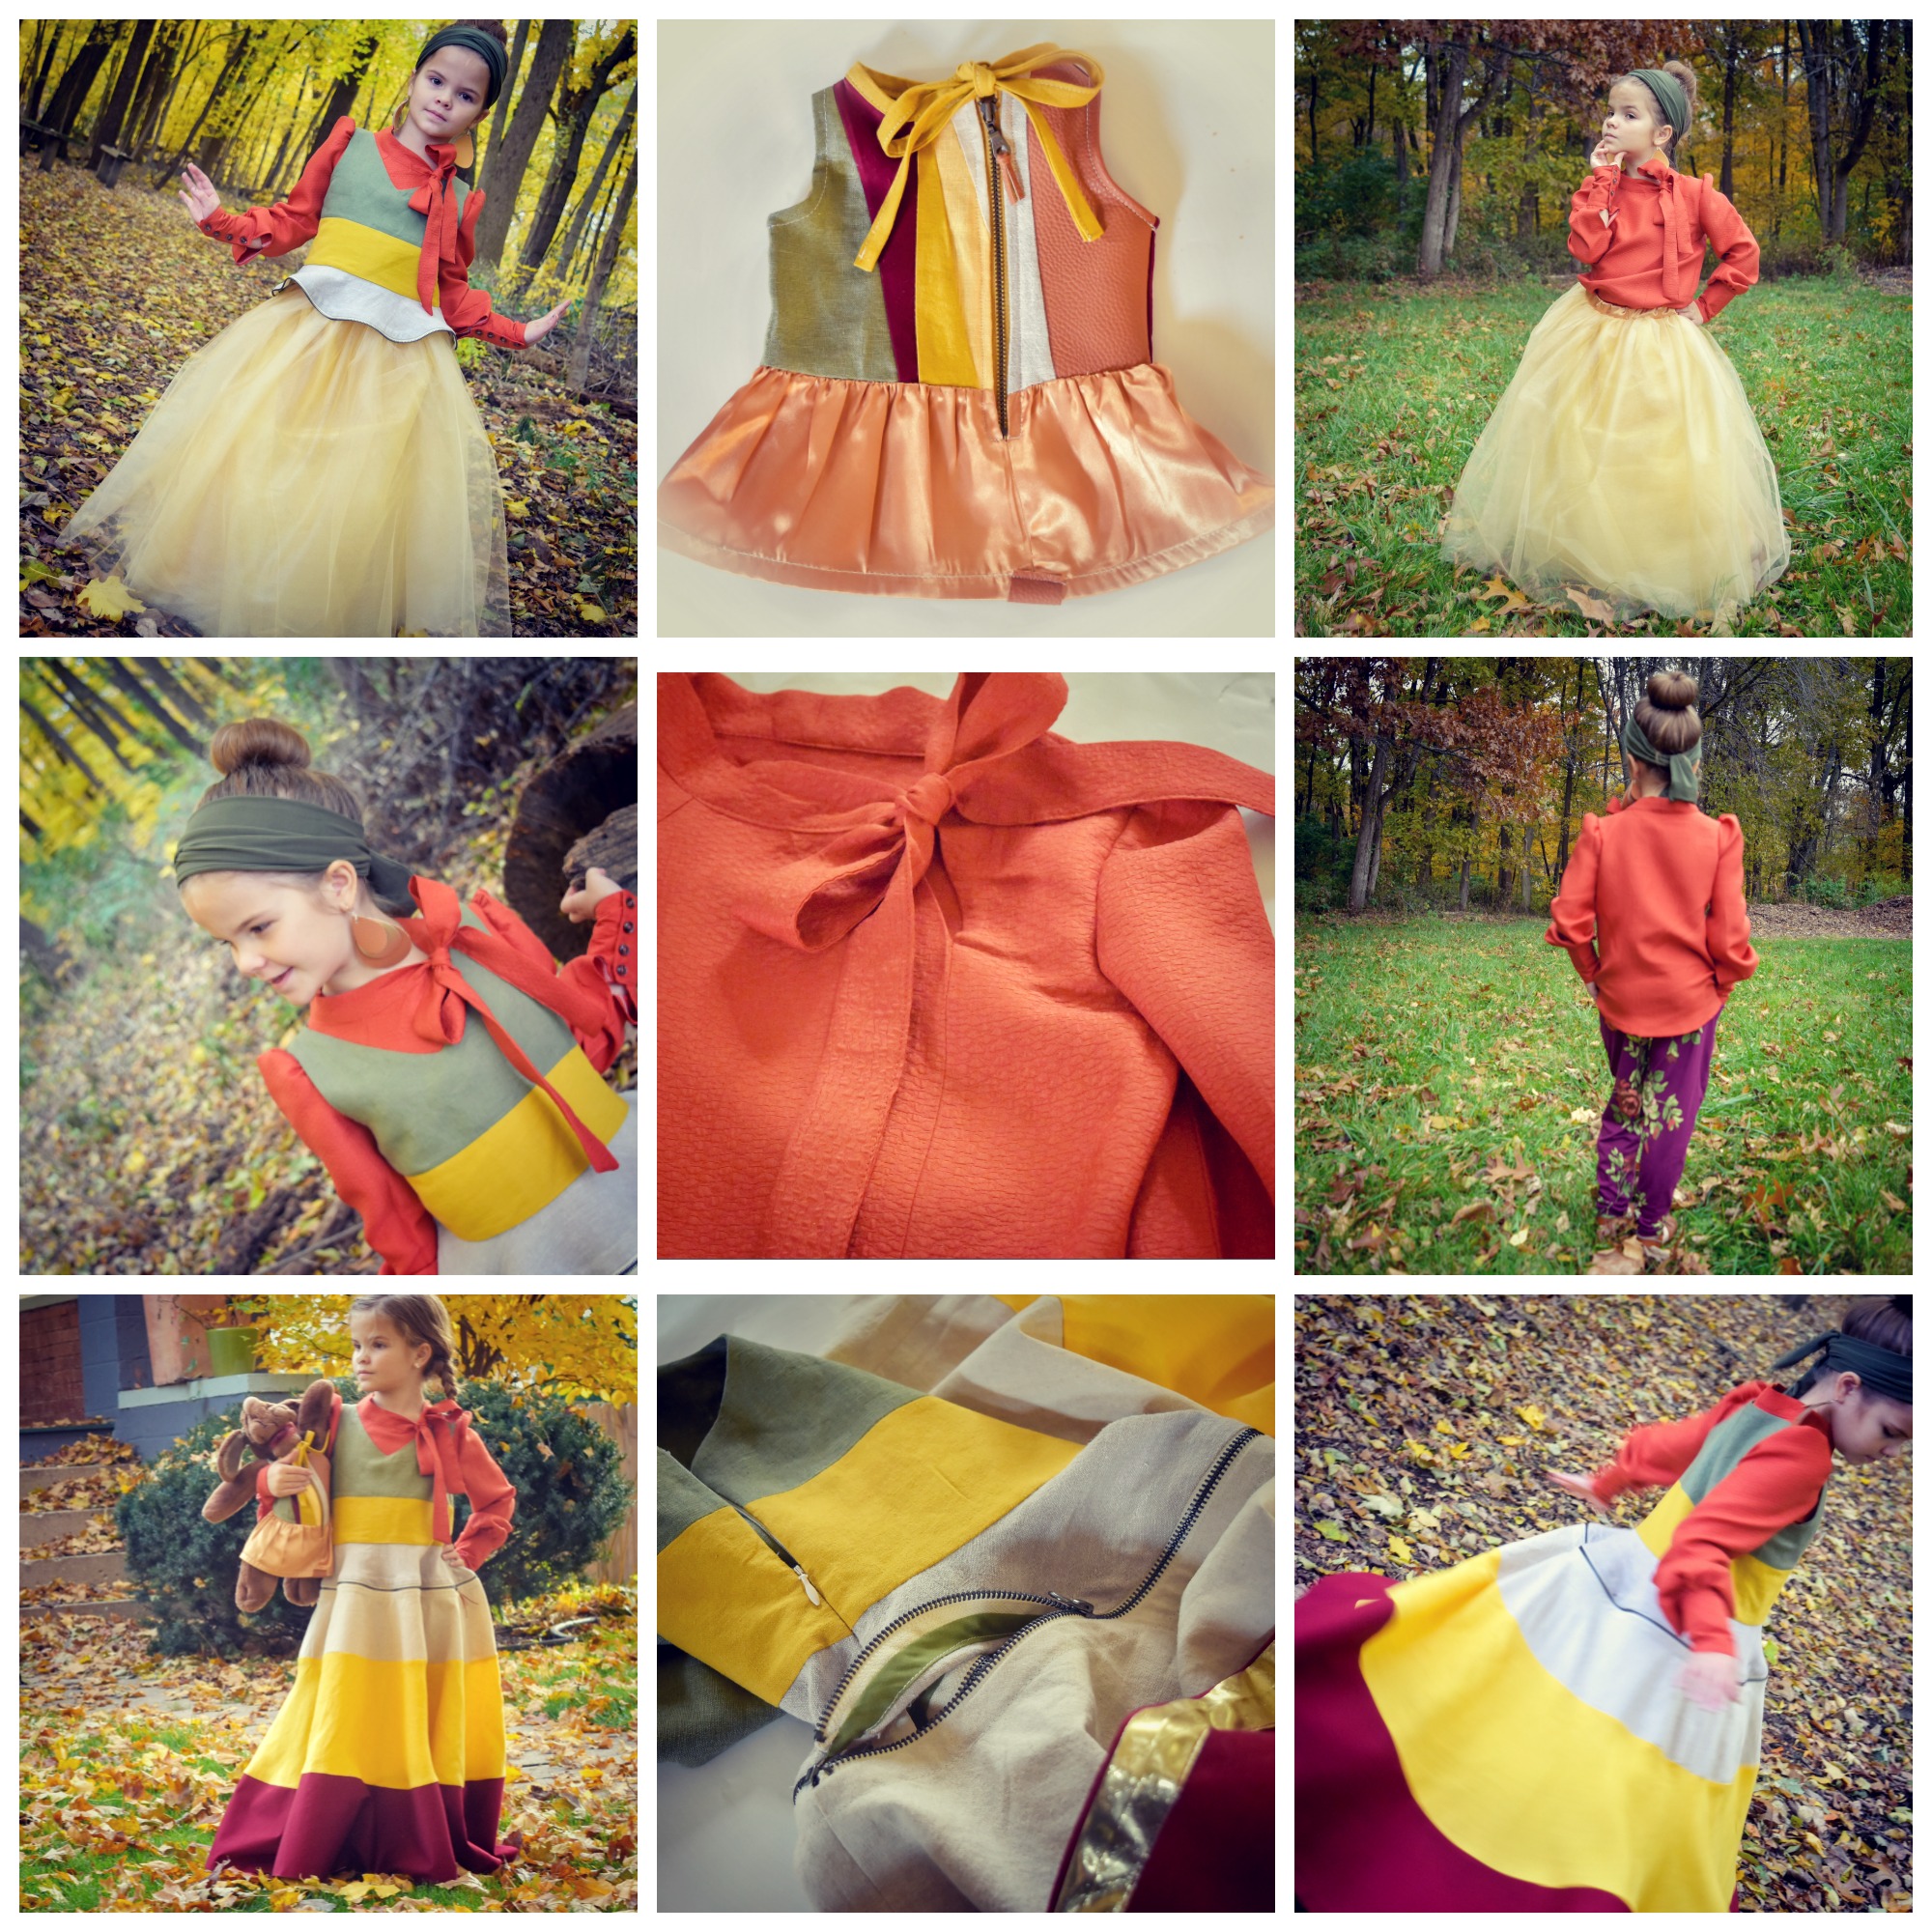
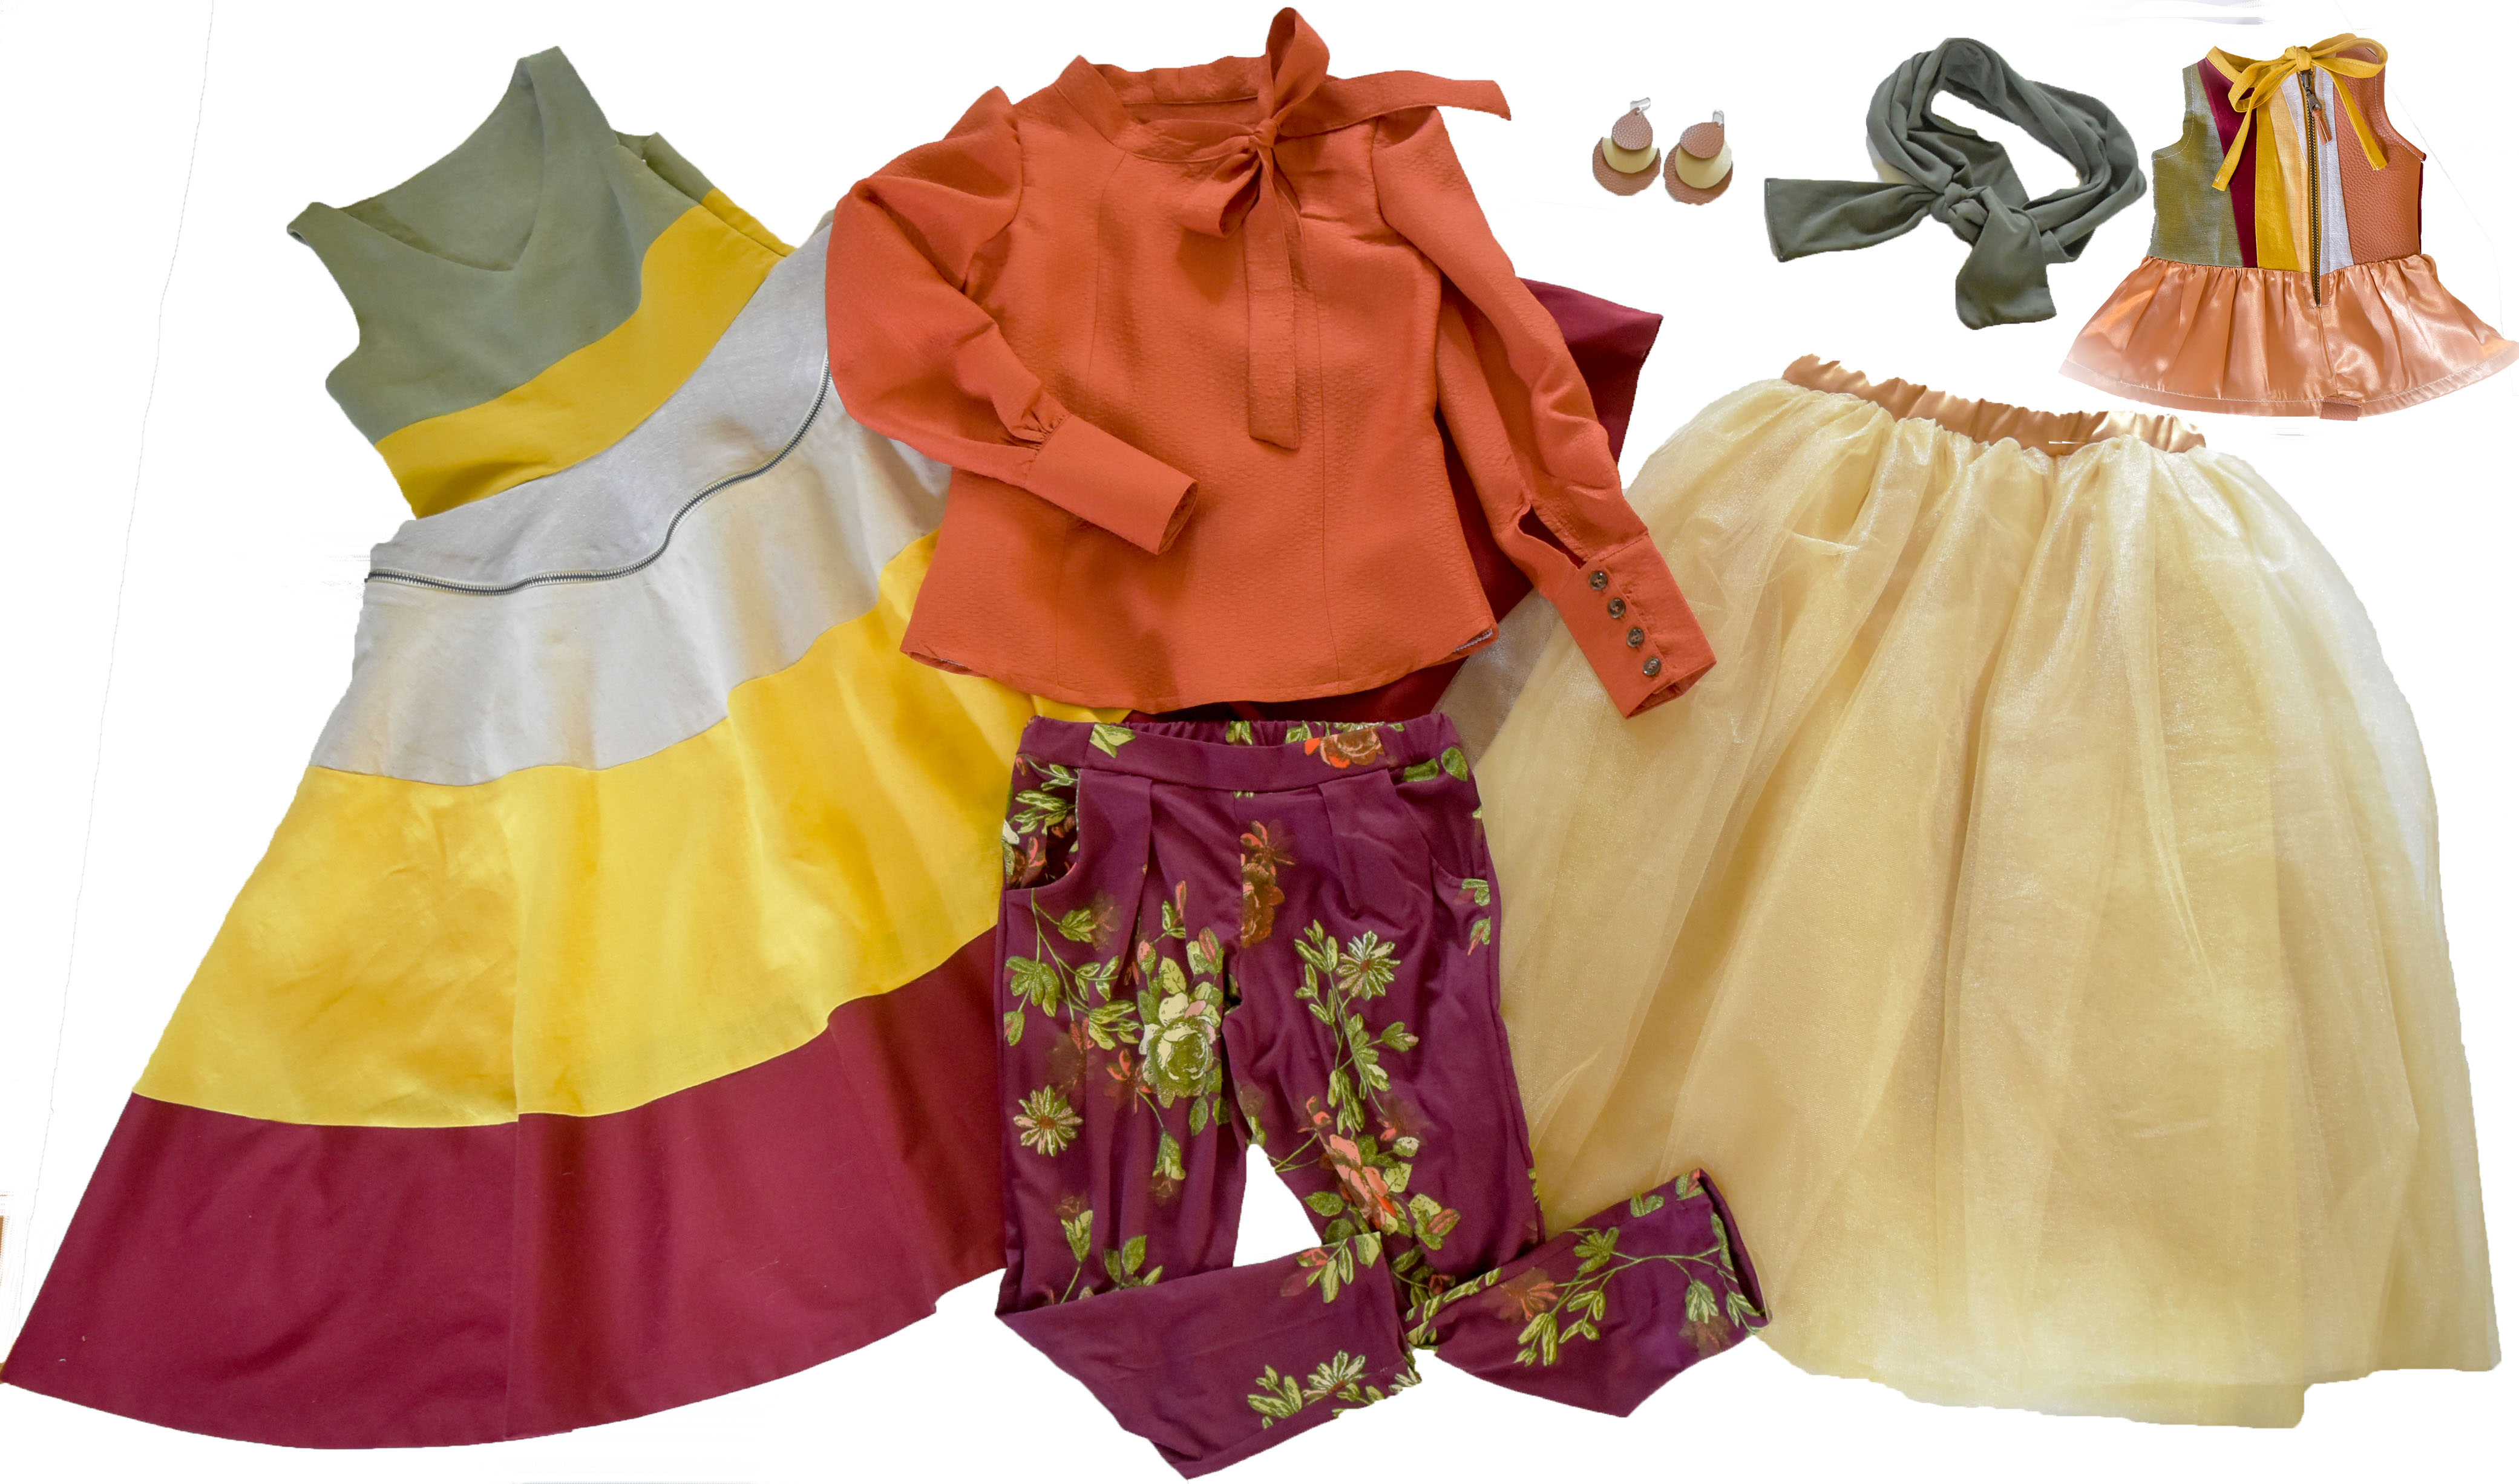
The layer-shedding dress in my head was color blocked panels to resemble the leave color change - in linen fabric ( love the crispness of linen just like fall) I had some in my stash but had to purchase some more colors from a local shop. For each challenge I try to incorporate something creative, functional and something that requires some skill. So for the layer shedding effect, I added two open ended zippers so it can shed the skirt just like trees looses their leaves. For this challenge the whole outfit was self-drafted and adapted from a single basic bodice block. I had to make sure the two zippers will fit in correctly in the layer so there is no gap where they meet on both sides and added bias binding to finish it off on the inside. Let me tell you the zipper was not as hard as getting those bottom three layers to match up and still have beautiful matching sides but I channeled my inner Tim Gunn and persevered. The way the colors are matched was not exactly how I wanted it in order but I had to work with the amounts of fabric I had and made it work. TIP of the WEEK - We know we have to pre-wash fabric but sometimes we don't because we get so excited. If you work with different fabrics in one garment, like this dress and especially the heart shirt I made for week 1 -WASH those fabrics before hand. The fiber content of different fabrics shrinks in different ways, If you want your garment to last, pre-wash at least once. For the heart shirt I washed all my fabrics twice and tumble dried on high so it can get all the shrinking done before you cut. At this stage the multiple layering process was born. I also made some fall colored pants in a love soft DBP for a more casual look. This outfit solves our issue of the girl who loves a dress in church and at events and restaurants but immediately dresses in pants when we get home. For our photo shoot she just put everything on at once and dropped layer by layer. Timing for some fall colored leaves couldn't have been more perfect. We headed out to Warnecke woods right here in Princeton, IL and also some at home as I forgot to do the shirt with vest and pants and Wrinkles wasn't ready yet with out first photoshoot. Wrinkles' dress is made of all the scrap fabric and some leather scrap from the earrings, metal zipper like Bella's dress and a off-set neck tie collar. I made some leather earrings (which I am keeping for myself) and a soft wrap headband to accessorize. I only have one child in kid-age clothes so to show you all the looks I had to clone her (Thank you Photoshop!) Even with pulling off layers we managed to get in and out of those woods in 10 minutes. On top of all these possibilities, I know that when summer swings around I will add a tank to wear under just the dress and then as she grows just the dress. I love to sew dresses that can be worn with something underneath so we get at least 2-3 years out of it. The tulle skirt she already wore under another long dress so I know we'll use that one plenty.

I couldn't possibly post all my favorites so please hop on over to Artbella creates for more pictures of my girl and details on our Nature inspired look. Patterns used: the shirt and the bodice of the dress I used the Building block Dress by Oliver and S (This is an awesome book to start with your own designs or you don't want to draft your own pattern.) Skirts - self-drafted. Math is everywhere and I try to remind my kids every day. I can't tell you how many times I've looked up how to calculate the radius of a circle. Pants: do you have the Graphite Trousers pattern by Toya yet? GET IT - My girl loves the fit. I used the top half and used leggings fit for the bottom part.
Made by Toya - Beside the Sea


Despite being a city dweller, this theme really appealed to me. But I then found it very hard to pin down to just one idea as there is just so much to be inspired by! I settled on those trips to the beach, not necessarily the summery ones with ice creams and swimming costumes, but the long autumnal walks, where beach combing and staring out to sea seems to restore the soul. I was determined to keep the design inspiration non literal and just be inspired by the shapes, textures and colours of the sea itself (which remain a focus), but then a print idea popped into my head (and sketchbook) and wouldn't leave!
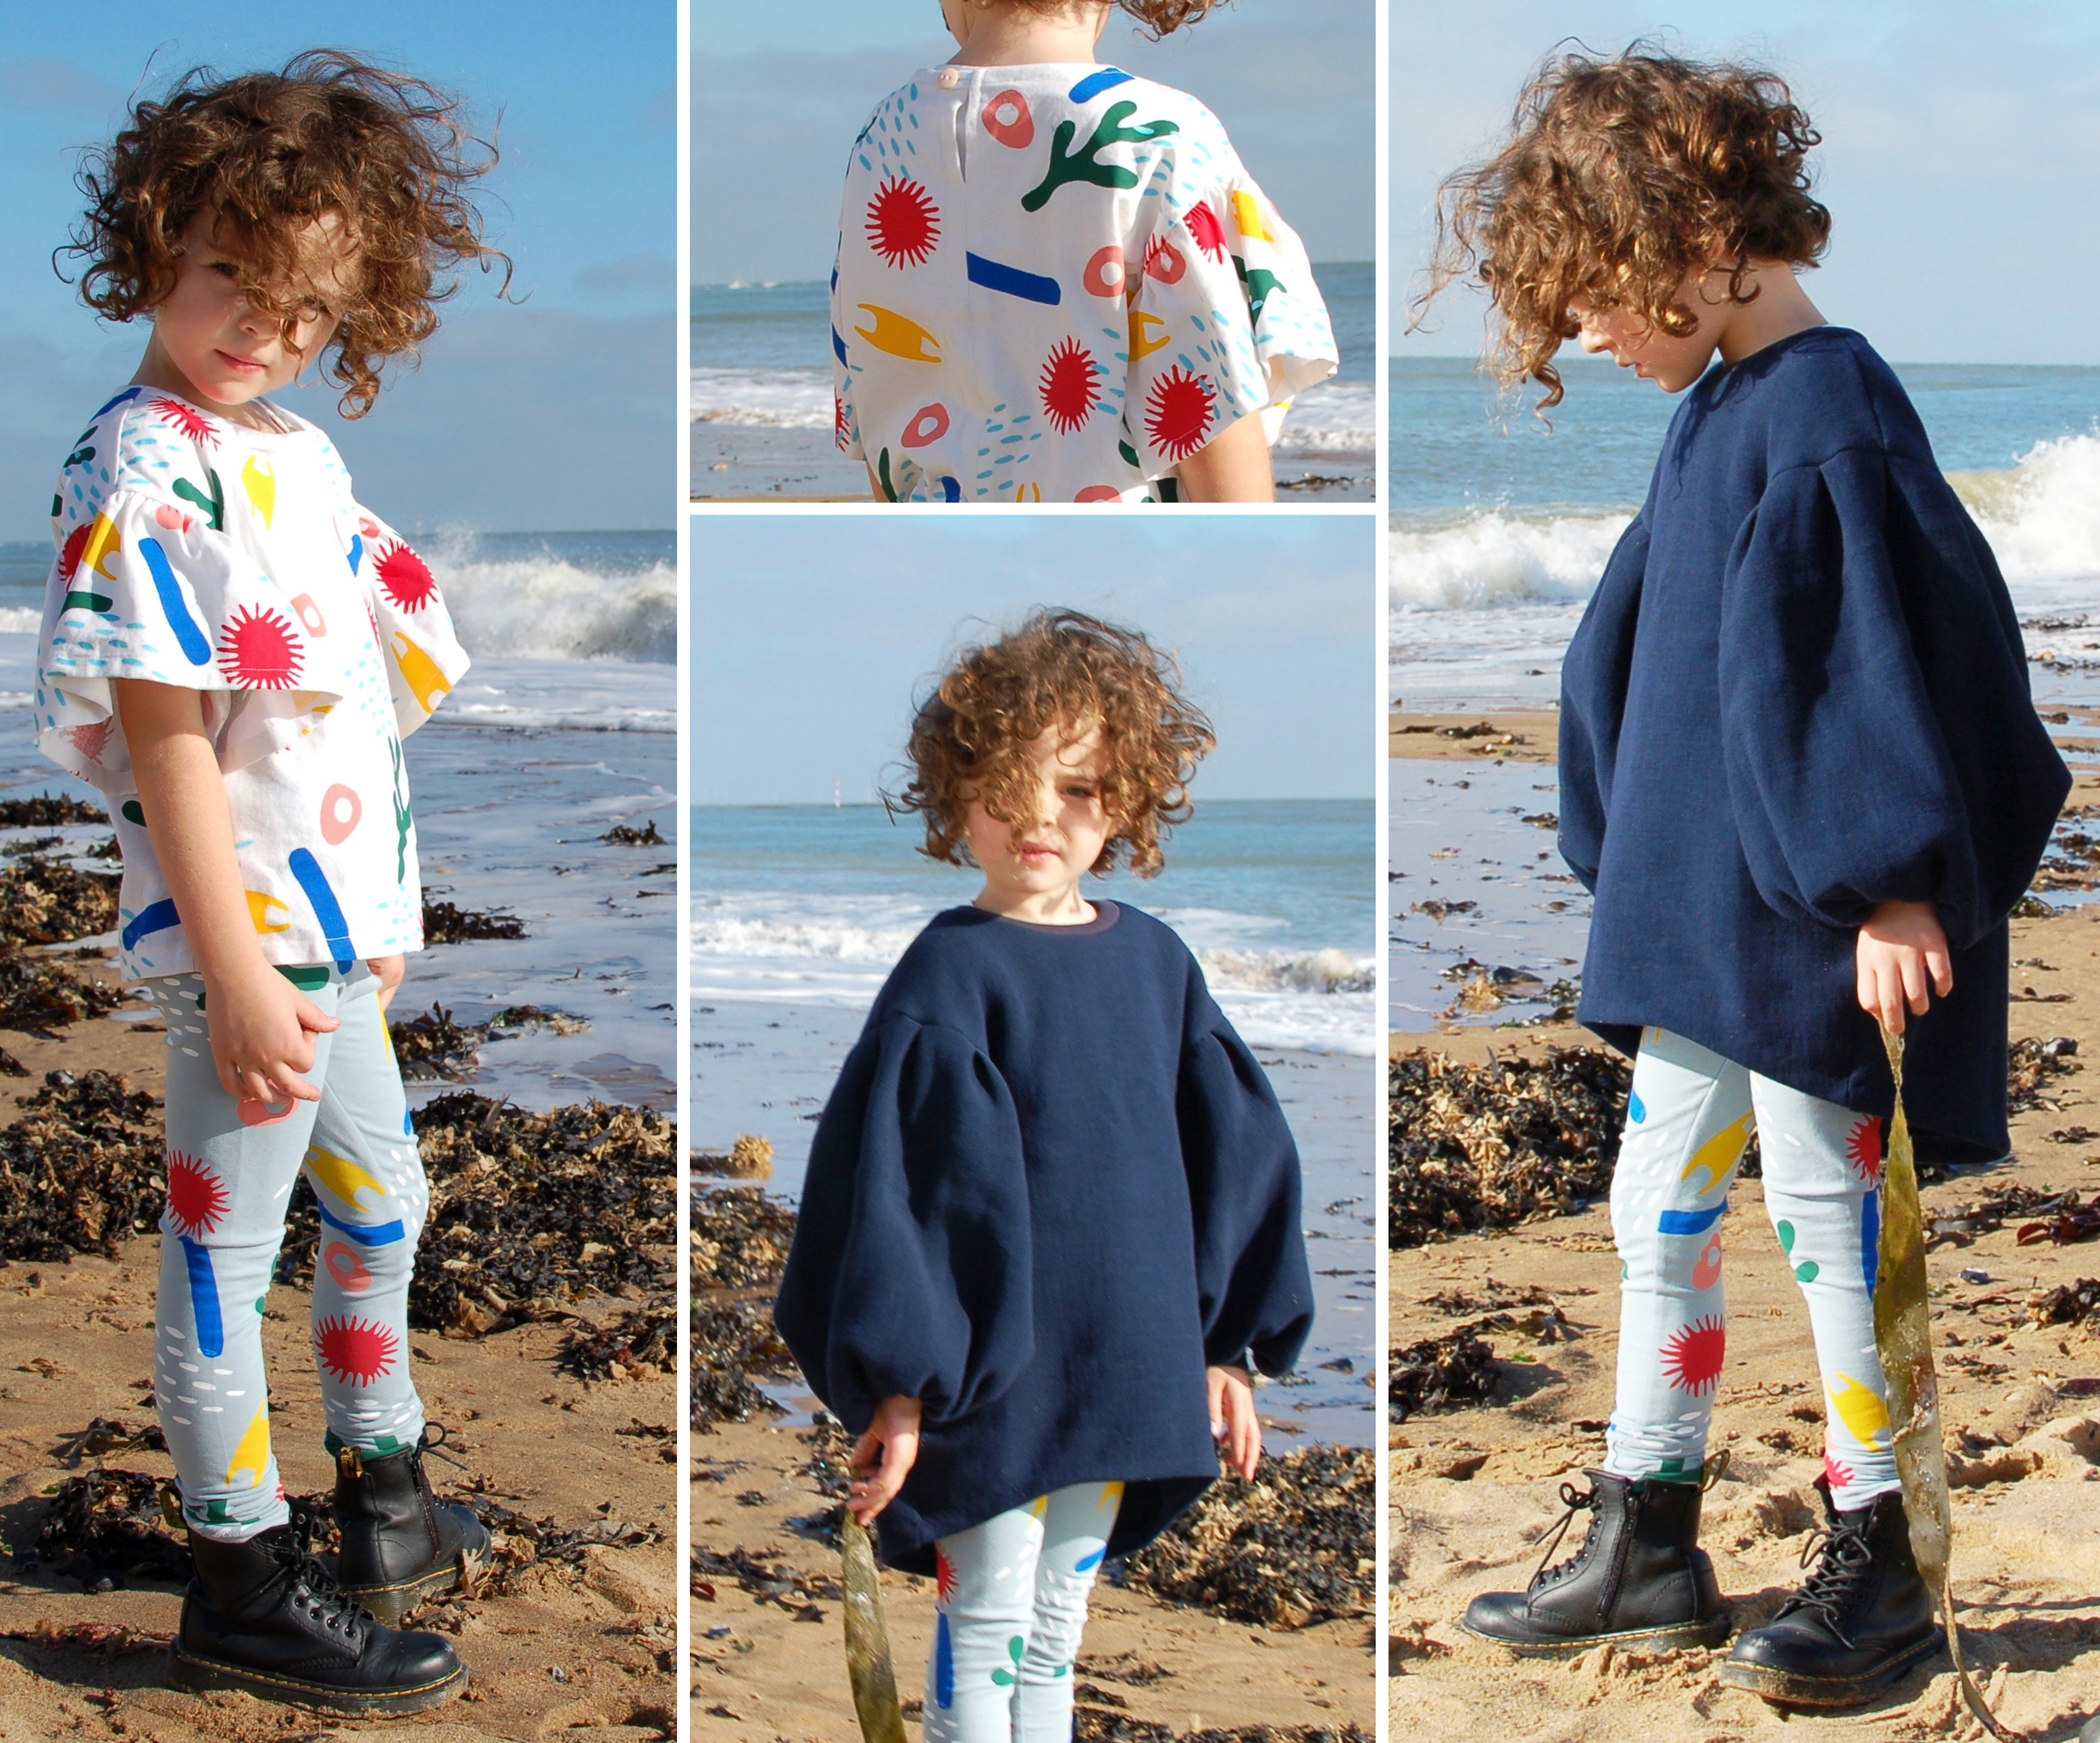
Starting with that print, I cut out the pieces of fabric for my youngest's top and leggings (both self drafted) and printed the design on before assembly. I used my Bobbinhood screenprint set and cut out individual stencils for each of the shapes which are loose interpretations of things you'd find on the beach or in rockpools: razor clam shells, seaweed, the spray of the sea, those shells that always get worn into rings, mermaid's purses (dogfish egg casings) and anemones. I chose bright colours because I knew that would appeal to my daughter but also to compliment the dark jumper. The leggings are made in french terry and the top is a cotton/linen mix from Minerva Crafts - it features ruffle sleeves, a hidden bias binding neckline finish and a little button closure at the back of the neck. The jumper was designed to have a cocoon shape and large voluminous sleeves gathered tightly into rib wristbands. I'm not sure if the inspiration for the shape was more waves or shells, but either way I used my Collage Sweater pattern as the starting point, sizing it up, dropping the shoulder seam and leaving off the waistband. Those puffy sleeves were created by adding box pleats at the shoulder seam and gathering at the wrist. The fabric was a strange double faced cotton/linen with a sponge sandwich layer that I found in my local fabric shop a year or so ago which I paired with navy cotton rib at the neckline and wrists.
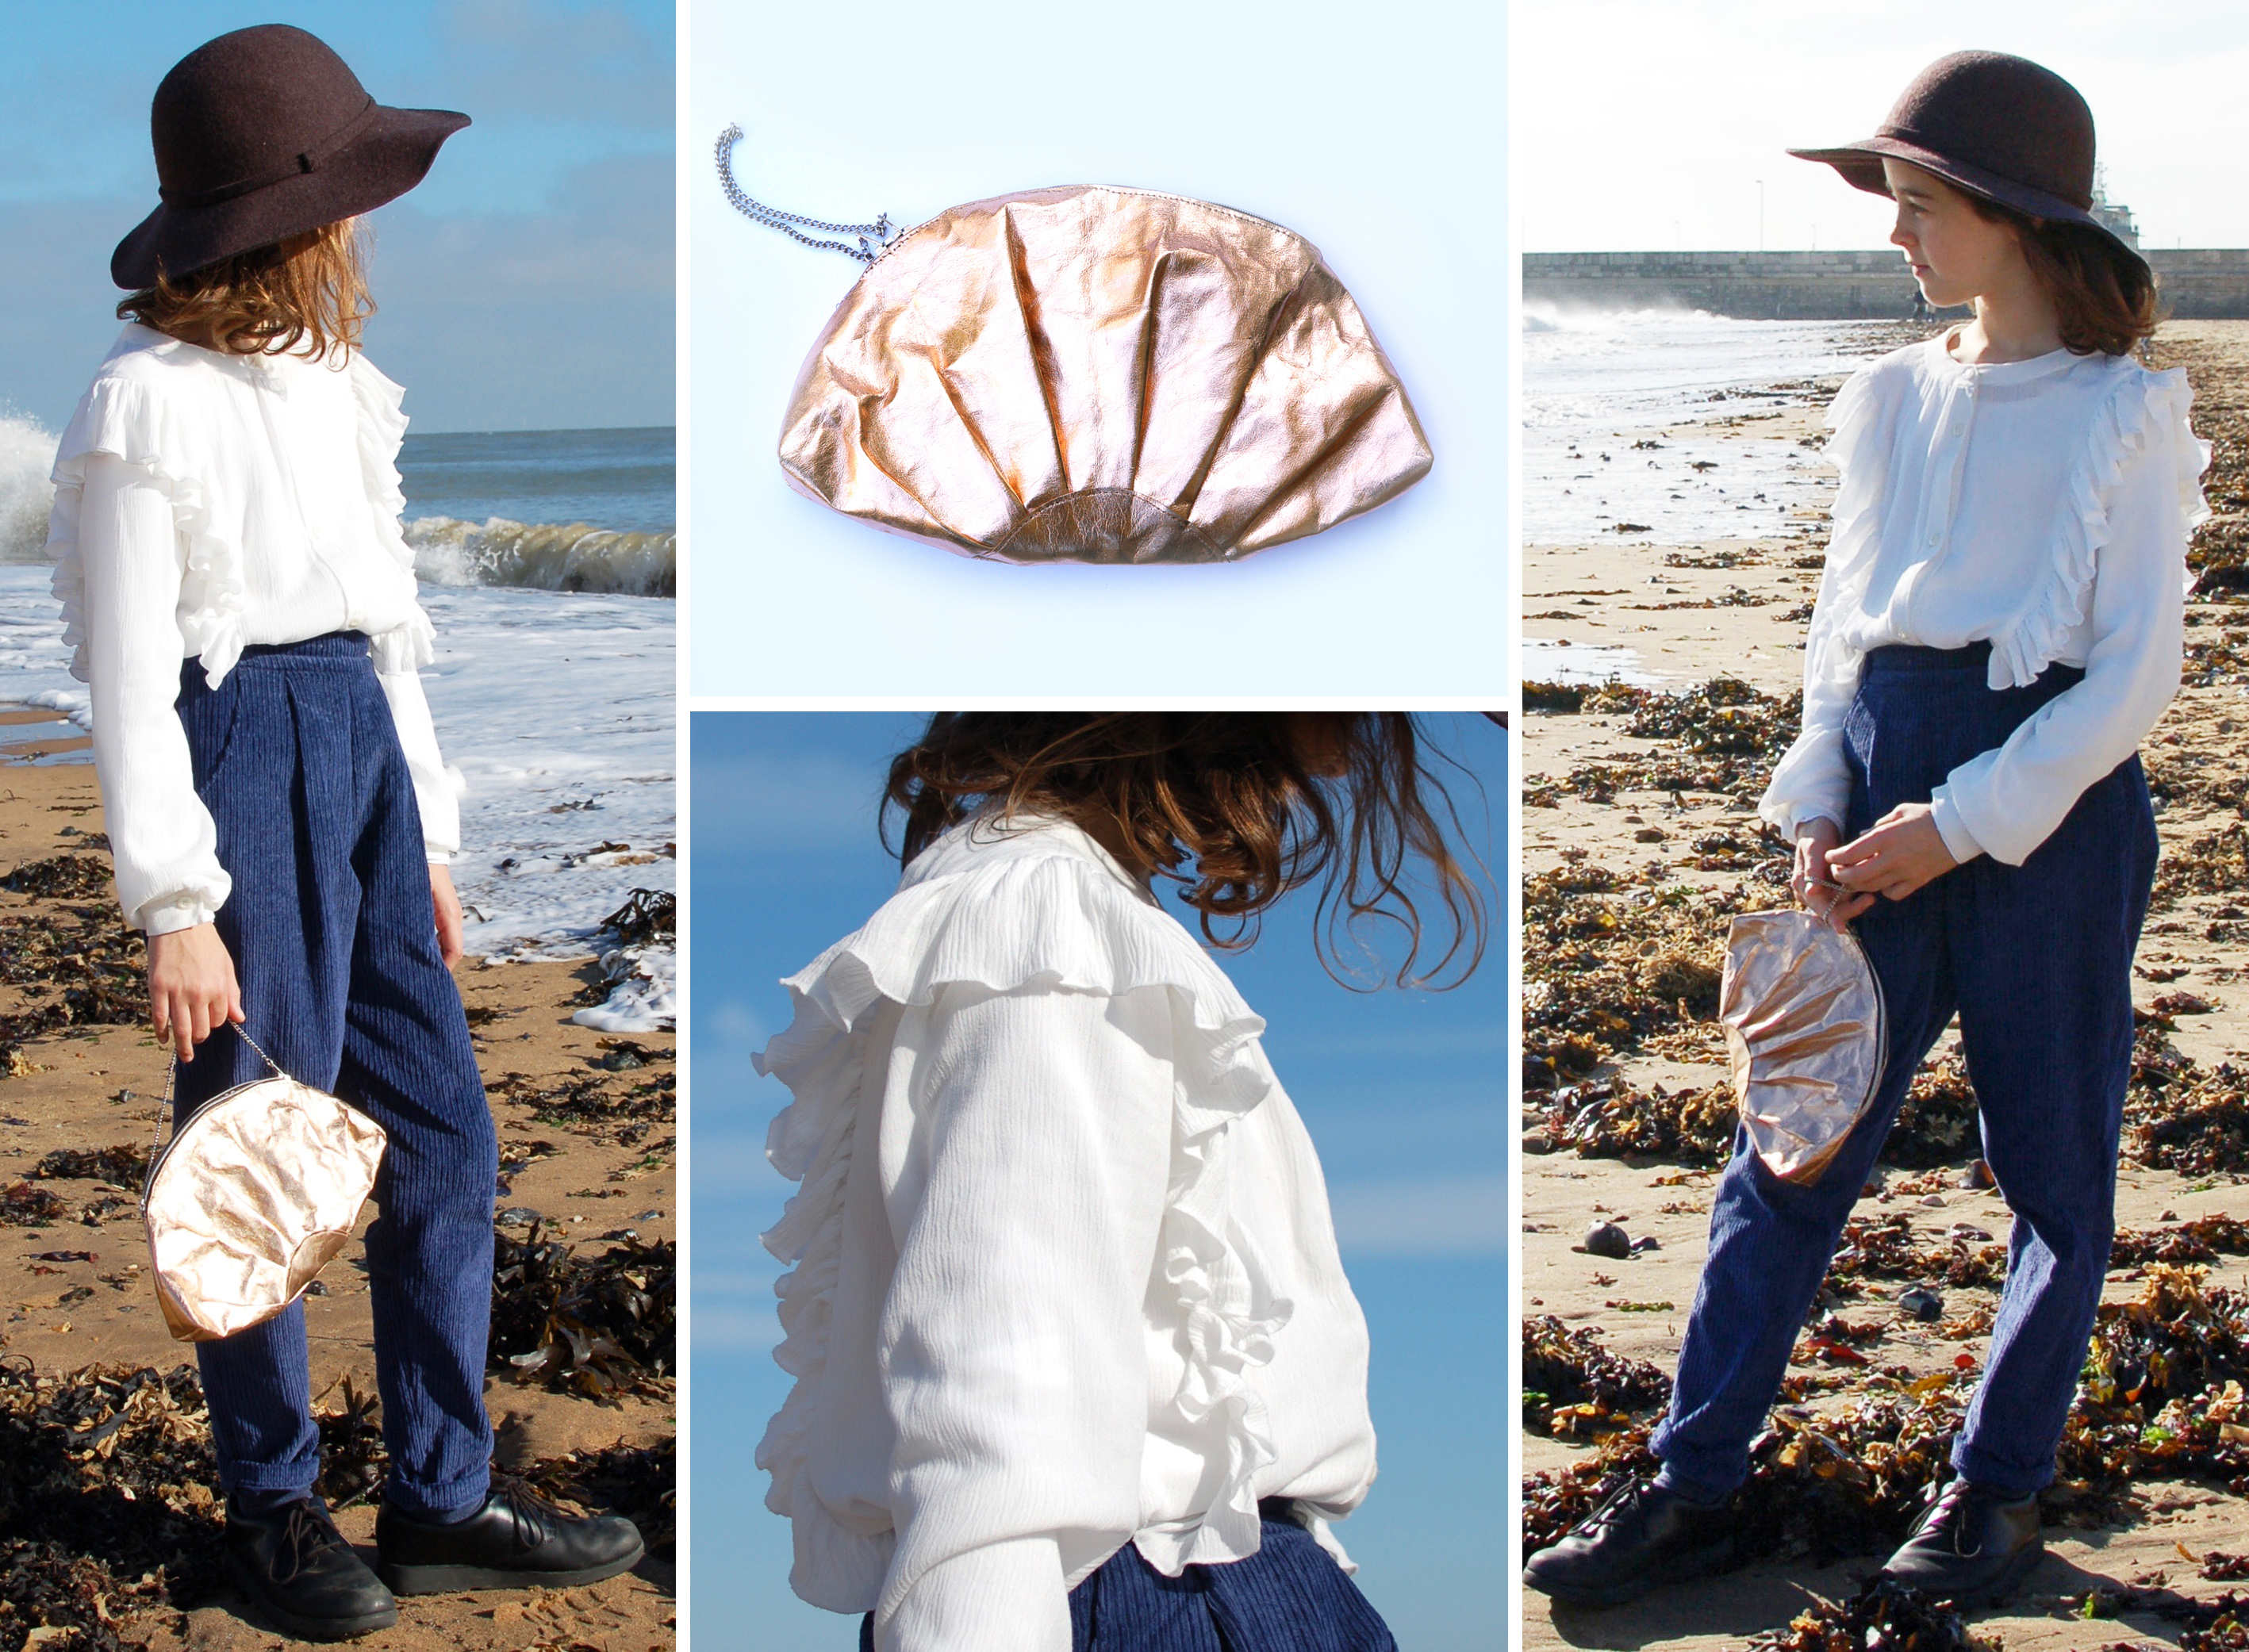
For my eldest's look I went with something more simple and elegant as that is more her taste - and I'm often drawn to cleaner, more classic styles where the focus is on subtle detail. The trousers were prompted by all the great corduroy that's around at the moment in RTW collections and the colour and texture seemed perfect to capture the inspiration source. The pattern is my own Graphite Trousers pattern sewn up without the tie. There is a flat waistband and pockets and pleats at the front and an elasticated waistband at the back for comfort. The rise is deliberately generous so that it's more suitable for being active (no trousers riding down when you crouch down or climb!) The frilled, flowy shirt is supposed to evoke the froth of the crashing (or lapping) waves as they meet the shore. I used Republique du Chiffon's Mini Suzon Shirt as a starting point for the bodice and neckline but changed where the seams of the shirt went so as to included a tightly gathered frill all along the front and back. I also had to draft some sleeves, which I kept simple to highlight the frills. The fabric was a perfectly textured crinkle viscose in my stash, that was perfect for gathering but harder to create the structure of the shirt with because it was so fluid. As a final touch I drafted a shell inspired pleated bag (which will actually be used as a pencil case) to make out of rose gold washable paper. It was my first time working with the material and it's quite an amazing texture. It easier to sew if you work with it while wet and doesn't need hemming as it won't fray. It becomes very stiff again when dry. It has a simple zip closure and chain handle. The hat is the model's mum's own! If you'd like to see more of the details or process please head over to my blog post.

Now it's your turn to get involved! 1/3 of the designers score comes from YOUR vote!
The rest of the designer's score will be determined as follows:
1/3 of the score by this week's celebrity guest judge Beth of Sew DIY
1/3 of the score comes from the panel of judges


I love the stencils!
ReplyDeleteMagical!
ReplyDeleteTruly magical and creative!
ReplyDeleteLove it!
ReplyDeleteAmazing work everyone!
ReplyDeleteI vote for the crafting fiend, faery in the woods!
ReplyDeleteI vote for the crafting fiend
ReplyDeleteFantastic!
ReplyDelete