Tuesday, March 31, 2020

Season 23 Week 3 - Fairytale

And we're on to Week 3!  This one is so fun and the designers really had fun with it too!  Here is the prompt:
Week 3: Fairytale
This theme is a child’s dream come true!  This week you’re going to translate a fairytale into everyday wear.  

Be sure to VOTE for two of the designers at the end of this post.

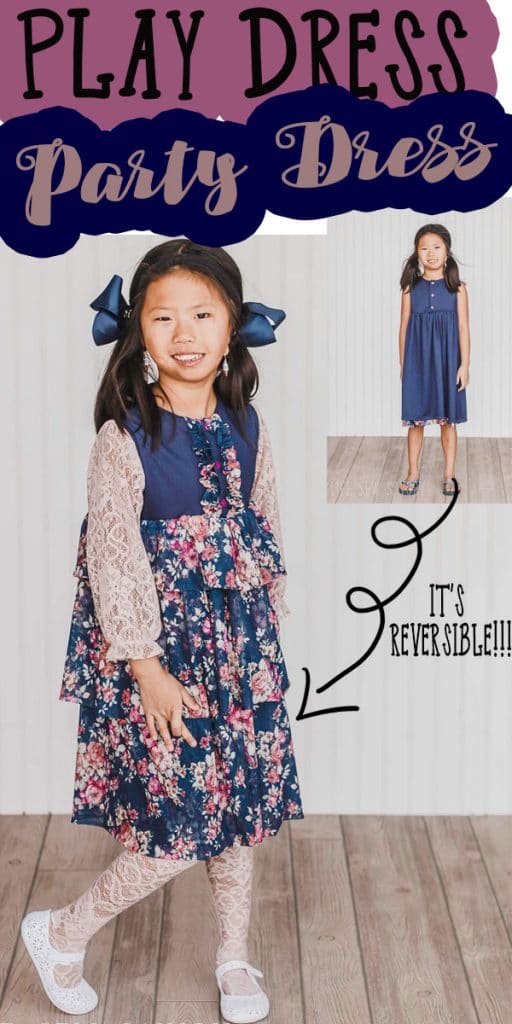
Baby Nest USA - Modern Alice


Hi again! This is Richelle and Reine for Week 3!  When the theme was revealed for Week 3, me and my daughter already knew we needed to do Alice in Wonderland. She’s one of our favorite characters. Alice is so much alike like my daughter - entering pre-puberty, sensible, adventurous and has insatiable curiosity about her surroundings. Her style is feminine, but not overly feminine and she is always wearing a beautiful shade of sky blue. Alice has a very effortless look that’s always ready to partake in adventures that require comfy clothes. I spent some time visualizing what we wanted to convey on this outfit without hitting the viewer over the head with it. After all, the theme is to make a fairytale into everyday wear. 


I wanted to do something modern but still have the features of the classic, contemporary style. My idea behind the whole outfit was what would a 10-year old Alice would wear in 2020? So I decided on using cotton and denim fabric to give it texture, modern vibe, and structure without losing the whimsical and feminine features of Alice’s clothes and sacrificing the wearability and comfort.


I used the Little Lizard King Oxford top as base and self-drafted the puffed flutter sleeves. I also drafted a pleated denim skirt using this medium weight denim fabric from Califabrics. I wanted to add some hard features and this denim was perfect for giving a nice volumized skirt. It features a flat waistband and elasticized back for comfort and ease whenever Reine had too much of the macarons and teas. To give a nod to Alice’s apron, I self-drafted a suspender that can be attached to the skirt. Alice loves bows so I made sure we incorporate that to the outfit. I made a removable bow brooch that attaches via a brooch pin. She also loves her black hair bow but to make it modern, I made a scrunchie with a big bow using the Little Lizard King Birmingham bow. Now to my most favorite item from this collection -- the bunny circle purse. This was a labor of love! I quilted layers of padding and cotton and added this Boho Bunny Applique from Hazel Alekmond. I mixed hand embroidery and topstitching to give a mixed media feel. The main fabric has some shine and glitters that look like leather in real life! I used gold hardwares and zippers to complement the gold thread on the denim and suspender and the gold hearts from the brooch and applique. 


We had so much fun making this collection. I hope you love it too! For more photos and behind the scenes, visit us at Instagram and Facebook. Reine also made some printable coloring pages. And don’t forget to vote!


Sew a Little Seam - Tale as Old as Time


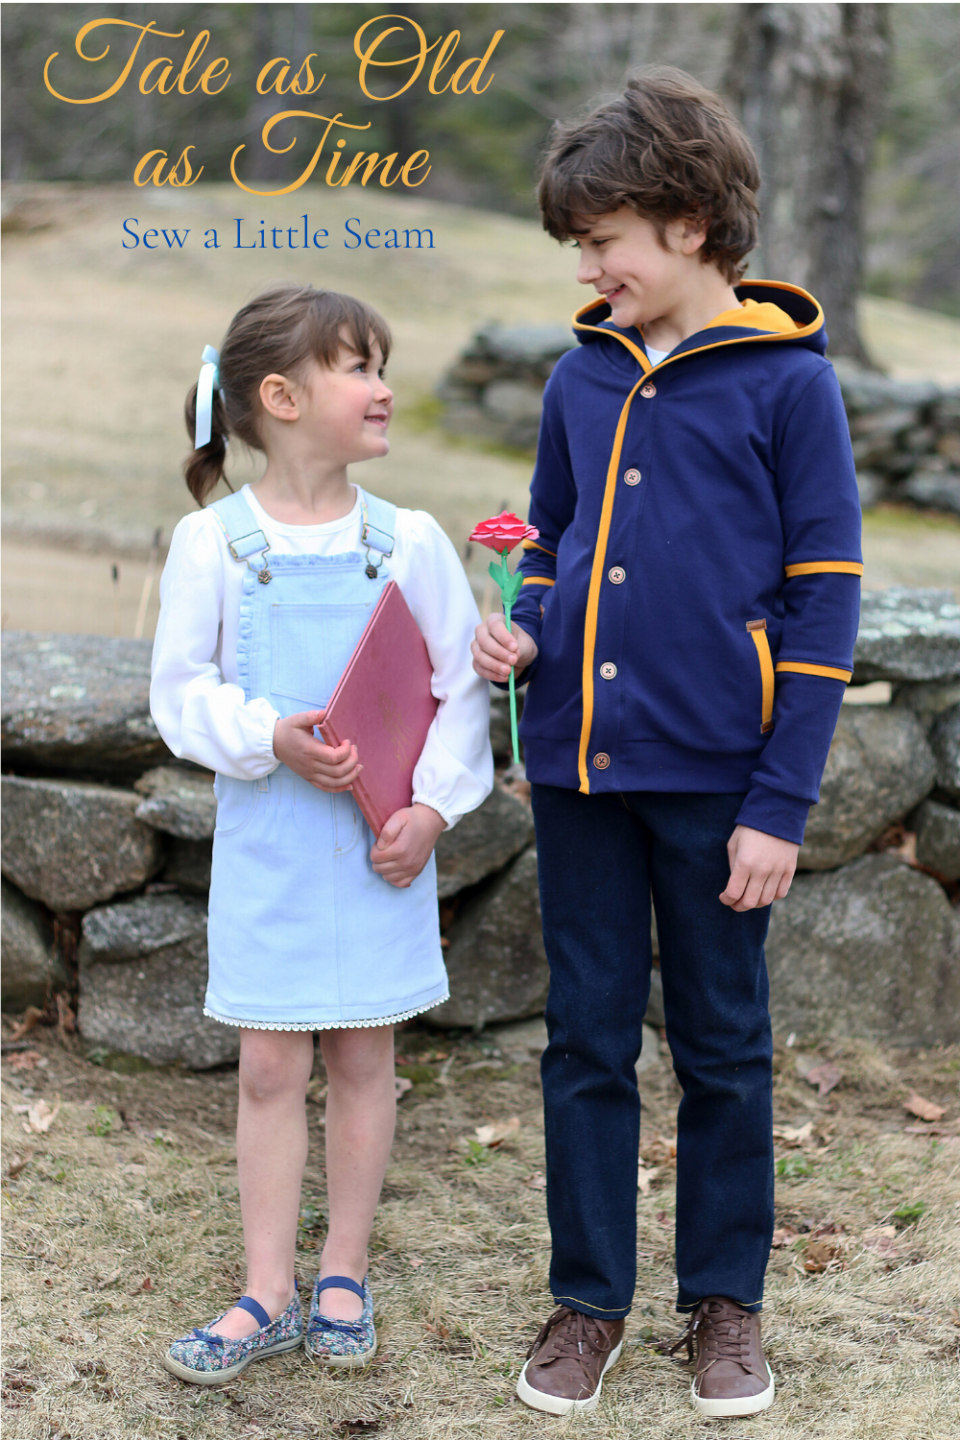
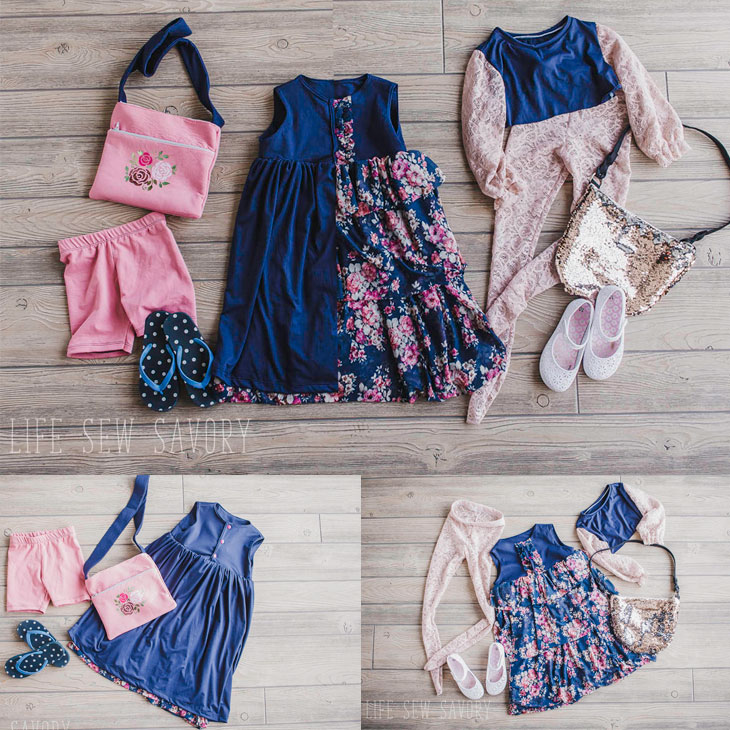
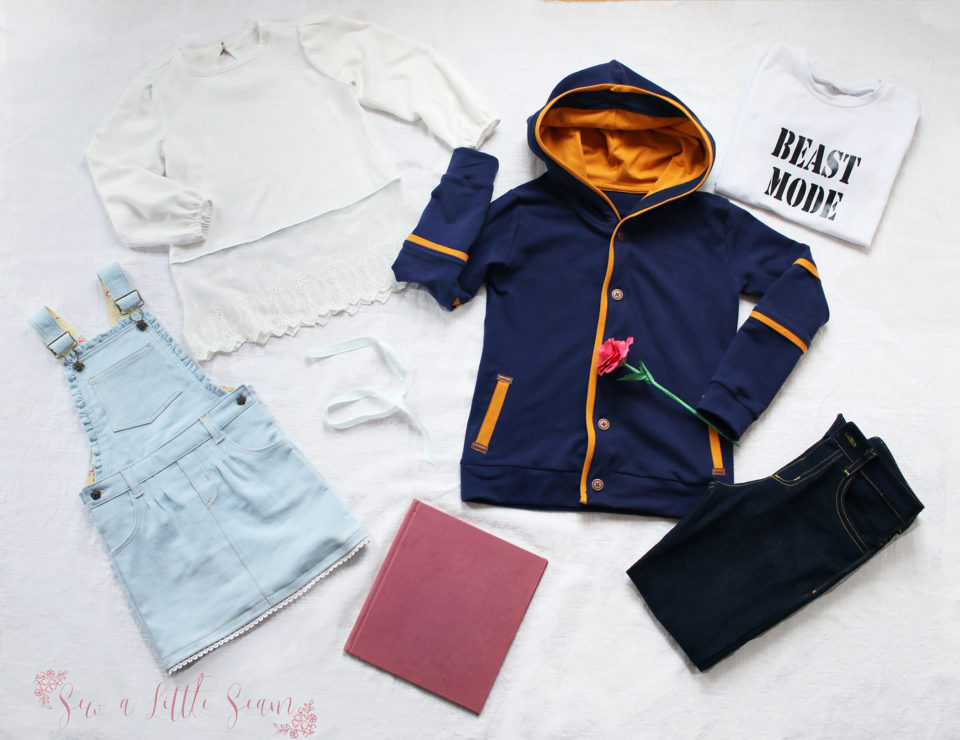
I'm so glad I made it to week 3 for Fairy Tale week! I'm a huge fairy tale fan and one of my favorites is Beauty and the Beast. I asked my son if he wanted to be Gaston or the Beast and he chose the Beast. I had to explain that he wouldn't actually get a full fur costume. But it worked out great because their relationship reminds me of Belle and the Beast - so stubborn one second and then so sweet the next. I decided to go with the Disney look of Belle in her blue dress and the Beast in his blue and gold suit.


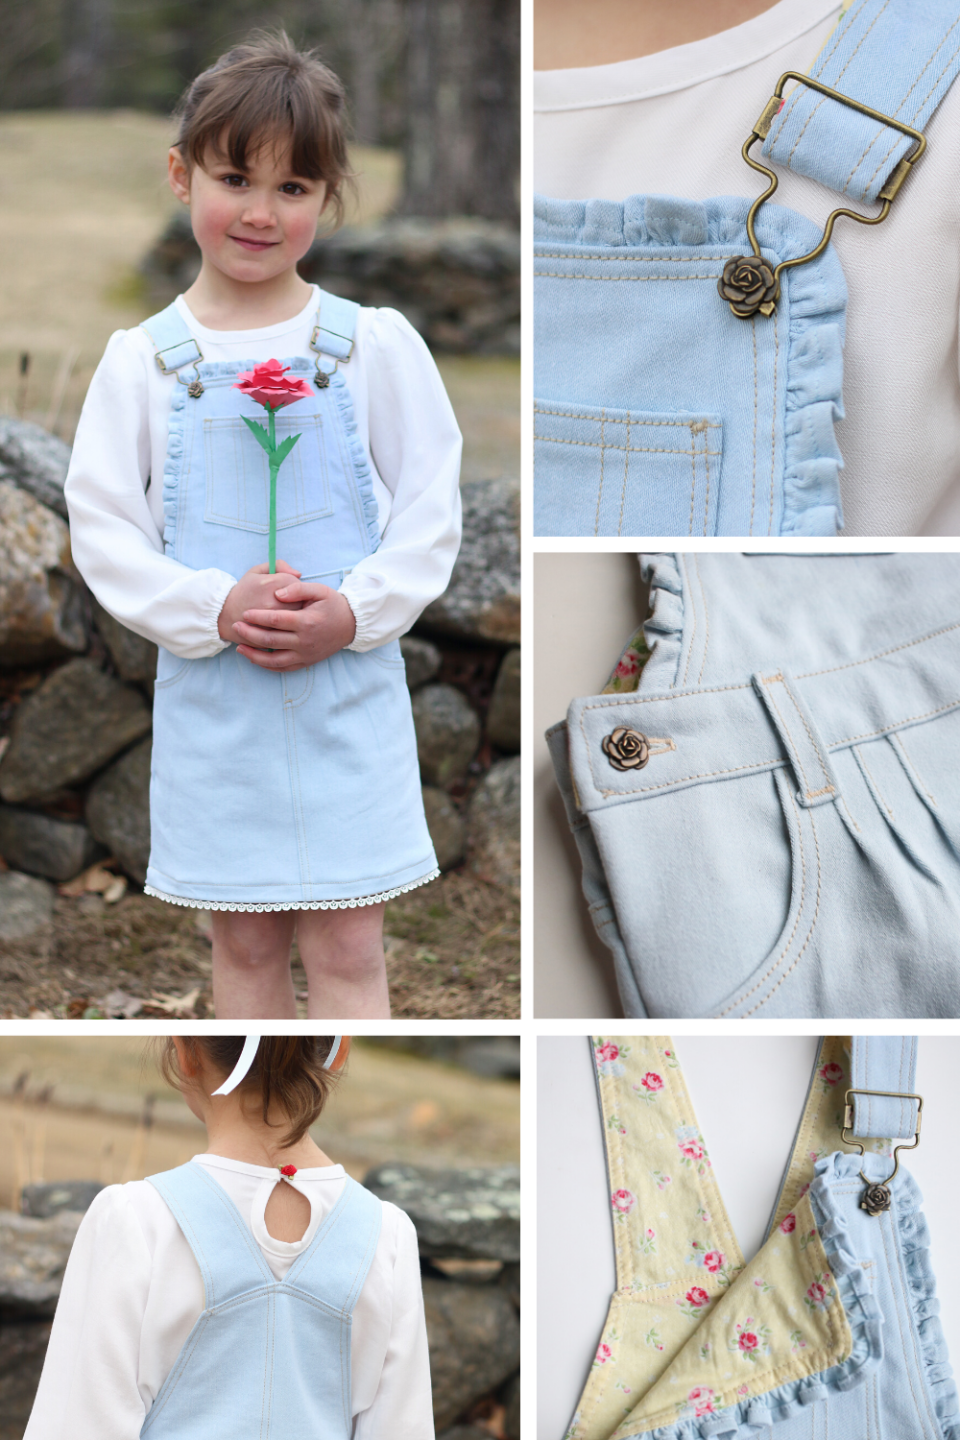
For Belle's look I drafted a denim overall pattern. The skirt has three pleats on each side and curved pockets, and the bib has a patch pocket and a cute little ruffle. Belle needs some roses, so the buttons are antique brass roses and I used a red ribbon rose on the keyhole of her top. The lining fabric has roses on a yellow background like Belle's ball gown. I also added some white trim to the hem of the skirt. Her top is the Juniper pattern modified to have a keyhole back and the sleeves from the Willow pattern. I used a viscose twill that is really soft and drapes nicely. The bottom is finished with a pretty leaf trim if she wants to wear it separately.


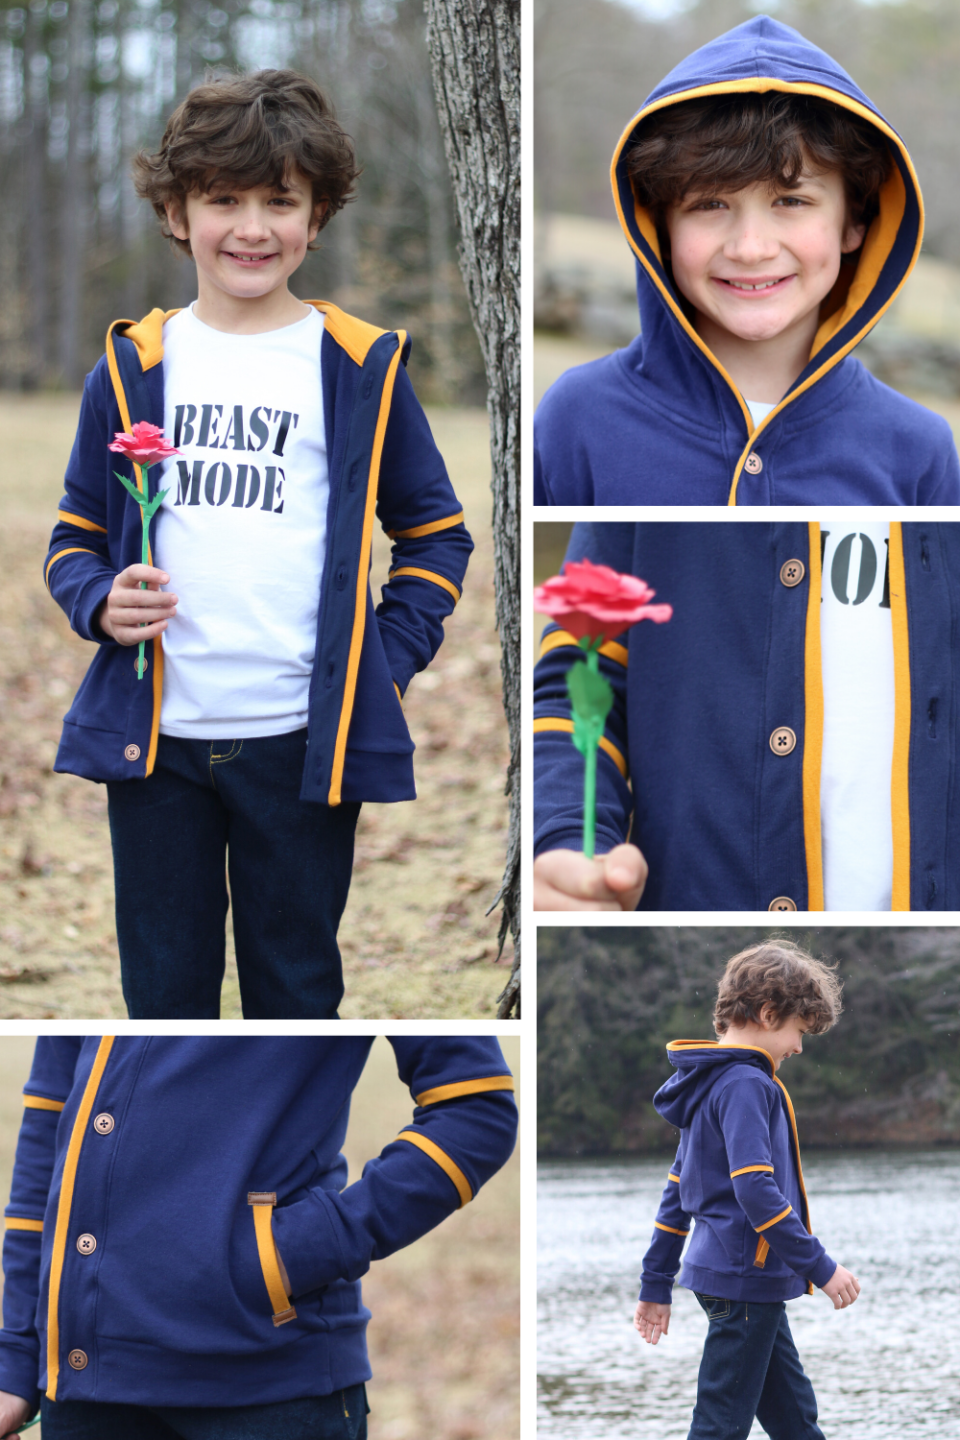
For the Beast's look, I modified the Constance pattern to have a button front with gold trim that wraps all the way around. I used the welt pockets from the Ollie pattern and added some leather trim to the edges for a little extra detail. I added gold trim to the sleeves too. The white tee underneath is also made from the Constance pattern and I added vinyl to the front. The jeans are the Grady pattern. We also made some paper roses as our art project for the week to use for the photos.


Thanks for reading about my fairy tale look! If you'd like to see more photos, you can head to my blog.


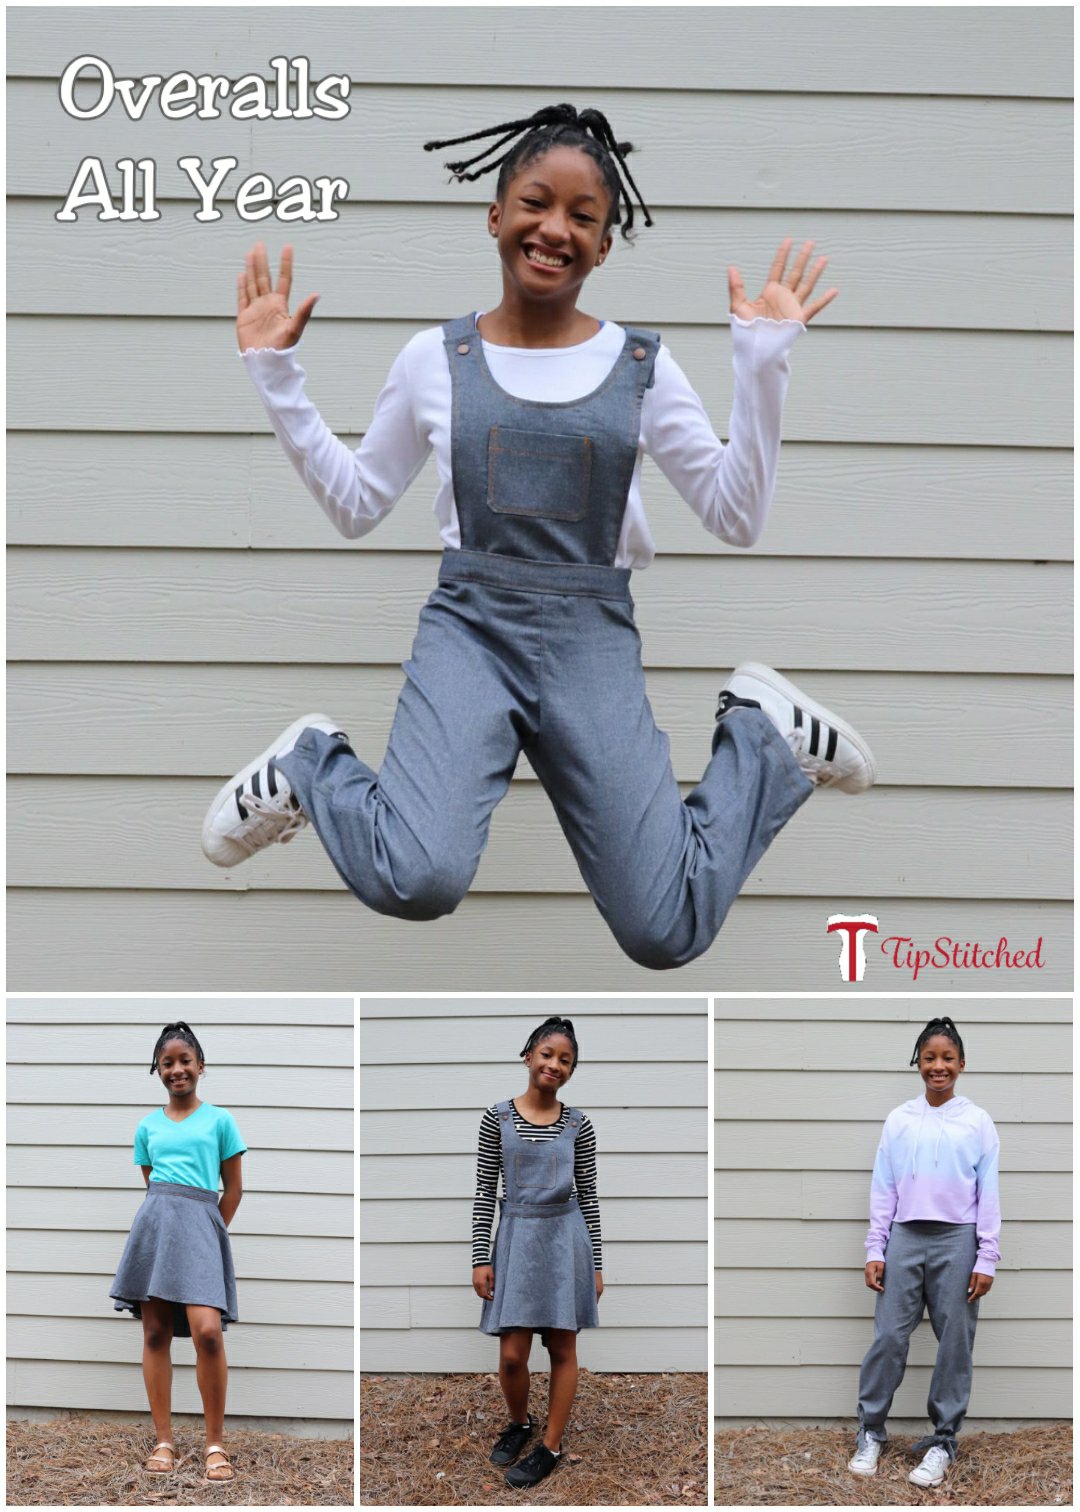
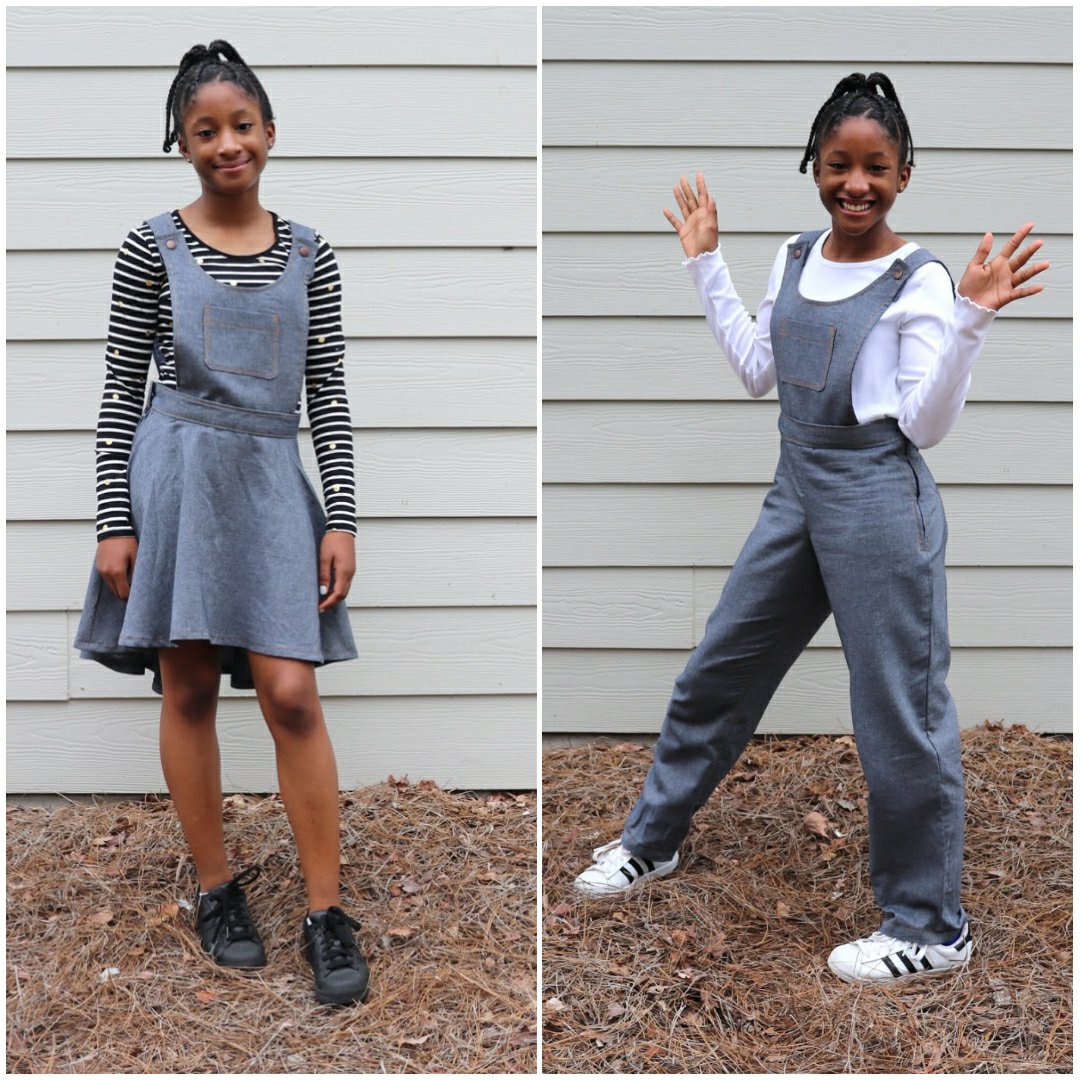
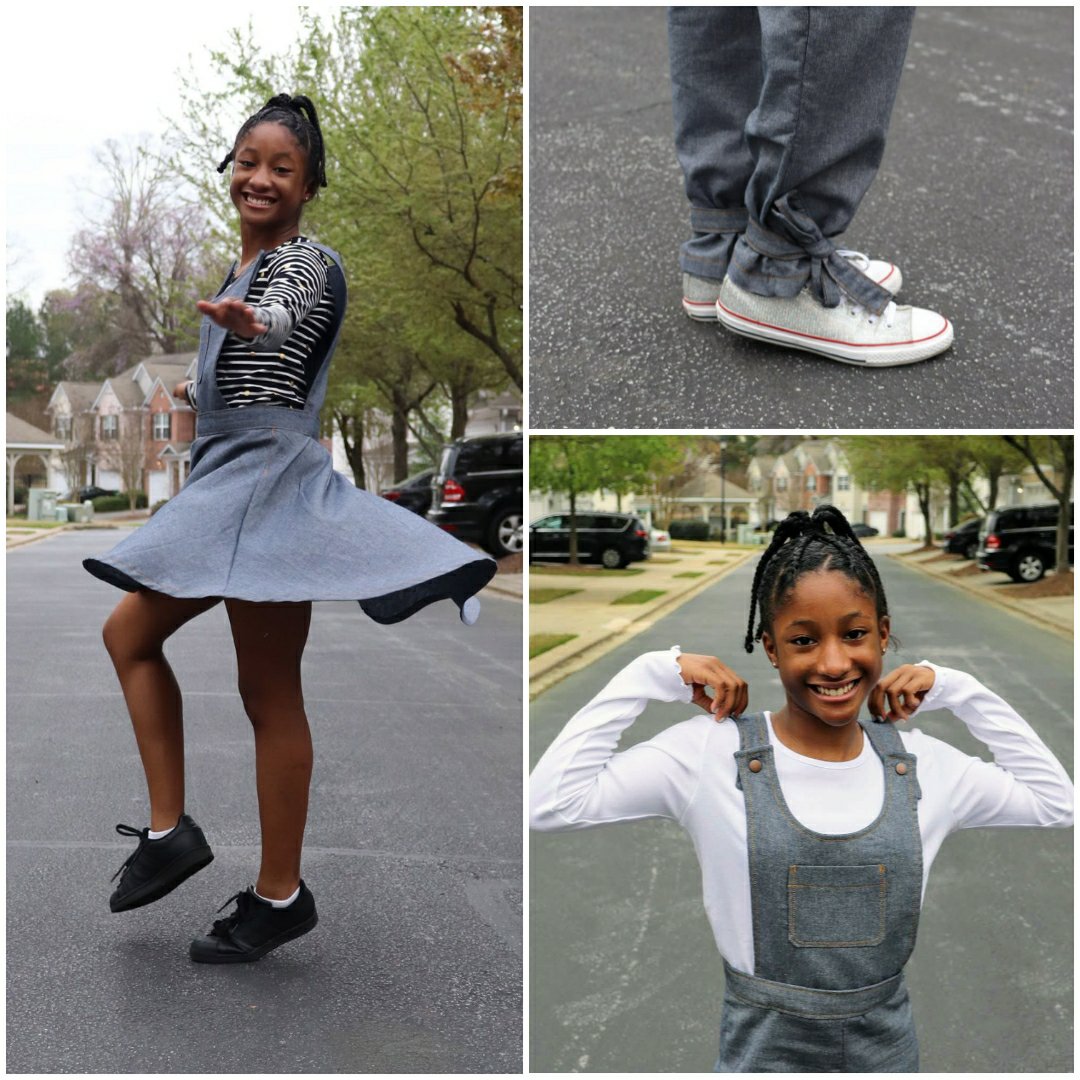
Tip Stitched -  To Grandmother's House We Go 

PRPWK3-title 

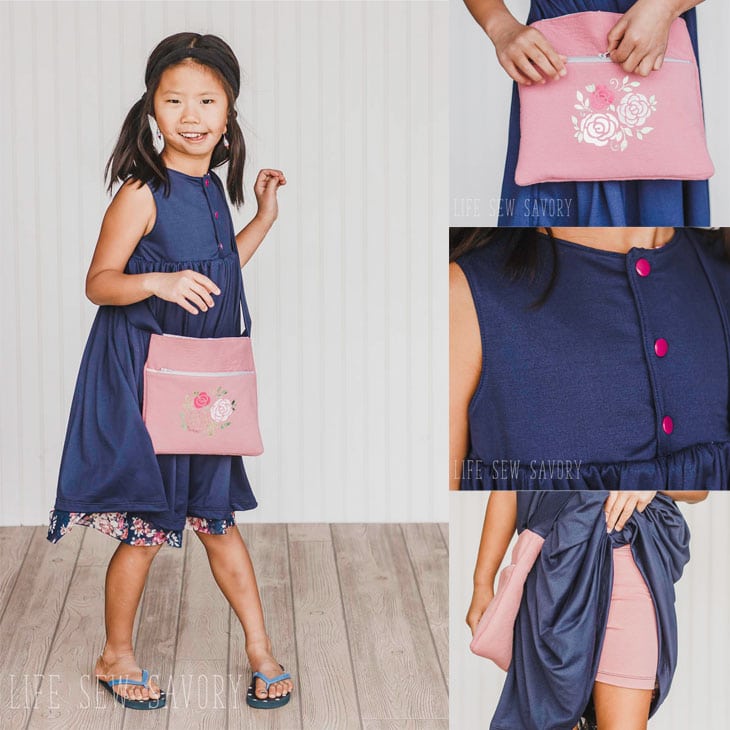
 Out of the four themes, this week was the one I was most worried about. Miss Socialite is twelve so she's not as into fairy tales as she used to be. Still I thought her pick would be Ana or Elsa since Frozen 2 came out recently and she has been watching it. To my surprise she immediately said "Little Red Riding Hood!" when I asked her for a fairy tale idea. Obviously that meant a red hooded cape, but what else? When I asked her what else would go with it she said she had to think about it. While she was searching pinterest I was thinking up a cute dress, maybe a knit bodice with a woven skirt.

  wp-15856100649441984139671588895663.jpg

Well she put a halt to those thoughts. She handed me this sketch of a red cape, white tee, gingham shorts and a red overskirt. It seems I have a little designer on my hands. Whelp, she asks and I deliver. She originally wanted red gingham, but I had to swap it to black because is what I had on hand. I actually think it works better and in the end I think she agreed with me. I also opted for a tie closure for the overskirt. Aside from those small changes I feel that I accurately created her vision. One of the perks of sewing is that I can make these kinds of ideas come true for her.

  PRPWk3-flaylaylogo

For the cape I used McCalls 7460, view C because I definitely wanted the hood and she chose the the squared hemline. This red crepe, from Minerva Fabrics, was in my stash and is the perfect shade of red. I also used the crepe for the overskirt which I drafted myself using her measurements. Lastly the shorts are McCalls 7150 and modified them to have a flat front and adjustable button elastic back. The black and white gingham shirting was supposed to be a shirt dress for me. Sadly this is not the first time she has claimed fabric from my stash that I already had plans to use. Thankfully, I still have two yards so maybe that shirtdress is now a shirt. LOL

  wp-15856100648381532783044861781124.jpg 
 She loves all the pieces and I love that she designed it to be practical for everyday wear. Head over to my blog, TipStitched, for more pictures and details of how I drafted the overskirt and modified the shorts. Fingers crossed I'll see you next week, Tiffany of TipStitched


That's Sew Kari - Present Day Princesses


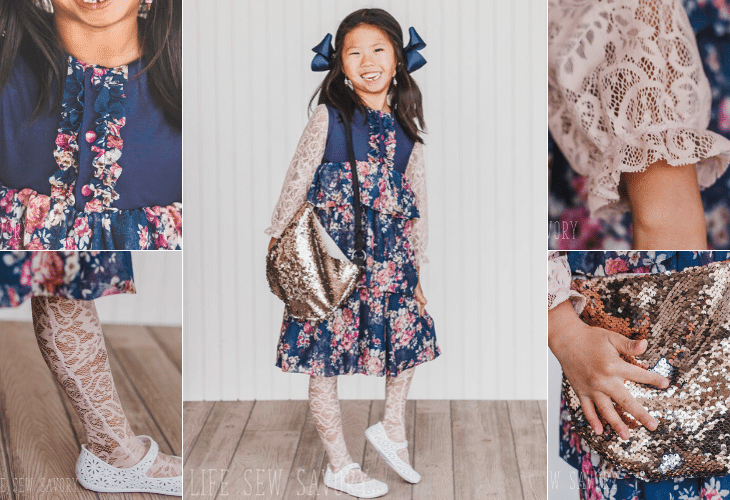
Yay!!!  I've been looking forward to Fairy-Tale Week from the moment the themes were announced.  Over the years, I've created numerous fairy-tale-inspired dresses for my two girls.  However, my girls are past the frilly dresses and of course, I want them to wear it afterwards!  I knew immediately I'd choose Princess Aurora for my youngest.  Her name is Aurora and I can't believe I've never made her a single thing Aurora-inspired.  I had an idea for my oldest based on her personality and I was pleased that she picked the same -- Princess Belle.   As I was formulating my idea, I decided to bring the princesses to present day as tweens like my girls are.  


Princess Aurora :

I sewed up a casual outfit with just the right amount of glam.  To start, I made a pair of cropped jeans with hand-beaded light pink and iridescent jewels added to the pockets.  I started with the Tyler Skinnies by Petite Stitchery & Co.  I cropped them and finished with a frayed hem (stitched above so they won't fray too high).   On the waistband, I added a light pink jeweled shank button.  The denim is Indigo Washed Designer Stretch Denim by Cali Fabrics that I got with my pre-season shopping spree.  To let you in on a little secret: this denim is actually inside out.  The backside was just the right shade of blue for my nod to Aurora's fairy godmothers fighting over blue and pink.  For the top, I started with the bodice of Wimberley by Little Lizard King, added the high-low peplum from the new Thistle Dress by Jennuine Design for One Thimble Issue 23 and added self-drafted bow sleeves with peek-a-boo shoulders in likes of her famous pink dress.  It's sewn up in a super soft knit so it can double as a sleep shirt.  My Sleeping Beauty requested the "Nap Queen" iron-on so I grabbed my Cricut to make it happen.   The final piece of the outfit is an oil cloth cell phone purse.  It features a single shoulder strap, large grommets and matching zipper. The oil cloth is also from Cali Fabrics!  (I snagged the LAST yard...)


Princess Belle: 

For Belle, I knew I wanted to go with a preppy outfit as a nod to her love of books and learning.  I started with a self-drafted skirt with a fitted side-zippered waist in a bright yellow floral eyelet.  The skirt has a built-in white cotton pettiskirt under the main layer.  Next, I turned to the Give Piece a Chance Crop Top by Duchess & Hare and used just the lining pieces and added the desired length so it would end at just above the top of the waistband. I used a solid white linen from Riley Blake Designs and adorned the back overlap with 5 red heart buttons.  I added a large rose in red foil iron-on from Cricut to tie in the rose that the Beast has under glass.  The final piece of her outfit is a cropped, fitted denim jacket from my remaining denim from Cali Fabrics.  I started with the Clementine Jacket from Violette Field Threads and removed the front overlap, cropped it several inches, and added a bottom band.  I also pieced the back of the jacket together to mimic a jean jacket my daughter owns.  It's fully lined and every seam is double top-stitched.  The lining also features a denim facing along the front edges.

I hope you love it as much as my girls do!!  I grabbed some screenshots (wink,wink) from their social media accounts because these princesses couldn't wait to show them off to their friends.  

Visit my BLOG for more pictures and details!!  Before you go, vote for your two favorites below!


Now it's your turn to help out!  Use the voting widget below to vote for TWO of the designers:


This week the celebrity sewing guest judge, Mandy of Sugar Bee Crafts really has her work cut out for her!  

1/3 of the designers score is determined by the guest judge
1/3 of the designers score is determined by the panel of judges
1/3 of the designers score is determined by YOU, the audience!

Inspired to sew along?  Link up and win prizes here.


Friday, March 27, 2020

Season 23 Week 2 Results!!!

Wow!  What an inspiring way to start Season 23!  And special thanks to each and every one of these designers for choosing to bring light and beauty and joy to the audience in the midst of such a tumultuous time in the world!

The results have been tallied and the winner of Week 1 is:


Kari of That's Sew Kari

Here's what Sherri of Mami de Sofiona, our celebrity guest judge had to say about the Catch you on the Flip Side look:

That’s Sew Kari - This look had me from that first fun photo with the mirror showing a different look. It gave me a little peek at the one shoulder ruffle option which is my favourite. Digging in deeper I was super impressed with the reversible/interchangeable aspect to all the pieces. The way that the reversible ruffle and skirt can become so many very tween friendly look is awesome. So well done!!

Sadly, only 4 designers are allowed to advance to Week 3, and we're reluctantly sending home:


Emily of Life Sew Savory

Fortunately our sponsors are sending her home with some nice prizes!  And, she received a $50 pre-Season shopping spree from CaliFabrics!

Plus she's part of the Project Run & Play family now, so keep your eyes open for more of her amazing work around here in the future!

Are you sewing along?  Be sure to link up your creations on the sew along page for a chance to win some fantastic prizes.

See you next week for the next theme!
Tuesday, March 24, 2020

Season 23 Week 2 Transformation

This week's theme is Transformation!

Tip Stitched - Overalls All Year


 Whew, I made it to Week 2! Thank you to those who voted. I'm so excited because I really wanted to share this transitional piece with you. I enjoy making things that can have multiple uses. My first thought was to make something reversible because that is my go-to for creating something that will give me two looks. Instead I challenged myself to create an outfit that was interchangeable and could be worn all four seasons.


After much back and forth I decided on overalls as they are made for layering, allowing them to transition easily from season to season. I used McCall's 7459 as my base. The twist that truly makes this ensemble season-less is the detachable bib. The ability to remove the bib allows the skirt and pants to be interchangeable and provides the option to wear each separately. In the winter the pants can be paired with a sweatshirt or hoodie. Then as spring comes around the skirt-all can be worn over a long sleeve or 3/4 sleeve tee. Remove the bib when the heat of summer hits and throw on tee or tank with some sandals. As the temps cool back down for autumn the overalls work great over a light sweater or heavier t-shirt.

  flatlaly2

After considering several ways to make the bib removable (buttons, hooks, snaps, zippers and even Velcro!) I selected snap tape. I was sure to attach the female side to the waistband for comfort when wearing either bottom alone. A few changes were to the bib were necessary. I added an inch to the bottom of the bib pieces so the bib would overlap and line up with the bottom of the waistband. Additionally the bottom edge needed to be finished so I sewed the all but 2 inches of the perimeter of the front and back bib right sides facing and then turned the pieces like a pillow and top stitched. Lastly I used bronze snaps instead of buttons as a matter of personal preference.


Of course no look for Miss Socialite is complete until she adds her touch. This time she wanted to add ties to the pants to create more of a jogger (or harem) look. Well actually she wanted to use a hair elastic to cinch them up and I convinced her these ties worked better. Also the skirt was too long for her liking, but instead of shortening to above the knee she requested a hi low hem. She now declares this is her favorite skirt! Which is a major win because she swore off skirts a couple of years ago. I hope you like it as a much as she does! Be sure to visit my blog for more details and a full pattern review. TipStitched Thank you, Tiffany


Life Sew Savory - Play Dress / Party Dress


Play dress party dress reversible dress

Get more wear from your dresses with TWO wearable sides. Simple and sweet on one side and ruffles and frills on the other! Play hard all day, then still have a clean side to wear the next day. My daughter is in love with both looks and wants to wear this everyday. The base dress pattern for this look is my free sweet rose dress.

Ahhh transformation... I was really thrown off by this theme. After the themes were announced I asked for transformation ideas in my sewing group and someone suggested a reversible dress. I loved the idea and ran with it. The blue and the floral mesh were already in my stash with some vague Easter dress plans and then I had this vision. I started adding details to make the play/party theme more transformational.


play dress side and close ups

The Play Side: A sweet simple blue dress. Snap front to help the dress go over the head, but easy to snap or unsnap. I also made a cute mini messenger bag for my daughter to carry around all her playtime treasures. She may be six, but my daughter is still no lady {haha} She wears shorts under her dresses all summer so she can play hard and still look cute.

Free patterns used: Summer Shorties and Mini Messenger Bag


The Party Side: All the frills! You can see in her face she LOVES this dress. From a simple play dress a simple flip will transform your dress to a look that will impress. The simple snaps now have ruffles down the sides and the skirt is three layers of double floral mesh. I sewed up some lace tights {I adapted a legging pattern}, and some lace sleeves. The lace sleeves are attached to a simple tee base and have elastic at the cuff for an extra touch. We topped off the look with a sequin purse - the kind that changes colors as it's SO fun.

Free Patterns used: Girls Leggings, Sweet rose dress


reversible dress flatlay

See my full blog post for even more details of how I adapted patterns to create these looks... and of course... outtakes!!

That's Sew Kari - Catch You on the Flip Side


Woo-hoo!!! It's Week 2 - Transformation Week!  No, I didn't exchange my younger daughter for a clone of my older daughter.... LOL  This week, I chose to sew for my oldest because she's in the midst of her own transformation -- from elementary school to middle school.  I couldn't think of a better way to celebrate her growing up than to give her a mini-capsule that F-L-I-P-S to suit her mood.  I came up with a 4-piece collection that she can style multiple ways depending on what she picks.


My inspiration for the entire collection started with the Black & White Polka Dot Oil Cloth that I selected from Cali Fabrics in my pre-season shopping spree.  I hadn't used oil cloth before, but it really caught my eye and knew Marissa would love it too.  From there, I selected hot pink and black -- two of her favorite colors.  Finally, I chose a funky hot pink, neon orange and black print that I had bought for her last year.


Piece 1: Reversible Skirt/Dress Combo -- This tube style dress contains a skirt on each end so one side can hide inside and act like a built-in pettiskirt.  The waist also folds down yoga style for a skirt option.  Pattern is self-drafted with the exception of the pockets on the pink side.  Pockets are from Carmelo by Little Lizard King.
Piece 2: Reversible Ruffle -- This ruffle can be worn on one shoulder, or halter style.  The halter tie doubles as a decorative bow when not used as a halter.  Hidden elastic sits between the layers.  This piece is self-drafted.
Piece 3: Reversible Tank Top -- I turned to my favorite knit dress bodice for this one.  I used Wimberley by Little Lizard King and lengthened to tank length and hemmed each side individually.
Piece 4: Reversible Mini Backpack/Purse -- I began with the Animazing Backpack Add-on by Little Lizard King.  For the outer shell, I created double usage straps -- backpack or cross-body.  The inside is plain black for more reserved occasions and has a removable shoulder strap.   We had quite the photo-shoot, trying as many of the combinations that we could and I'm certain there are more than what we captured!  Many more details on my blog!!!
P.S. Thanks to the magic of Photoshop, I can share all sides in one picture 😊


Sew a Little Seam - Whatever the Weather


I'm so happy I made it to week 2 for Transformation Week! I've really enjoyed sewing based on themes. When designing patterns, I create whatever comes to mind, but having a set of boundaries has been a great way to come up with some fun and different ideas than what I normally would.


My look for transformation week is an outfit that changes with the weather, because as Mark Twain said, "If you don't like the weather in New England, just wait a few minutes." This outfit can be worn in five different ways. For chilly days she has the zippered jacket, then when it warms up, the sleeves zip off to create a vest that is reversible. The sleeves can be worn separately as a cardigan, or if it gets really warm she could just wear the white long sleeve tee.


Now let's talk details. The solid pink side of the vest has welt pockets and can have the sleeves added by zipping them on. When the sleeves aren't on I like how the zipper adds some extra detail to the vest. The plaid side of the vest has zip pockets. I thought about adding a zipper to this side too so you could add the sleeves, but I wanted it to have a more traditional look. As an added bonus the sleeves look really cute as a cardigan. I sewed up a white, long sleeve tee to go underneath using the Brynn pattern. I altered the shoulder so I could add some pom pom trim and lace for a little extra detail if worn alone. And of course she needs a bag to carry the pieces she takes off, so I made a reversible drawstring bag. This will be great for hiking or camping. The jeans are the Grady pattern. I shortened the back pockets a bit to make them a bit more feminine, added some heart details, and pink topstitching. I also made them fully lined so when rolled the bottoms have the little pop of fabric to match the plaid vest. Plus, my daughter loved how soft they were with the lining.


The floral fabric was from Blended Thread Fabric, the pink plaid was from Raspberry Creek Fabrics, and the solids were from Purpleseamstress Fabric. I had a hard time narrowing down the photos, so if you'd like to see more, make sure to head over to my blog. Thanks for checking out my look this week!


Baby Nest USA - Turn Back the Time


Hi again! This is Richelle and Reine for the Week 2 - Transformation Theme.

Several goals this week:
1. Pattern modification / Fabric transformation
2. Mini fashion capsule that is wearable throughout four seasons and can be mixed and matched.
3. Transform something old and broken into a fresh and new item.
4. Transform home decor into a wearable garment.

With new movies and shows set in the 80s coming out, from Stranger Things to The Goldbergs, it’s no surprise that my daughter fell in love with that era. I’m glad it’s coming back! It’s my decade, and this project has been a good homeschooling lesson for us, especially during this difficult time. Reine and I were able to discuss the expressions, toys and gadgets, the famous singers, songs, movies and of course - the fashion! I tell ya, my daughter had a LSS (Last Song Syndrome) from the song “Wake Me Up Before You Go Go!”. She won’t stop singing it! Born in ‘86; I knew I had to make my daughter’s request for a super tubular 1980s inspired outfit. The ‘80s has pretty audacious trends - bold colors, bold prints and bold silhouettes. It embodied the mindset of more is more. Having said that, we decided to go for bold, fun 1980s prints and silhouettes but with subtlety. We want it to be 1980’s inspired but still 2020 trendy and something that can be mixed and matched with today’s garments.


First is the top. I wanted to transform a vintage cotton curtain into a wearable garment that can be worn in this modern world. I love this curtain’s print! It’s true vintage, fun and colorful! The base of the top is Little Lizard King’s Sausalito Sweater Top. The pattern is intended for knits but I wanted to challenge myself to modify a knit pattern to work on a woven fabric. I kept the relaxed drop shoulder, omitted the neck, sleeve, and hem bands and used bias binding around the openings. I also used a Hong Kong Binding on the side seams. I hacked the shoulder with a shoulder button placket, so it’s easy to put on and off. It’s also a fabulous way to show off these teal colored wood buttons. To give it a boxy, swing style effect, I modified the pattern pieces by slashing the bust apex and lower portion of the bodice, extending the originally cropped top length, and giving it a lil bit of hi-lo silhouette to highlight the contrast from the hem’s striped bias binding. 

For my all season fashion capsule, I made a bomber jacket based on Petite Stitchery’s Billie. I used cotton fabric from Ziggie Lane that has this cool acid-washed denim look, as acid wash is evocative of all things 80s. I also love that it’s a soft 100% cotton for comfort, wearability and breathability. I paired the jacket with Hawthorne Supply Co.’s Black and White Artisan Stripes. The grey binding was made from Raspberry Creek’s grey cotton lycra. I love using cotton lycra for binding, since it has a good structure and recovery. I modified the jacket to be reversible with a matching removable and reversible hoodie. It’s a super fun way to transform the look! Oh - It has pockets for snacks, cassette tapes, scrunchies, etc. 


I also self-drafted a pair of pants matching the fabrics from the jacket and incorporated stripes so it will also go well with the boxy top. I gave it a semi-harem style with a slightly fitted look. I also wanted this piece to be wearable from one season to another so I decided to add a zipper that would transform it from pants to shorts, allowing Reine to wear them throughout the seasons. 

Now for the fanny pack, I had this old purse that had broken zipper teeth that was really showing age on the bottom part. I wanted to transform an old, broken item into something fresh and new, so I decided I need to make an accessory that will complete the look. What’s more 1980s than a fanny pack, right?! The fanny pack is self-drafted and the materials were upcycled from the old purse. While making this fanny pack that transforms from shoulder to waist pack, I realized I can make a strap #2 that can transform to a belt. I used this cream/gold webbing and plastic buckles from Hobby Lobby. The strap is removable so it can be used for the fanny pack or as a belt. 


To be honest, this project really pushed me to think beyond my limited self-taught fabric engineering and pattern drafting skills. The finished products were totally worth it! I have one happy kid! I hope you like them too, and don’t forget to vote! 

For more pics, videos and behind the scenes visit me on Instagram and Facebook. For free coloring pages click here

Now it's your turn to help! Use the voting widget below to choose TWO:

This week's celebrity sewing guest judge will certainly have her work cut out for her!! Sherri of Mami de Sofiona created STUNNING looks when she was a designer on Project Run & Play and is well qualified to preside of the Transformation theme!
Friday, March 20, 2020

Season 23 Week 1 Results

Wow!  What an inspiring way to start Season 23!  And special thanks to each and every one of these designers for choosing to bring light and beauty and joy to the audience in the midst of such a tumultuous time in the world!

The results have been tallied and the winner of Week 1 is:


Here's what Katie Kortman, our celebrity guest judge had to say about the Simply Sweet look:

1- That's Sew Kari
I loved the color scheme, it was perfectly Analogous!  The details that really set this look apart were the beautifully styled photos, the coordinating purses that fit the scheme and went beyond what was required, and the way the two looks coordinated so well even with mixing prints and solids!

Sadly, only 5 designers are allowed to advance to Week 2, and we're reluctantly sending home:


Gail of Boo & Lu

Fortunately our sponsors are sending her home with some nice prizes!  And, she received a $50 pre-Season shopping spree from CaliFabrics!

Plus she's part of the Project Run & Play family now, so keep your eyes open for more of her amazing work around here in the future!

Are you sewing along?  Be sure to link up your creations on the sew along page for a chance to win some fantastic prizes.

See you next week for the next theme!
Tuesday, March 17, 2020

Season 23 Week 1 Analogous Color

We're finally to Week 1 of Season 23!!!  The designers have really outdone themselves, so prepare to be amazed!!

Be sure to scroll all the way to the end of this post where you can vote for TWO of your favorite looks.

Sew a Little Seam - City Sunset


I learned a lot from this week's theme. I usually keep it pretty simple with my color choices, so it was a lot of fun to step outside my comfort zone and try something new. I'm not going to lie, I was intimidated starting out. I kept second-guessing myself, and my sewing space looked like a rainbow exploded, with every color of fabric I owned tossed across desks and chairs. I ended up basing my colors off a photo of a sunset. Mother Nature knows how to do analogous. I really liked how the colors came together in the end and I think I'll be trying out a lot more color combinations now!


The idea for my designs started with my daughter's sweater. She loves feminine looks, so I chose a pretty, delicate sweater knit and added a ruffle to the front in a V shape. Her shorts are the Linden shorts that I altered to have pleats at the front for a bit of extra detail. They have a flat front waistband and an elastic back for easy on and off. It also has slant front pockets, belt loops, and faux back flap pockets. To finish the shorts, I sewed up a yellow belt that could be tied in a bow at the front. I also made some sparkly yellow hair bows out of faux leather.


My son really loved the bright colors in his outfit and asked when he could wear it to school, so I'll consider that a win! The polo shirt was made using a combinations of my Birch Button Up shirt and the Movie Night Pajamas. I drafted a new placket piece to create the look I wanted and added the yellow bands to the sleeves for a pop of the accent color. I sewed on patches to the shirt front and used a pair of his old hockey skate laces to add just a hint of lime green to the inside of the collar and the vents at the side. The shorts are the Grady pattern. I added grommets to the waistband and used skate laces as drawstrings. My son loved the hockey lace details. The shorts have welt pockets, slant front pockets, a fitted waistband, and a button and zip front. My son is slim and his store bought pants are always pulled as tight as they can go with the adjustable elastic, so I love that he can have a fitted waistband that actually fits.


You can find more info and photos on my blog. Thanks!

That's Sew Kari - Simply Sweet


I can't believe Week 1 is finally here!!  My journey from receiving the theme to writing this entry has been, um, adventurous to say the least.  My ideas changed about eleventy billion times. I bought not one, but two complete different analogous color schemes (more on that on my blog...lol). AND my sewing room (okay corner of my bedroom) looks like a craft store blew up -HA!  So, without further ado, I present Week 1: Analogous Colors.  I'll admit it,  I had to Google it  (and just now writing this and misspelling it, I realized I'd been mispronouncing it for about 3 weeks...ha!)  These are the colors that sit beside each other on the color wheel.  So off I ran to Hobby Lobby to buy a color wheel which I lost misplaced somewhere in my room.
The colors I used for my entry are: Yellow-orange, Yellow, and Yellow-Green.   
These colors reminded me of Lemons and Pineapples.
For my oldest daughter, I used a yellow-orange DBP with white pin stripes for a long summer maxi.  I started with the bodice of the Capri pattern by Little Lizard King and changed the neckline to a regular scoop.  I also added a front seam so I could run my stripes at a 45-degree angle for added interest.  Then on the back, I added a scoop back between the straps and raised the strap attachments to mimic the front bodice.   I also free-hand drew the bottom curve, taking inspiration from the Magnolia pattern.  For the maxi skirt, I used the WOF in total, but added seams on both sides so I could add pockets.   Then I drafted a Pineapple Cell Phone Cross-body Purse with quilted body and a leafy portion on the front.
My younger daughter loves lemons (actually eats them like oranges...) so naturally she needed the lemon outfit.  I started off with the brand new Carmelo Dress by Little Lizard King and changed the neckline as well as the back, creating an opening that mimics the end of a lemon.   Between the bodice and skirt is faux piping from the yellow-green/white striped fabric from the top of the back bodice.   For the skirt, I pieced it together to include my self-drafted "Pucker Pockets" -- each pocket panel is just one piece folded accordion-style to create a pocket.  At the top of each pocket, I added a 3" channel of elastic.  I added a deep 1.5" hem and used a blind hem stitch.  My favorite piece of her outfit is the self-drafted Lemon Slice Purse that zips shut.   Then I grabbed my Cricut Maker and added a lemon slice iron-on on each side.


Life Sew Savory - Pops of Color


project run and play week 1: Analogous Colors color blocked shirts and ruffles from Life Sew Savory

I love that we are starting the first week with COLOR! Working with color on these dreary winter days just makes me smile. I've never made anything specifically with analogous colors, so I had a hard time limiting myself. In the end I made three looks, each with three colors, and some overlap. Orange ended up being the common thread in all three looks and I love them each individually as well as a collection.

Please forgive any strange looks in the photos, we ended up taking photos on a day with temps just above freezing, so my poor kids were literally freezing. I love the way the color of their shirts contrast the bleak landscape and the full look was just what I was going for.


color blocked shirt and project run and play week 1

All the patterns used in this post are free patterns from Life Sew Savory with a few fun edits. I used solid color knit fabric from my stash and from fabric.com to get a variety of colors from the color wheel to work with. I had made these rainbow felt circle garlands last year and they ended up being the perfect prop for our photoshoot.


clothing details for run and play

Let's talk about the boys shirts first. I used the boys basic free t-shirt pattern as the base. Jack's shirt was a basic color blocking with three colors and some basic geometric shapes. Color blocking is such a fun way to elevate a simple pattern.

The striped shirt Max is wearing was made from the same pattern with custom fabric. I love making my own striped fabric and first tried this technique on Pjs for the boys years ago. It takes awhile and it not a fast process, but being able to make striped fabric in the colors I want is so handy and I love the way it works here.

Rose's ruffle top was the girls swing top {another free pattern from my site} but pretty much only as a base. I changed up the neck with a super easy cheater V neckline and also lengthened a bit. Then I sewed ruffles, ruffles and more ruffles onto the top. I started with a 2" ruffle and each one after is longer than the one before. Each ruffle layer is sewed directly on to the shirt. I also added ruffles to the sleeves when I sewed to the shirt. We paired the top with some leggings {also a free pattern}


DIY stripes and color blocking method

I'm thrilled with how these looks came out and how they look together. My kids were pleased because they are comfy clothes made with soft fabrics. They don't always like everything I make, so it's a win when they do. Want more fun photos {and out-takes} from our cold photoshoot? Check out my full post here.


Tip Stitched - Shine Brite Like A Diamond


PRPTitle 

 As soon as I saw the theme for week 1, analogous colors, I knew I would be working in the blue/green/purple section of the color wheel. Miss Socialite is all about the blues right now (see her headphones, speaker and slippers-lol). She is also obsessed with anything "holo" or iridescent. So this outfit hits all of her must haves!

  PRPWk1FlayTitle

When I saw this oil slick holographic poly-spandex knit by Yaya Han at Joann I knew it was perfect. The metallic fabric contained all of her favorites; blue, teal, aquamarine and a bit of purple depending on the lighting and the angle. From there I pulled out the aquamarine and blue for the rest of the outfit. Both fabrics are light weight terry cloth from Cali Fabrics. At first I considered using ponte or a sweatshirt knit, however I wanted to use a lighter fabric so she can get a little more wear out of before spring officially gets here.

  PRPWk1Close 

 The Dia Sweater pattern, by Misusu Patterns, has been in my pattern collection since Black Friday last year, but I had yet to sew it up. I love that the geometric design lends itself to color blocking, which was perfect for this theme. Plus I knew that the diamond would really stand out in the holographic fabric. She's a standout kinda kid, so subtle doesn't suit her. After a little sketching I decided on the color placement for the rest of the sweater and after I color coded my pattern pieces everything came together easily. I opted for the hi-low sweater length so that she can wear these over the matching joggers or leggings in the future.

  PRPWK1collage

For the joggers, which happen to be Miss Socialite's favorite thing to wear, I used Simplicity 8268 as a base. My initial plan was to hack the front leg into thirds (think thigh one color, knee another and the final on the calf), but as usual she had a better idea. Her suggestion was add a stripe down the side which gives a sportier look. I had to admit I preferred this to my plan so I went with it. To add the stripe I shaved about 1" off the outside seam of both the front and back leg and added 3" stripe the length of the joggers. As a result of losing the original side seam I had to move the pockets closer to the center front, but I was able to keep the original size. This is important because the more she can fit in her pockets, the less she will hand me to carry in mine! I hope you love this outfit as much as we do. Please visit my blog, TipStitched, to see more photos and read my full pattern reviews. I love the way everything pulls from the diamond, which shines almost as bright as she does! Hope to see you next week! ~Tiffany

Baby Nest USA - Stroke of Genius


When the theme “Analogous Colors” for the first week was announced, the first thing that came to my mind was my daughter’s love for arts and colors. My daughter Reine loves arts (both digital and paper). I knew right away that we should involve her art so she will have fun too! Yellow is currently her favorite color so I decided to pick the yellow tones and paired it with its complementary color - violet. My main piece is the sweetheart dress. I used Carmelo from Little Lizard King for the bodice since its scalloped back reminds me of a painter’s palette. I modified it to have braided straps and mashed the skirt of Little Lizard King’s Milton because the bias strips remind me of paint stripes. I used the purples I picked (red violet, violet and blue violet) for the straps and skirt pieces. I’m obsessed with pipings so I looked for the chunkiest cording I can find and made a piping from the violet fabric. I also used the same fabric to cover my buttons. The dress has enclosed waist seam and the bias skirt pieces were pieced together via French seam and Hong Kong bias closure. The hem is finished off with the same satin bias tape. Fabrics used were from Hawthorne Threads Sugar and Spice Which reminds me of marbled water colors.


An artist needs an apron too so I made a “grow with me” artist apron incorporating the colors yellow, yellow orange and orange. I used the Violette Field Thread’s Maddie Jumper as base. I modified it to have an adjustable neck and waist straps with snaps closure. I slimmed and straightened the side and hem and used the kangaroo pockets to hold paints, paint brushes and other artist’s paraphernalias. I made the pockets longer to accommodate the length of the supplies. I used Hawthorne Threads Colors Fabric Swatch for the pockets since the circles reminds me of a watercolor pan. I added beauty marks on the colors I used for this collection by adding hand embroidered flowers on each colors used. To make it fun and playful, I hand embroidered a peekaboo arts and craft supplies on the pocket. It was hard to find colors I love for my yellow tones so I end up doing ombre hand dyeing on a medium weight fabric that has paint splatter print from Hobby Lobby. To complete the collection, I made a Sailor Bow from Made for Mermaids. I modified the middle closure with the same braids I used for the dress. I hand embroidered brushes and dripping paint to make it personalized.  Since I want my daughter to get involved with the process, I had her do a fun art on a pair of blank canvas shoes. She decided to draw pincushion cactuses (very fitting!) with purple flowers and a sun representing the yellow tones. I also made shoe laces from the same purple fabric from the dress to tie it up together. My daughter even drew a cactus on a big canvas and digital art of her wearing the purple dress. 


It has been fun for me and my daughter to do this Art inspired pieces. We love them so much! I hope you do too! 


You can see more pictures, videos and behind the scenes here https://www.instagram.com/babynestusa/ and www.facebook.com/babynestusa and don’t forget to vote!

Boo & Lu - Sherbet Chic

I was so excited when I learned this weeks theme, analogous colors. The thoughts and ideas started pouring through my brain and I was SO excited to share these ideas with my little model, my 5 year old daughter Layla. I watched her face as I told her all of my ideas and I brought up a color wheel to explain what analogous colors were. She patiently waited as I finished my spiel and said to me, "Actually, mommy, I don't like any of those ideas. We are going to do it this way."
So, I threw out all of the ideas I had and sat down with her to come up with a plan. It is HER outfit after all! And thus, our week 1 design was born: Sherbet Chic.


Using my daughters 3 favorite colors, Yellow, Pink, and Orange, we created this chic analogous look.
We both sat down to look through all of the beautiful fabrics that Cali Fabrics has to offer. I love that they make it easy with their refined search feature. Now that we knew our colors for this look, we could filter our choices by each color.
We used a total of 4 different fabrics from Cali Fabrics to create this look.
Neon Pink Stretch Velvet, Neon Orange Midweight Stretch Ponte De Roma, White on Bright Yellow Polka Dot Bullet Liverpool Knit, and Yellow Floral Lace.


I used the Autumn Shift Dress pattern by Simple Life Pattern Company as my base for this look.
Layla insisted on lots of bows. She is very girly and if I would have let her wear a head full of bows with this look, she absolutely would have. I recently found a gorgeous runway dress that had a huge bow cascading down from the models shoulder. I knew that this was the look I wanted to achieve, while still keeping it practical for my 5 year old.
In order to create this look and have it look seamless, almost like it was crossing through the dress, I drafted a crossover bodice that I pleated at the side to give the illusion of a cinched bow center.
The bow was created using a gorgeous neon orange ponte de roma from Cali Fabrics. I added a sheer yellow lace overlay to tie the bow in with the yellow dress.
The blazer is my favorite part of this look. Layla's as well, she says it's the softest thing she's ever worn!


I knew from the start that I wanted a statement jacket for my daughter to wear. It's cold here! The tulip hemline allows the dress to peek out in the back in the most perfect way. I lined the jacket in the neon orange made my sleeves long enough that I could fold the hem up twice to give the illusion of large cuffs. I love that extra pop of color, and it helps to tie the whole look together. I was originally going to hand sew the cuffs down so they stayed folded, but then decided not to so that the jacket could be reversible.
Now onto my most favorite part of the look. The big yellow bow! I thought the big bow on the dress would be my favorite, but the yellow bow at the back of the blazer is what makes me most excited. (Okay, maybe I love bows more than my 5 year old).
The bow is hand sewn through the neon pink velvet fabric only so that my daughter could wear the jacket with either side out and no one would see the stitches. I stitched the bow down in multiple spots so that when worn it would not sag and maintain the same gorgeous shape no matter how much my daughter runs around and plays. I carefully placed it right where the blazer crosses over with each side of the tie laying on either side of the blazer.


You can read more and see more pics on my blog: Boo and Lu


Now it's your turn! Use the voting widget below to choose your TWO favorite looks for the Analogous Colors theme. 

  This week's guest judge, Katie Kortman is sure going to have her work cut out for her! Good think she's the color queen!

1/3 of the designers score is determined by the guest judge
1/3 of the designers score is determined by the panel of judges
1/3 of the designers score is determined by YOU, the audience!

Inspired to sew along?  Link up and win prizes here.