It's the final day of the Summer Hack-stravaganza! We're excited to share this final amazing tutorial from Kari of That's Sew Kari with you. And yes, there's a final giveaway at the end of this post!
Hi y'all!! It's Kari from That's-Sew-Kari and hacking patterns is probably one of my favorite things about sewing! It seems like the only time I sew a pattern "as is" is when I'm testing patterns, but after that, I'm always tweaking it or making my own.
Here's a peek at how the skirt is attached! It's the Janie Dress underneath (I chose the gathered circle so I could use a woven fabric) and Banana Boat Tee on top -- connected at the neckline and armscye.
Cut out the Banana Boat Tee pattern pieces (shown as the longer pieces above). Use the neckline and armscye of the Banana Boat Tee to draw a matching neckline and armscye on the Janie Dress pattern. (In my example, the tee is a looser fit than the dress, so on the dress bodice, I angled down towards my daughter's size.)
***I didn't add length to my Janie bodice, but in the future, I'd probably add at least an inch or measure to get it closer to the belly button to avoid scrunching the tee too much.
Complete the Banana Boat tee except for the neckline and armscye. Complete the sleeves but do not attach them yet.
Sew the shoulder and side seams of the Janie Dress bodice. Sew the skirt.
With both the tee and the bodice right side out, slide the tee inside the Janie bodice. Pin along the neckline.
Sew the neckline with a stretch stitch.
Clip the SA of the neckline.
Turn right side out so the Banana Boat tee is on the outside. Topstitch the neckline, if desired and baste the sleeve openings. Add the sleeves. Pull the Banana Boat Tee out of the way and attach the Janie skirt to just the Janie bodice. Scrunch the side of the Banana Boat tee and you are done!
Head over to my blog for more pictures and fabric details.
That is SO adorable and SO on trend!!! We're delighted to have this tutorial because we're going to USE IT!!!
Today's giveaway:
Enter to win 2 patterns of your choice from the Project Run & Play shop in and of these 2 ways:
We hope you enjoyed this Summer Hack-stravaganza as much as we did! Next week we're going to keep the goodness going with a couple of very fun things...see you then!
You're going to ADORE this next piece in the Summer Hack-stravaganza! It's so much fun to work with creative people who inspire you on a daily basis! Be sure to get the details of today's giveaway at the end of this post. Here's Ajaire:
Hi! I'm Ajaire from Call Ajaire and I can't wait to share this super easy romper mashup with you! To get started, you'll need the Ultramarine Cover-Up (designed by me) and the Made by Jack's Mum High Kick Harem Joggers patterns, which can both be found here in the Project Run & Play shop.
The top of the Ultramarine Cover-Up view A (no hood) is generous enough with the front and back v-necks that it can pull on and off the shoulders without any closures. Thanks to a discussion with my friend Randi, it seemed like it was just screaming to made into a romper, so I searched the PR&P shop for a jogger bottom that would work well as a romper. I immediately fell in love with the High Kick Harem Joggers and their comfy yet stylish look.
My number one tip for hacks and mashups is always do a trial run of each pattern in the correct size before making any modifications. That way you know how the pattern fits as intended and you can make your changes from there. I made a size 2t jogger which is bigger than her measurements, but she wears a giant cloth diaper so I wanted to make sure there was ample room in the tush. They ended up perfect in width with some extra in length, which is just what I was hoping for - she'll grow into them in time for the cooler fall weather.
I already knew her fit size in the Ultramarine Cover-Up is 18m so I was ready to get started using the 18m cover-up and 2t joggers. I printed out all of the pieces for view A of the cover-up, but only the front/back piece would need to be hacked. The High-Kick Harems have the option for colorblocking and since I wanted a shorts romper, the colourblocked upper leg piece was the perfect length to make the romper. So I only need that one piece printed out from the jogger pattern.
For the mashup, line up both the front/back cover-up piece and the jogger colour blocked upper leg piece along the center fold line. Slide the jogger piece down until it's 1" (2.5cm) below the waist cinch marking on the cover-up pattern piece. This inch will make up for some of the waistband depth that would normally be in the jogger since we're not using the waistband piece.
Beginning at the waist cinch mark, trace up and around the neckline and shoulder of the Ultramarine Cover-up and back down to the other side of the waistline. Then draw a line down to the jogger leg opening, curving the line slightly near the waist to hug the cover-up pattern line. From there, simply trace around the High-Kick Harem Joggers and back up to the waist cinch mark.
Be sure to trace the actual waist cinch mark and the notch at the raglan sleeve and then measure the width of the jogger leg opening. Subtract 3/4" (2cm) from the opening measurement to remove the 3/8" (1cm) seam allowance on either end from the true measurement. You'll use this measurement as the "leg opening" to determine the length of the leg bands in the next step.
Plan to cut two of the front/back mashup pattern pieces on the fold. For my romper I only cinched the back so I could show off that cutie unicorn panel, but there's ample room to cinch both if you prefer. The waist cinch mark will tell you where to place the cinching later on. You'll also need two leg bands which are cut with the width along the direction of greatest stretch in the fabric. Take your leg opening measurement and multiply it by two to get the full leg measurement of front and back without the seam allowances. This measurement is multiplied by .85 to get 85% of the full opening. This will give the band the ability to stretch around the opening and hold it together nicely around the leg. Add 3/8" (1cm) seam allowance to the bands at either end to keep the seam allowances in the mashup consistent. The height of the band should be 2" (5cm) which already includes seam allowance.
To sew the mashup, decide if you want to cinch both the front and the back or just the back and follow the instructions in the Ultramarine Cover-Up and the waist cinch markings to do so. Then use the neck bindings, raglan sleeves, and instructions from the Ultramarine Cover-Up through the neckline.
Here's the only "hack" part of the sewing and it's super easy. Sew the side seams together and the crotch seams together using a serger or stretch stitch. Then sew each of the leg bands' short ends together so you have two loops. Match the seam of the band to the inner leg seam and the halfway point of the loop to the outer leg seam and pin, stretching the band to fit. Sew the band to the leg opening using a serger or stretch stitch. Repeat with the other band and leg.
Finally, use the arm bindings and instructions from the Ultramarine Cover-Up to complete the armscyes, cinch the back waist, and your romper mashup is complete!
I've already made three of these for this 20 month old, but I'm dying to make one for my 9 year old. When I do I'll be sure to share over on Instagram. I can't wait to hear what you guys think about this Ultramarine/High Kick Harem hack/mashup so please remember to tag me @callajaire!
Now how's that for amazingly comfortable?!?!? And the cuteness factor is through the roof!
Today's giveaway:
Enter to win 2 patterns of your choice from the Project Run & Play shop in and of these 2 ways:
This next post in our Summer Hack-stravaganza is so fun! Miranda from Inspinration always sews such delightful clothes for her kids, and today is a fine example of that! Here's Miranda with the full scoop:
Welcome to today's stop on the Hack-stravaganza pattern tour! I am
Miranda from Inspinration and I played around with the Foliis by Sofilantjes and the Abby's Marigold pants by the Wolf and the tree.
Both patterns are amazing as they are with enough cute details to sew
plenty according to the instructions. Although they are great, I
always like more options and presume you do too, so I made adjustments
to both to broaden the set of options even more.
To the Abby's Marigold pants I added inseam pockets (which forced me
to create a side seam) and I finished the bottom with a cuff
containing elastic (this way you can keep the trousers rather long
without them touching the floor). I turned the Foliis is a short
sweater by dropping the zipper. The outfit that I made is exactly how our middle daughter loves to dress. She prefers softs trousers, with
pockets and short tops. In this blog post, I am showing you how I
hacked the patterns and if you want to take a closer look at the
entire ensemble, you can visit the blog post on my own site.
Abby's Marigold pants with inseam pockets and elastic cuffs:
Step 1: Cut off the bottom of the trousers to create a new length
suited for adding cuffs. To do so, first determine the height of your
finished cuff. I would advise taking the height of your elastic, that
gives the cleanest look. In my trousers, it is more because I forgot
how tall our girl had become and the fabric that I really wanted to
use was a bit too short... I love hacking, but it is often also
out of necessity because I either made a mistake or do not have enough
fabric. Cut of the height of the cuff plus 3/8" from the bottom of
your trousers (you add the extra 3/8" because the original hem is
1/2").
Step 2: Draw the cuff. The width of the cuff should be the width of
the bottom of the trousers. The height is the height of the elastic
times two plus two times 3/8 seam allowance. For example, if you are
using 1" elastic your cuff should be (2*1"+2*3/8" =) 2 3/4" high. This
is the minimum height, you can, like me make taller cuffs if you like
the look or are out of fabric ;)
Step 3: cut the trouser pieces halfway in two to create a side seam.
This step is only needed if you want to add pockets.
Step 4: Add 3/8" seam allowance to both sides of the cut. The piece
with the smaller curve is the front.
Step 5/6/7: Draw the pocket based on the front leg. The top of the
pocket should align with the waist curve. The left straight line
(blue) is the pocket opening. Measure the width of the hand of
recipient and add 1/2". Make a 90-degree angle and add 3/8" (the seam
allowance.) Finally, draw the outer curve such that the hand will fit
in the pocket. The green line shows how deep the pocket should be. The
exact shape is not that important as long as the blue line is high
enough such that the hand can go in the pocket and the top should
align with the trousers. I remember being nervous drawing my first
inseam pocket, so if you are as well that is fine. As long as you
stick to the basic rules: top of the pocket being the same as the top
of the trousers and taking into account the size of the hand, it will
work.
Step 8: Place one pocket on a pants piece, right sides facing (the
green indicates the wrong side of the fabric). Sew on the 3/8"seam
allowance from the top to the bottom of the pocket. Repeat for the
other three legs.
Step 9: Place a front and back leg on top of each other, right sides
facing.
Step 10: Sew around the curve of the pocket all the way down to the
bottom of the pants.
Step 11: The side seam is now closed except for the top. To make
adding the waistband easier, it is recommended to make a temporary
basting stitch at the top of the trousers such that the top is also
connected. Lay the leg pieces precisely next to each other at the top.
Alighn the top of the pockets to the top of the front legs (the
pockets are therefore laying under the front leg pieces). Make a
temporary basting stitch in the seam allowance at the top of the
pants. Continue the standard pant's instructions.
For the elastic cuff: measure your elastic by determining what is
comfortable on the ankle of your recipient and also goes over the
foot! The cuff is added in the end and is attached the same way as the
waistband (check the instructions of the pattern). Close the
band into a loop. Fold in on itself to only have the right sides out.
Sew it to the bottom of the trousers but keep a small hole. Pull the
elastic through (with a safety pin or your other preferred tool to
pull elastic though). Hand stitch the hole closed.
Foliis as a short sweater:
Step 12: Take off 3/8 seam allowance from the front, and cut that
piece on the fold as well.
Step 13: I wanted the sweater to be a bit longer than the cropped top
so I ADDED 3/8" to the bottom of the front and back. This will result
in a truly short sweater, so you can also add 2" and you will still
have a rather short sweater. I made the waistband in the same
fabric, not in ribbing, so I redrafted the waistband to exactly match
the bottom of the bodice. Cut two on the fold; this way you will have
two seams aligning with the side seams. Add the waistband according to
the instructions but now you can sew all around like with the sleeve
cuffs.
Step 14/15: Now that the front does not have a zipper, you have to
slightly adjust the construction of the hood. It will require a bit of
extra hand sewing. Before attaching the out hood in step 25, first,
fold the front curve 3/8" inwards, the curve that will be against the
face. Iron the 3/8" flat. Pin the outer hood to the neckline and make
the folded edges meet, sew in place around the entire neckline.
When you are adding the lining (in step 26 and 27) you will not be able
to pin and sew down entirely until the neckline. Just leave 2"open and
close that by hand as well.
Hopefully I have inspired you to hack even more!
Thank you so much Miranda!!! Your pattern hacking skills are so useful to make exactly the items your children love and most importantly, WEAR! I know I'll be using that pocket tutorial...so helpful!
Today's giveaway:
Enter to win 2 patterns of your choice from the Project Run & Play shop in and of these 2 ways:
Today you're in for a treat! Susana of Suco by Susana took her favorite elements from three dresses and mashed them all into one completely amazing dress! And the best part? She's got a tutorial for us so we can make this dress too!! (Be sure to scroll to the end for today's giveaway information.) Here's Susana:
I'm a big fan of hacking patterns, from the most simple hacks (like shortening a dress skirt to become a blouse) to some more complex hacks. Sometimes it goes well and sometimes it doesn't, but I always learn something with it.
For this blog tour the challenge was to do a hack, simple or not, so I went all out and made one dress using elements from three patterns. I like how it turned out and my daughter loves it. The three patterns used for this are the:
It's summer here right now and I'm already sewing my children's cold weather clothes so I wanted to make a dress with the bodice in warm cotton vyiella and the skirt in a drapey thin corduroy.
For the bodice I used the Maria Blouse pattern. I love how it fits my daughter and I've hacked it into a dress twice before. One of my favorite ways to hack this pattern is by moving the button placket to the back and having a solid front. The first time I did this was for the blue dress that I made for Season 20 week 2. Just like on that dress this time I also omitted the collar and finished the neckline with self-made bias. So here's how to do it:
Print out the front pattern piece for the blouse and measure the width of the placket and the width to the center front. The pattern measures 4cm from the center front to the edge, 3cm of which are to fold back the placket.
Transfer those measurements to the back pattern piece, adding them to the center back. The back piece will now be cut twice mirrored instead of on the fold.
On the front piece fold back the placket up to the center front mark (where the button holes were). The front piece will now be cut once on the fold.
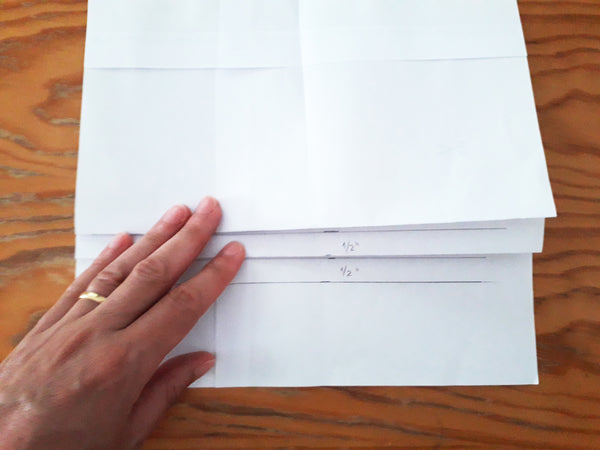
One detail that I particularly love about the D'Anjou Dress is the pleats, so I added two horizontal pleats to the bottom of the bodice. I haven't made pleats many times before and I always get confused when I start calculating and sewing them, so I find it helpful to make a visual aid with paper first.
On the D'Anjou dress the pleats measure 1/2", so I went along with that measurement too. Draw several paralel lines 1/2" apart until you can fold them down to create two pleats. This means seven lines measuring a total of 3". This is what needs to be added to the bottom of the bodice.
On the front and back bodice add those 3" down from the cutting line marked on the pattern. Add another 1cm as seam allowance, and cut the pattern pieces along that line.
These are the finished bodice pattern pieces.
To make the dress you'll also need the sleeves of the Maria blouse, the skirt of the D'Anjou dress (or lengthen the peplum of the Maria Blouse), and the pocket from the Odeline dress.
Cut out your fabric and the bodice part should look like this: two mirrored sleeves, one front on fold, two mirrored backs, self-made bias tape and fusible interfacing for the button placket.
Start by sewing the bodice according to the instructions of the Maria Blouse. Because you're not making a collar, finish the neckline with the bias tape:
Fold the tape in half wrong sides together
Fold the placket to the right side of the back as shown below and
Pin tape to the right side of neckline, pining it on top of the folded placket, and sew
Trim back the seam allowance and clip notches to reduce bulk
Fold the bias tape down to the wrong side of the bodice, folding the plackets along with it.
Pin the bias tape along the neckline and sew. I messed up when placing the tag in this photo and sewed it to the center front. I unpicked it later and sewed it in the correct place, on the back of the bodice.
The neckline is all done and you can continue following the instructions on the pattern.
With the sleeves and side seams sewn it's now time to make the pleats on the bottom of the bodice. To make it easier draw all the lines with a removable pen or tailor's chalk. Now start from the bottom and work your way up:
Fold the first pleat wrong sides together, sew and press it down.
Fold the second pleat in the same way, sew and press down.
Sew the button holes on the right placket and the buttons on the left placket, and the bodice should look like this.
For the skirt, cut two skirt pieces and two pockets.
Sew the skirt along the side seams, right sides together.
Finish the top raw edge of the pockets, fold it 2cm down to the wrong side and sew.
Finish both side raw edges and press them 1cm (3/8") in to the wrong side.
Place each pocket on the side seams of the skirt, aligning the center top and bottom of the pocket with the side seam of the skirt, and the bottom raw edges of the pocket and skirt together.
Topstitch the sides of the pocket to the skirt and baste the bottom.
Then gather the top of the skirt, pin it to the bodice right sides together and sew. Finish the hem of the skirt, fold it 2.5cm (1") to the wrong side and topstitch.
Give it a good press and the dress is all done.
I love those big pockets and think that they give a fun look to a classical looking dress.
Thank you so much Susana! What a special dress! Today's giveaway:
Enter to win 2 patterns of your choice from the Project Run & Play shop in and of these 2 ways: