
mamacitamax said...
I also needed to post a correction. I phrased this week's theme as being Halloween and Dress-Up, but initially when emailing the info to all of the designers, I listed it as Halloween and Harvest. I thought the idea of some beautiful harvest inspired outfits would be great as well so don't think anyone is cheating because they didn't do a costume! Now that that is out of the way, enjoy! :)
Jessica G.'s Changing Leaves -
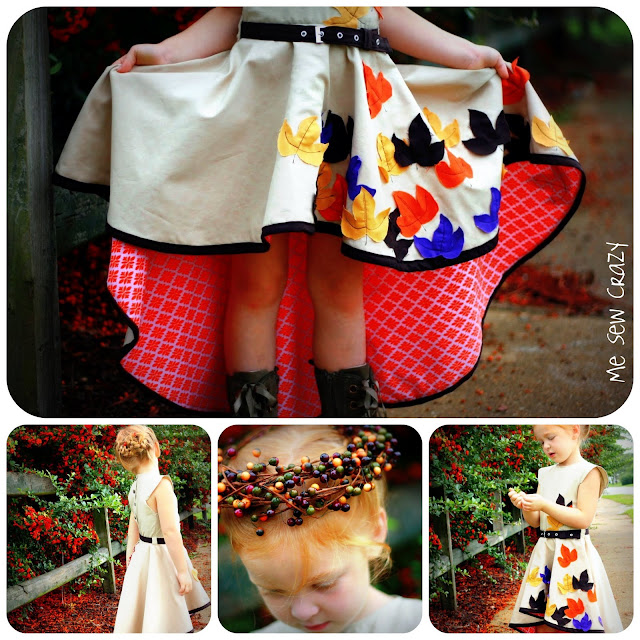
I contemplated this Halloween / Harvest Theme for quite some time before deciding upon a design. I really wanted to do a costume, but for the life of me just couldn't think of a single thing that I actually WANTED to make. While we do celebrate Halloween in my house, I ended up leaning towards the Harvest theme....and who doesn't love the changing colors of the leaves in Fall?!!
I wanted my dress to be extremely tailored, yet whimsical at the same time. Throughout the competition I have strived to keep my looks true to myself, things that my children would actually wear on a daily basis. But for this particular week, seeing as how it is costume inspired, I thought I would push the edges ever so slightly.

With a tailored fitting bodice, cap sleeves, and off kilter circle skirt with alternate lining, this dress pulled off the exact look I was going for. I also handmade the belt as I wanted it to match the bias trim exactly, and appliqued the hand cut leaves. Lastly, this dress officially ended my fears of the dreaded button foot...I used it for the first time because 17 buttons is no joke! I don't know if I will ever hand sew a button on again now - lol.
Although I may not see my daughter wearing this particular dress for any reason outside of this competition...unless you know of an upcoming Harvest Fair in which my daughter can be a part of! I can see changing the fabric / colors / appliques to make it more appropriate as a flower girl dress for a wedding! Which makes me feel like I have ultimately done my job as a designer.

For more pictures from this Photo Shoot, please head on over to Me Sew Crazy! Thank you so much, and I hope you like it!
Alida's Cruella Deville:
I had a major "make it work" moment this week when Caroline fell down the stairs and broke her arm :-( The poor baby has a fracture in each bone above her wrist. To make matters worse, her cast couldn't fit into the sleeve of her Cruella coat! I had to run to my craft room and re-do the whole thing and make a poncho, which actually turned out pretty cute!
She looks a little disheveled here, this is actually the last shot of the shoot as she was taking the poncho off, but Ellie looked up at me and smiled and I just couldn't help but include it.


Look at that face...totally Cruella!

Make sure to visit me at I Make Stuff for more photos and details about our botched photo shoot. (What? A 2-year-old with a broken arm and a teething baby don't make great models? Sheesh, I shoulda hired professionals.)
Simple Simon and Co--Disney's Up

When we heard that costumes were on the agenda, we both knew exactly the costumes that we wanted to make---- you see in our community this summer we have had Disney UP-mania. A local builder, built a life-sized Up house that is awesome and amazing....and we wanted to make some amazing UP! costumes to go with it. So, here is our Carl and Ellie Fredricksen.

For Carl's outfit, we wanted to go with his iconic look in the movie. It is complete with some wide-leg, chocolate brown trousers, with extra, extra large cuffs at the bottom to mimic his pants in the movie. He has his vintage "Dick and Jane" shirt on with handmade suspenders and a bowtie, and with his stylish glasses--we think he is one cute Carl.

iCandy - DJ Lance


Look at that face...totally Cruella!
Make sure to visit me at I Make Stuff for more photos and details about our botched photo shoot. (What? A 2-year-old with a broken arm and a teething baby don't make great models? Sheesh, I shoulda hired professionals.)
Simple Simon and Co--Disney's Up
Young Ellie to Young Carl: You don’t talk much. [ long pause] I like you!
When we heard that costumes were on the agenda, we both knew exactly the costumes that we wanted to make---- you see in our community this summer we have had Disney UP-mania. A local builder, built a life-sized Up house that is awesome and amazing....and we wanted to make some amazing UP! costumes to go with it. So, here is our Carl and Ellie Fredricksen.
For Carl's outfit, we wanted to go with his iconic look in the movie. It is complete with some wide-leg, chocolate brown trousers, with extra, extra large cuffs at the bottom to mimic his pants in the movie. He has his vintage "Dick and Jane" shirt on with handmade suspenders and a bowtie, and with his stylish glasses--we think he is one cute Carl.
And our darling Ellie has one of our favorite dresses from the movie-- the picnic scene under a tree in the opening vignette. Her 60's mod jumper dress has a fitted bodice, with a full twirly skirt, added sash and some extra large buttons. As our weather is sometimes very iffy in October, she has an added white peasant shirt to keep her a little warmer.
To read more about each of these looks, head over to Simple Simon & Co today.
What a fun adventure day we had. Carl and Ellie, dozens of balloons, and two very happy kids running around playing out every movie scene.
And our hope for these kids....it's the same as Ellie's last message to Carl.
Thanks for the adventure. Now go have one of your own.
iCandy - DJ Lance
This week, we were challenged to create a halloween costume or harvest look.
I was super excited because Halloween is one of my favorite holidays and I love making costumes!
All of our kids already had plans for their costumes, except for my youngest,
so we thought we would create a costume just for him.
After tossing aside idea after idea, one night, it came to me.
It was perfect.
Autie (and everyone else I shared the idea with)
LOVED it.
So we got to work.

Autie is the genius behind the hat, isn't it perfect??
She made the pattern, we bought some crazy expensive orange fur, and added some foam stars.

Painted thrifted shoes, a foam faux-belt-buckle, thrifted painted glasses (which didn't stay on very long), and handmade orange, yellow and white jammies complete the look.

And yes, if you're wondering, this really is the Yo Gabba Gabba set. We have friends in high places....
:)
Come visit us at iCandy handmade for more details!


