
Hello! I'm Cherie from you & mie and I'm so excited to be here on Project Run & Play! Before the Project Run & Play sew-along began, I had just started dabbling in making children's clothing. But seeing all the amazing work of the competitors and being able to participate with the fantastic sew-alongers really pushed me to a whole new level. I've been challenged to try so many new things and learned so much in the last 6 months. Not only that, but I've joined an amazing community of talented and brilliant sewists and bloggers. So I have Project Run & Play and the ladies behind it, liZ and Elizabeth, to thank for so much of what I've done! Thanks for everything and for inviting me here today!
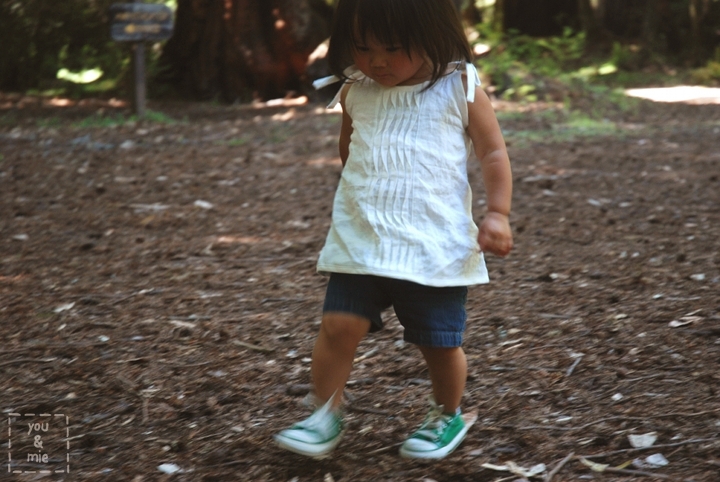
Summer weather is upon us and my daughter needs lots of warm weather tops for outdoor play this season. I'm going to share a tutorial for my latest top, the Summer Breezes Top.

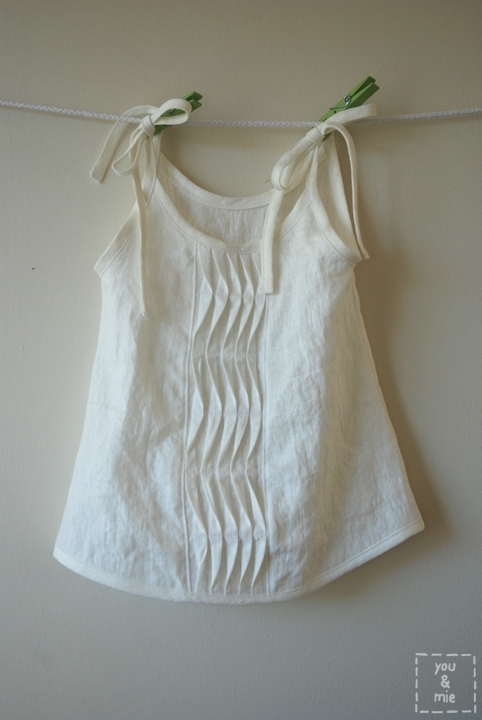
I saw a tank top in a store about a year ago that used this type of "wavy pleats" (as I like to call them). I knew I wanted to copy the style, but wasn't sure how I wanted to do it. Recently, this technique started popping up around blogland and I decided it was time to share my take on it as well. The waves created by the changing directions of the pleats reminded me of a summer's breeze, hence the name of the top.
The top is made of white linen, which at the time seemed like the perfect simple breezy summer top. But now I'm kicking myself wondering what I was thinking! A white top for a messy, dirt-loving toddler made of linen, the most wrinkly fabric ever? Awesome job, Cherie. Nice. So I'll let you choose whatever is appropriate for your kiddo.
This top is finished off with bias tape, so feel free to make your own or use store-bought in either a matching or contrasting color/pattern. Feel free to brighten it up with some colors!
Ok, let's make one together! Here's what you'll need:
3/4-1 yard of lightweight fabric
A few yards of bias tape (store bought or homemade)
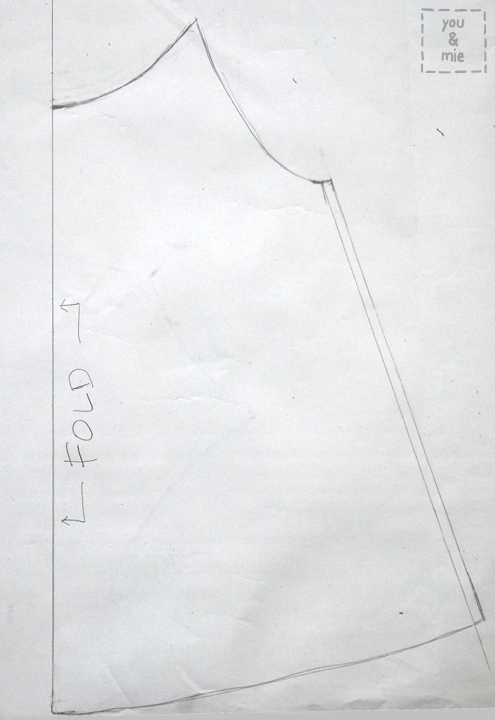
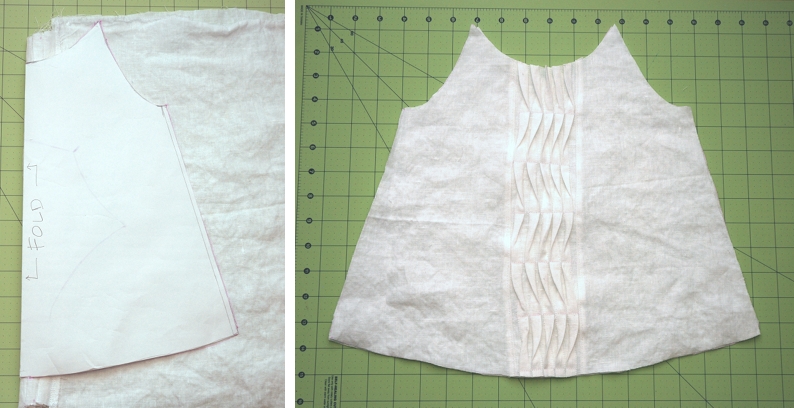
First you have to make your pattern. I have to admit, I don't have an exact science for this, so I hope you can experiment with drafting your own. To keep it simple, I made one pattern to use for both the front and back of the top.
I started with a straight vertical line which is the center fold of the pattern piece. Then I used a top that fit my daughter and traced the neckline. Mark the bottom of the arm hole and draw a curved line up to meet the neckline. From the bottom of the armhole, draw a line (I flared mine out slightly for an A-line shape) that is the desired length of the top. From there, draw a slight curve back to the vertical center line. You will not need to add seam allowance to the neckline, armhole or bottom since we'll be finishing these off with bias tape. You will want to add seam allowance along the side seam. And there's your pattern!
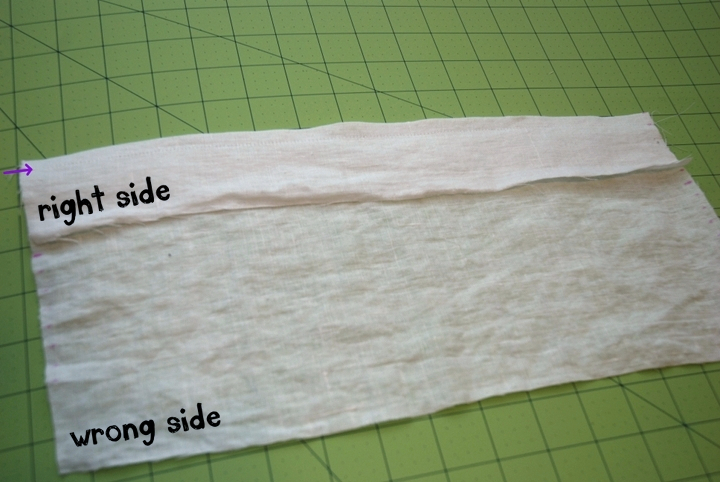
Now we'll make the pleated placket (I'm not really sure what else to call it). Cut a rectangle out of your main fabric that is at least 8 inches wide and a couple inches longer than the length of your pattern.

Find the center of your rectangle by folding it in half lengthwise and marking it. I wanted my pleats to be 1 cm each, so I made 7 marks on either side of the center, each 1 cm apart. Do the same on the bottom of the rectangle.

Starting from the left, make your pleats. Folding your fabric with wrong sides together, the first and third marking should match up and the 2nd mark is where the fold is.

Press your fold and sew along the length of the fabric 1 cm from the folded edge.
Press your pleat and fold it down toward the right. Make your next pleat using the next three markings and continue until you have five pleats.

When they are all pressed down toward the right, they should look like this.
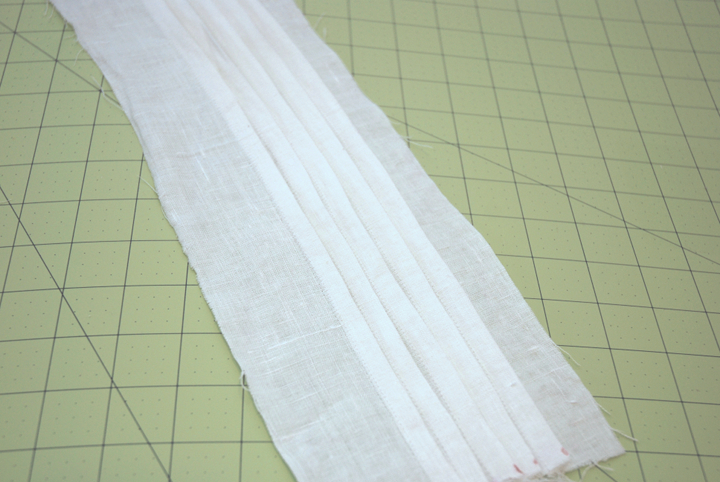
Sew a line across the top of the pleats about 1 inch down from the top. Change the direction of your pleats by folding them towards the left. Mark a line 2 inches down from your first line with chalk and sew.

Continue changing the direction and sewing down the pleats every 2 inches until you get to the bottom.

Cut out two pieces of fabric that are each larger than your pattern piece. We're going to attach the pleated placket before cutting out the pattern piece (less math).

Trim the edges of your placket piece to about 1/2 an inch on either side. With right sides together, sew the placket to the edge of one piece of fabric, and then repeat with the other side.
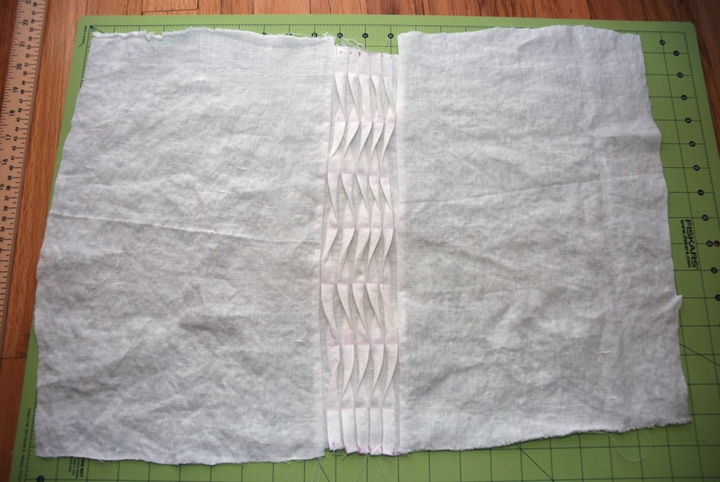
On the wrong side, trim the seam allowance to 1/4 inch and finish by serging or zig zag stitching. Press away from the placket, then on the right side, top stitch along the edge of the placket.

Fold your fabric in half, making sure to fold right down the center of your pleated placket and trace your pattern piece. Cut it out. Cut out the back piece from a piece of fabric as well.
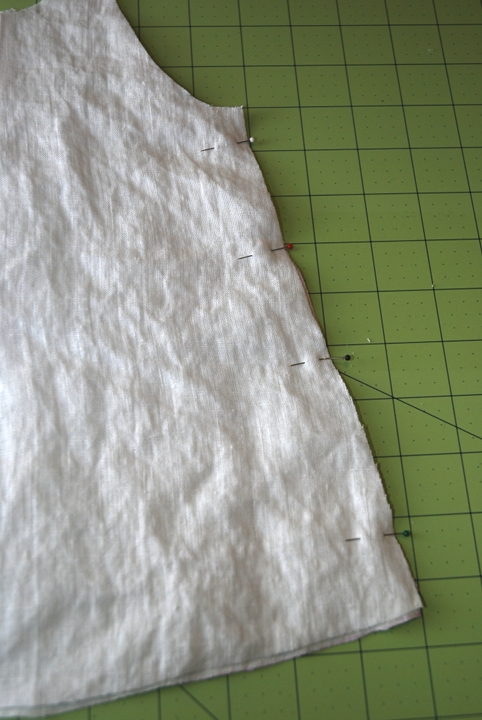
Pin the sides of the top, right sides together, sew, press and finish edge. Repeat on other side.
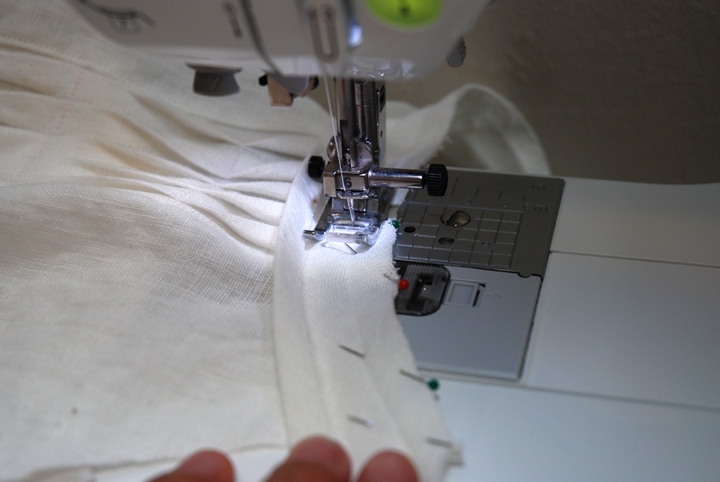
Baste the pleats along the neckline of the top to keep them folded in the correct direction.

Open up your bias tape and pin it along the edge of the neckline, right sides together. Sew along the fold closest to the edge.
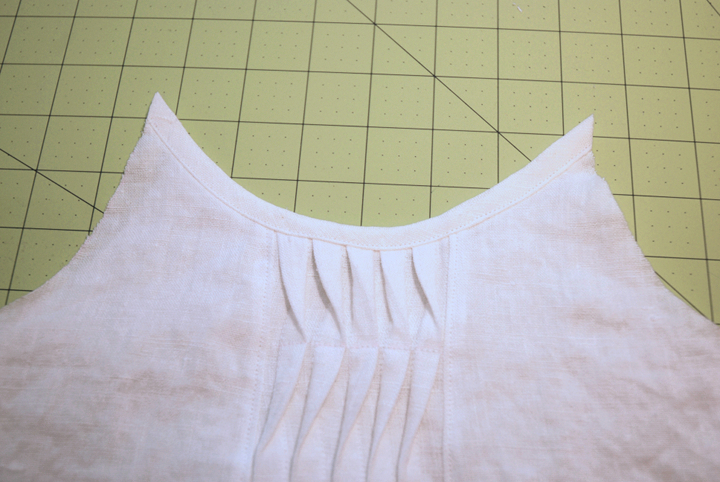
Fold the bias tape over the edge of the neckline, press and pin. Make sure the edge of the bias tape is covering the stitching on the wrong side.

Top stitch just above the edge of the bias tape making sure to catch the edge on the wrong side. Trim off the extra bias tape and repeat for the back.
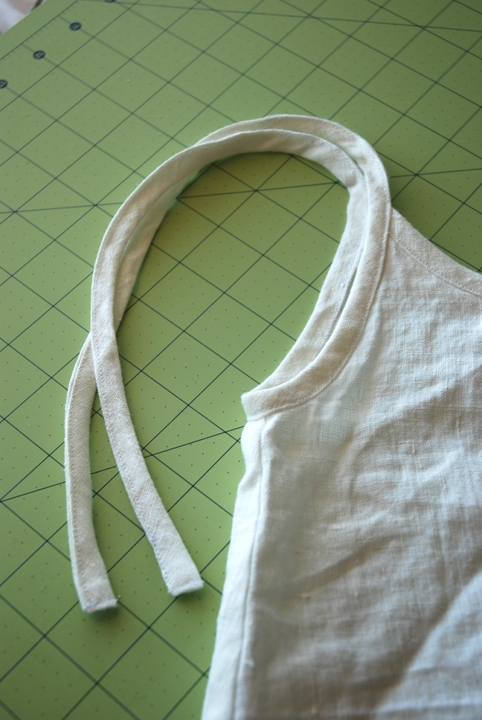
For the armholes and straps, we'll do the same thing. Leave about 12 inches of bias tape for the strap then start pinning the open tape to the edge of the armhole. Measure another 12 inches of bias tape when you get to the other end of the armhole and cut. Sew the bias tape along the armhole, fold the bias tape back up and when you get to end of the straps, fold it in about a 1/4 inch before folding it up.

Sew the ends of the straps closed, then top stitch along the edge of the bias tape closing up the straps and finishing the armhole.
For the bottom of the shirt, normally I'd just hem it by folding it up twice, but with all the extra pleated fabric, I thought it'd get too thick, so I finished it with bias tape as well.

Done!

I hope you enjoy some nice summer weather and I'd love if you stopped by you & mie to say "hi" some time! Thanks for letting me join in on the fun! - Cherie

What a cute top, Cherie! Thanks for sharing such a great tutorial. I've been tempted to try some cool pleats like this, and I think you've convinced me to give it a go! :)
ReplyDeleteAmazing! I'll definitely be trying this technique. Thank you so much for the great tutorial!
ReplyDeleteCherie - I am so in love with this top! Seriously, everything you make is just fabulous. So well done!
ReplyDeleteOh this is just beautiful! Here's an old trick for saving white kids clothes after they stain them : Rit dye. This would be great in a soft blue. Thanks for the tutorial!
ReplyDeleteTotally!! I just dyed a pair of white shorts that had strawberry stains on them. Let's see how many times she can wear this before it's given new life - and I think blue would be perfect!!
DeleteSo lovely, Cherie! I'm definitely going to try the pleating technique. Adorable!
ReplyDeleteThis is a great top, I'm going to mix your tutorial for the wavy pleats with Colette Patterns' Sorbetto top and make a shirt for me! :)
ReplyDeleteGreat idea! I was thinking this could definitely be made into an adult top too!
DeleteI love everything about this top! I have a weakness for dressing my children in white, so not practical but so summery and fresh looking. This one is definitely going on my to do list. Thanks for sharing!
ReplyDeleteShut up Cherie!!! This is way too cute.
ReplyDeletelove love love! I want one for me. :) thanks for the great tutorial!
ReplyDeleteLOVE this!!
ReplyDeleteI love this Cherie and one of my favorite things are white linen in the summer, even if it only stays clean for a half an hour! 15 minutes with my kid maybe. Those wavy pleats are very chic.
ReplyDeleteOh my gosh this is the cutest shirt!!!!! I want to wavy pleat everything now! Great tutorial! I LOVE little kids in white, even though it's not always super practical. :)
ReplyDeleteThanks for having me! I've had so much fun sewing along with ALL you ladies!
ReplyDeleteAh, gorgeous!!! What a great tute!! And I love white, too - the linen is lovely, even if you have to iron it 10 times a day. Thanks so much for sharing!
ReplyDeletePerfect perfect top! I feel so inspired! Great job Cherie and great tutorial as well :).
ReplyDeleteLove this! And your daughter is the cutest model out there!
ReplyDeleteWow, love this! Great job and technique!
ReplyDeleteLOVE it, Cherie!!! Adorable and great job explaining everything! :)
ReplyDeleteSign this girl up for Season 5! ;) Cherie, you are so awesome - I'm so glad you started sewing along for PR&P so I could find you and we could be friends! Great tutorial and way cute project.
ReplyDeleteI love this!!! Want to make one for myself too!
ReplyDeletelove this!! thanks for sharing, Cherie :)
ReplyDeleteThis is great! I especially love the advice to sew the pleated panel into the fabric and then cut out your pattern piece--it seems to me that this technique could be adapted to add such a panel to a variety of different garments/locations.
ReplyDeletewow, i love this top, those pleats are the coolest! i have to agree with kristin, i hope to see you on pr&p season 5!!
ReplyDeleteLove this pleating technique. Must try it! Thanks for always bringing something refreshing and inspiring to the table!
ReplyDeleteI think my daugther is going to be a proud owner of a summer breze top very soon!!! I been hoarding a cut of white linen for as long as i can remember, and i think that can be enough fabric to try one for myself too!!! Thanks Cherie, this top reminds me why i follow your blog, you are fantastic!!!
ReplyDeleteVery nice Cherie. This reminds me of my sparkle's fishy looking tutorial! Love those wavy pleats!
ReplyDeleteLove the pleats, the top and the wee one. Too cute for words. Ok, maybe a little prone to stains, but it looks so devastatingly cute in this fabric, worth it. Actually, linen may not be a prone to staining as other fabrics. Vague recollection of learning that once. How about a grown up dress to match?
ReplyDeleteThis is fantastic. I love the simple color. Thanks for sharing how to make the pleats.
ReplyDeletevery cute, great job!
ReplyDeleteThis is adorable! I love the simple shirt and the tutorial is amazing. I just wanted to let you know that I am featuring this on my blog for fun find friday tomorrow.
ReplyDeleteacouplecraftaddicts.blogspot.com
Thanks!!! I'm so glad you like it!
DeleteThis is such a nice top...featured it her
ReplyDeletehttp://sewprettysewfree.blogspot.com/2012/06/summer-breezes-top.html
Aww, thank you!
DeleteAmazing job. You really made a tricky bit of pleating look so easy! And it's just adorable on your sweet model!
ReplyDeleteLove the idea! I am going to make a modified version for myself, to wear to work at a law firm. It will look elegant and clean with a suit. Plus it is a vertical design, which means it should be elongating and therefore slimming. Thank you!
ReplyDeleteBefore I saw the cute little model, I thought this was an adult tank. I think it would look good both ways! Nice job and explanation.
ReplyDeleteLove this tutorial. Thank you!
ReplyDelete