
Wow, this Season has simply flown past! It's not possible that it's Week 4 already, is it? Well, the designers have sewn up their Signature Style looks, so it must be true!
Be sure to scroll all the way to the end of the post so you can support them with your vote.
Made of Starlite - Princess Academy

The very first dress I ever sewed for my daughter was a Cinderella inspired dress that she could wear to church. She was 4 months old and I was feeling sad that I couldn't afford all the cute dresses at Baby Gap, so I rummaged through my stash (aka old diaper box with fabric left-over from making Halloween costumes) pulled out a dress to trace for a pattern, and set to work! It was beautiful, if not very practical (she couldn't wear it in the carseat because I put a huge bow on the back) and thus began my quest to make princess dresses that she could wear every day of her life! 🤩🤩 I've made three or four since then, some for her and some for friends, but signature style week, with an excuse to make a whole collection of princess inspired outfits was too good an opportunity to pass up! My main problem, as you can plainly see, was narrowing down *which* princesses to do for this particular collection. 😃 I won't lie and pretend I don't have six more outfits and models lined up for as soon as I can sew them!!

With my little finally in kindergarten, she is trying to wear all her favorite dresses to school. Not that I don't think floor-length ballgowns are playground appropriate, but I designed this collection with the idea that she would be allowed to wear all of them to school whenever she felt like it! Granted, some of them are put away for future years, since I asked friends and cousins who resemble particular princesses to be my models for this shoot, and they are not all size 5. I blew my entire pre-season shopping spree at Cali Fabrics for this collection, and rounded it out with a few special purchases from Etsy (sequin tiger applique!! Iridescent vinyl!!) and my (much more significant) stash.

You can visit my blog for more details on pattern hacks and specific fabric info, but given the sheer number of patterns I used, I'm just going to list them for you!
- Cinderella- Marissa dress by Violette Field Threads // Talula tee by Violette Field Threads // Sonora skirt by Lil Luxe Collection // Magali Backpack by I Think Sew
- Jasmine- Bomber jacket Burda Style pattern #133 // Tatum dress by Violette Field Threads // Cali separates by Lil Luxe Collection // drawstring bag from Made Everyday tutorial
- Elsa- Fulton cardigan by Lil Luxe Collection // Basic tee by Lil Luxe Collection // Slim Trousers by Lil Luxe Collection
- Anna- Talulah tee by Violette Field Threads // Brooklyn overalls by Violette Field Threads
- Belle- Margot tunic by Violette Field Threads // Poppy dress by Violette Field Threads // Rocky Shore tights by Sofiona Designs
- Ariel- Ivy bodysuit by Violette Field Threads // Talulah tee by Violette Field Threads // Rocky Shore tights by Sofiona Designs // Petunia purse by Violette Field Threads

Thank you thank you SO much for all your votes and kind words that have gotten me this far! Please be sure to visit Made of Starlite for an extra detailed account of the journey that was this collection, and soooooo many more photos!!
Love Hazel Grace Designs - Dreaming of Christmas

It is the final week of Season 21 of Project Run and Play and never in my wildest dreams did I suspect I would still be showing off my creations! Thank you everyone for all your love and support!
This weeks sewing prompt is Signature Style and my signature style for my kids started 10 years ago when I went looking for matching Christmas clothes for my boy/girl twins and could not find any. I took my sewing skills and made them multiple matching outfits for not just Christmas but Easter, their birthdays and any other holiday! Since Christmas is my favorite holiday and has been since I was a little girl, I decided to make Hazel her Christmas Eve to Christmas Day wardrobe! If only my older kids would let me still do this for them as well! Hazel's Christmas Eve to Christmas Day wardrobe consists of her Christmas Eve dress and fancy winter coat to wear over it, her Christmas Eve pj's and a fun outfit to hang out in on Christmas Day!
Hazel's Christmas Eve dress is a vintage inspired sleeveless dress with princess seams, a round collar that ends in points near the invisible zipper and a pleated circle skirt. The front of the dress is accented with snowflake buttons added to the collar and a bow made out of the same red satin on her left side. To make the dress, I started out with a princess seam pattern I have been working on, and I cut it at Hazel's natural waist. I have a pattern that is no longer in print with a pleated circle skirt and so I added that skirt making changes to the pleats as necessary to fit the bodice! I drafted the collar to match one I liked in a picture to fit around the neckline and end at the invisible zipper in the back. After fully lining the dress and adding an invisible zipper, I felt the dress needed a little something more so I added the snowflake buttons on the collar and the bow to finished the look. The red shatung satin came from Cali-Fabrics online! It is absolutely gorgeous and was easier to sew with than I expected! I also sewed black lace tights to complete the look using Abby's Footed Tights pattern from The Wolf and The Tree!

After completing the dress I thought this would be the time to sew the vintage 1940's swing coat I had always dreamed of sewing. I used black lux fleece for the outer of the coat and cotton to line the coat, so that it could be easily washed and dried! The pattern is a 1949 Simplicity pattern that I bought 10 years ago on Etsy and the instructions literally fell apart in my hands when I pulled them out of the envelope. I added the full lining as the coat only had facings in the pattern. Snaps were used to keep the cape on the coat or make it removable if it is just too much at the time. Hazel always loves a little sparkle so I used some rhinestone heart buttons I had been saving to add a little sparkle to the coat! It is the perfect coat to go over her fancy dress!
After we get home from Christmas Eve service at church, my kids all run to get their special Christmas Eve pj's so we can make a cake for the next day and then read the Night Before Christmas and The First Christmas stories before bed. Hazel likes slim fit pants with pockets, which is not the typical flannel pajama pant. I took a basic pants sloper and slimmed it down adding pockets to the front of the pants. For the waistband, instead of the usual fold over one, I added a yoga waistband which hopefully makes life easier at Christmas time as we hope to be potty training then! For the shirt I used the set-in sleeve option for my basic t-shirt pattern still in production. Due to this look being one I didn't plan on when sketching out looks, I pulled both the flannel for the pants and the knit for the shirt from my stash! I used my Cricut Maker and some heat transfer vinyl to cut out an svg design I purchased from Kingsbury Bespoke on Etsy and added it to the shirt.

Christmas Day is spent eating cake (Jesus' birthday) and lazily opening gifts at our own pace. The whole family likes to be comfortable for the day and Hazel is no exception! Hazel will pick a shirt that looks like a dress before she will pick a t-shirt or any other shirt so I thought it would be fun to make a more casual "dress" type look for her shirt as well as some leggings to wear with it! Again I started with my t-shirt pattern, this time with the long puffed sleeves, and chopped it at about where an empire seam would hit thinking I could add a "skirt" to it there! To add some details to the shirt, the "skirt" portion has a rolled hem on the top, gathered and sewn to the outside of the shirt. The sleeves and skirt portion are finished with a narrow cover-stitch. The fabric I used for the shirt is the same fabric I used for the dress I made for Hazel to wear home from the hospital when she was born! I love this fabric and know for sure I bought it at JoAnn Fabrics many many years ago. To go with this top, I made leggings from a leggings pattern I have been working on with a yoga waistband and bows made from the top material at the hem. The fabric for the leggings came from my stash as well!

For the first time ever one of my kids is ready for Christmas months in advance and not hours in advance! Thank you very much for letting me share part of who I am with you these last 4 weeks. I appreciate it so much and thank you for always being willing to see my looks even with my 2 year old model! To read more about the patterns and fabric used check out my blog post.
Striped Swallow Designs - Boho-Chic
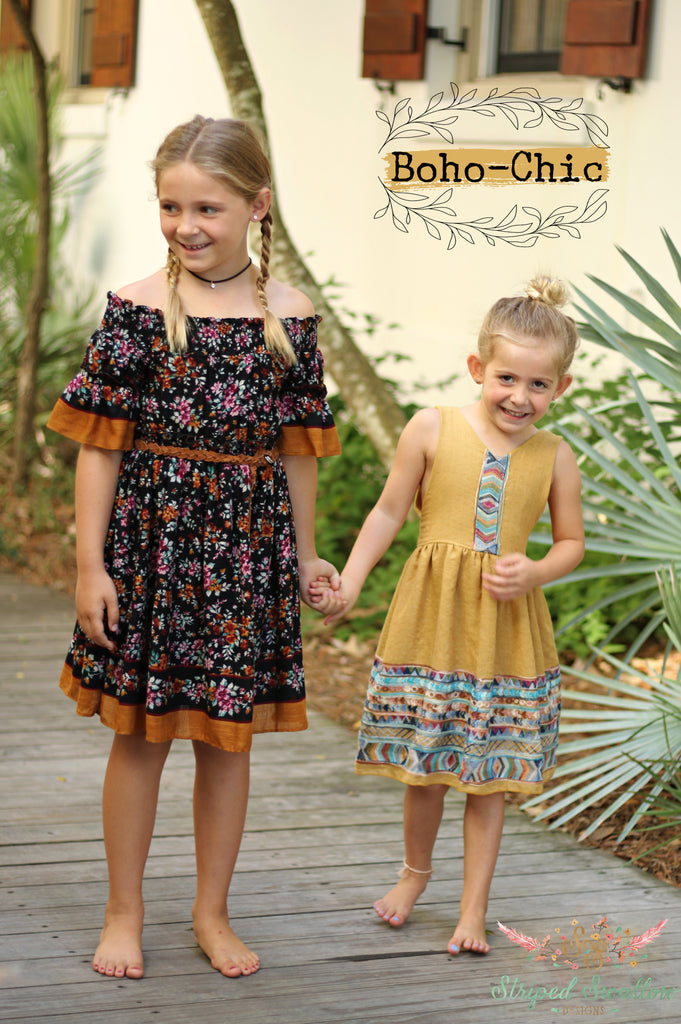
Wow, I can't believe Week 4 is already here and I've made it this far! When I heard week 4's theme -- Signature Style, I was excited to show off my style. I definitely have a particular style which is very Bohemian. I love all Boho styles -- the effortless, relaxed fashion and all the use of various decorative trims, fringe, pompoms, tassels and embroidery to name a few. This week I wanted to share my vision of Boho-Chic with you all.

Bohemian designs incorporate a lot of ethnic, folk and floral patterns. So when choosing fabrics for this week I wanted to show two different boho styles which led me to make one dress in floral and the other using a fabric with gorgeous embroidery details. Fun fact -- both of these fabrics are actually up-cycled from RTW kimonos. I had ordered a mustard kimono a few months back and tried it on and it was just too big on me so I was going to return it. Before I put it in the mail though, I thought why not keep it to cut up and sew a top for myself because I was obsessed with this fabric. While on the hunt for a floral fabric to pair with the mustard dress for this week, I ended up coming across another kimono that I thought would be perfect. Pics of the kimonos prior to me cutting in to them are over on my blog.

For the first dress, I drafted a sweet off-the-shoulder dress using one of my favorite techniques, shirring, for a delicate look on the bodice plus it makes it super comfy to wear. The dress can be worn on the shoulders as well. I love fun, unique details so the sleeves I added two ruffled layers with the bottom layer having a rolled hem on the border print. To bring in the chic element I made a braided belt out of suede I found in my stash (from my previous adventure in sewing baby moccasins) and added fringe detailing to it and styled the dress with a simple choker and suede Panama hat.
For the second outfit, I drafted a v-neck dress with a unique back. I had a vision for cross straps with a drapey back bodice that would allow the cross straps to peak through. One of my favorite things about pattern designing is figuring out how to design unique details that you can't simply draft straight from a book. Though it may take a little longer and a few more muslins to figure out, it's so worth it to be able to make garments with such cool design elements. Plus I always feel pretty accomplished once I figure it out. :) That was definitely the case with this back.

Thank you all for your support during this competition! I have had such a blast this season and super grateful to be a part of the Project Run and Play family now! And as always...more pics and details for this week are over on our blog. xo- Mandalynn
And now it's your turn...use the widget below to support the designers.
Wow and wow again!!!
The designers scores are determined as follows:
1/3 of the score is based on YOUR vote
1/3 of the score by this week's celebrity guest judge Amber of Damask Love
1/3 of the score comes from the panel of judges
If you are inspired to sew along, you can link up your creation on the sew along page. (Only 3 days left!!!)

That Boho-Chic is amazing!
ReplyDeleteLove Dreaming of Christmas, there is old and new and so playful too.
ReplyDelete