Showing posts with label Baby. Show all posts
Tuesday, July 21, 2020

Summer Hack-stravaganza: Cobalt Shorts, Thyme Shirt, & Aurora Raglan

The first entry in the Project Run & Play summer Hack-stravaganza is by Audrey.  She hacked 3 patterns to create this adorable brother/sister coordinating look.  (Scroll to the end for today's giveaway information...)


What patterns do you see here?  On the sister we have the Aurora Raglan hacked into a dress with a circle skirt!  On the brother, we have the Thyme Shirt and the Cobalt Shorts; both of which recommend WOVEN fabrics, sewn with KNIT fabrics!  Ready for the details?


Cobalt Shorts woven to knit details:

This was literally the easiest hack ever!  Because the elastic back allows you to fit the finished garment to the child, NO ADJUSTMENTS were needed to change from using a woven fabric to a knit fabric.  I sewed the Bermuda length with the faux fly option.  I did use a stretch stitch when sewing these Cobalt Shorts.  So easy and FUN!


Thyme Shirt woven to knit details:

Again, this was a super duper easy transformation.  When I measured him, he was between sizes, so I decided to use the smaller size since I was using a knit fabric.  It worked out perfectly!  This is the Thyme Shirt with short sleeves.  I used a stretch stitch, and that's the only adjustment needed!  Such a cute shirt and so easy to make with knit fabric.


Big sister got a maxi Aurora Raglan Dress with a skirt skirt.  She hasn't stopped spinning since...

Aurora with a circle skirt details:

I measured to where the waist is on my girl and used the Aurora Raglan pattern pieces for the bodice, sleeves and ties.  Then I used the Aurora pattern's finished measurements chart and my daughter's waist to ankle measurement to calculate the dimensions of a circle skirt using the By Hand London circle skirt calculator app.  (You can also use the Janie Dress pattern pieces for this if you detest math!)  Once I had the circle skirt cut out, it was simply a matter of sewing it to the Aurora Raglan top and hemming it.  Easy peasy!

For fabric links and more photos of these two in their coordinating clothes, please visit Skirt Fixation.

Today's giveaway information:

Enter to win 2 patterns of your choice from the Project Run & Play shop in and of these 3 ways:

Follow Project Run & Play on Instagram and comment on the post with these outfits.
Follow Audrey on Instagram and comment on her post with these outfits.
Leave a comment on this post!  

Winner will be drawn at random on July 24.  


Monday, June 10, 2013

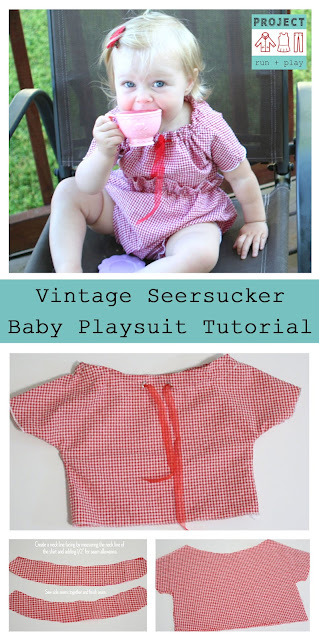
Vintage Seersucker Baby Playsuit Tutorial


Hello PR&P readers!  I'm RaeAnna from Nashville - long time "listener", first time "caller!" :)
Seriously, I am soooooooo excited that this is my first time posting on the Project Run & Play website!
I found out about PR&P during season 4 and fell in love with blogging about kids clothes sewing!  I'm enjoying my own blog growth as I continue sewing for my 3 year old boy and 1 year old girl in my spare time as a stay at home mommy!
 (For all my Project Run & Play sew along looks click here!)


I was inspired by some pictures of 1950's baby clothes and came up with this self drafted playsuit for the summer!  I had some gingham seersucker to use that works great with this design!  And as soon as I made it I have been finding gingham style posts around the internet EVERYWHERE!  LOL!  I'm glad to know I'm "trending"!


You'll need:
existing shirt/bloomers to draft your pattern
fabric
2 metal grommets
elastic
ribbon or bias tape for the drawstring neck tie

Here we go!


This completes your top!  You can use this technique for any of your existing patterns - I think it creates such a cute and "vintage-y" vibe! 

 
Thank you for reading and I would love to have you join me in my sewing adventures on my blog! Come visit my blog today for the tutorial of how I made the bloomers to match!

Cheers!

Sewing Mama RaeAnna Blog

Vintage Seersucker Baby Playsuit Tutorial


Monday, November 28, 2011

Putting New Life into Old Onesies

Today I'm sharing a tutorial I posted a few months ago over at Simple Simon and Company.  It was during the time I was getting things ready for the arrival of baby Ruth.  I was feeling badly about the fact that Ruth would be wearing hand me down onesies that had already gone through two other children so I was looking for ways to spruce them up a bit.


Now Ruth is here and is big enough to wear all the onesies that I worked on and the beet dyed onesies are far and away my favorite.  I love the color and the way they wash and because they've already been broken in they are super, super soft.   

So because Ruth is finally able to wear these and because I really do love them I'm sharing them again over here at Project Run and Play----the highly recommendable beet dyed onesies.
 
That's right. I said "beet dyed onesies".
Weird? Probably. But I didn't start coloring my baby's undershirts with food all at once. There was a method to my madness and it all started here when I made these:

Tea dyed onesies.
And I love them. And I started to think if I could dye them with tea maybe I could dye them with other staining foods....like beets. Which coincidentally are delicious to eat when chilled and pickled. And even better when mixed with spinach and peas and blue cheese and where was I? Oh yea...staining clothes.

So I tried the beets. I used the same steps as I did with the tea dying but used beet juice from canned beets instead. (You can find those steps and instructions here  )

The outcome looked like this:
I left one onesie in longer than the other and you can tell...I like the darker one better. It came out a nice, dusty, muted, rose color that I really like.
And then of course I added trims and lace and stuff.

I am happy with the results and I'll feel a lot better about putting my baby Ruth in these redone onesies than the dingy hand-me-downs they started out as.

PS---I'm planning a little experiment with some other foods as well...like tomatoes...I'm hoping for a nice orangy red. But we'll see. It may be a sad, soggy craft fail.

Note:  I tried the tomatoes---I could never get it to stain/dye evenly and couldn't get the color darker than like an orangy peach.  However, when I originally posted this I got some awesome suggestions about dying with other types of food and undoubtedly there will be more tutorials to come.