Showing posts with label Boys. Show all posts
Monday, November 15, 2021

Prose & Poetry Joggers Zip Fly Tutorial: Audrey from Skirt Fixation

 Prose Zip Fly tutorial

Today we have Audrey from Skirt Fixation joining us with a really cool zip fly hack for the Prose & Poetry Joggers. This pattern is on sale all month long. You can find the code for $3 off by signing up for our newsletter


Hi, I'm Audrey from Skirt Fixation and I am excited to show you how to add a zip fly to your Prose and Poetry Joggers. Let's get started! 


Step 1: Finish raw edges of fly on both fronts using a serger or zig zag stitch.


Step 2: With the right sides together, sew the front together between the pins.


Step 3: Create fly shield: Cut a rectangle 5 inches wide by 1 inch longer than your fly.


Step 4: Fold the fly shield in 1/2 with the wrong sides together and finish the long and bottom edges.


Step 5:  Place zipper with the bottom stop 3/4” above the bottom of the zip fly with the zipper facing up.

  Sew the zipper to the shield along edge of the zipper closest to the finished edge of the zipper fly.


Step 6: Open up the pants and fold down the right side (as worn) out of the way.  Cut off the extra curved part of the left pants front in a straight line.  This will measure 1.25” at the top.


Step 7: Place the zipper shield with attached zipper face down on the left (as worn) pants front.  The raw edge of the pants and the finished edge of the zipper fly will line up.  The zipper is sandwiched between these two layers.  Pin in place


Step 8: Sew the zipper shield to the pants sewing as close to the zipper as you can.  Use a zipper foot.


Step 9: Open up the pants and fold down the right side (as worn) out of the way.  Pull out the zip fly and edge stitch along the zipper on the left pants front.  Stop at the bottom, even with the bottom of the zipper, just below the zipper stop.


Step 10: Fold the right side of the pants front (as worn) back to its final position.  Take time to adjust this side over the left side and when you are satisfied, pin the the right front in place.  


Step 11: Turn the pants to the wrong side.  Fold the zip fly back away from the right front (as worn) and pin it to keep it out of the way for the next few steps.


Step 12: Still on the wrong side of the pants, pin the zipper to the right fly (as worn) ONLY.  Tip: place a ruler under the fly when pinning to keep from catching the pants front.


Step 13: Fold the right pants front out of the way.  Sew the zipper to the right fly (as worn) using a zipper foot to be able to sew as close to the zipper as possible.


Step 14: Turn the pants to the right side.  Lay them out flat, taking time to smooth out any wrinkles.  Draw a line with chalk to mark where you want to topstitch the outline of the fly.  


Step 15: Topstitch along the top stitch line.  You will be sewing through the right pants front (as worn) and the fly underneath.  After you have topstitched along the curved line, unpin the zip fly on the back side of the pants and return it to its proper position.  Sew a bar tack along the curve of the topstitching to hold the zip fly in place.  If desired, add a 2nd bar tack at the very bottom of the zipper on the topstitch line.


Step 16: Because the original Prose Cargo Pants has a gathered waist you will need to take in some excess fabric across the back.  Pinch out a 1” total dart above the back pockets and sew it.  Press toward the center back.


Step 17: This photo shows the back pocket with the completed dart.


Step 18: Fold the waistband in 1/2 with the right sides together.  Sew across the short ends with a 3/8” seam allowance.  Turn the waistband with the wrong sides together.


Step 19: Pin the waistband to the top of the pants with the raw edges aligned.  Line up one end of the waistband to the edge of the right pants front (as worn.)


Step 20: Line up the other end of the waistband with the zipper shield on the left side (as worn.)


Step 21: Pin the waistband in place all the way around the top of the pants.


Step 22: Sew the waistband to the pants.  At both side seams, you will stop sewing, backstitch, and then move forward leaving a 2” gap.  (This is to insert elastic across the back.)


Step 23: Insert 2” elastic across the back, beginning at the gap you left in one side seam and pulling the pin out through the other side seam.  Make sure the elastic extends into the front of the pant beyond the side seam by 1”.


Step 24: Sew down the waistband at the side seams making sure to catch the elastic in this seam.


Step 25: Close the two holes you left to insert elastic by sewing across the waistband.


Step 26: Finish the raw edges of the waistband and pants together using a serger or zig zag stitch.  Press this seam down toward the pants.


There you have it! Now you can add a zip fly to your Prose & Poetry Joggers or Skirt! We would love to see what you make using this tutorial. Join our FB Group and share a picture if you end up using these instructions.


Save this image on Pinterest to come back to this tutorial later:


Tuesday, September 8, 2020

Theodor Sweatshirt Pattern

 Are you ready for some inspiration?  Tami of SewSophieLynn is HERE for you!  

When Tami sews basics it's always so good and you just know you need to recreate what she sewed!  In this case, Tami sewed the Theodor Sweatshirt in some yummy soft french terry. The Theodor Sweatshirt is a classic raglan sleeve sweatshirt style for many jersey fabrics.  If you’ve never sewn a raglan sleeve pattern before, you’ll appreciate the ease of this one!  If you’re a fellow raglan sleeve lover, this is the pattern for you!

Be sure to check out more about Tami's Theodor Sweatshirt at SewSophieLynn.

And did you see all the new patterns?  It's a perfect collection with something for everyone!

Friday Dress

Morocco Pants and Shorts

Hygge Vest

Woodland Wanderer Coat

Robin Dress

Tintin Shorts and Trousers

Joseph(ine) Cardigan

Frances Leggings

Theodor Sweatshirt

Mary Dungarees

Let's celebrate with new clothes!!!  For the rest of the week we'll be featuring each of these patterns with some of your favorite Project Run & Play designers.  Get ready to be inspired!

Let's celebrate a SALE!!!  These stunning new patterns are 20% off during our Back to Learning event.  (No code necessary.  Sale lasts from now until Saturday, September 12 at midnight Eastern Time.)

Let's celebrate with a GIVEAWAY!!!  One person who makes a purchase during this event will get their money back!!!  Happy shopping...

See you tomorrow for the next featured pattern.

Monday, July 27, 2020

Summer Hack-stravaganza with Life Sew Savory


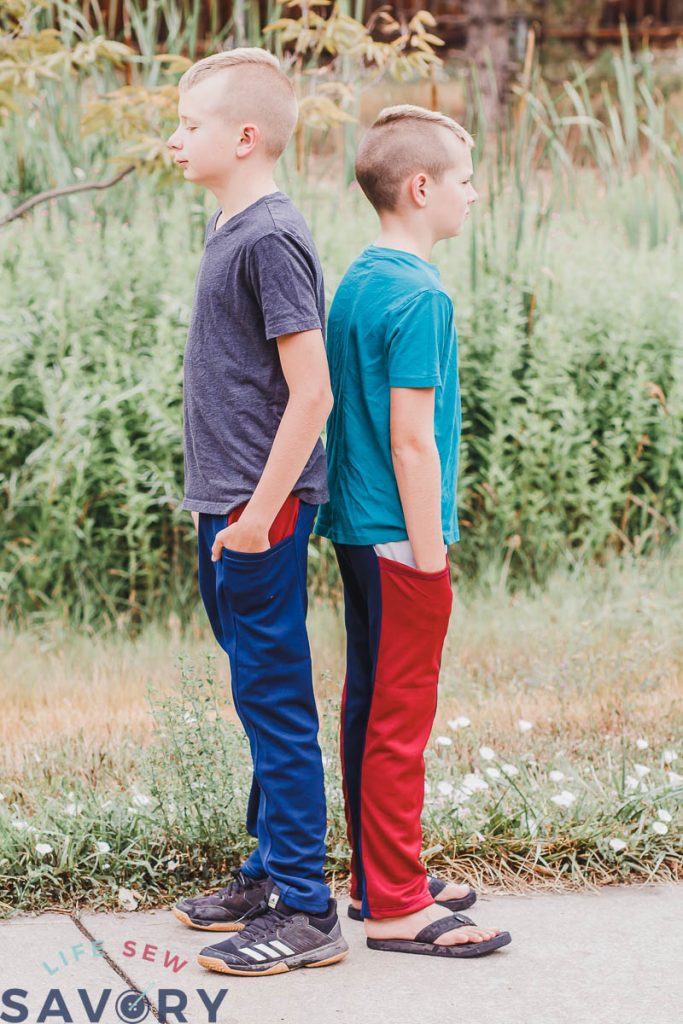
The Summer Hack-stravaganza continues with Emily from Life Sew Savory and some BOY sewing goodness!!!  

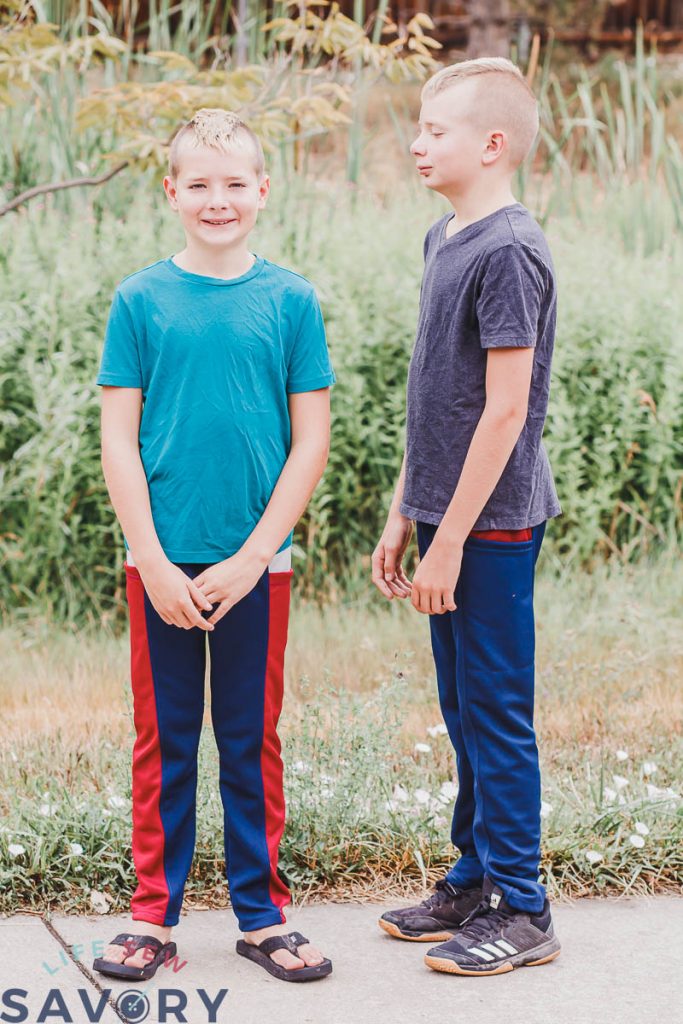
Hi Friends! It's Emily Thompson from Life Sew Savory here. I was one of the designers on Season 23 and while it was super stressful, it was also very fun. I have two tween boys and a younger daughter and I'm always looking for more ways to sew for my boys.

While looking through the Project Run and Play Shop for patterns I was inspired by the fun bottoms for boys. Today I'm going to show you how to mashed up two patterns and then added my own little spin to these fun joggers as well. Hopefully if you are looking for a similar style you will be able to make these as well.

slim fit jogger hack

Jogger/Pants Hack tutorial-

For this project I started with the Four Seasons Joggers and the Spider Monkey Pants. The fabric used was a combination of Double Knit 100% Poly-Sportswear, and Dimple Mesh/Bird's Eye Light 100% Poly-Sportswear. I bought it from Ronittextle.

I really love the side pockets of the Spider Monkey pants, but the fit of the joggers was more what I was looking for. I decided to mash the two patterns and ended up hack the style a bit more to be just want I was looking for.

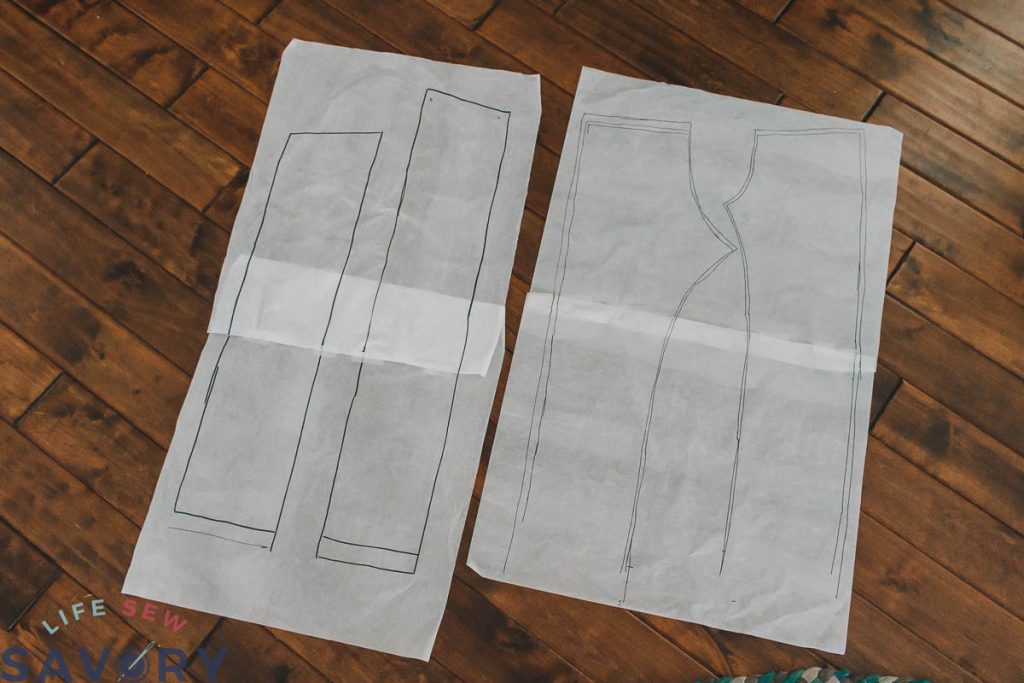
I began by tracing the Spider Monkey side pocket and the Four Season front and back.

For tons more modeled photos AND a giveaway for free patterns see my full post on lifesewsavory HERE.

jogger pants hack

There are two lines on the pants because I made two different sizes.

I cut out the larger size of the pants front and back and took about an in off the ankle up through the thigh from the inseam. I wanted a slim fit jogger {middle school dress code!}

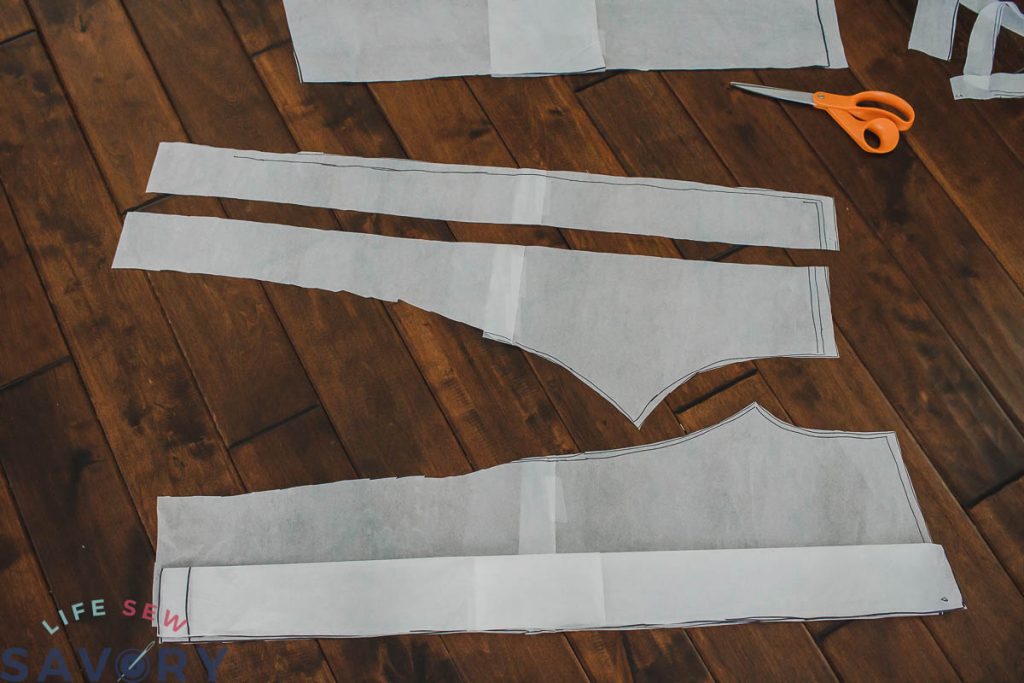
Then I folded the pocket pieces in half and took half the width off the side of the front and half off the side of the back of the pants.

hacking a jogger pattern

Now the front and back pieces are ready to have the pocket from the different pants pattern attached to this one. Remember to add a seam allowance to the cut edges when you cut the fabric.

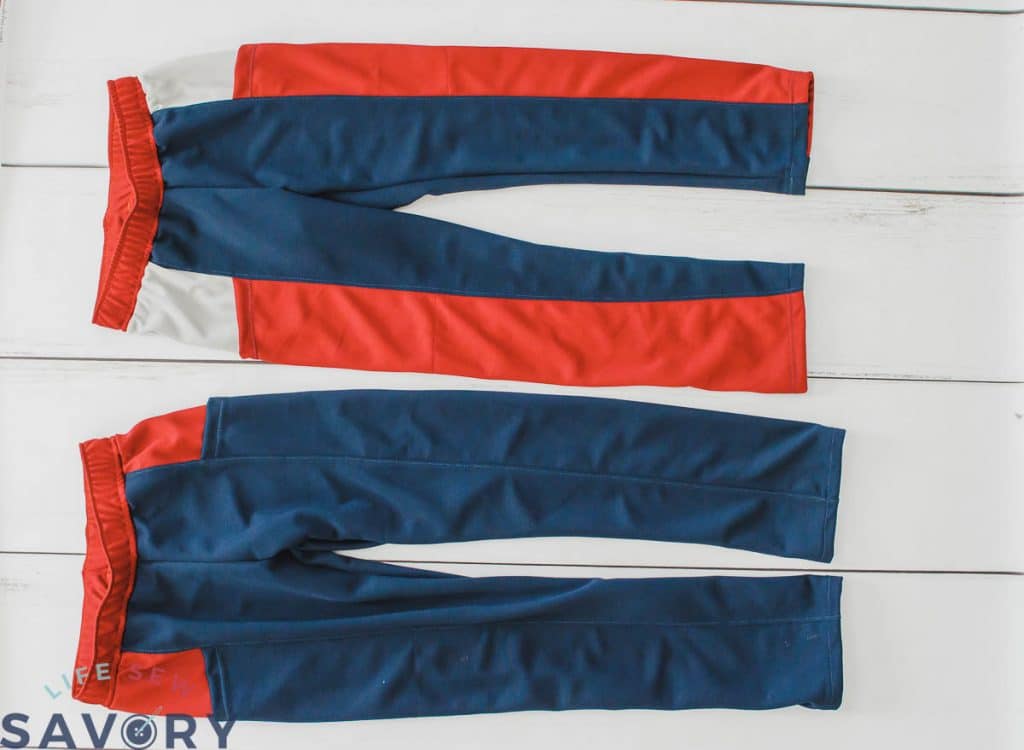
I made two versions of these joggers. One with the side panels the same color as the front and back and the other a more colorful version.

jogger hack

Sew up the pants according to the two different pants patterns. Another hack I added was the elastic waistband. The Four Season Joggers have a knit fabric band only, but I cut a waistband of the mesh fabric and then put 1.5" wide elastic through it and top-stitched.

project run and play pattern hack

Thank you so much, Emily!!!  My boys are now demanding these exact pants, so it's a good thing we have a tutorial now!  
Today's giveaway:
Enter to win 2 patterns of your choice from the Project Run & Play shop in and of these 3 ways:

Follow Project Run & Play on Instagram and comment on the post with these outfits.
Visit Life Sew Savory and comment on her post with these outfits.
Leave a comment on this post!  


Tuesday, July 21, 2020

Summer Hack-stravaganza: Cobalt Shorts, Thyme Shirt, & Aurora Raglan

The first entry in the Project Run & Play summer Hack-stravaganza is by Audrey.  She hacked 3 patterns to create this adorable brother/sister coordinating look.  (Scroll to the end for today's giveaway information...)


What patterns do you see here?  On the sister we have the Aurora Raglan hacked into a dress with a circle skirt!  On the brother, we have the Thyme Shirt and the Cobalt Shorts; both of which recommend WOVEN fabrics, sewn with KNIT fabrics!  Ready for the details?


Cobalt Shorts woven to knit details:

This was literally the easiest hack ever!  Because the elastic back allows you to fit the finished garment to the child, NO ADJUSTMENTS were needed to change from using a woven fabric to a knit fabric.  I sewed the Bermuda length with the faux fly option.  I did use a stretch stitch when sewing these Cobalt Shorts.  So easy and FUN!


Thyme Shirt woven to knit details:

Again, this was a super duper easy transformation.  When I measured him, he was between sizes, so I decided to use the smaller size since I was using a knit fabric.  It worked out perfectly!  This is the Thyme Shirt with short sleeves.  I used a stretch stitch, and that's the only adjustment needed!  Such a cute shirt and so easy to make with knit fabric.


Big sister got a maxi Aurora Raglan Dress with a skirt skirt.  She hasn't stopped spinning since...

Aurora with a circle skirt details:

I measured to where the waist is on my girl and used the Aurora Raglan pattern pieces for the bodice, sleeves and ties.  Then I used the Aurora pattern's finished measurements chart and my daughter's waist to ankle measurement to calculate the dimensions of a circle skirt using the By Hand London circle skirt calculator app.  (You can also use the Janie Dress pattern pieces for this if you detest math!)  Once I had the circle skirt cut out, it was simply a matter of sewing it to the Aurora Raglan top and hemming it.  Easy peasy!

For fabric links and more photos of these two in their coordinating clothes, please visit Skirt Fixation.

Today's giveaway information:

Enter to win 2 patterns of your choice from the Project Run & Play shop in and of these 3 ways:

Follow Project Run & Play on Instagram and comment on the post with these outfits.
Follow Audrey on Instagram and comment on her post with these outfits.
Leave a comment on this post!  

Winner will be drawn at random on July 24.  


Saturday, November 9, 2013

Children's Holiday Wear Inspiration: Boys

Ready for some holiday inspiration for the little men in your life?
 
We are!  So we'll do just what we did for the girls...a round up for clothing from some commercial stores that have potential for some great holiday sewing inspiration. (For both casual and dressy looks.)