Showing posts with label Season 16. Show all posts
Friday, June 29, 2018

Season 16 Results

How about that for the most incredible finale ever???  It seems like Project Run & Play is one of those things that just keeps getting better and better!!!

The results of the final week of Season 16 of Project Run & Play are as follows:

1st Place:


Runway Ready by Sabra of Sew A Straight Line

Here's what Megan of Megan Nielsen, our celebrity guest judge, had to say about her look:

"I really loved these designs SO much. I often feel like there isn't enough cool boy sewing out there, but these designs were very very cool and exactly the kind of things I would dress my own son in. I love the level of detail and workmanship in these pieces. The number of pockets in everything was amazing, and i'm imagining all of the string and bottle caps and little treasures they would store :) The execution is brilliant and I love that all of these pieces coordinate but aren't too matchy matchy, and are very practical for every day life. The photoshoot location and styling was also absolutely spot on and so well done."

Sabra will be rewarded with:

Cricut Maker and starter kit from Cricut ($600+ value)
$100 fabric bundle from Riley Blake Designs
$100 gift certificate from Simple Life Pattern Company
6 yards of her choice of fabric from Michael Miller Fabrics ($100 value)
1 year subscription to One Thimble magazine ($85 value)
6 yards of her choice of fabric from Art Gallery Fabric ($75 value)
5 patterns ($80 value) from Oliver + S
8 patterns ($75 value) from Violette Field Threads 
Welcome pack from Spoonflower ($60 value)
90 labels from Jennifer's Jewels ($45 value)
3 patterns ($30 value) from Petit a Petit & family
$25 gift certificate from Lil Luxe Collection

2nd Place:


Black, White and Teal All Over by Lisa of Mabey She Made It

Lisa will be rewarded with:

$75 gift certificate to Fat Quarter Shop
$75 fabric bundle from Riley Blake Designs
4 yards of her choice of fabric from Michael Miller Fabrics ($75 value)
Sewing tools from Fiskars ($75 value)
$75 gift certificate from Simple Life Pattern Company
6 month subscription to One Thimble magazine ($45 value)
5 patterns ($45 value) from Violette Field Threads
60 labels from Jennifer's Jewels ($30 value)
$20 gift certificate from Lil Luxe Collection
2 patterns ($20 value) from Petit a Petit & family


3rd Place:


Our Kawaii Life! by Kat of Sew Chibi Designs

Kat will be rewarded with:

$75 fabric bundle from Riley Blake Designs
Sewing tools from Olfa
$50 gift certificate from Urban Sew
$50 gift certificate from Simple Life Pattern Company
2 yards of her choice of fabric from Michael Miller Fabrics ($35 value)
3 patterns ($30 value) from Violette Field Threads
1 month subscription to One Thimble magazine ($25 value)
30 labels from Jennifer's Jewels ($15 value)
$15 gift certificate from Lil Luxe Collection
1 pattern ($10 value) from Petit a Petit & family


Congratulations and huge, HUGE thanks to each one of these designers.  They made this Season memorable, and so inspiring!!!


And now it's your turn.  To audition for a designer spot on Season 17, enter the link up here.  The winning look will be announced Monday.  That winner is also going to receive a $40 gift certificate to Raspberry Creek Fabrics and 2 patterns from Hey June Patterns!

If you're not interested in a designer spot, please come back next week for a really, really ENORMOUS surprise we've been saving for everyone!!!!

Tuesday, June 26, 2018

Season 16 Week 4 - Signature Style

Can you believe the final week is here?  This has been an AMAZING Season, and each of these ladies have put forth fantastic effort.  They each deserve a medal, and thankfully, our fabulous sponsors are going to be rewarding them with dream prize packages.  Our guest judge for this week, Megan Nielsen has a very tough job in front of her!  And your vote counts too, so please be sure to support these fabulous designers by voting at the end of this post.  

Sew Chibi Designs - Our Kawaii Life!


Six years ago, if you told me I'd be one of the final 3 designers on Project Run & Play, I'm not sure I would have believed you! This is totally one of those "pinch me, this can't be real" moments! I'm forever grateful to everyone who has supported and cheered me on! It's been a staggeringly talented season and each designer really gave it their all! I've been hoping to make it to this week because I really wanted to let loose! In the words of last season's winner, Pearberry Lane: this is us! We're silly, expressive, purposefully mismatched, happy, and a little weird! We're constantly evolving and learning new cultures and trying new ideas out and so I wanted to create a collection that reflects just that! I call this summery collection Our Kawaii Life!


It was a goal of mine to start with all three of my girls and finish with all three as well! As soon as I was asked to be on this season, I decided to design a custom print using the "level of pattern difficulty" graphics I created for the Umaru pattern collection I just released: milk kitties! My philosophy is "well, why not?!" and so I say, why not make an adorable milk kitties fabric?! Here in Portland, there's a city motto of "Keep Portland Weird" and we wholeheartedly embrace it! I wanted to make something twirly for my eldest because, even though she prides herself on not being a girly girl, she adores twirly things. Using the Simple Life Pattern Co.'s Adelyn's Scoop Top Pattern (who so graciously sponsored us!), I made a circle skirt top, accenting all of the colors of the fabric through different elements of the pattern. I drafted a special version of the Tomoka collar (from the Tinny Dress pattern) to fit the neckline of the Adelyn. For her bottoms, I made stretch denim capri pants using my Pudding Pants pattern with diagonal seaming and inset pockets but altered them so that they were fitted. They also have cuffs by the knees and faux leggings bottoms which I sewed to look like stripes, using brushed poly knit (sponsored by Cali Fabrics). For her accessories, I made little bow scrunchies (actually, I made bow scrunchies for all three girls) and a blue choker necklace with hook and eye closure for her. For my middle girl, I made a super fancy t-shirt using this gorgeous baby pink sequin fabric (also from Cali Fabrics) which has a fair amount of stretch in it and my own Umaru shirt pattern. To make it comfy, I lined it in hot pink striped jersey and used a deep hem so it falls nicely by her hips. Her bottoms (as well as my youngest's) are my own Natsu shorties, which are knee length and have a relaxed fit, made in a stretch denim as well. For my youngest, I drafted a cap sleeve version of the Seraphic Raglan in which the sleeves are folded back towards the neckline so there isn't an apparent hem on that metallic knit fabric. The print she is wearing is a stretch minky that I ordered from Spoonflower that's a little creepy and really cute (I couldn't resist!). All of the girls have patches on their shorts! I'd say about 95% of those patches I designed myself (there's about 100 of them total!), using mostly my own graphics. I made those patches by using (light) iron-on transfer paper applied to white canvas and then I satin-stitched them on!


My two older girls are really into Emojis these days so I also wanted to make Emoji swimsuits for them! The silver, happy face one-piece swimsuit is based on the Lorelei Swimsuit (also sponsored by Simple Life Pattern CO.!), omitting the flutter insert to give a color-blocked feel! That silver metallic fabric is a dreamy holographic triangle print from Cali Fabrics that makes rainbows when the light hits it! The lightning blot two-piece suit is a mash-up of the Abby Rashguard and briefs-style bottoms I drafted by hacking the Azur swimsuit into bikini bottoms! Be sure to stop by my blog to learn more about Our Kawaii Life!  Thank you so very much to Audrey, to the judges and guest judges and to everyone who supported me throughout this unforgettable journey! It's truly been a dream come true! ❤ 


Mabey She Made It - Black, White, and Teal All Over


 I can’t believe I’m here in the final! If I were to describe my signature style, I'd say it was clean classic pieces with unforgettable details. This challenge was been incredible for making me think about my style and really distilling it into a cohesive look that "fits" each of my girls’ personalities. I started with a Victorian-inspired bustle dress and jacket since my oldest and I have a common love for the elegance of the Victorian era. I wanted a classic flat front and a bustled back for the skirt and a close-fitting bodice with sweet girly details like a Peter Pan collar, pintucks, and pearl buttons. But the back is where my heart is. With a combination of regular and French tucks, it’s a beautiful cascade of bustled fabric. I created a black and white pinstripe jacket to go with it and used pleated trim to accent all the edges, including the sleeve cuffs, and added trim in the back. The brass buttons pop off the black, and bring it to life. It’s so elegant, and she LOVES it.


My middle girly is a bit more rough and tumble so she got an easy-to-wear stamped denim (the pinstripe twill, denim, and teal ponte all came from CaliFabrics who sponsor PR&P), ruffled t-shirt, and classic cardigan. The details in her outfit include front welt pockets and the center front button placket and brass buttons that echo sister’s jacket in the skirt, a ruffle inserted into the sleeve, front, and hem of the tee, and wide cuffs and nine small brass buttons for lots of flair. The outfit fits her personality perfectly.


My youngest girl got an incredibly beautiful wrap dress with herringbone detail on one front panel and bugle bead trim outlining that stair step neckline. The lined bodice alone is 36 pieces, but it’s stunning and the detail was worth every bit of effort. I love how the stair steps meet at the top creating a square neckline and how the white front panel makes the herringbone detail pop. The simple skirt uses a horizontal orientation with a vertical band across the bottom. It’s deceptively simple but beautifully complex—just like her. And that’s it! Please head over to Mabey She Made It for all the photos, details, and several process and behind-the-scenes photos you for sure don’t want to miss.


Sew A Straight Line - Runway Ready

Final week. Signature Style. Two things you need to know: 1) I have always been drawn to military uniform styling, and 2) I have always wanted to do a big collection like they do for the finals of Project Runway. I made an eight-piece collection for my Signature Style, pushing myself in techniques and design. And I based the whole look around memories of my dad in his helicopter flight suit. An aviation collection for the catwalk, I give you Runway Ready.

 sew a straight line runway ready title 

I started my look with Ivy's jumpsuit, directly inspired by an Army flight suit, specifically my father's. He's a retired Army helicopter pilot, and his flight suit, from the smell to the texture are ingrained in my childhood memories of him. I started off with Ottobre 3/2016 #26 for the jumpsuit itself.  I changed the waist to be flat in front, and gathered from about the hipbones and around, like my dad's uniform. I dropped the buttoned-half placket and instead drafted a full exposed zip, again like the flight suit. I drafted faux flap pockets at the chest, epilates to gather the sleeves at the shoulders, and a collar stand for my traditional collar. Star resin snaps accent everything. The jumpsuit is in a lovely textured lawn from CaliFabrics. Her bomber jacket is a mash-up of The Study Hall Jacket by Go To Patterns and Ottobre 3/2016 #17 and my own ideas. I love the zippered welt pocket on the sleeve and the contrasting stitching I did throughout. I encased the zippers at the ends, to add some professional finishes. I did that on all my jackets this season. And because I loved how the tie dye for what was to be the lining turned out so much, I wanted to show it off more. Instead of a lining, I made it fully reversible with pockets on either side. The one side is a star chambray (also a CaliFabrics score) and the reverse is a cotton print I tie dyed. 

sew a straight line runway ready 4 

The reverse tie dyed of the bomber uses the same fabric as the uniform shirt for my older son. I started with Ottobre 3/2016 #24 then added all the uniform details I love so much. I made epilates at the shoulders, cargo-style flap chest pockets and a yoke cut on the bias that you can't really see. After sewing, I tie dyed the finished shirt in blues to bring in some color. His pants are almost entirely self-drafted. I used Ottobre 1/2016 #36, the same pattern as his jeans from Week 1, to get the basic pants fit and shape. I pleated the knees for movement, gathered the cuffs in ribbing for a hip, skinny leg fit, the back pockets are cut in an upside down T shape and go across the center back. There is a hidden pocket at the one outer side seam, with an invisible zipper closure. For the waistband, I wanted to incorporate a technique I made up for when my boys were small and belts were a hastle. It's a built-in belt, of sorts, with twill tape fed through the waistband and emerging from either side of the waist opening. It closes with a plastic snap buckle closure, and is great for skinny kids that don't like the buttons of adjustable elastic cutting into their waists and hip bones. The jacket I made for this outfit is one of my most intense designs and sews yet. I launched things off with Ottobre 1/2013 #39, the same jacket pattern from Week 3. But the only thing I kept the same were the under collar, cuffs, and the back. Welt hip pockets, a cargo flap sleeve pocket.  Cargo flap pocket at one chest side, zippered pocket with flap accent at other side. A front yoke. Epilates. Zipper fly with snaps. Outer collar with snap closure. Fully lined. Inside media pocket. I wanted all the utilitarian styling and design of a military jacket. It's sewn with a warm, soft fleece lining, and the outer is a waterproof nylon ripstop from CaliFabrics in traditional camo print. 

sew a straight line runway ready 5 

My middle son's look starts off with a simple self-drafted tank in a star-print knit from CaliFabrics. I tie dyed it in blue and fuchsia after sewing and I love how the colors pop on the stars. His pants started as Ottobre 3/2016 #38. But I changed things up again. I did the same front closure as on my older son's pants. I cropped the legs to make a more hip, modern style with ribbed cuffs. And my favorite changes are the pockets. The pattern already had a cool split-pocket thing going on in the back. I added a button closure to one back pocket and a zipper to the other. And then I did the same inseam pocket on one leg as his brother's pants, only this time with an exposed zipper. His sweatshirt might be my favorite piece in the collection. I wanted a modern, kid-friendly take on a traditional aviator sweater. Using French terry, I quilted pattern pieces I drafted. I used contrasting thread, so that the quilting really pops out. Then I added leather patches at the shoulder to really bring that aviator sweater feel into things. You can see all the nitty gritty details of the collection, and some photo shoot outtakes on my blog HERE 

flat lay sew a straight line f 

Thoughtful details, functional styles, muted colors mixed with bold accents. Form and function. My signature style.


Voting ends Thursday at 8pm EST

Friday, June 22, 2018

Streak, Stroke, Stripe RESULTS

Stripes forever!!!  These amazing, talented, hard-working designers showed us how stripes can be used in any and EVERY way!  Plus they made it very, very hard for us all, and the judges to determine the results!

Our week 3 winner is:


Graceful Geometrics by Lisa of Mabey She Made It

Here's what Adrianna of Hey June Patterns, our celebrity guest judge, had to say about her look:

"Lisa:  When I first saw this look, I audibly gasped.  The colors were soft and lovely and the garments are simply stunning.  Both outfits fit the models perfectly and really seem to bring out their personalities as well.  I was especially impressed with the technical skill involved with the piecing and stripe matching on the dress.  My favorite part is the geometric stitching on the shirt though - what a fun way to incorporate the theme while sticking to her overall aesthetic!  Well done!!"

Now the hardest part...sadly, only 3 designers get to advance to final week.  And by close margin, we're saying goodbye to:


The Stripes in the City by Liesel of It's Liesel.   Plan on seeing more of Liesel's work around here in the future, she's part of the Project Run & Play family now!

Thankfully, our sponsors are helping to make this easier by rewarding her with:


PreSeason $50 shopping spree from CaliFabrics.


$75 gift certificate from Fat Quarter Shop


4 patterns of her choice from Winter Wear Designs.


Tuesday, June 19, 2018

Season 16 Week 3 - Streak, Stroke, Stripe

It's time to see how the designers have interpreted the Streak, Stroke, Stripe theme.  Stripes are so on trend right now, and have been for a long time for a good reason!  I think you're going to absolutely ADORE the way the designers interpreted this theme!!!

Mabey She Made It--Gorgeous Geometrics


 Stripes! I love the symmetry, angles, and juxtapositions of strategically placing positive and negative spaces. Working with stripes and trying to do something exciting and "new" is a daunting task though, and I have loved the challenge it poses. My inspiration this week came from a mix of quilting and vector images (interesting combination, right?) for a couple of dresses that make you stop to admire the detail in some places and the details fade to the background in others. And I wouldn't have it any other way. And the fabric? These looks are made from a poly blend so they're durable, machine-washable, and they come out of the dryer wrinkle free. It's a mama's dream fabric for kids. It looks elegant, but with none of the fuss.


My first look was a dress that utilizes a quilt "block" as a focal point of the whole dress and the rest of the dress is built around it. I fussy cut the stripes to create a diamond shape from both the ivory and gray sections and used them together to create alternating quarters of the diamond background. Then I used the same black stripe to "hold" the corners of the diamond like a setting in a ring and extended the stripe all the way around the dress bodice and used hooks-and-bars to create a closure that doesn't interfere with the stripe at all. The skirt is a box-pleated maxi skirt because I love the strong lines that a box pleat gives and knew it would be the perfect complement to the bold stripes. By matching the stripes across the pleats I get a more simple visual but with detail and fullness that I couldn't achieve with a gathered skirt.


My second look pairs a solid ivory top and a pleated pinstripe skirt with more subtle detailing. I used a charcoal gray thread and a triple stitch to follow the parallel and perpendicular lines I drew onto the front of the ivory top, making a beautifully simple yet interesting striped motif. I LOVE the strong geometric design on such a simple background. And in the back, I created a low-scooped back with a bow tie for a fun surprise when you turn around. The gray pinstriped skirt also has some beautiful details like the inseam pocket, invisible side zipper, and the contrasting direction of the waistband stripe. This look had to be deceivingly simple next to the large scale of the dress, and I think it's a perfect complement. Overall, I love how using stripes (which I do regularly but in a much more literal manner) pushed me outside my comfort zone and got me to think about stripes in a whole new way. My gorgeous geometric creations are pieces I'll love for a long time to come. My only regret? That that top isn't my size. ;) Come over to Mabey She Made It to read all about the details and see more photos of the designs including some process shots!


Sew Chibi Designs - Action, GO!


Excited to finally share this week's Stripes themed looks! Of all the challenges this season, I think I was most anticipating this one because it gave me a chance to change my perspective on something we see every day! Each week, I wanted to try out different moods: the first week was a bit moody and French, last week was super girly and cute, and this week it's about cool, idol-inspired fashion... but for girls! Always a fan of the series, "Boys Can Wear Pink", I thought about how to do something that would have a similar message, but for girls! It's empowering for them to see themselves in hip, urban streetwear in addition to the pretty dresses because it gives them a chance to appreciate different facets of what makes them awesome individuals! For motivation, while designing my stripes looks, I watched what I watch a lot of every day: Asian pop music videos, especially those from Taiwan and Japan! Paired up with my longtime love of optical illusions, I created fashion for my girls that they could wear on a summery Friday night, hanging out with friends in the city, playing vintage video games at the arcade, then catching a movie at one of the retro theaters nearby.


Sephira's look is, oddly enough, pretty monotone. In stark contrast to the usual rainbows, I chose to carefully add stripes of red, infrequently and "spontaneously", only popping up in the slashes on the jeans and the single stripe around the shirt. Starting with the shirt, I took my own pattern, the Umaru shirt which features a built-in, hidden, color-blocked pocket and altered it to be a continuous pattern piece folded up instead. I love the look of moto jackets but wanted to make something that could be worn any time of year so I made a cowl-necked shirt with a separating zipper that curves towards the neck (to mimic the curves of her sister's shorts curve). I found this interlocked knit fabric with basic black and white stripes, with a hidden pocket on both sides of the zipper. After the shirt was sewn, I felt it needed more excitement so grabbed about 5 black fabric markers and created an optical illusion effect with triangles within the stripes, by filling in the negative space (several times, until it was the same opacity as the original stripes) with black. The back (which can be seen in my post) has four hidden triangles as well as.  A single stripe of red was added to break up the monotony of the black and white. The 5-pocket, black, denim jeans I made are adapted from the Koko skinny pants pattern by Blaverry and feature striped topstitching on the pockets as well as a zipper fly, adjustable elastic back, and belt-loops. To make it edgier, I made cut-outs at the knee fronts then color-blocked them in white denim (with super secretive decorative stitching I'll mention later on) with zippers for when it's time for running and playing. I also added four "slashes" of red by making facings like welts to create a finished, reverse applique effect. Cool girl ready for some action? ✅Check!


Azriella's look is based on all of the best dress shirts I find in Asian men's fashion combined with Portland hipster fashion. I am helplessly inspired by what is done in terms of fashion in countries like Taiwan, Japan, and Korea. I started out with this twill fabric from Ikea as part of their SOMMER collection that has stripes in all sorts of designs and in all the best colors. For her stripes, I wanted to do more of a color-blocked effect with varrying widths and applications. Using the Morocco Pants pattern by Petit a Petit Patterns, I made fitted shorts with a zipper fly, wide hook and eye closure, inset and double welt pockets, and contrast (black in the front, white in the back) cuffed hem facings. Her shirt was a based off of pattern #08 in the Japanese sewing book,  a Sunny Spot (2015) but with the button placket and French seams (side seams as well as sleeve/armscye seams) of the Laramie Pattern by Hey June Patterns. I did an inset of two color-blocked panels of opposing stripes using a two corner method of setting in a square into a single piece of fabric. The big question I asked myself when I was designing this week's theme was, how can I show stripes in a way that hasn't been seen frequently, and then I discovered glow in the dark thread. I used the thread in several places: the twin topstitching in the back of Azriella's shirt and Sephira's sleeves; as well as the (several) running topstitches on the white denim of Sephira's jeans and for two, satin-stitched rows on Azriella's shorts. They lost their minds when they discovered their outfits glowed in the dark! That's what it's all about for me: my kiddos are excited about forward fashion and the stuff I make them. Happy mamma, here! To read more about all the hidden details, check out my blog post, Action Go! on my blog, Sew Chibi Designs!


It's Liesel - Stripes in the City

DSC_9114-title 

 What a fun theme this week! I'm so excited to be moving on to this round. Thank you for helping to get me here! Streak, Stroke, Stripe is the inspiration, and I loved choosing fabrics to use for this one. I thought about manipulating fabric to create my own stripes, but I decided to stay truer to my style. To style these looks, I added small stripe influenced details to push the theme all the way through!

  Week 3 collage 1

The first piece I made was the pin stripe rayon challis wrap maxi skirt. I knew this piece had to be created for this week. I wanted to use a variety of prints, fabrics, and scales of prints, so to go with this skirt, I made a dolman sleeve top with a knit fabric, and a stripe with a much larger scale than the skirt. I think they work well together, so well, that it's almost not "crazy" enough for a good pattern mix outfit. Haha! The skirt's stripes are so fine, that it almost acts as a solid. But I love the subtle detail it adds to the outfit. For the skirt, I used the Isabel dress pattern from Made for Mermaids. I used the skirt portion, and re-drew the curve to make it the length I wanted. It was designed for knits, so I made it wider, and gathered to get the fit I wanted. Then I added two layers of ruffles. Longer in the back, and gradually shorter around the front. The waistband encloses the skirt in it's seam. To secure it, there is a button sewn into the inner layer of the waistband, a buttonhole on the other edge of the skirt, and a second tie sewn into the side seam of the skirt. The shirt for this look started out as the Jalie Bobbie top pattern. I scooped out, and widened the neck, and made the body of the shirt shorter, and wider than designed, for a more bohemian feel. Then I added ruffles to the sleeves.

  Week 3 collage 2

For my second outfit, I used this beautiful olive print ITY from Cali Fabrics. Since I used symmetrical stripes on my first outfit, I wanted to go more abstract with this. It was fun to play with pattern placement on this print. I used the Havanna Blouse pattern from Cali Faye as a starting point. I modified the front bodice, so I wouldn't need to add a button, drew a completely new back piece, lengthened the blouse to dress length, and added pockets! Since this was designed for woven fabrics, I also made modifications to the width of the bodice so it wouldn't be as full with the heavier knit. I absolutely love how comfortable and easy it is to wear, and the simple, but strong style. With all the neutral colors in these outfits, I wanted the photos to be in a neutral background, so the stripes could have the focus. We went to an unused parking garage, and the setting would have been perfect, except for the WIND. We managed to get most of them on the ground level though, and it worked out perfectly! Please go to my blog post to see the rest of the photos, and more details!

  DSC_9225

Sew A Straight Line - Retro Stripes

Streak, stroke, stripe. It's week three, baby! I'm rolling things a back to a time of iconic music, movies, and fashion. A time when both pastels and neons were raging and print mixing was at its peak. A time when stripes were bold and bodacious. My look this week is 80s inspired and 2018 rad. 

title shot retro 

Pastels were my launching off point for my daughter's look. I wanted a rugby shirt for her, remembering how rad those were when I was a kid in the 80s. I drafted polo-style shirts for my boys years ago. To switch my pattern to a rugby style, I inverted the placket, keeping the front of the shirt flat and smooth across with the placket itself on the inside of the shirt. I pieced three knits for the body and sleeves of the top, making wide stripes. Then I used a contrasting rib knit at the cuffs and upper collar. The placket and under collar are from a funky stretch twill. The shorts are a beautiful linen from my stash. In fact, nearly this entire week's look was from my stash. I only bought the panel for my son's shirt and some zippers. Anyway, shorts. The linen has a great wavy stripe print that I would have LOVED to wear as a kid. I used Ottobre 1/2016 #16 as a starting point. I made the pant pattern into shorts and drafted a buttoned welt pocket at the back instead of patch pockets. 

ivy retro stripes

My son's look has a cool backstory. Two weeks ago, my 12 year old asked me my plan for Stripes Week. I told him I had a few ideas I was tossing around, but nothing that I was super excited about. About 15 minutes later, he looked at me and said, "I have an awesome idea!" He grabbed a sharpie and the pizza box from our dinner that night, and sketched out an idea for a shirt that was just too awesome. His idea was a solid panel with some picture or scene on it, broken up with bold stripes. We jumped online and found the perfect panel. It had a strong Miami Vice vibe to me, and my 80s Retro Stripes look was born. My 9 year old is the model for the 12 year old's design. The basic silhouette of the button down uses Ottobre 3/2015 # 24. I cut the left side front into 20 strips, alternating the fabric, starting with wider linen and more narrow beach scene fabric at the top, then going to more narrow linen and wider beach scene at the bottom. On the right, I added a buttoned welt pocket with the beach scene fabric, and some piping along a front yoke. The entire shirt is sewn with a bright blue contrasting thread. The shorts started with a trouser pattern from Burda Style, 149b. I wanted something loose and casual, and different. The pattern uses a gusset through the crotch, making them comfortable and unique. I drafted a zippered fly and a drawstring waist. There is also a hidden button on the inside at the waist opening as a more secure closure in addition to the drawstring. I added some parallel lines of stitching at the back pockets as a subtle nod to our stripe tribute. Finally, I frayed the leg openings to give it a cutoffs feel. And what would an 80s look be without a windbreaker? I had in my stash some great quality, super lightweight outerwear twill. I have no clue where I got it, and it was obviously cut into, but I don't remember buying it or making anything from it, so it's a total mystery. But it needed to be a jacket. I wanted an updated Members Only look, and think I got it. Ottobre 1/2013 #39 got me super close. I added piping, or pinSTRIPES, with the same funky stretch twill as my daughter's rubgy shirt placket. I omitted the flap pockets at the chest and instead went with a zippered welt pocket to match the waist pockets. Then I lined the whole thing because, well, because lining looks and feels nice. The drawstring waist finishes things off nicely. You can see more on my blog

jjjonas stripes

Pinstripes, rugby stripes, wavey stripes, pieced beachy stripes. A look that would have turned heads in 1988, but made for 2018. Retro rad, retro stripes. 

retro stripes flat lay

Now it's your turn. Support these incredibly talented designers with your vote. Voting ends 8pm EST Thursday night.  I don't know about you, but I think Adrianna of Hey June Handmade, our guest judge this week, is going to have a very difficult time!
Monday, June 18, 2018

Season 16 Week 3 Sew Along - Streak, Stroke, Stripe!

Wasn't last week amazing?  Thank you to everyone who linked up things from your stash looks!  It's so inspiring to use stashed fabric isn't it?  The winning entry has been chosen.


Sleeveless Modkid Vivian by Sweeter Than Cupcakes

And now it's time for week 3!  Here's the theme prompt for you to sew along:

Week 3: June 18-22   Streak, Stroke, Stripe

From zebras to referees to Tutankhamun’s funeral mask - stripes are always striking, and always in good taste. This week, use the boldness, the duality and the yin and yang of stripes to inspire your inner fire and make THE LOOK.

It's your turn to link up.  The winning entry, as determined by the judges (the talented panel of advisors) will win:


$40 gift certificate to Raspberry Creek Fabrics


2 patterns of their choice from Hey June Patterns.


No links to items for sale, please.

If you're sewing along, we'd love for you to grab the HTML in the box below and put it up on your sidebar to let everyone know you're joining the fun at Project Run & Play!


grab button for Project Run & Play
<div class="project-run-play-button" style="width: 255px; margin: 0 auto;"> <a href="http://www.projectrunplay.com" rel="nofollow" target="_blank"> <img src="https://blogger.googleusercontent.com/img/b/R29vZ2xl/AVvXsEg1OOb2g4JiXpmh0MgvYdrBO4MXlHQtZCV8Hqie2Y0hrl6ghdktNhed6RKpLFnRWfuZp88mjSIyMICuU-ncGAQ264ArNif3alwO9i5-GDRVPpEcnHsz7k2zayzUyC9pbCXm_5ME662oyi0X/s1600/PR%2526P+Sew+Along+Badge.jpg" alt="Project Run & Play" width="255" height="255" /> </a> </div>

See you tomorrow for the designer's creations. Your are going to be SO inspired!!!
Friday, June 15, 2018

Sew Your Stash RESULTS!

Raise your hand if you want to shop the stashes of these amazing designers!  Or if you were inspired to shop your own stash!  The results have been tallied, and the results are:

Our week 2 winner is:


Roses are Red by Liesel of It's Liesel 

Here's what Kelly of True Bias, our celebrity guest judge, had to say about her look:

"I am certain that my daughter wishes that you were her mom because this is exactly what she wants to wear. Your entry was so romantic and sweet and still appropriate for children. I love how you played with overlays and layers. Although for me, the best part is the fit. Both dresses fit your daughters perfectly. It's obvious that you are skilled at fit and that really shines in both of these dresses. I am very impressed."

Now the hardest part...sadly, only 4 designers get to advance to next week.  And by close margin, we're saying goodbye to:


The 90s Refashioned by Candice of Candice Ayala.   Plan on seeing more of Candice's work around here in the future, she's part of the Project Run & Play family now!

Thankfully, our sponsors are helping to make this easier by rewarding her with:


PreSeason $50 shopping spree from CaliFabrics.


$50 gift certificate from Sash Fabrics.


3 patterns of her choice from Winter Wear Designs.


Tuesday, June 12, 2018

Season 16 Week 2: Sew Your Stash

Now we get a peek into the stashes of our designers!  They've pulled from their store of sewing supplies like a magician pulling a rabbit from a hat.  Prepare to be amazed...

Sew A Straight Line - Bohemian Beach

When I very first was invited to be a part of Project Run and Play, before knowing the themes, I knew immediately I wanted to do two things: make an embroidered top for my daughter using some gorgeous hand carved wood blocks I picked up in Thailand this past winter, and finally use the espadrille kits I have been hanging onto for far too long. When I found out Week 2 would be Sew Your Stash it seemed the perfect time to cross off those two bucket list items. Using the embroidery and espadrilles as my launching point, I quickly came up with a relaxed, bohemian mini collection. Bohemian Beach: cool clothes for a beach-bound summer.

bohemian beach 

Making a bohemian-inspired look for my son was a bit more of a challenge than for my daughter, especially using only materials I had on hand. Thankfully, I had a couple of espadrille kits in my size, and even more thankfully he and I wear the same size. I didn't want to use the pattern that came with the kit for him, I wanted to make something of my own, and try to make them a bit more masculine. I modeled the pattern I came up with from traditional oxford shoes, using scraps of linens I had in my bins. For the lacing, I cannibalized the leather laces off of my own pair of slippers. Desperate times. His shorts I have had in mind for quite a while. I used Ottobre 1/2013 #33 to get the fit and the basic pattern pieces. I drafted an exposed button fly (with cool metal buttons I bought in bulk 6 years ago). There are pin tucks below the hip pockets, giving a better fit and adding some fun detail. I made an exaggerated and asymmetrical back yoke and drafted a welt pocket. The cuffs are folded and bar-tacked in place. They are made out of some super soft green linen I picked up on the same Thailand trip as the wood blocks. Perfect for summer. His top is made mostly of scraps. I wanted a design that would mimic the shape of the embroidery on my daughter's top, and had this X fabric. Starting with a basic tee from Ottobre 1/2013 #35, I let the shapes of the scraps of black and white knits I had in my scrap bins dictate the shapes of the colorblocking I came up with. I think the black triangles are a little reminiscent of a rising and setting sun over the ocean. Or a shark fin. Or just triangles on a shirt. 

seth boho

Her top is completely self drafted. I wanted a loose-fitting, peasant-style top. It has raglan sleeves and a gathered waist to give it shape. The single gauze is leftovers from a maternity skirt I made when I was pregnant with her, so kind of special that way. I went to Thailand this past winter and picked up a few hand carved wooden blocks that had been used in the local textile industry. They are absolutely gorgeous in their detail, and I really wanted to capture that in something special. I first stamped the top with a white paint to follow, then I used embroidery floss and HOURS of time to stitch the designs. The colors of embroidery floss were determined by what I had in my stash. I originally wanted a more rainbow spectrum, but didn't have enough of all of the colors. But I LOVE how it turned out, and am so glad I was limited in my selection to these. Her shorts are based on a RTW pair she had, though in trying to redraft them, I ended up with a much slimmer fit. I love it. So so much. They are a light-weight, distressed denim I have no idea where I got, and have all the traditional jean-detailing: zippered fly, hip pockets, back yoke and pockets. But I changed things up at the waist closure. I had this cute green leather buckle in my notion stash, and it matched my son's shorts too well to not use. I did an off-centred waistband with the buckle as the closure. Finally, her espadrilles are to pattern from the kit, using a scrap I had held onto hoping to use as an accent on a top for me. I think I still have enough left over for that, too. Both pairs of espadrilles were hand sewn with crochet thread, instead of the recommended yarn, because I had crochet thread and didn't have the other. It seems to have worked just fine. And my grandmother's upholstery needles I inherited with all her sewing supplies were perfect for stitching through the soles of the shoes. 

ivy boho 

Two looks perfect for long walks on the beach and running from the waves. More details and beachy pictures of my kids on my blog HERE. They are casual, comfortable, and relaxed, but with unique and thoughtful details that make them special. 

bohemian beach flat


Sew Chibi Designs - Ice Cream & Sundays!


Welcome to Week 2 everyone, I'm super happy to have made it here! I was keen to the idea of the "Sew Your Stash" challenge because it's the perfect excuse for me to use some of my most treasured fabrics!  This week, I wanted to make some really sweet, super playful and girly looks! The fashion I like to make my kiddos is reflective of their bubbly and silly personalities: bright, diverse, and, most importantly, with a sense of humor. There's something about their smiles when they see fashion that they can identify with that is really special to me. Making things that are surprising and zany is what makes sewing fun to me and deeply fulfills my creative side. So for my 4 year old, I wanted to make something that I knew she would love: 🍦Ice Cream🍦! I have been hoarding this chartreuse, fleece-backed neoprene for about two years now because I wanted to use it on something really special!  I paired it up with the pink floral for my 6-year-old because together they make a rainbow color story and we are madly in love with rainbow things in our family! As I was drafting the second outfit, I asked myself, "Where are these girls (in these dresses) going?" Brunch! These two little ladies are getting all dressed up for a Sunday afternoon in downtown Portland, in one of the many hipster neighborhoods, the Hawthorne district, enjoying some eats and stopping at a few shops along the way! So that's why I decided to call this week: Ice Cream and Sundays (pun intended! 😊)


Since my youngest is still so small (to me, anyway), I thought it would be a fun opportunity to make her an ice cream dress! I used the Blake dress with pockets as a base and added a lined "ice cream" overlay in bubblegum pink. For the neckline, I created a casing between the layers with topstitching, opted for stitched eyelet openings over inset ones and inserted an itty bitty green piping into the channels, setting them into the shoulder seams. I made tiny puff "cherries" for the green tie ends because an ice cream is best with cherries on top, right?! As an accessory, I made her a pair of rainbow-pieced and floral scrunchies. Neoprene is such a great fabric for those with curious kids because it doesn't wrinkle and this particular fabric washes really well too! To be honest, she got the dress a little dirty after our outing (but I still needed a few more shots), so when we got home I washed it on a gentle cycle. All of the garden photos in the collage above were actually taken after it was washed! She loved her dress so much that she requested to change out of her pajamas in the middle of the night to change into her ice cream dress and has been living in it ever since!


For my middle girl, I made a crop top set! I didn't have a crop top of this shape in my repertoire so I drafted her blouse from my personal blocks (to her dimensions) in Illustrator. I added darts to the front and back to give the blouse a slightly more fitted shape. The sleeves were slightly eased to maintain crisp lines and also have a little cuff finish. For the bottom, I made a gathered circle skirt with a fitted waistband and invisible zipper closure rather than an elastic casing to maintain the clean lines of the outfit. For a peekaboo surprise, I made the waistband using a quilting technique that I have frequented in the past: improv piecing!  Basically, I take scraps of fabric (the more irregular the better) and match them up with other pieces. Then I sew, using a super short stitch length directly on a paper copy of the pattern piece. The short stitch perforates the paper so it can be carefully torn away from the paper! It's a lot of fun! It gives the waistband a sort of abstract art, belted look. I used the same technique to make a geometric fabric "kitty" necklace with nickel chain and lobster claw clasp closure. She was really excited to have a proper necklace and it was her favorite animal too! To finish her look, I made a hair accessory from my own free pattern and tutorial that I made ages ago but haven't made in a while: a bunny ear headband! It wraps around her head and then the ends have wire in them (I tucked the wire ends and inserted the wire into a channel, then stitched the openings closed to keep them in place). Instead of knotting the ends, all you have to do is just twist a couple of times and that's it!  Stays in place perfectly too! As a last minute garment (not pictured) I made matching green knit biker shorts (using a pattern of my own: the Natsu shorties) so my little girl could spin and prance and play to her hearts' content while still maintaining her modesty. I took a secret video of our walk back with her skipping and twirling and having fun in her outfit that you can check out on my blog, Sew Chibi Designs (along with the full story and more pictures!) It was such a fun and whimsical week for sewing! I hope you like my Ice Cream and Sundays Collection as much as we do here!


Mabey She Made It - Country Chic 


When perusing my stash I decided to finally use a trio of Joel Dewberry voiles that I got a few years ago and have been waiting for just the right project. These beautiful prints are variations of one of my favorite color combinations—aqua and orange—and I knew I wanted to create something light, summery, and sophisticated for two of my girls. After looking around for lots of inspiration I got really excited to do a look centered around asymmetrical button plackets and breezy peasant tops. It’s perfectly chic with the relaxed feel of the country and I couldn’t love any more how the paradox plays out.


The teal linen was screaming to become a jumper, so I started piecing together a bodice where the front panel is cut with the skirt, the button placket is on the left, and a third panel on the right balances things out. I love how the skirt sides are gathered and come to a square while the center is flat and sleek. It gives the skirt just enough volume without being too cutesy or detracting from the bodice. In the back, I wanted there to be a smooth curve around the shoulder blades but to be taller in the center. Kind of like refined overalls, which pair perfectly with a subtly-printed peasant shirt I drafted using a tutorial on Indietutes.


My second look includes a flounced peasant shirt and straight-legged culottes with an offset button placket to tie in with the jumper but have its own look. I started with the Number 9 trousers from Shwin Designs in a lightweight stretch denim I had on hand (from when I decided I was going to make all my girls’ school clothes and then promptly realized that wasn’t going to happen since we were moving.)  I also split the front leg pieces to add a front seam, eliminated the front faux fly, and added a button placket to the left front leg. In adding the waistband, I attached it so it’s aligned with the button placket for fully functioning opening in front even though the elastic-backed waist makes it so this wasn’t necessary.  I love all the details on this outfit including the brass buttons, welt and slash pockets lined with a third voile print, and front leg seams.  Head over to Mabey She Made It to see even more details, the story behind the buttons, and the rest of the photos from our shoot.


It's Liesel - Roses are Red

DSC_8943-title copy 

 This theme was a fun one for me! I have a stash. Hahaha. Plenty of woven, and plenty of knit. I wanted to use woven for sure, since I don't grab it as often when I'm sewing, but thought it would be fun to use some knit too. Most of my woven stash has been given to me, from friends, and friends of friends. Often quilters, or other women who sewed in the past, but are not sewing anymore, so I haven't chosen a lot of what I own. There is still a lot of beautiful fabric that has come to me in this way, but this floral piece is one I picked up at my local shop a while ago. The eyelet was a hand me down, and I used a white flat sheet for the bodice lining. The red knit lace was something I bought a year or two ago, with specific plans for a specific daughter, but hadn't gotten around to it yet.

  Week 2 collage 2.2 

 The floral dress was imagined after I decided I wanted to use my whole 2 yard cut. And my daughter loves maxi dresses. I used the bodice from the Quinn pattern from Made for Mermaids, altering the back to be quite a bit lower, re-drawing the sides of the front bodice, and creating the front tie piece since that style is so trendy right now! I wanted to make a V shape in the back with the straps, since I knew I would be incorporating that same element in the other dress too. I cut extra long ties, and strung them through a small buttonhole I made in the center back to tie in a bow, creating the V. To make the skirt, I cut the remainder of the length of my fabric in half, so I could get as deep of a hem as possible, and gathered the whole width of the fabric. I love deep hems for their function, and appearance, and full skirts :) It's topped off with a simple bow from Maggie Rocket's sock bow pattern, made from the same eyelet as the bodice.

  Week2 collage 1 

 This red knit dress was created from the Uptown Downtown dress pattern from Sew Straight Patterns. It is lined with red double brushed poly I also had in my stash, and sewn completely on the sewing machine, because I don't own any red serger thread! I had to figure out the best construction for the enclosed lace V shaped panel I added in the back, and I am so happy with the results! Everything was muslined this round so I could make sure it would work before I cut into my stash. I couldn't go replace my fabric for this challenge if it didn't work! The lining seams are all hidden, except for the armscye. I have never made a flower crown, but in the spirit of using things we already own, my girls and I created this head piece out of my wedding bouquet. Please read the post on my blog for more details and all the photos from our fun summer evening photoshoot!

  DSC_9032


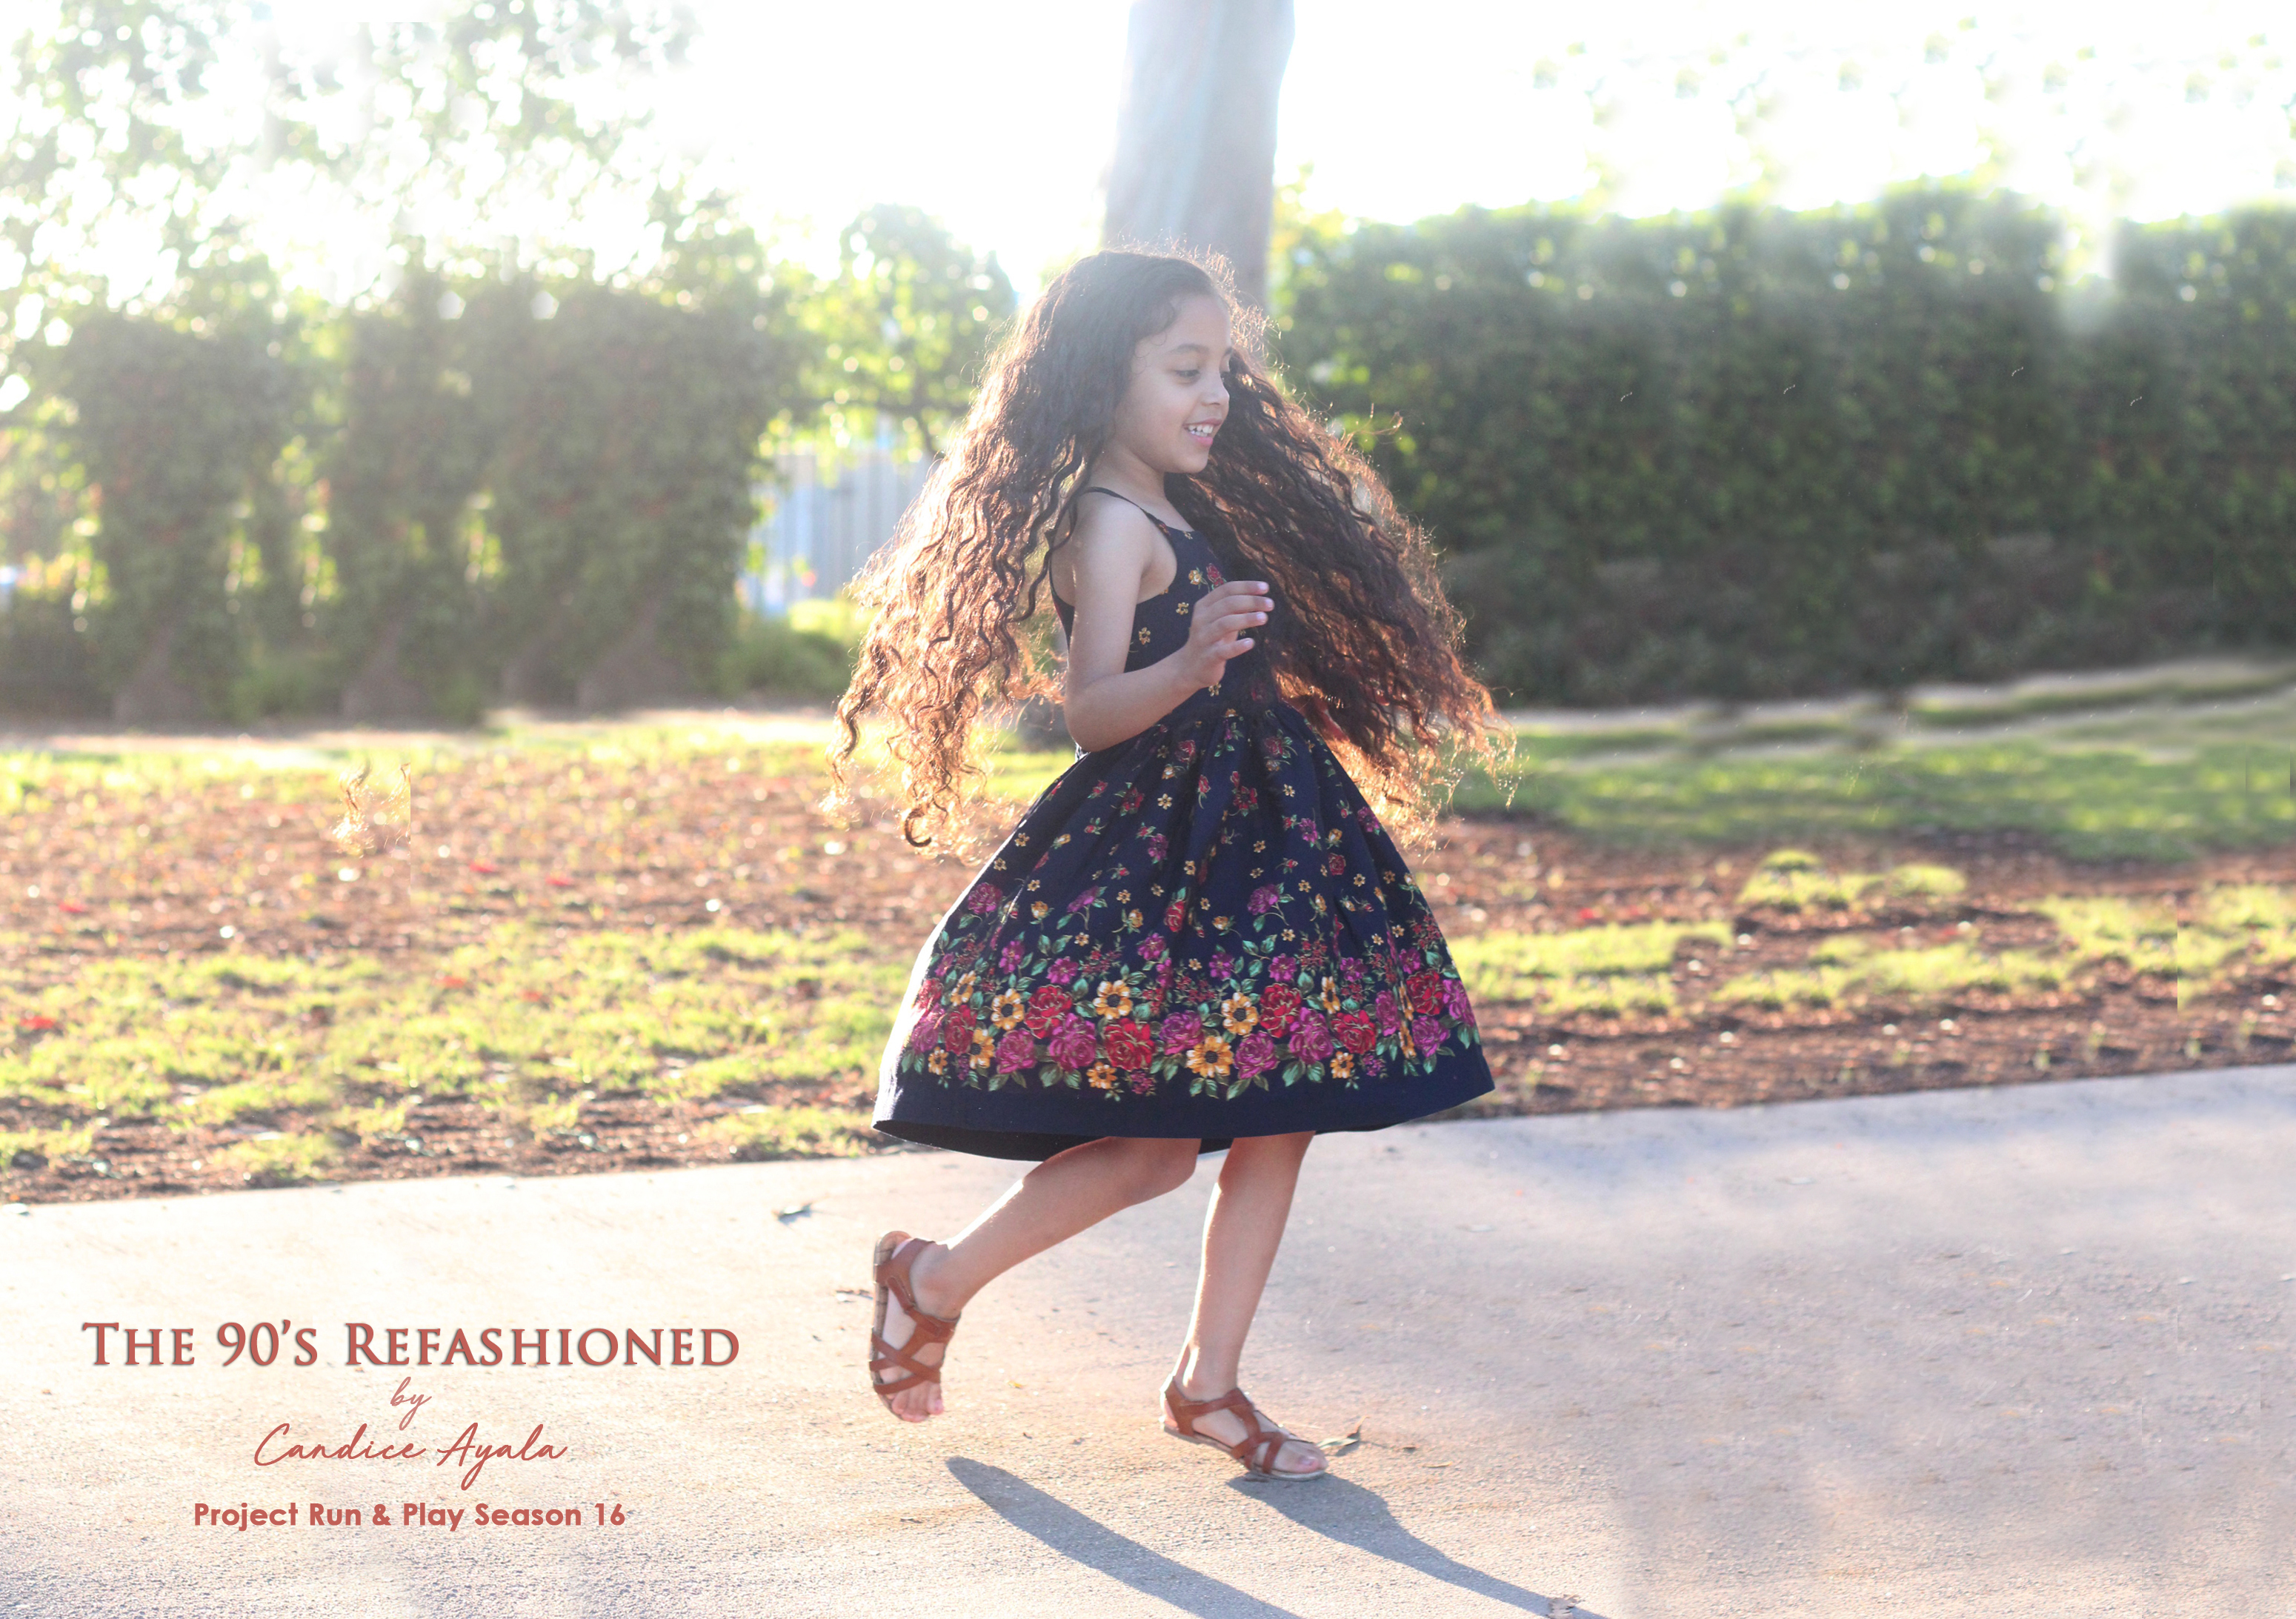
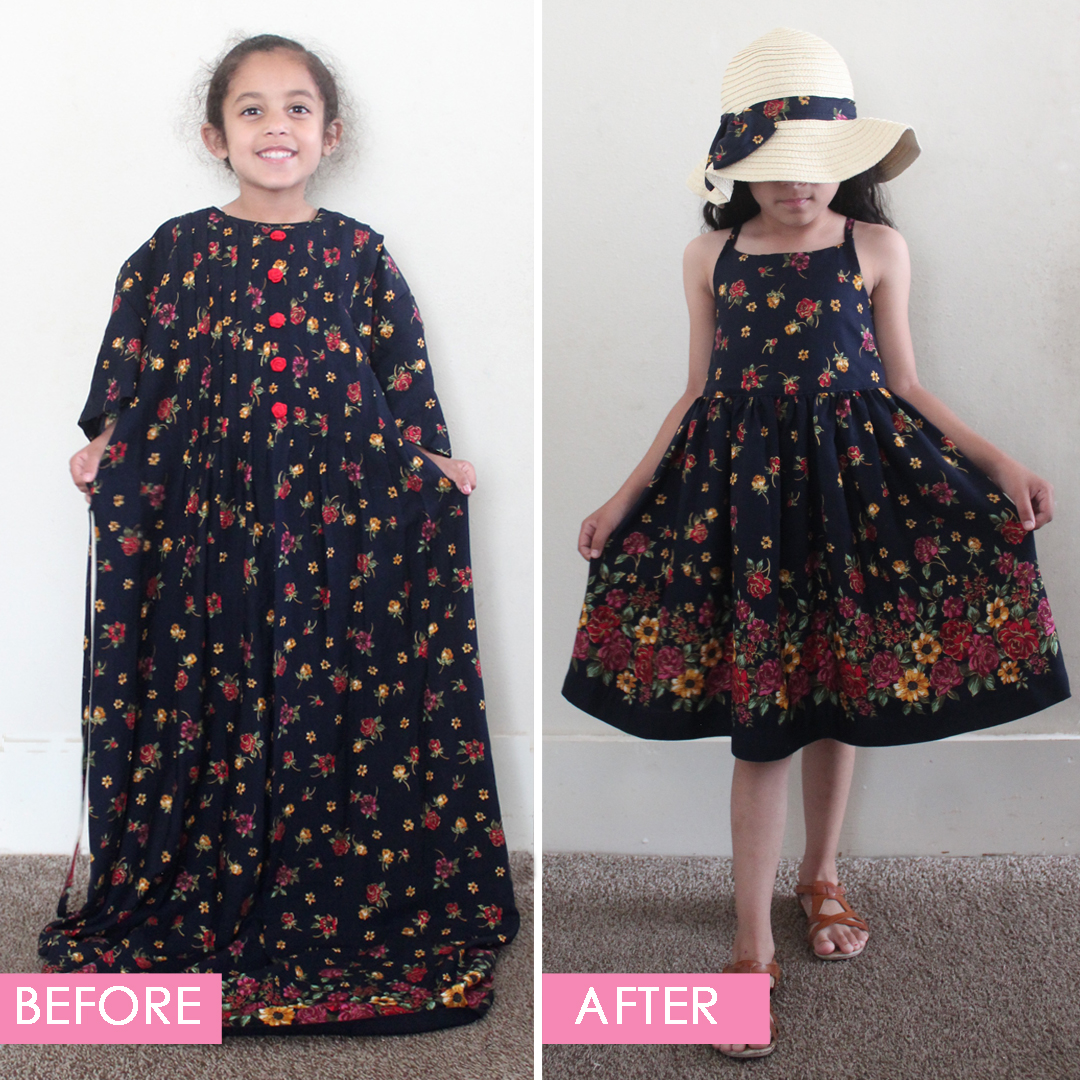
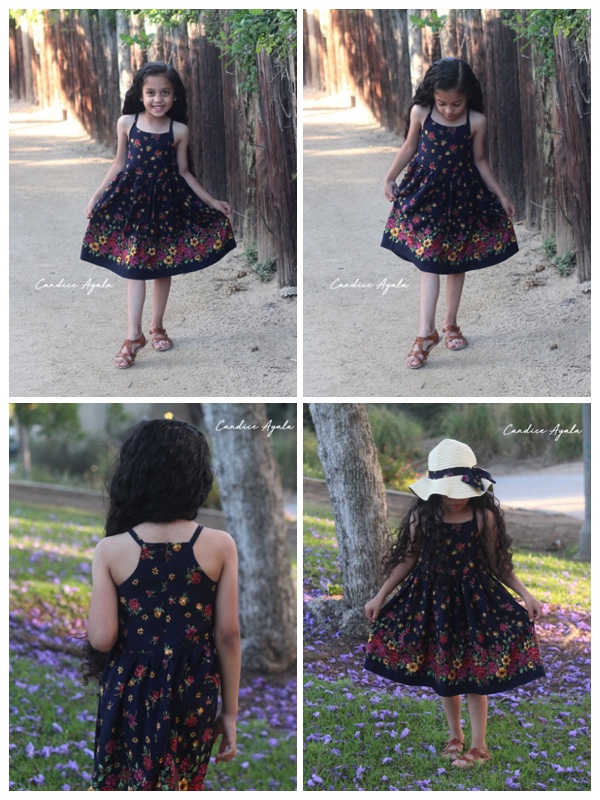
Candice Ayala - The 90s Refashioned

DIY Upcycled Dress by Candice Ayala

It's Week #2 Season 16 for Project Run and Play and I'm so excited to share with you this week's look. I know I sometimes interpret things very literally, but everything about this week's blurb made me see “UPCYCLE UPCYCLE UPCYCLE” flashing in red lights! lol. Being "conscious of my surroundings and ecosystem both in nature and stash" made me think of the fact that by upcycling I'm making a conscious effort to reduce my carbon footprint. And the "cloth from the past" definitely made me think of vintage garments I've acquired sitting in my ever growing stash meant for upcycling. Or it could just be because I'm on an Upcycling kick at the moment, it's all I can see…lol. So needless to say, this project is also an upcycle. (Seriously, I feel like I just can't help myself lol)

DIY Upcycled Dress by Candice Ayala

So now we have a garment from the 90's refashioned into something simple and trendy!

DIY Upcycled Dress by Candice Ayala

Okay, now let me walk you though my process: Picking something from my stash to use wasn't as hard as I thought it would be, once I decided to use some key words from the blurb, I decided on a dress I found at Goodwill a year ago. I remember thinking just how gorgeous the border print was, and picked it up even if I wasn't sure what I was going to do with it then. Keywords from the blurb: Ecosystem - pick something thats bio degradable; It’s a soft cotton rayon so its biodegradable - check! Nature - pick something that depicts nature; It has a beautiful floral border print that depicts nature - check! Cloth from the Past - pick something that has a style from a different fashion era; its a dress style from the 90’s so cloth from the past - check!

DIY Upcycled Dress by Candice Ayala

I wanted to make something appropriate for the weather for our trip home to Belize (we are probably still in the air as you are reading this) and because I did the most on my first project, I wanted to keep this one simple and sweet. Abigail was wearing this knit dress from Target while I was explaining to her the fabric choice and my ideas and half way through my brainstorming she interrupted me and said, “just make it like this one mom, its really soft and comfy”. I was about to explain to her that the fabrics are two totally different kinds, but then I realized THERE LIES MY CHALLENGE! And so I went with it! You can visit my blog HERE to see the original dress inspiration, more on how I modified the dress to be lined and to include an invisible zipper, plus more action shots. Visit my blog post for more info HERE.

Voting ends 8pm EST on Thursday. This week's guest judge is Kelly of True Bias.